1. Introduction
This manual provides detailed instructions for the operation and maintenance of your Volorful V68 144GB Digital Voice Recorder. Please read this guide thoroughly to ensure proper use and to maximize the device's capabilities. Keep this manual for future reference.
2. Product Overview
2.1 Package Contents
Upon unboxing, verify that all items are present:
- 1 x Volorful V68 Digital Voice Recorder
- 1 x USB-C to USB-C Cable
- 1 x 3.5mm Transcription Cable
- 1 x USB-C to USB-A Cable
- 1 x 128GB TF Memory Card (pre-inserted or separate)
- 1 x Lanyard
- 1 x User Manual

2.2 Device Layout and Controls
The Volorful V68 recorder features a user-friendly design with clearly labeled buttons and a 1.44-inch color screen.

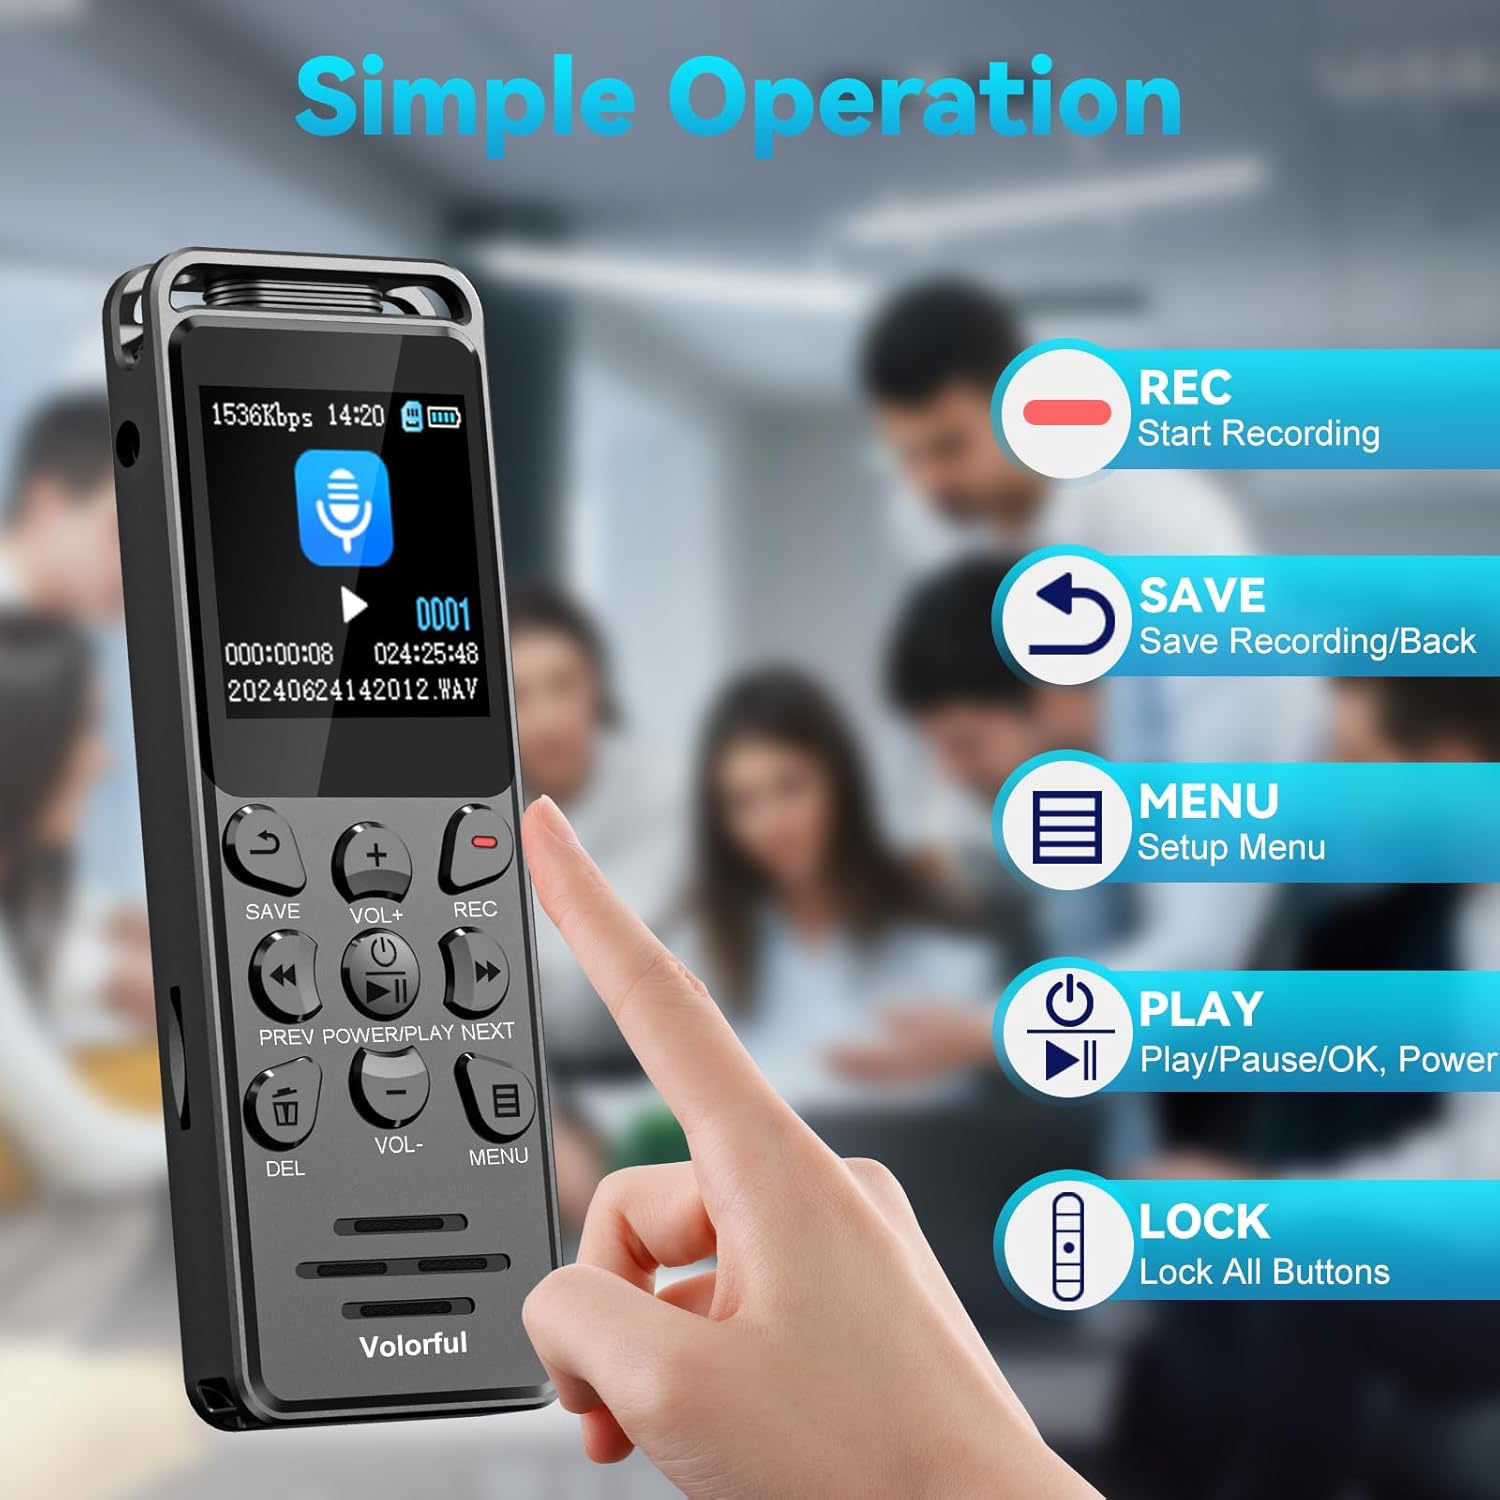
Key buttons and their functions:
- REC Button: Initiates recording.
- SAVE Button: Saves the current recording and returns to the previous menu.
- PLAY/PAUSE/OK/POWER Button: Powers the device on/off, plays/pauses audio, and confirms selections.
- VOL+ / VOL- Buttons: Adjusts volume levels.
- PREV / NEXT Buttons: Navigates through files or fast-forwards/rewinds during playback.
- DEL Button: Deletes selected files.
- MENU Button: Accesses the setup menu.
- LOCK Switch (Side): Locks or unlocks all buttons to prevent accidental operation.

3. Setup
3.1 Charging the Device
Before first use, fully charge the recorder. Connect the device to a power source (computer USB port or USB wall adapter) using the provided USB-C cable. The built-in 580 mAh battery typically charges completely in approximately 2 hours.
3.2 Powering On/Off
- To Power On: Press and hold the PLAY/PAUSE/OK/POWER button.
- To Power Off: Press and hold the PLAY/PAUSE/OK/POWER button until the screen turns off.
3.3 Initial Settings
Upon first power-on or after a full battery discharge, you may need to set the date and time. Navigate to the 'Settings' menu using the MENU button and adjust these parameters for accurate file timestamps.
3.4 Memory Management
The recorder comes with 16GB of internal storage and includes a 128GB TF (microSD) card, providing a total of 144GB storage capacity. This allows for up to 9,000 hours of 32 kbps recording or storage for approximately 30,000 MP3 songs.
4. Operating Instructions
4.1 Recording Audio
The Volorful V68 features a 2159 professional recording chip and DSP 7-level intelligent noise reduction for clear audio capture.
- Start Recording: Press the REC button. The screen will indicate that recording has begun.
- Save Recording: Press the SAVE button to stop and save the current recording.
- Recording Formats: You can select between MP3 (32~160Kbps) and WAV (256~1536Kbps) formats in the settings menu. WAV offers higher fidelity.
4.2 Playback
- Play/Pause: In the file list, select a recording and press the PLAY/PAUSE/OK/POWER button to start or pause playback.
- Adjust Volume: Use the VOL+ and VOL- buttons.
- Navigate: Use the PREV and NEXT buttons to skip between files or fast-forward/rewind within a track.
- Variable Speed Playback: This feature allows you to adjust the playback speed of recordings. Access this option through the playback menu.
4.3 File Management
- Access Files: Navigate to the 'Files' or 'Recordings' section from the main menu.
- Delete Files: Select a file and press the DEL button. Confirm deletion when prompted.
- File Naming: Recorded files are automatically named with a timestamp (YYYY-MM-DD-HH-MM-SS) for easy organization.
4.4 Menu Navigation
Press the MENU button to access the device's settings. Use the PREV and NEXT buttons to scroll through options and the PLAY/PAUSE/OK/POWER button to select.
5. Advanced Features
5.1 Voice Activated Recording (VOR)
The VOR function allows the recorder to automatically start recording when sound is detected and pause when silence occurs, conserving memory and battery life. There are 6 adjustable sensitivity levels.

5.2 A-B Repeat Function
This feature allows you to repeatedly play a specific segment of an audio file, useful for learning or transcription.
5.3 Password Protection
Secure your recordings with a 6-digit password. This feature can be enabled in the settings menu to protect sensitive information.
5.4 Line-in Recording
The device supports line-in recording, allowing you to record audio directly from external sources such as MP3 players, smartphones, or computers using the 3.5mm transcription cable. Ensure the 'Line-in' option is selected in the recording source settings.

5.5 Timed Recording
Schedule recordings to start and stop at specific times, ideal for capturing lectures or meetings automatically.
5.6 MP3 Player Functionality
The Volorful V68 can also function as an MP3 player, supporting various audio formats including MP3, FLAC, WMA, APE, OGG, and WAV. Transfer your music files to the device's storage to use this feature.
6. Maintenance
- Cleaning: Use a soft, dry cloth to clean the device. Avoid liquid cleaners or abrasive materials.
- Storage: Store the recorder in a cool, dry place away from direct sunlight and extreme temperatures.
- Battery Care: To prolong battery life, avoid fully discharging the battery frequently. Charge the device regularly, even if not in use for extended periods.
- Data Backup: Regularly back up important recordings to a computer to prevent data loss.

7. Troubleshooting
| Problem | Possible Cause | Solution |
|---|---|---|
| Device does not power on. | Low battery; device frozen. | Charge the device for at least 30 minutes. If unresponsive, press and hold the power button for 10-15 seconds to force a restart. |
| Cannot record. | Memory full; incorrect recording source selected; device locked. | Check available memory and delete unnecessary files. Ensure 'Microphone' is selected as the recording source in settings, not 'Line-in' unless an external source is connected. Check the lock switch on the side. |
| Poor recording quality. | Noise reduction settings; microphone placement; recording format. | Adjust noise reduction levels in settings. Ensure the microphone is not obstructed and is close enough to the sound source. Consider using WAV format for higher quality. |
| Date/Time resets after battery discharge. | Internal clock battery (if applicable) or main battery fully depleted. | Recharge the device and reset the date and time in the settings menu. Keep the device charged to maintain settings. |
| Files not appearing on computer. | Improper USB connection; driver issue. | Ensure the USB cable is securely connected. Try a different USB port or cable. The device should appear as a removable disk. |
8. Specifications
- Model: V68
- Brand: Volorful
- Memory Storage Capacity: 144 GB (16GB internal + 128GB TF card)
- Hardware Interface: USB Type C
- Compatible Devices: MP3 Player, Personal Computer, Smartphone
- Display Technology: LCD
- Standing Screen Display Size: 1.44 Inches
- Microphone Format: Built-In
- Battery Average Life: 70 Hours (continuous recording at 512Kbps)
- Battery Cell Composition: Lithium Polymer
- Media Format: MP3 Audio, WAV
- Headphones Jack: 3.5 millimeters
- Product Dimensions: 9.9 x 3.3 x 1.2 cm; 65 g
9. Warranty and Support
For warranty information or technical support, please refer to the contact details provided with your purchase or reach out to the seller, Volorful-CA, directly through the platform where the product was purchased. Keep your proof of purchase for any warranty claims.