
1. Introduction
This manual provides essential information for the safe and effective operation of your RSYEKU MIG135 3-in-1 Welding Machine. This versatile unit supports Gasless MIG, Lift TIG, and Stick welding processes, making it suitable for a wide range of applications from home DIY projects to professional maintenance and repairs.
The MIG135 features dual voltage compatibility (110V/120V) and a powerful output, capable of welding mild steel plates up to 3/8 inches (9 mm) thick. Its synergic control system automatically matches voltage to wire feeding speed, simplifying operation for both beginners and experienced users. The machine also incorporates advanced safety features including overcurrent, overload, overheating, and overvoltage protection.

Figure 1.1: The RSYEKU MIG135 performing Stick, Lift TIG, and Flux Cored welding.
2. Safety Information
Always prioritize safety when operating welding equipment. Failure to follow safety guidelines can result in serious injury or death. Read and understand all safety warnings before use.
- Electric Shock: Welding current can cause fatal electric shock. Ensure proper grounding and insulation. Never touch live electrical parts.
- Fumes and Gases: Welding produces fumes and gases that can be hazardous to health. Work in a well-ventilated area or use local exhaust ventilation.
- Arc Rays: Arc rays can burn eyes and skin. Wear appropriate welding helmet with proper shade, protective clothing, and gloves.
- Fire and Explosion: Welding sparks and hot metal can cause fire or explosion. Keep flammable materials away from the welding area. Have a fire extinguisher readily available.
- Hot Parts: Welded parts and equipment can be extremely hot. Allow them to cool before handling or wear heat-resistant gloves.
- Overcurrent Protection: The machine has built-in overcurrent protection. Do not bypass or modify safety features.

Figure 2.1: Integrated safety features of the welding machine.
3. Product Components and Overview
3.1 What's in the Box?
Your RSYEKU MIG135 Welding Machine package includes the following items:
- 1 x MIG135 Welding Machine
- 1 x MIG Torch
- 1 x Ground Clamp
- 1 x Electrode Holder
- 5 x 3/32'' Welding Rods
- 1 x 1 LB 0.8 mm/0.03" Flux Core Wire
- 1 x 2 LB 1 mm/0.035" Flux Core Wire
- 1 x Brush
- 1 x User Manual
Note: A Lift TIG torch is not included and must be purchased separately for TIG welding operations.

Figure 3.1: Package contents of the RSYEKU MIG135 Welding Machine.
3.2 Machine Overview and Controls
Familiarize yourself with the main components and control panel of the welding machine.
Figure 3.2: Front and side view of the welding machine with labeled parts.

Figure 3.3: Control panel and button functions.
- Selection Button: Used to switch between MMA (Stick), MIG, and TIG welding modes.
- Smart Digital Display: Shows current welding parameters (e.g., current, voltage).
- Power Indicator LED: Illuminates when the machine is powered on.
- Thermal Protection LED: Illuminates if the machine overheats, indicating automatic shutdown.
- Voltage Knob: Adjusts the welding voltage.
- Wire Feed Speed/Ampere Knob: Adjusts wire feed speed for MIG or amperage for Stick/TIG.
4. Setup
4.1 Power Connection
The RSYEKU MIG135 is designed for dual voltage operation. Connect the machine to a 110V/120V power supply. Ensure the power outlet is properly grounded and capable of handling the machine's input current (up to 37.4A for 110V/120V).
4.2 Wire Installation (MIG Mode)
This welder supports 2LB spools of 0.030" (0.8mm) and 0.035" (1.0mm) flux core wire.
- Open the wire spool compartment.
- Place the wire spool onto the spindle, ensuring it rotates freely.
- Feed the wire through the guide tube and into the wire feeder mechanism.
- Close the wire feeder tension arm and adjust tension as needed.
- Ensure the correct drive roller size (0.8mm or 1.0mm) is selected for your wire.
- With the MIG torch pointed away from yourself and others, press the trigger to feed the wire through the torch liner until it exits the contact tip.
4.3 Connecting Accessories
- MIG Torch: Connect the MIG torch cable to the designated MIG gun socket on the front panel.
- Ground Clamp: Connect the ground clamp cable to the negative output terminal (-). Secure the ground clamp to the workpiece or welding table, ensuring good electrical contact.
- Electrode Holder (Stick/MMA): For Stick welding, connect the electrode holder cable to the positive output terminal (+).
- Lift TIG Torch (Optional): If using a Lift TIG torch (purchased separately), connect it according to its specific instructions, typically to the negative output terminal (-), with the ground clamp on the positive (+).
5. Operating Instructions
The MIG135 offers three welding processes: Gasless MIG, Lift TIG, and Stick (MMA).

Figure 5.1: Flexible and efficient welding with quality results.
5.1 Selecting Welding Mode
Use the Selection Button on the control panel to cycle through MMA, MIG, and TIG modes. The active mode will be indicated on the digital display.
5.2 Synergic Control and Parameter Adjustment
The machine features synergic control, which automatically adjusts voltage to match the wire feeding speed in MIG mode. This simplifies setup and provides optimal welding parameters.
- Current/Wire Feed Speed Knob: Adjust this knob to control the welding current (amperage) for Stick and TIG modes, or the wire feed speed for MIG mode.
- Voltage Knob: In MIG mode, this knob fine-tunes the voltage. In Stick and TIG modes, it may have limited or no function depending on the specific process.
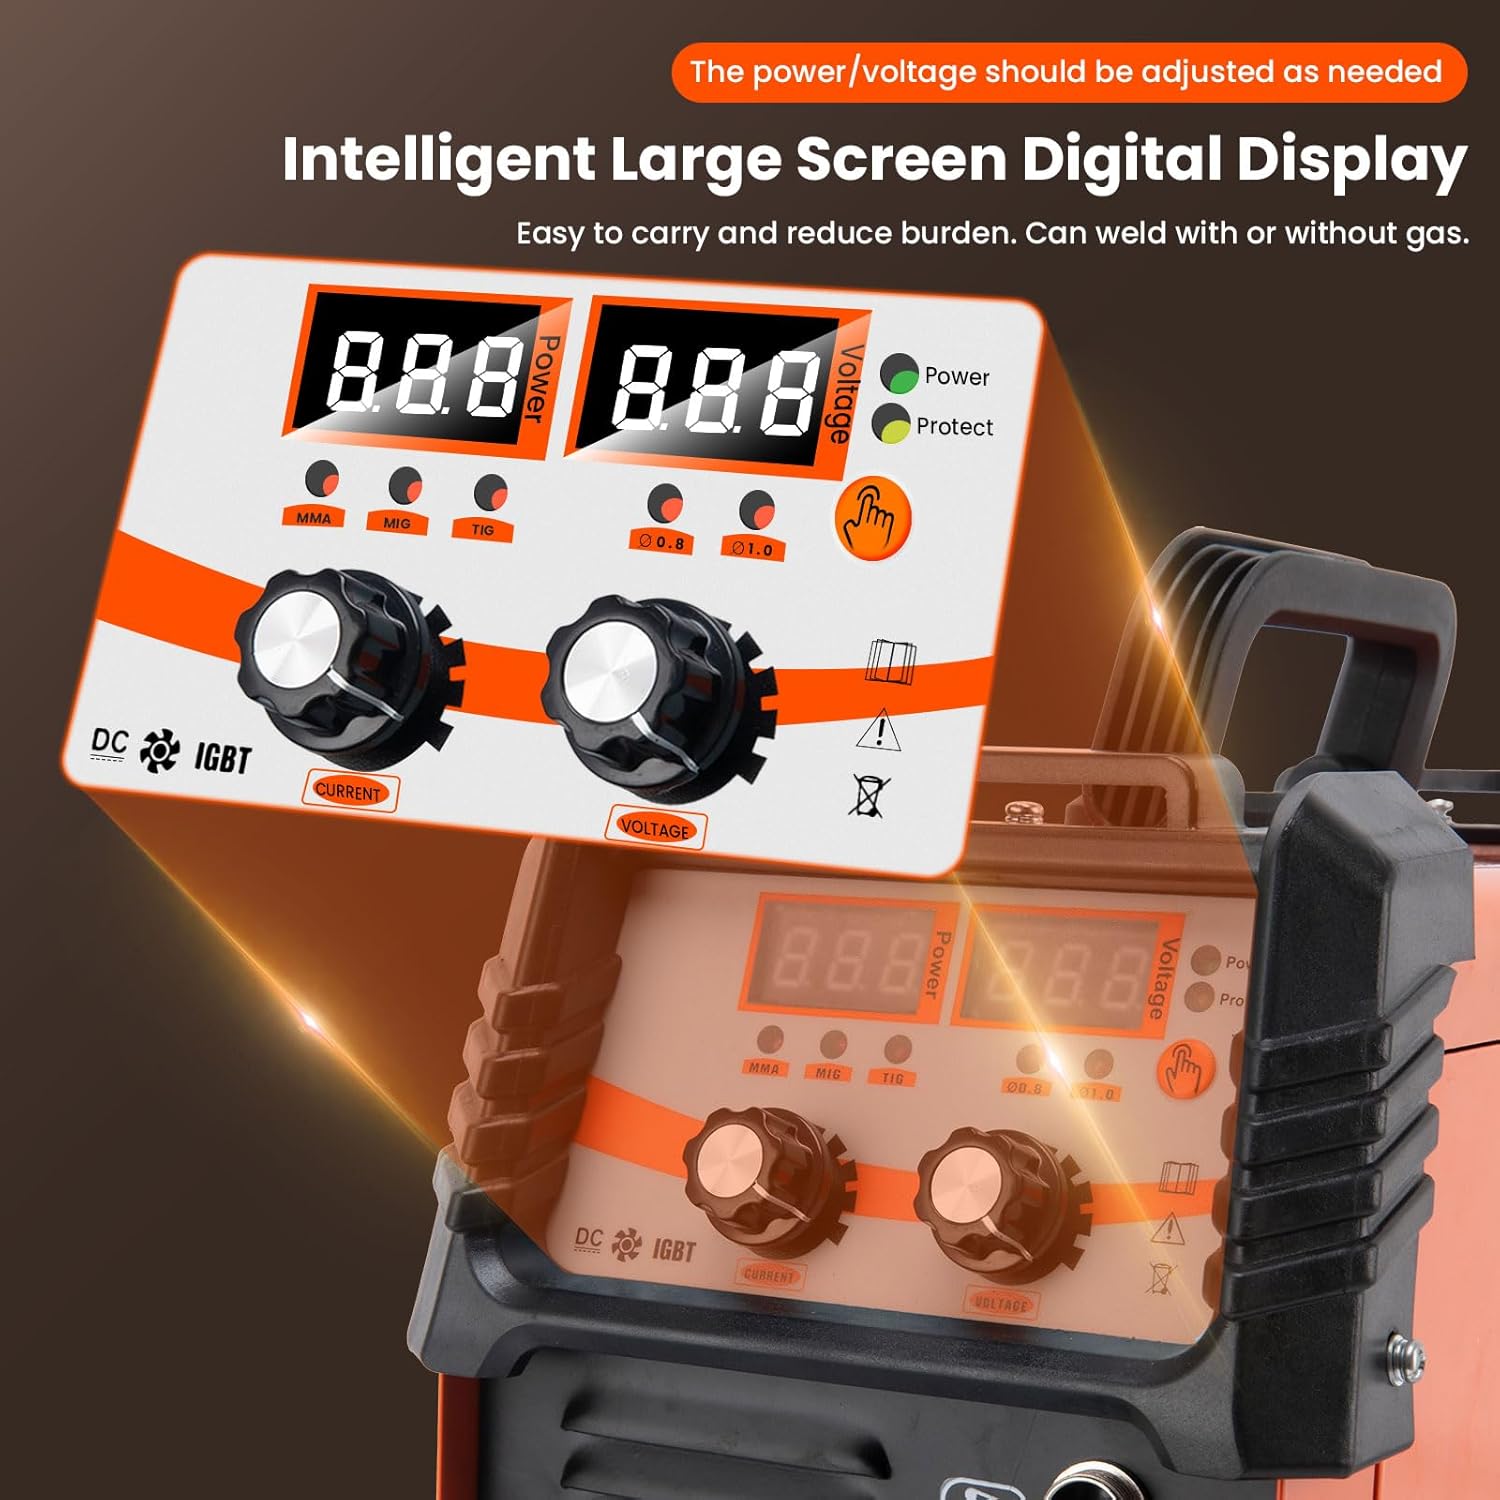
Figure 5.2: Intelligent digital display for precise control.
5.3 Welding Process Specifics
5.3.1 Gasless MIG Welding
This mode uses flux-cored wire, eliminating the need for external shielding gas. It is ideal for outdoor use and welding dirty or rusty materials.
- Select MIG mode.
- Adjust wire feed speed and voltage using the respective knobs. The synergic control will assist in setting optimal parameters.
- Ensure proper stick-out and travel speed for a clean weld.
5.3.2 Lift TIG Welding
Requires a separate Lift TIG torch and appropriate shielding gas (e.g., Argon). This mode offers precise control for thinner materials and cleaner welds.
- Select TIG mode.
- Connect the TIG torch and gas supply.
- Set the amperage using the current knob.
- Initiate the arc by gently touching the tungsten electrode to the workpiece and lifting slightly.
5.3.3 Stick (MMA) Welding
Uses coated electrodes and is suitable for a variety of materials and thicknesses, often used for heavier fabrication and outdoor work.
- Select MMA mode.
- Insert the appropriate electrode into the electrode holder.
- Adjust the amperage using the current knob based on the electrode type and material thickness.
- Strike the arc by scratching or tapping the electrode on the workpiece.

Figure 5.3: The MIG135 is suitable for welding multiple types of metals.
6. Maintenance
Regular maintenance ensures the longevity and optimal performance of your welding machine.
- Cleaning: Periodically clean the machine's exterior with a dry cloth. Use compressed air to blow out dust and debris from inside the machine, especially around cooling vents, to prevent overheating. Ensure the machine is unplugged before cleaning.
- Wire Feed Mechanism: Inspect the wire feed rollers and liner regularly for wear or blockages. Clean any debris from the wire path.
- Cables and Connections: Check all cables (power, torch, ground) for damage, cuts, or loose connections. Replace damaged cables immediately. Ensure all connections are secure before operation.
- Storage: Store the welding machine in a clean, dry environment, away from excessive dust, moisture, and corrosive materials.
7. Troubleshooting
This section addresses common issues you might encounter. For problems not listed here, contact customer support.
| Problem | Possible Cause | Solution |
|---|---|---|
| Machine does not power on | No power supply; loose power cord; internal fuse blown. | Check power outlet and circuit breaker. Ensure power cord is securely connected. Contact service if fuse is suspected. |
| No welding output | Incorrect mode selected; poor ground connection; torch/electrode holder not connected; thermal overload. | Verify correct welding mode. Ensure ground clamp has good contact. Check all cable connections. Allow machine to cool if thermal protection LED is on. |
| Wire feed motor not working (MIG) | Wire tangled/jammed; drive roller tension incorrect; contact tip blocked; motor malfunction. | Check wire path for obstructions. Adjust drive roller tension. Clean or replace contact tip. If problem persists, contact support. |
| Poor weld quality / Excessive spatter | Incorrect parameters (voltage/wire speed); improper technique; dirty workpiece. | Adjust voltage and wire feed speed. Ensure proper stick-out and travel angle. Clean workpiece thoroughly before welding. |
| Overheating / Thermal Protection LED on | Exceeded duty cycle; insufficient ventilation; blocked cooling vents. | Allow machine to cool down. Ensure adequate airflow around the machine. Clean cooling vents. |
8. Specifications
Technical specifications for the RSYEKU MIG135 3-in-1 Welding Machine (Model: MIG/MMA/TIG-325).
Figure 8.1: Detailed technical specifications.
| Parameter | Value (110V/120V) | Value (220V) |
|---|---|---|
| Voltage (V) | 110V ±15% | 220V ±15% |
| Frequency (Hz) | 50/60 | 50/60 |
| Phase | 1 | 1 |
| Input Power (kW) | 4.1 (MIG) / 5.1 (MMA) | 4.1 (MIG) / 5.1 (MMA) |
| Input Current (A) | 37.4 (MIG) / 46.3 (MMA) | 18.7 (MIG) / 23.2 (MMA) |
| No Load Voltage (V) | 70 ±5 | 70 ±5 |
| Current Range (A) | 40-325 (MIG) / 20-325 (MMA) | 40-325 (MIG) / 20-325 (MMA) |
| Electrode Diameter Applicable (mm) | 0.8/1.0 (MIG) / 1.6-3.2 (MMA) | 0.8/1.0 (MIG) / 1.6-3.2 (MMA) |
| TIG Tungsten Electrode Max (mm) | Max 2.4 mm | Max 2.4 mm |
| Duty Cycle (%) | 60% | 80% |
| Refrigeration Type | Fan | Fan |
| Efficiency (u) | 80% | 80% |
| Power Factor (Cos) | 0.73 | 0.73 |
| Insulation Class (Grau) | F | F |
| Protection Class (IP) | 21S | 21S |
| Net Weight | 4.9 kg (10.8 lbs) | 4.9 kg (10.8 lbs) |
| Case Size | 308mm*220mm*165mm | 308mm*220mm*165mm |
| Suitable for Welding Rods | 2.5 / 3.2 | 2.5 / 3.2 |
Note: Item Weight from product specifications is 23.3 pounds, which differs from the 4.9 kg (10.8 lbs) listed in the image. Please refer to the product packaging for the most accurate weight.
9. Warranty and Support
Specific warranty details for the RSYEKU MIG135 Welding Machine are not provided within this manual. For information regarding warranty coverage, duration, and terms, please refer to the product packaging, purchase documentation, or contact the seller or manufacturer directly.
For technical support, troubleshooting assistance beyond what is covered in this manual, or inquiries about replacement parts, please contact the RSYEKU customer service department through the contact information provided at the point of purchase or on the manufacturer's official website.