Wilding Wallbeds P100T
Wilding Wallbeds P100T Twin Size Murphy Bed Mechanism Kit Instruction Manual
DIY Piston Lift Hardware for Cabinet Bed
Introduction
This manual provides comprehensive instructions for assembling and operating your Wilding Wallbeds P100T Twin Size Murphy Bed Mechanism Kit. This kit is designed for DIY enthusiasts to construct a durable and space-saving cabinet bed. Please read all instructions carefully before beginning assembly.
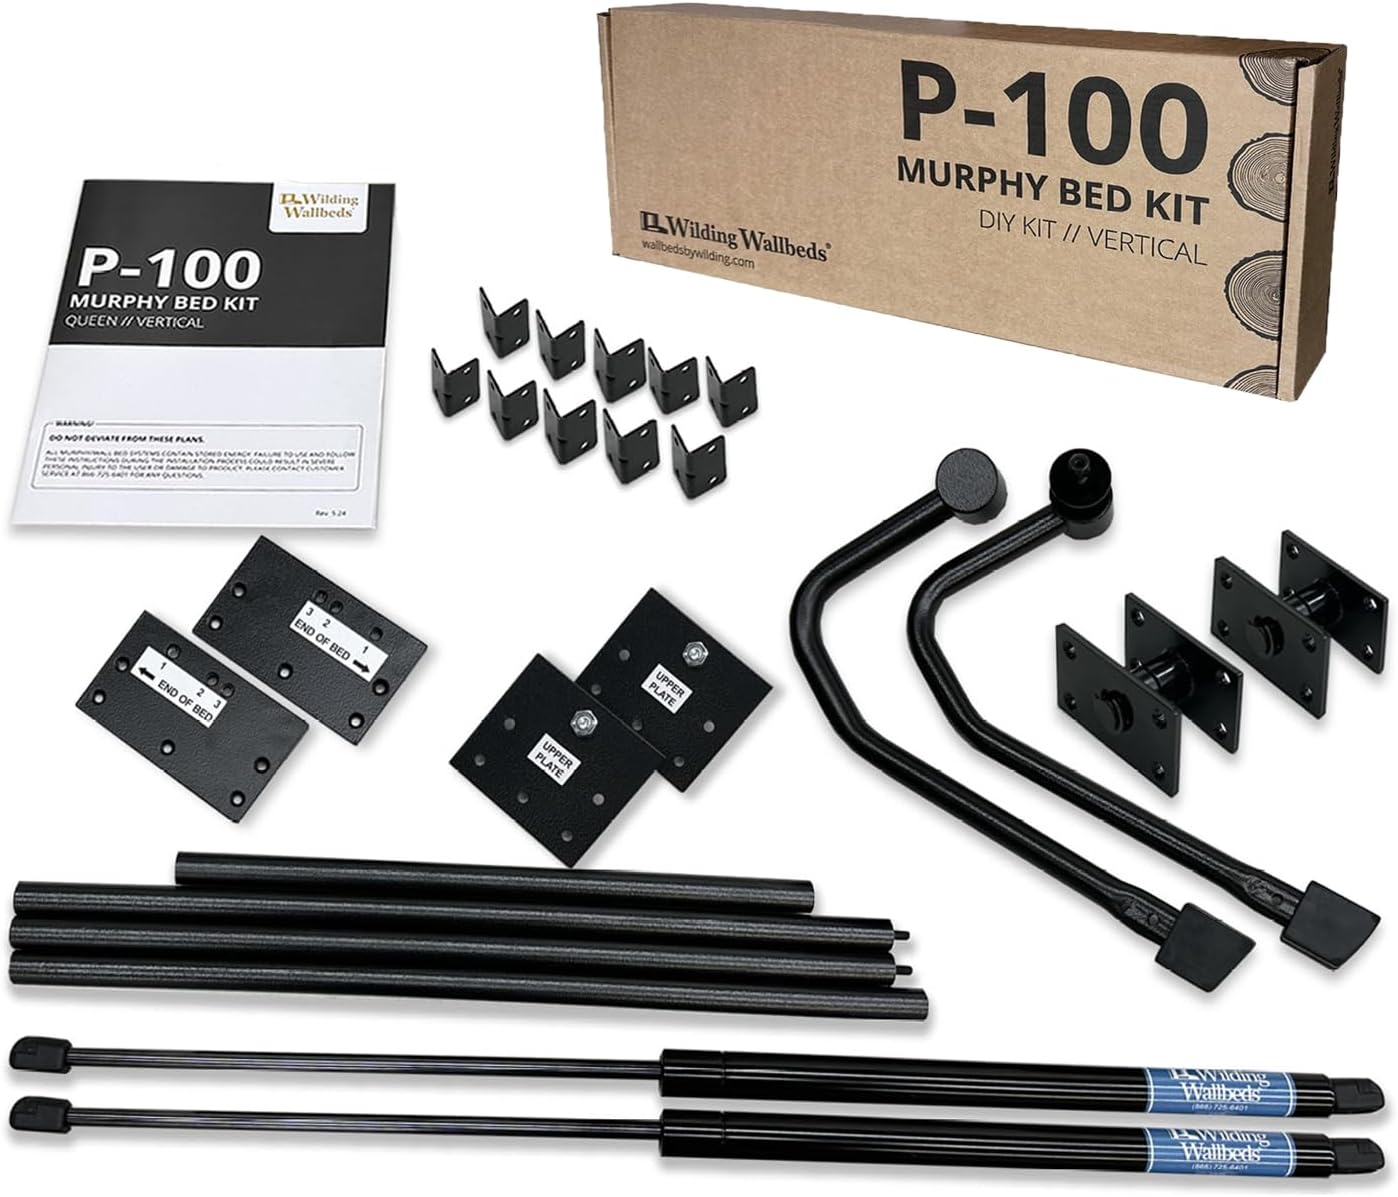
Image: All components included in the Wilding Wallbeds P100T Murphy Bed Mechanism Kit.
Important Safety Information
Always follow the detailed assembly instructions to prevent instability or injury. Be cautious of pinch points around pistons, pivot posts, and articulating legs during assembly and use. Do not exceed the maximum weight recommendation of 1,500 lbs to ensure the longevity and safety of the bed frame.
Package Contents
Your Wilding Wallbeds P100T kit includes the following hardware components:
- Pistons
- Pivot posts and plates
- Assembly hardware
- Tubular legs with a metal connecting rod
- Detailed step-by-step instruction booklet with diagrams, cut list, and construction plans
Note: Lumber for the cabinet bed frame is not included in this kit. You will need to source appropriate wood materials as per the instructions.
Setup and Assembly
The assembly process involves several steps, including wood preparation, hardware installation, and final mounting. Refer to the included instruction booklet for precise measurements and diagrams.
1. Wood Material and Cutting
It is recommended to use furniture-grade plywood for your cabinet bed. MDF can be used but may result in a heavier bed. Particle board is not recommended. The instruction booklet provides a detailed cut list and panel layouts for various bed sizes, including Twin. You can make cuts yourself using a table saw or circular saw with a guide, or have a hardware store cut the pieces for you.

Image: The instruction booklet details recommended tools and materials for the project.

Image: Detailed diagrams and cut lists are provided for various bed sizes.
2. Edge Banding
Apply edge banding to the cut wood pieces as indicated in the instructions. This can be done using an iron and a sharp chisel for trimming. The instruction manual includes a QR code linking to a video tutorial for professional edge banding techniques.
3. Drilling and Assembly
Pre-drill all holes as specified in the instructions. For larger holes, start with a small drill bit to create a pilot hole, then use a larger Forstner bit to drill halfway through from one side, and then flip the piece to complete the hole from the other side for a clean cut. Assemble the bed box components using screws and wood glue for added durability.
4. Mechanism Installation
Install the pistons, pivot posts, and plates according to the diagrams. The P100T kit features a piston lift system designed for smooth and effortless operation, supporting up to 1,500 lbs.
Video: Detailed assembly instructions for the P100 Mechanism Kit, demonstrating each step of the installation process.
Video: A general guide to assembling a DIY Murphy Bed Kit, covering essential steps and tips.
Video: Close-up view of the S200 Murphy Bed Mechanism Kit, highlighting its components and function.
Video: Unboxing and initial setup steps for a Hideaway DIY Murphy Bed Hardware Kit.
5. Mounting to Wall
The bed cabinet must be securely mounted to wall studs. Use a stud finder to locate the studs and follow the instructions for proper attachment to ensure stability and safety.

Image: A fully assembled Murphy bed, demonstrating its integration into a living space.
Operating Instructions
To open the Murphy bed, gently pull the handles on the cabinet face downwards. The piston lift mechanism will assist in lowering the bed smoothly. The tubular legs will articulate and extend to support the bed. To close, lift the bed frame upwards, guiding the legs back into position, until the bed is securely stored vertically within the cabinet.
Video: Demonstration of the F200 Murphy Bed Frame operation, showing how to easily open and close the bed.
Maintenance
- Regularly inspect all hardware and connections for tightness. Tighten any loose screws or bolts.
- Keep the piston mechanism clean and free from debris.
- Wipe down wood surfaces with a soft, damp cloth. Avoid harsh chemicals.
- Ensure the bed operates smoothly. If you notice any stiffness or unusual noises, contact customer support.
Troubleshooting
- Bed is difficult to lift or lower: Check the tension adjustment on the piston mechanism. Ensure no obstructions are present.
- Squeaking or grinding noises: Lubricate moving parts of the mechanism with a silicone-based lubricant.
- Bed does not stay securely closed/open: Verify that all mounting hardware is properly secured to the wall studs.
For any issues not covered here, please refer to the detailed instruction booklet or contact Wilding Wallbeds Customer Service.
Specifications
| Feature | Detail |
|---|---|
| Model | P100T |
| Size | Twin |
| Product Dimensions | 16"L x 66.5"W x 88"H (Cabinet dimensions will vary based on build) |
| Weight Capacity | Up to 1,500 lbs |
| Mechanism Type | Piston Lift Hardware |
| Material | Commercial-grade steel, Powder Coated finish |
| Assembly Required | Yes |
Warranty and Customer Support
Wilding Wallbeds offers a lifetime warranty on its mechanism kits, reflecting their commitment to quality and durability. For any questions, concerns, or assistance with assembly or troubleshooting, please contact Wilding Wallbeds Customer Service. Their knowledgeable representatives are available to provide prompt and effective support.
Customer Service Phone: (866) 877-7803
You can also find additional resources and video tutorials by scanning the QR codes in your instruction booklet or visiting the Wilding Wallbeds website.