Introduction
This manual provides comprehensive instructions for the SUNER POWER 30W Solar Panel Kit, which includes a high-efficiency 30-watt solar panel and an Ultra-Smart 10A MPPT charge controller. This kit is designed for efficient charging and maintenance of 12V batteries in various applications such as boats, cars, RVs, motorcycles, and marine vehicles. Please read this manual thoroughly before installation and operation to ensure proper use and safety.
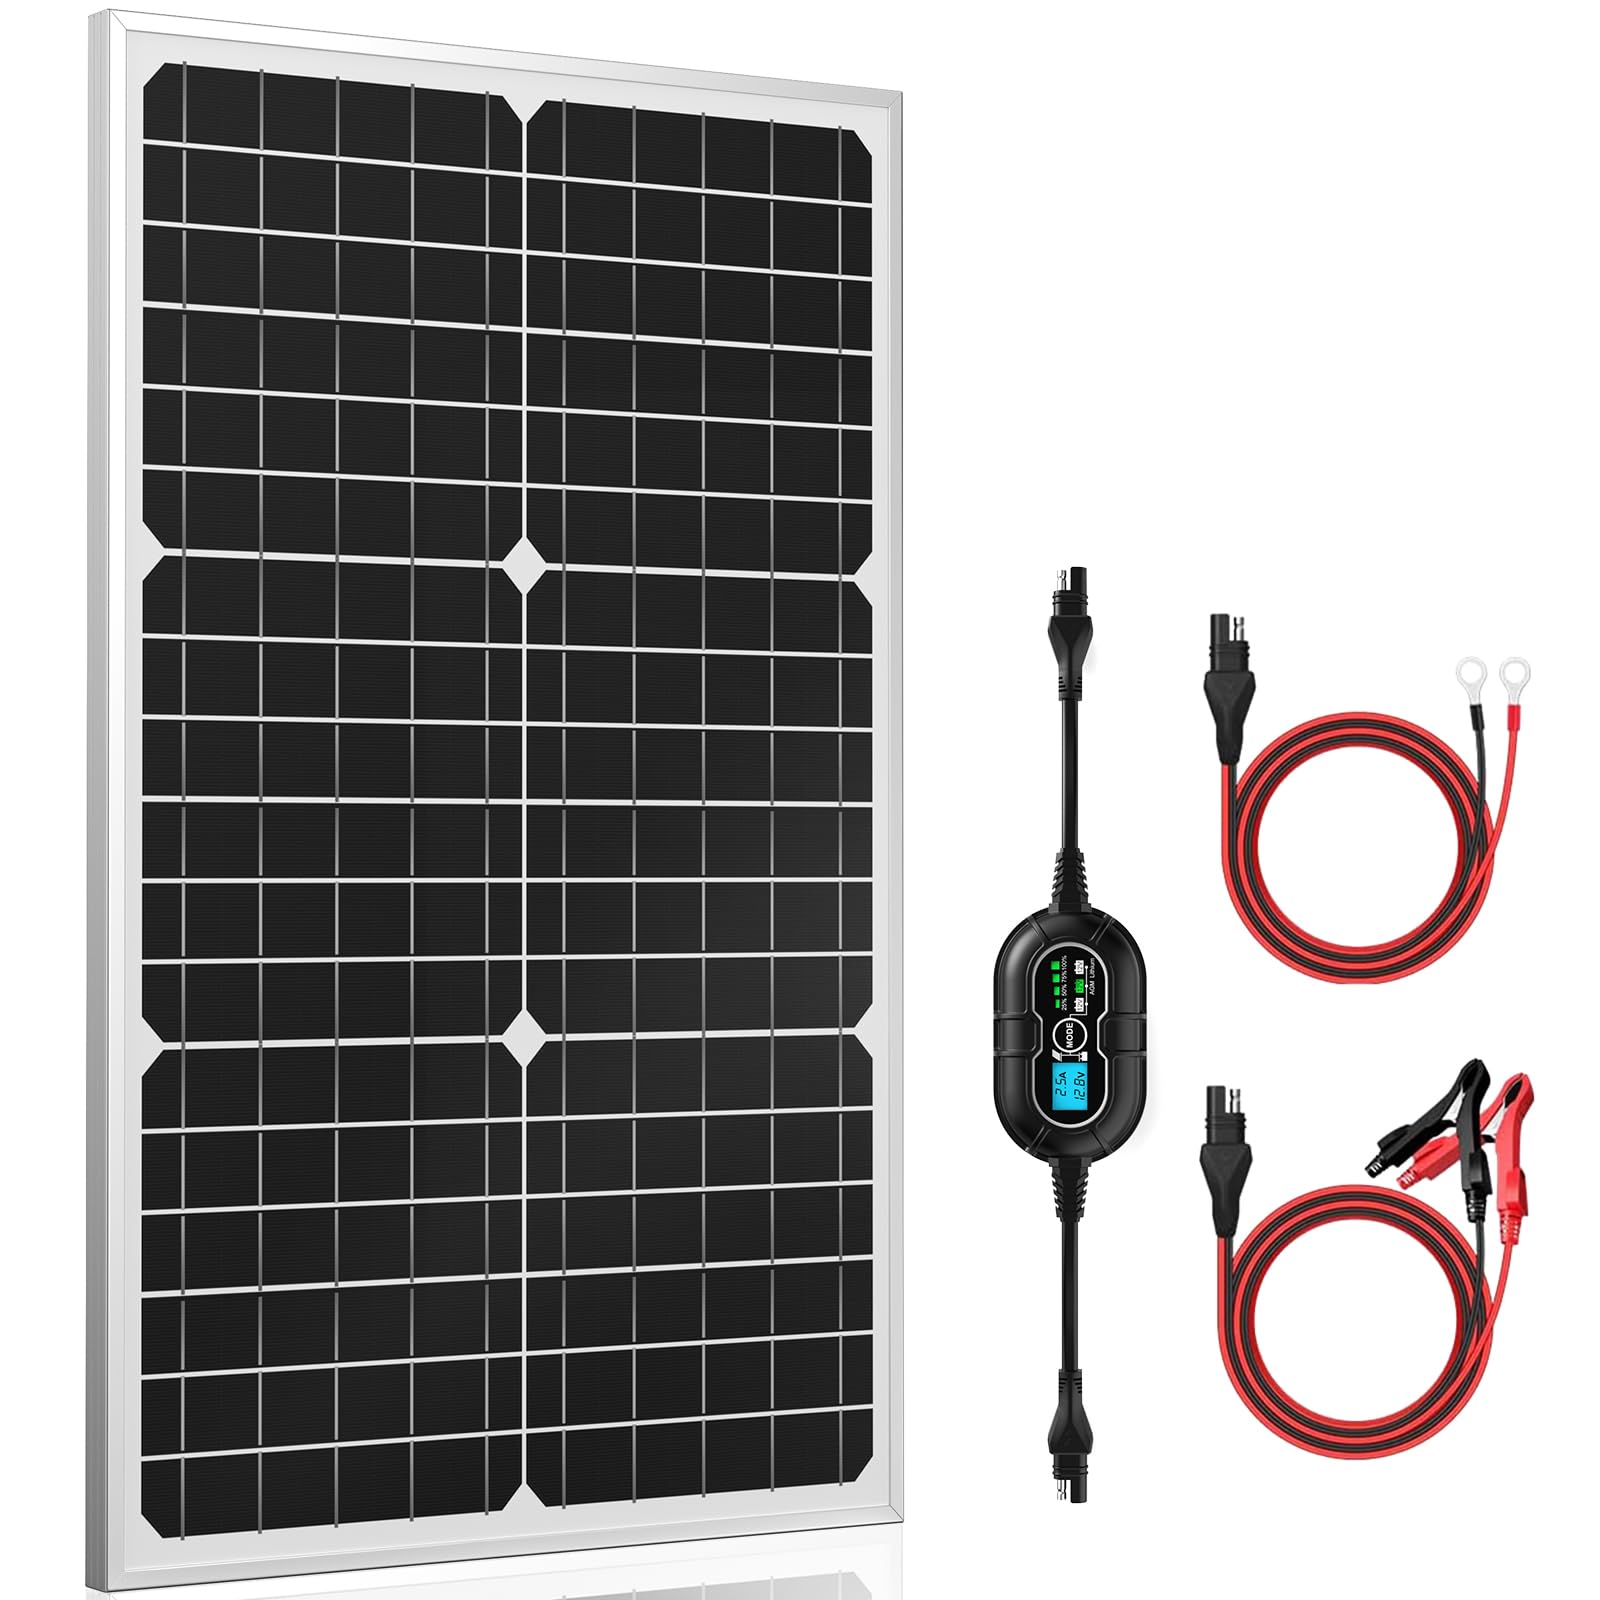
Image: The complete SUNER POWER 30W Solar Panel Kit, showcasing the solar panel and charge controller.
What's Included
Your SUNER POWER 30W Solar Panel Kit includes the following components:
- 1 x 10A MPPT Solar Charge Controller
- 1 x 30W Solar Panel
- 1 x SAE-Alligator Clips Cable
- 1 x SAE-Battery Eyelet Cable
Key Features
The SUNER POWER 30W Solar Panel Kit is equipped with advanced features for optimal performance and safety:
- Ultra-Smart MPPT Technology: Achieves up to 99% tracking efficiency and 98% peak conversion efficiency, improving utilization by 20%-30% compared to other technologies.
- Improved 3-Stage Charging: Utilizes Bulk, Absorption, and Float stages for effective 12-volt battery charging, ensuring safety and extending battery life.
- Full Safety Protections: Includes safeguards against over-charge, over-discharge, over-voltage, over-current, over-load, short circuit, reverse polarity, and over-temperature. The system is waterproof and spark-proof.
- Three Battery Modes: Supports 12V, 12V AGM, and 12V Lithium battery types, compatible with flooded, gel, AGM, SLA, VRLA, maintenance-free, and LiFePO4 lithium batteries.
- Visual Charging Status: Digital charge controller displays PV charge current, battery voltage, and state-of-charge (25%-50%-75%-100%).

Image: A diagram illustrating the enhanced performance characteristics of the solar panel, including high efficiency and transparency.

Image: An illustration detailing the smart 3-stage charging process (Bulk, Absorption, Float) employed by the charge controller.

Image: A visual representation of the charge controller's compatibility with various 12V battery chemistries and types.
Setup Instructions
Follow these steps to properly set up your solar panel kit:
- Mount the Solar Panel: Position the 30W solar panel in a location that receives maximum direct sunlight throughout the day. Ensure it is securely mounted using appropriate brackets (not included).
- Connect the Charge Controller:
- First, connect the charge controller to your 12V battery using the provided SAE-Alligator Clips Cable or SAE-Battery Eyelet Cable. Ensure correct polarity (red to positive, black to negative). The controller display should illuminate.
- Next, connect the solar panel to the charge controller using the SAE connector. Ensure the connection is secure.
- Verify Connections: Check all connections for tightness and correct polarity. The charge controller display will show the battery voltage and charging status.

Image: A diagram illustrating various easy installation methods for the solar panel, including flat and pole mounting options.
Operating Instructions
Understand how to operate your solar panel kit effectively:
- Monitor Charging Status: The digital display on the charge controller shows the current battery voltage, PV charge current, and state-of-charge (25%, 50%, 75%, 100%).
- Select Battery Type: Use the "MODE" button on the controller to select the appropriate battery type (12V, 12V AGM, or 12V Lithium) for your connected battery. This ensures optimal charging.
- Understanding Charging Stages: The controller employs a 3-stage charging algorithm:
- Bulk: Rapidly charges the battery to approximately 80% capacity.
- Absorption: Charges the battery to 100% at a decreasing current.
- Float: Maintains the battery at full charge, preventing overcharging.
- USB Charging: The controller features two USB ports for charging compatible devices directly from the solar panel, even without a connected battery.

Image: The digital display of the charge controller indicating various charge levels from 25% to 100% and maintenance mode.
Safety Features
Your SUNER POWER charge controller is designed with multiple safety protections:
- Over-Temperature Protection
- Over-Voltage Protection
- Over-Current Protection
- Short Circuit Protection
- Discharge Protection
- Over-Charge Protection
- Reverse Polarity Protection
- Waterproof and Spark-Proof Design

Image: A visual representation of the various safety protections integrated into the charge controller, ensuring secure operation.
Technical Specifications
| Feature | Specification |
|---|---|
| Brand | SUNER POWER |
| Model Number | SP-30W-M PRO |
| Maximum Power | 30 Watts |
| Product Dimensions | 24"L x 13.2"W x 0.7"H |
| Material | A+ Grade Solar Cell, Aluminum Frame, Tempered Glass |
| Efficiency | High Efficiency (up to 99% tracking, 98% conversion) |
| Connector Type | Plug & Play SAE Harness |
Maintenance
Proper maintenance ensures the longevity and efficiency of your solar panel kit:
- Regular Cleaning: Periodically clean the surface of the solar panel with a soft, damp cloth to remove dust, dirt, and debris. A clean panel ensures maximum sunlight absorption.
- Inspect Connections: Routinely check all electrical connections for corrosion, looseness, or damage. Ensure cables are securely fastened.
- Environmental Protection: The solar panel and controller are designed to be waterproof and weather-resistant. However, avoid prolonged submersion or exposure to extreme conditions beyond specified operating temperatures (-40°F to 140°F for the panel).
- Battery Health: Monitor your battery's health and ensure it is compatible with the selected charging mode on the controller.

Image: A visual representation highlighting the waterproof and weather-resistant design of the solar panel, suitable for various outdoor conditions.
Troubleshooting
If you encounter issues with your solar panel kit, refer to the following common problems and solutions:
- No Power Output from Panel: Ensure the solar panel is receiving direct sunlight and is not shaded. Check all connections from the panel to the controller.
- Battery Not Charging: Verify that the charge controller is correctly connected to the battery with proper polarity. Confirm the battery type selected on the controller matches your battery. Check for any error indicators on the controller display.
- Battery Drains When No Sun: The SUNER POWER charge controller includes reverse polarity protection and is designed to prevent reverse current flow. If your battery is draining, ensure all connections are correct and that there are no external loads drawing power from the battery when the solar panel is not active. Consult the controller's display for any error messages.
- Controller Display Not Working: Check the battery connection to the controller. Ensure the battery has sufficient voltage to power the controller's display.
Warranty and Support
For warranty information or technical assistance regarding your SUNER POWER 30W Solar Panel Kit, please contact SUNER POWER customer support. Refer to your purchase documentation or visit the official SUNER POWER website for contact details and further assistance.