VOWNER VOWNER-165
VOWNER Shoe Cabinet Instruction Manual
Model: VOWNER-165
1. Introduction
Thank you for purchasing the VOWNER Shoe Cabinet. This manual provides detailed instructions for assembly, operation, maintenance, and troubleshooting to ensure safe and efficient use of your new shoe cabinet. Please read this manual thoroughly before beginning assembly and retain it for future reference.

Figure 1.1: VOWNER Shoe Cabinet with 2 Flaps (Grey)
2. Safety Information
Please observe the following safety precautions during assembly and use:
- Anti-Tilt Device: Always install the included anti-tilt device to prevent the cabinet from tipping over, especially in households with children or pets. Securely fasten it to a solid wall stud.
- Weight Limit: Do not exceed the maximum weight limit of 100 kilograms (220 pounds) for the entire cabinet. Distribute weight evenly.
- Assembly: Assembly should be performed by adults. Keep small parts and hardware away from children to prevent choking hazards.
- Placement: Place the cabinet on a flat, stable surface. Avoid placing it in areas with high humidity or direct sunlight.
- Handling: This is a heavy package (approximately 17.64 kg / 38.8 lbs). It is recommended that two people lift and move the cabinet during assembly to prevent injury.
3. Package Contents
Before beginning assembly, verify that all parts and hardware are present and undamaged. If any components are missing or damaged, please contact VOWNER customer support.
- Cabinet Panels (Numbered)
- Flip Drawer Mechanisms
- Adjustable Shelf Panels
- Handles (Black)
- Anti-Tilt Kit (Wall anchor, strap, screws)
- Assembly Hardware (Screws, dowels, cam locks, etc.)
- Instruction Manual
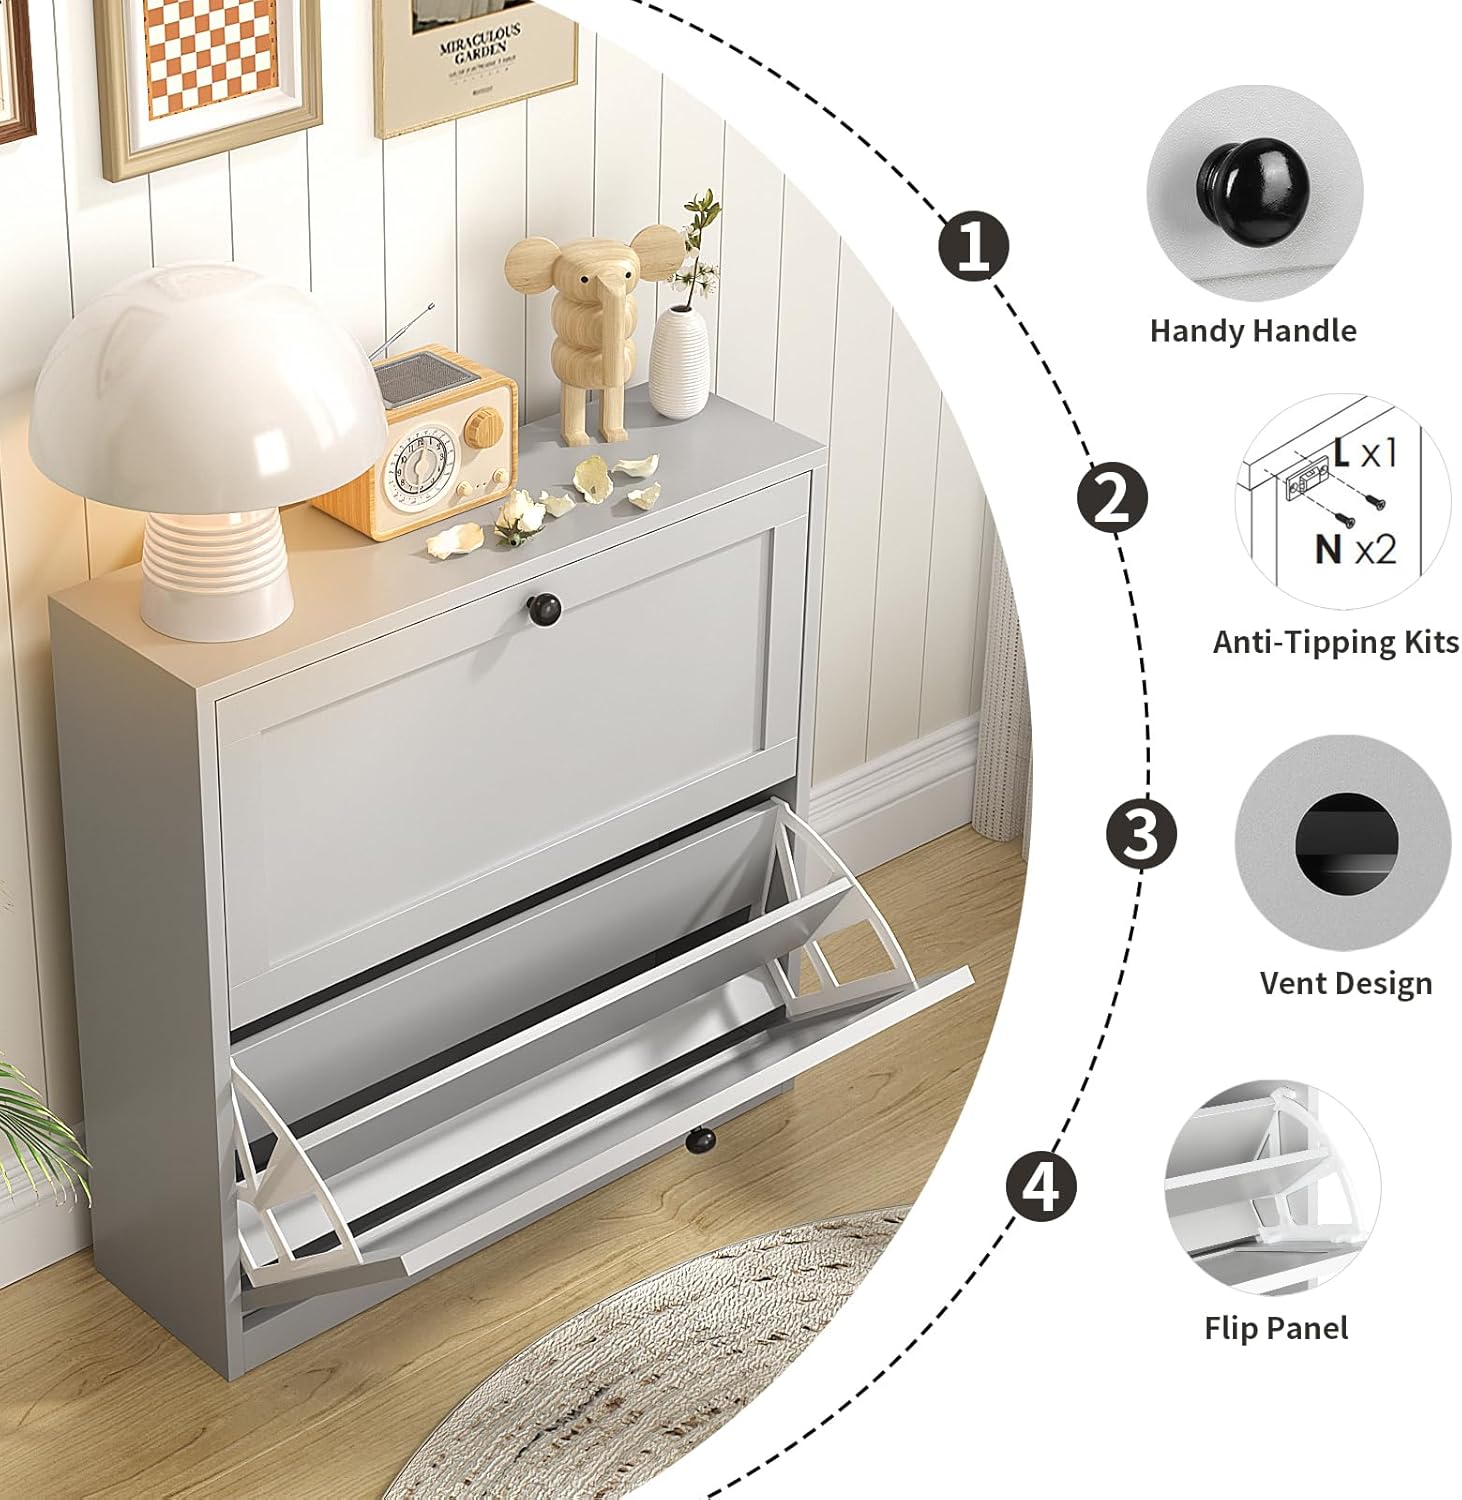
Figure 3.1: Key Components and Features
4. Setup and Assembly
4.1. Before You Begin
Clear a spacious area for assembly. You will need the following tools (not included):
- Phillips Head Screwdriver
- Hammer (for dowels)
- Drill (for anti-tilt device wall mounting)
- Pencil and Measuring Tape

Figure 4.1: Product Dimensions
4.2. Assembly Steps
Follow the numbered instructions provided in the separate assembly guide included with your hardware. The general steps are:
- Identify Parts: Lay out all numbered panels and hardware.
- Assemble Frame: Connect the side panels to the top and bottom panels using the provided hardware.
- Install Back Panel: Secure the back panel to the assembled frame.
- Assemble Flip Drawers: Construct the two flip drawers, attaching the front panels and the internal shoe racks.
- Insert Drawers: Slide the assembled flip drawers into the cabinet frame.
- Attach Handles: Secure the black handles to the front of each flip drawer.
- Install Anti-Tilt Device: Securely attach the anti-tilt strap to the top rear of the cabinet and then to a wall stud using appropriate wall anchors and screws. This step is crucial for safety.

Figure 4.2: Adjustable Shelf Positions
5. Operating Instructions
5.1. Storing Shoes
The VOWNER Shoe Cabinet features two flip drawers, each designed to hold multiple pairs of shoes. To access the storage compartments, gently pull the handle on the front of the drawer. The drawer will tilt open, revealing the internal shoe racks.

Figure 5.1: Shoe Cabinet with Flaps Open
5.2. Adjusting Shelves
Each flip drawer contains an adjustable shelf. This shelf can be positioned in two different grooves or removed entirely to accommodate various shoe heights, including flats, mid-boots, or heels. To adjust, carefully lift the shelf and reposition it into the desired groove.
5.3. Closing Flaps
To close the drawers, gently push the front panel upwards until it clicks securely into the closed position. Ensure no shoes are obstructing the closing mechanism.

Figure 5.2: Shoe Cabinet with Flaps Closed
6. Maintenance
Proper maintenance will extend the life of your VOWNER Shoe Cabinet:
- Cleaning: Wipe the cabinet surfaces with a soft, damp cloth. Avoid harsh chemicals or abrasive cleaners, which can damage the finish.
- Moisture: Protect the cabinet from excessive moisture and direct water exposure. Wipe up spills immediately.
- Hardware: Periodically check all screws and connections to ensure they remain tight. Retighten if necessary.
- Ventilation: The cabinet features a vent design to help with air circulation. Ensure these vents are not blocked.
7. Troubleshooting
Refer to the table below for common issues and their solutions:
| Problem | Possible Cause | Solution |
|---|---|---|
| Drawers do not close smoothly. | Obstruction by shoes; misaligned mechanism; loose hardware. | Ensure shoes are properly placed and not blocking the mechanism. Check that all hardware on the flip drawer mechanism is securely tightened. |
| Cabinet wobbles or feels unstable. | Not placed on a level surface; anti-tilt device not installed or loose; loose assembly hardware. | Move cabinet to a level surface. Ensure the anti-tilt device is securely fastened to both the cabinet and a wall stud. Retighten all assembly screws. |
| Scratches or dents on surface. | Impact during use or assembly. | While the cabinet is designed to be dent and scratch-resistant, minor damage can occur. Use furniture repair markers or touch-up paint if desired. |
8. Specifications
Detailed specifications for your VOWNER Shoe Cabinet:
| Feature | Detail |
|---|---|
| Brand | VOWNER |
| Model Number | VOWNER-165 |
| Color | Grey |
| Product Dimensions (D x W x H) | 9.45" x 31.5" x 31.5" (24cm x 80cm x 80cm) |
| Special Features | Dent resistant, durable, scratch-resistant, adjustable shelves, anti-tilt device |
| Room Type | Entryway, Hallway |
| Door Style | Double flip door |
| Weight Limit | 100 Kilograms (220 lbs) |
| Included Components | Shoe cabinet (all parts for assembly) |
| Number of Pieces | 1 (assembly required) |
| Item Weight | 17.64 Kilograms (38.8 lbs) |
| Assembly Required | Yes |
9. Warranty and Support
VOWNER stands behind the quality of its products. For information regarding warranty coverage, replacement parts, or technical support, please refer to the contact information provided on your purchase receipt or visit the official VOWNER website. Please have your model number (VOWNER-165) and purchase date ready when contacting support.
Related Documents - VOWNER-165
 |
Assembly Instructions: Shoe Cabinet 4 Compartments Detailed assembly instructions for the Shoe Cabinet 4 Compartments, including parts identification, tools required, and step-by-step assembly guidance. Covers both the main cabinet and drawer front set. |
 |
Bay Isle Home HC310N1 Shoe Cabinet Assembly Instructions Step-by-step assembly guide for the Bay Isle Home HC310N1 Shoe Cabinet, including parts list, safety warnings, and wall mounting instructions. |
 |
Ivy Bronx Marble Shoe Cabinet Installation Guide Comprehensive installation manual for the Ivy Bronx Marble Shoe Cabinet, providing step-by-step instructions, parts identification, hardware list, and safety warnings for secure assembly. |
 |
DOADW 8 Tier Tall Shoe Rack Assembly Instructions A comprehensive assembly guide for the DOADW 8 Tier Tall Shoe Rack, detailing all necessary parts and providing clear, step-by-step instructions for quick and easy setup of this metal shoe organizer. |
 |
Assembly Instructions: Gracie Oaks 11-Tier Shoe Storage Cabinet (HPAN1001) Detailed assembly instructions for the Gracie Oaks HPAN1001 11-Tier Shoe Storage Cabinet. Includes parts list, hardware list, step-by-step assembly guide, and general usage guidelines. |
 |
Assembly Manual: N657P285157W / N657P285158W Cabinet Comprehensive assembly manual for the N657P285157W and N657P285158W cabinet, including parts lists, hardware details, step-by-step instructions, safety warnings, and load capacity information. |
Ask a question about this manual
Ask about setup, troubleshooting, compatibility, parts, safety, or missing instructions. Manuals+ will review the question and use this page’s manual context to help answer it.