1. Safety Information
Please read all safety instructions before assembling or using the kitchen cart.
- Ensure all parts are properly secured before use.
- Do not allow children to play on, with, or around the cart.
- Be cautious when moving the cart on uneven surfaces to prevent tipping.
- Use the lockable wheels to secure the cart in place when not in use.
- The built-in power outlet is rated for 120V/12A. Do not exceed this rating to prevent electrical overload.
2. Setup and Assembly
This kitchen cart requires assembly. Follow the included assembly instructions carefully. Ensure all components are present before beginning.
2.1 Unpacking and Part Identification
Carefully unpack all components and verify against the parts list provided in your separate assembly guide. Keep all hardware organized.
2.2 Assembly Steps
Refer to the detailed step-by-step instructions and diagrams in your assembly manual for proper construction. Ensure all screws and fasteners are tightened securely.
2.3 Attaching Wheels
The cart is equipped with five concealed wheels. Attach them according to the assembly instructions. Two wheels are lockable; ensure they are positioned for easy access when you need to secure the cart.

Image: Detail of the concealed wheel and side racks, illustrating the mobility feature.
3. Operating Instructions
3.1 Using the Drop Leaf Countertop
The kitchen cart features a 50" W x 11.8" D drop leaf. To extend the countertop, simply unfold the leaf and ensure the support mechanism is securely engaged. To fold, release the support and lower the leaf. This provides additional workspace or dining area as needed.

Image: Visual guide for extending and folding the drop leaf countertop.
3.2 Utilizing the Built-in Power Outlet
The cart includes a charging station with 3 AC outlets (120V/12A) and 2 USB ports (5V/2A). Connect your kitchen appliances or electronic devices to these outlets for convenient power access. Ensure the total power draw does not exceed 12A.

Image: The integrated power strip with three AC outlets and two USB ports.
3.3 Storage Compartments
The cart offers various storage options:
- Drawers: Three drawers are provided for utensils and dinnerware.
- Side Racks: Five open side racks with bamboo sticks are ideal for organizing spices, bottles, or wine.
- Internal Storage: The two barn doors conceal internal storage racks with 2-tier shelves, designed for condiments. Adjustable shelves inside the main cabinet provide flexibility for various item sizes.
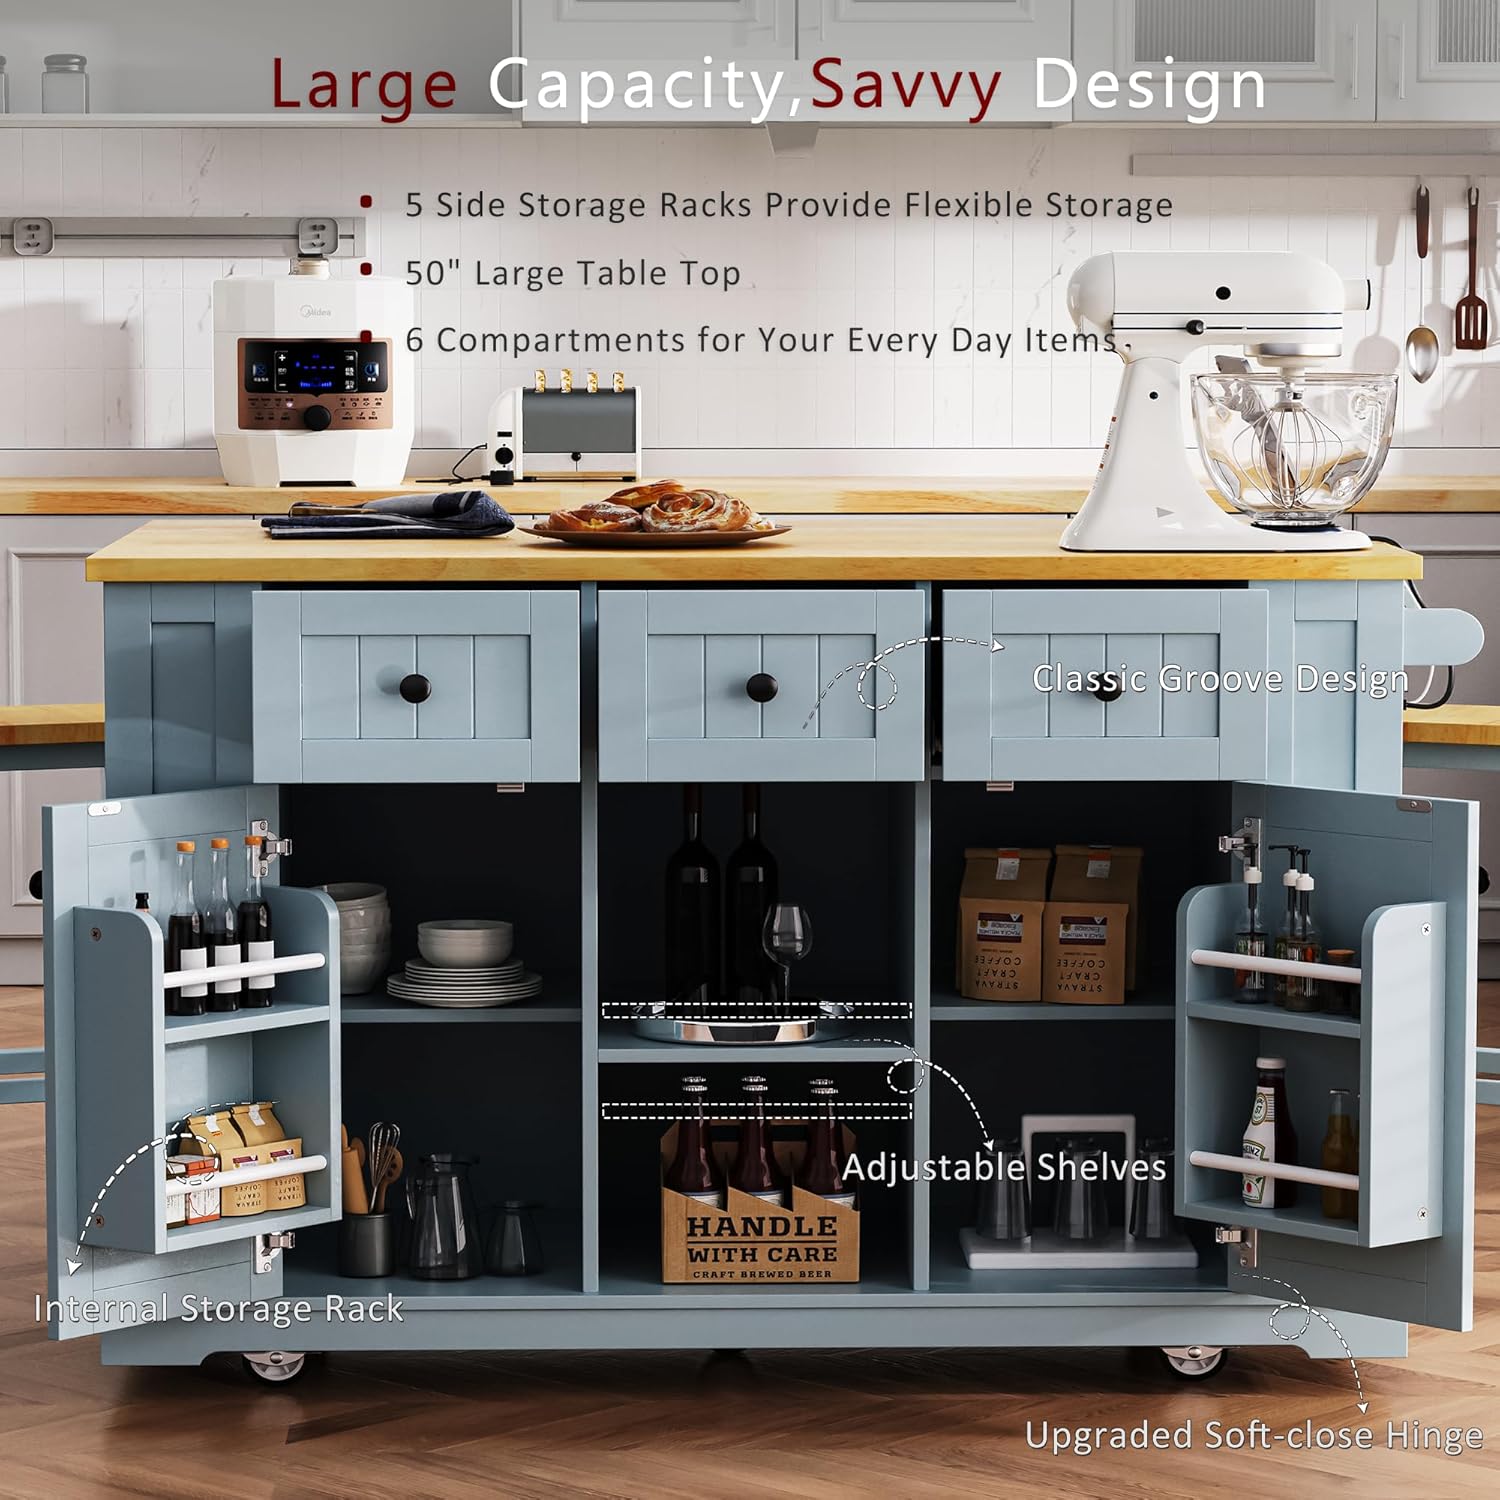
Image: Overview of the cart's storage capabilities, including drawers, internal shelves, and side racks.
3.4 Moving and Securing the Cart
The concealed wheels allow for easy movement. To secure the cart in a stationary position, engage the locks on the two lockable wheels. To move, unlock the wheels.
4. Maintenance
4.1 Cleaning
Wipe the surfaces of the kitchen cart with a dry cloth. Avoid using harsh chemicals or abrasive cleaners that may damage the finish. For spills, wipe immediately with a damp cloth and then dry thoroughly.
4.2 General Care
Periodically check all screws and fasteners to ensure they remain tight. Retighten as necessary to maintain stability. Avoid placing excessively hot items directly on the countertop without protection.
5. Troubleshooting
5.1 Cart Instability or Tipping
- Check Wheel Locks: Ensure the lockable wheels are fully engaged when the cart is stationary.
- Even Weight Distribution: Distribute items evenly within the cart, placing heavier items on lower shelves to improve stability.
- Tighten Fasteners: Verify that all assembly screws and bolts are securely tightened.
5.2 Wheels Not Rolling Smoothly or Locking
- Clear Obstructions: Check for any debris or obstructions around the wheels.
- Lubrication: If wheels are stiff, a small amount of silicone lubricant can be applied to the wheel axles.
- Lock Mechanism: Ensure the locking mechanism is free of obstruction and fully engages/disengages.
5.3 Power Outlet Not Functioning
- Check Power Cord: Ensure the cart's power cord is securely plugged into a functional wall outlet.
- Overload Protection: The power outlet has a 12A limit. If too many high-power devices are connected, it may trip. Unplug some devices and try again.
- Reset Button: Check if the power outlet has a reset button and press it if necessary.
6. Specifications

Image: Comprehensive dimensions and load capacities of the Merax Kitchen Cart.
| Feature | Detail |
|---|---|
| Model Number | CC00852 |
| Product Dimensions (D x W x H) | 53.14" x 29.52" x 36.4" |
| Item Weight | 128.75 Pounds |
| Material | Bamboo, Engineered Wood |
| Maximum Weight Recommendation (Cart) | 300 Pounds |
| Tabletop Load Capacity | Up to 400 Pounds |
| Power Outlet | 3 AC Outlets (120V/12A), 2 USB Ports (5V/2A) |
| Drop Leaf Dimensions | 50" W x 11.8" D |
| Assembly Required | Yes |
| Color | Grey Blue |
7. Product Overview Video
Watch this official video for a visual overview of the Merax 53" Kitchen Cart Island, demonstrating its features and functionality.
Video: A 50-second overview of the Merax 53" Kitchen Cart Island, highlighting its power outlet and seating capabilities.
8. Warranty and Support
8.1 Customer Support
For any problems, questions, or assistance with your Merax Kitchen Cart, please visit our official website at Merax.com or contact us directly via email at csr@merax.com.
8.2 Return Policy
This product is eligible for a 30-day return policy for refund or replacement, as per Amazon's terms. Please refer to your purchase details for specific return instructions.


