1. Introduction
This manual provides essential information for the safe and efficient operation, installation, and maintenance of your fishkeeper Aquarium Filter U-V. Please read these instructions thoroughly before use and retain them for future reference. This filter is designed for aquariums ranging from 10 to 75 gallons.
2. Key Features
- Dual Filtration System: Incorporates both biochemical sponge filtration and UV light sterilization for comprehensive water purification.
- UV Light Sterilization: Effectively cleans green water and algae, achieving a 99.99% sterilization rate.
- Ultra Silent Submersible Pump: Operates at less than 35dB, ensuring a quiet environment.
- Adjustable Bubble Output: Allows for customization of aeration levels.
- Multi-functional Design: Supports various modes including wave making, air supply, water pumping, and water cycling.
- Detachable Pump Body: Facilitates easy cleaning and maintenance.

Image 1: Dual Filtration System with Biochemical Sponge Filter and UV Light.

Image 2: Ultraviolet Sterilization for 99.99% Sterilization Rate.

Image 3: Ultra Silent Operation (less than 35dB).
3. Specifications
| Feature | Detail |
|---|---|
| Model Number | FK087-12W |
| Recommended Tank Size | 10-75 Gallons |
| Flow Rate | 132 GPH (Gallons Per Hour) |
| Power Consumption | 12W |
| Noise Level | <35dB |
| Dimensions (L x W x H) | 26.7 x 12.09 x 11 cm (approx. 10.5 x 4.76 x 4.33 inches) |
| Weight | 748 g (approx. 1.65 lbs) |

Image 4: Product Dimensions.
4. Setup Instructions
- Unpack: Carefully remove all components from the packaging.
- Assemble Filter Media: Ensure the biochemical sponge filter is correctly placed within the filter housing.
- Attach Pump: Securely attach the pump unit to the filter housing.
- Position in Aquarium: Submerge the filter completely in your aquarium water. Use the suction cups to firmly attach it to the side or back wall of the tank. Ensure the water level is above the minimum operating level indicated on the filter.
- Connect Air Tube (Optional): If using the adjustable bubble output, connect the air tube to the designated port and position the air stone as desired.
- Power On: Once fully submerged and securely placed, plug the filter into a suitable power outlet.
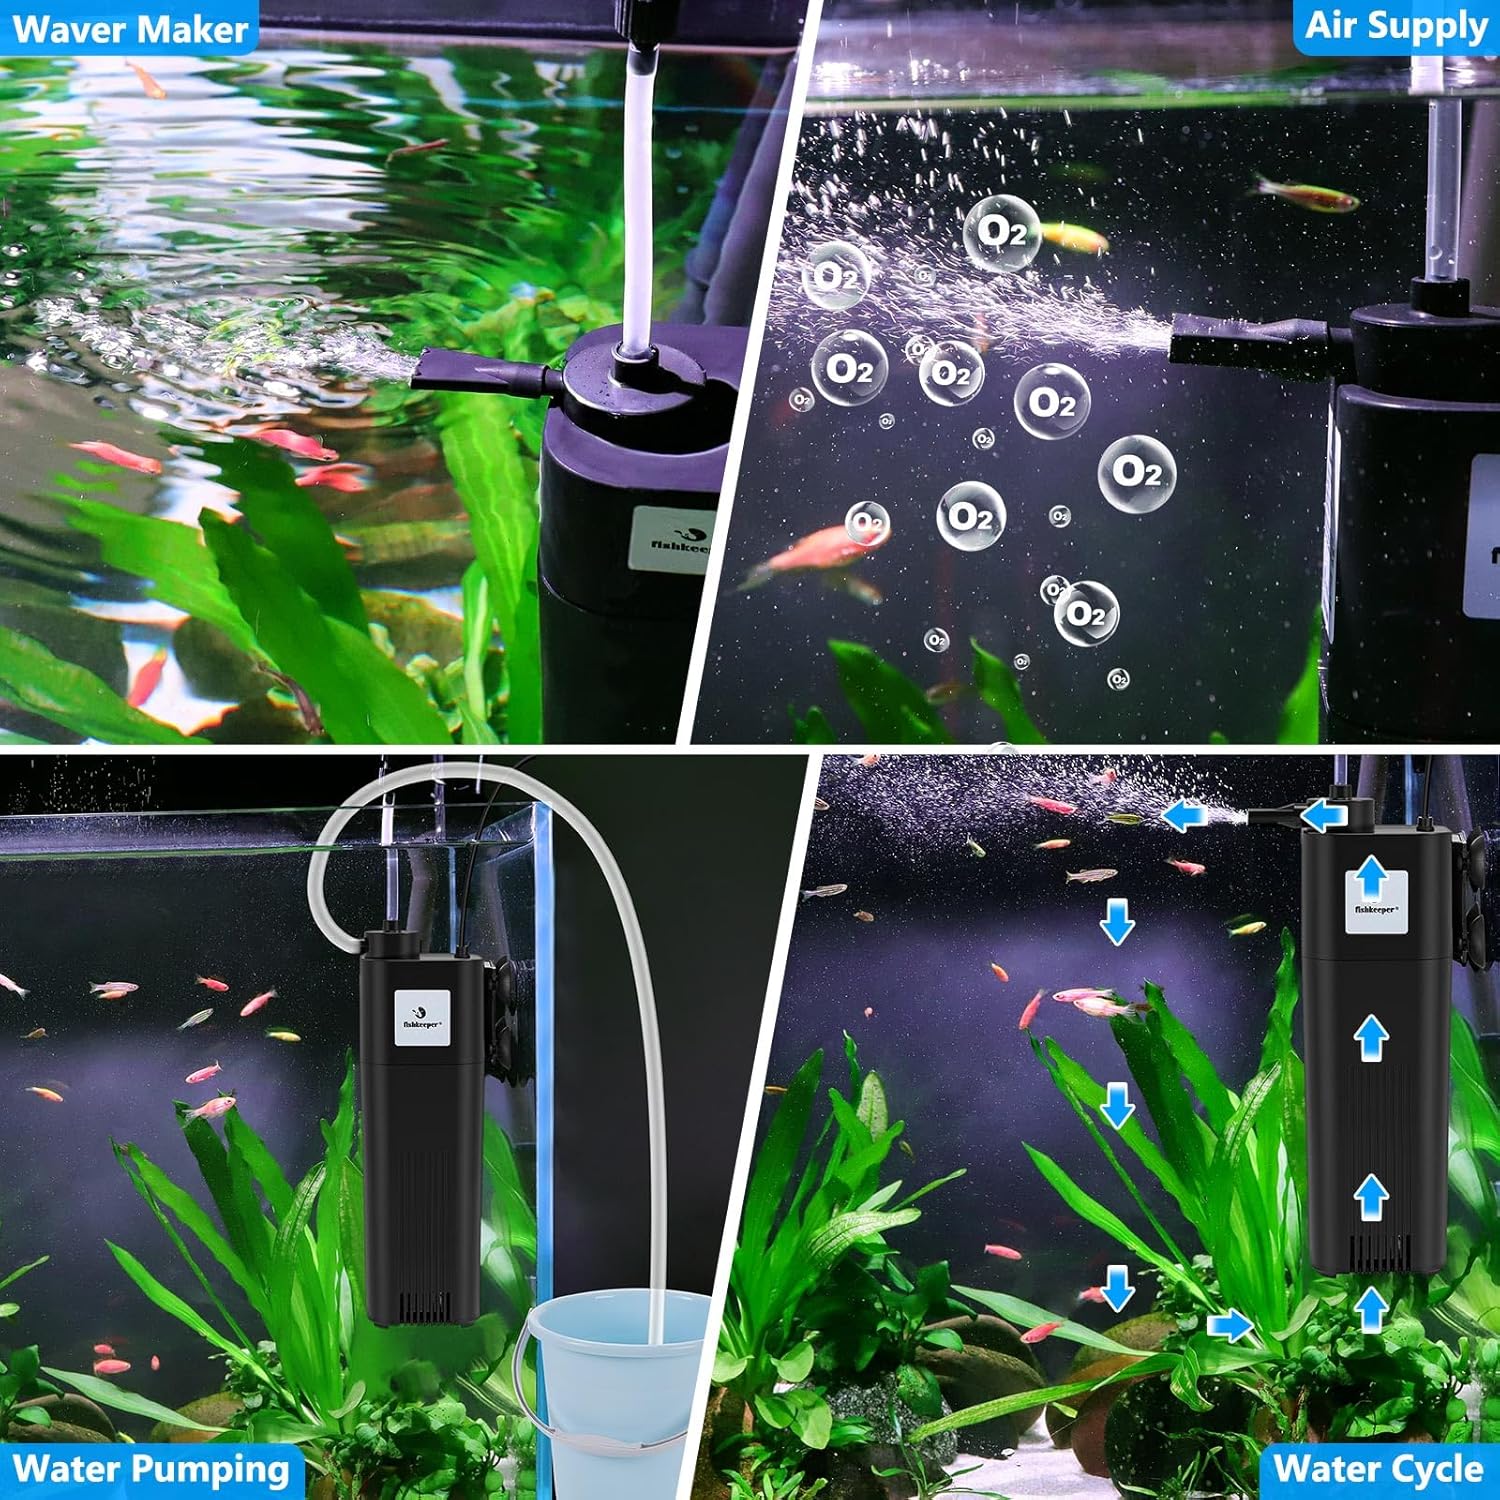
Image 5: Demonstrating various operational modes including wave making and air supply.
5. Operating the Filter
- Initial Start-up: After plugging in, the filter will begin circulating water. It may take a few moments for air to purge and for a steady flow to establish.
- Adjusting Flow/Bubbles: Use the adjustable knob on the filter to control the water flow rate and the intensity of the bubble output.
- UV Light Operation: The UV light operates automatically when the filter is powered on. It is designed to reduce free-floating algae and harmful bacteria.
- Monitoring Water Clarity: Observe your aquarium water clarity. Significant improvement in green water and algae should be noticeable within 72 hours of continuous operation.

Image 6: Water clarity improvement after 72 hours of filtration.
6. Maintenance
Regular maintenance is crucial for optimal filter performance and water quality.
- Disconnect Power: Always unplug the filter from the power outlet before performing any maintenance.
- Remove Filter from Tank: Carefully detach the filter from the aquarium wall.
- Disassemble: The pump body is detachable. Gently separate the filter housing from the pump unit.
- Clean Filter Sponge: Remove the biochemical sponge filter. Rinse it thoroughly with old aquarium water (not tap water, to preserve beneficial bacteria) to remove accumulated debris. Replace if heavily worn or damaged.
- Clean Impeller/Rotor: Access the pump's impeller/rotor. Clean it with a small brush to remove any debris or mineral buildup. This ensures quiet operation and efficient flow.
- Clean UV Lamp (if applicable): If your model has a replaceable UV lamp, carefully clean the quartz sleeve surrounding it. Replace the UV lamp according to manufacturer recommendations (typically every 6-12 months) to maintain effectiveness.
- Reassemble and Restart: Reassemble all components, ensuring they are securely fitted. Place the filter back into the aquarium, ensure it is fully submerged, and plug it back in.
Video 1: Demonstration of internal aquarium filter cleaning and maintenance.
Video 2: Overview of a submersible UV aquarium filter, highlighting features and maintenance aspects.
Video 3: Sizing guide for an aquarium filter, showing how to adjust for tank depth.
Video 4: Demonstration of a large aquarium filtration pump, including assembly and filter media replacement.
7. Troubleshooting
- No Water Flow: Check if the power cord is securely plugged in. Ensure the impeller is not blocked by debris and is spinning freely. Verify the water level in the tank is sufficient for the pump to operate.
- Reduced Water Flow: Clean the filter sponge and impeller. Check for any blockages in the intake or output nozzles.
- Excessive Noise: Ensure the filter is fully submerged and securely attached to the tank. Clean the impeller as debris can cause rattling. Check for air trapped inside the filter housing.
- Green Water/Algae Persists: Ensure the UV lamp is functioning (some models have an indicator light). Replace the UV lamp if it's old or appears dim. Perform partial water changes and reduce light exposure if necessary.
8. Safety Information
- Always unplug the appliance before handling, performing maintenance, or placing hands in the water.
- Do not operate the filter dry; it must be fully submerged in water.
- Ensure the power cord is not damaged. If damaged, do not use the appliance.
- Keep out of reach of children.
- This appliance is for indoor use only.
9. Warranty and Support
Your fishkeeper Aquarium Filter U-V is covered by a standard manufacturer's warranty against defects in materials and workmanship. For specific warranty details, please refer to the product packaging or contact fishkeeper customer support. For technical assistance or replacement parts, please visit the official fishkeeper website or contact our customer service team.