RXFSP GGJ
RXFSP 55-inch Digital Signage Kiosk User Manual
Model: GGJ
1. Product Overview
The RXFSP 55-inch Digital Signage Kiosk is an indoor LCD advertising display featuring a 4K touchscreen and running on Android 11.0. It is equipped with 4GB RAM and 64GB ROM, offering robust performance for various digital signage applications. The kiosk supports multiple connectivity options including WiFi, HDMI, and USB, and integrates with a CMS system for content management.
Key features include:
- Multi-Function Play: Supports USB flash drive plug-and-play, auto playback, and remote control. HDMI-in allows connection to external devices.
- 4K Visual Experience: 3840x2160 resolution with 400cd/m² brightness and a 178° IPS wide viewing angle.
- Intelligent Split Screen: Built-in modules for displaying video and pictures in multiple windows.
- CMS System: For remote content publishing, timed tasks, and data monitoring.
- Connectivity: 2.4+5G WiFi, Ethernet, Bluetooth, HDMI, USB.

Figure 1: RXFSP 55-inch Digital Signage Kiosk.

Figure 2: Capacitive Touch Screen Functionality.
2. Setup and Installation
This section provides instructions for unpacking and assembling your digital signage kiosk. It is recommended to have two people for safe handling and assembly due to the product's size and weight.
2.1 Unpacking
- Carefully open the packaging box.
- With assistance, gently lay the box on its side and slide the main display unit out.
- Remove all protective foam and packaging materials from the display.
- Locate the accessory box containing the base, wheels, power cord, WiFi antenna, screwdriver, keys, and screws.
Video 1: Installation guide for the Digital Signage Kiosk, demonstrating unpacking, base assembly, and connection of accessories.
2.2 Base Assembly
- Place the base unit on a flat, stable surface.
- Attach the four wheels to the designated corners of the base using the provided screws and screwdriver. Ensure they are securely fastened.
- Carefully lift the main display unit and align it with the mounting points on the base.
- Secure the display unit to the base using the larger M6 and M8 screws.

Figure 3: Packaging list showing the main unit, base, wheels, power cord, WiFi antenna, screwdriver, keys, and various screws.
2.3 Connecting Peripherals
- Locate the input panel on the back of the kiosk.
- Connect the power cord to the power input and a suitable power outlet.
- Screw the WiFi antenna into its designated port for wireless connectivity.
- For wired network access, connect an Ethernet cable to the RJ45 port.
- Utilize the USB ports for connecting USB flash drives or other peripherals.
- Use the HDMI input to connect external devices such as laptops or media players.
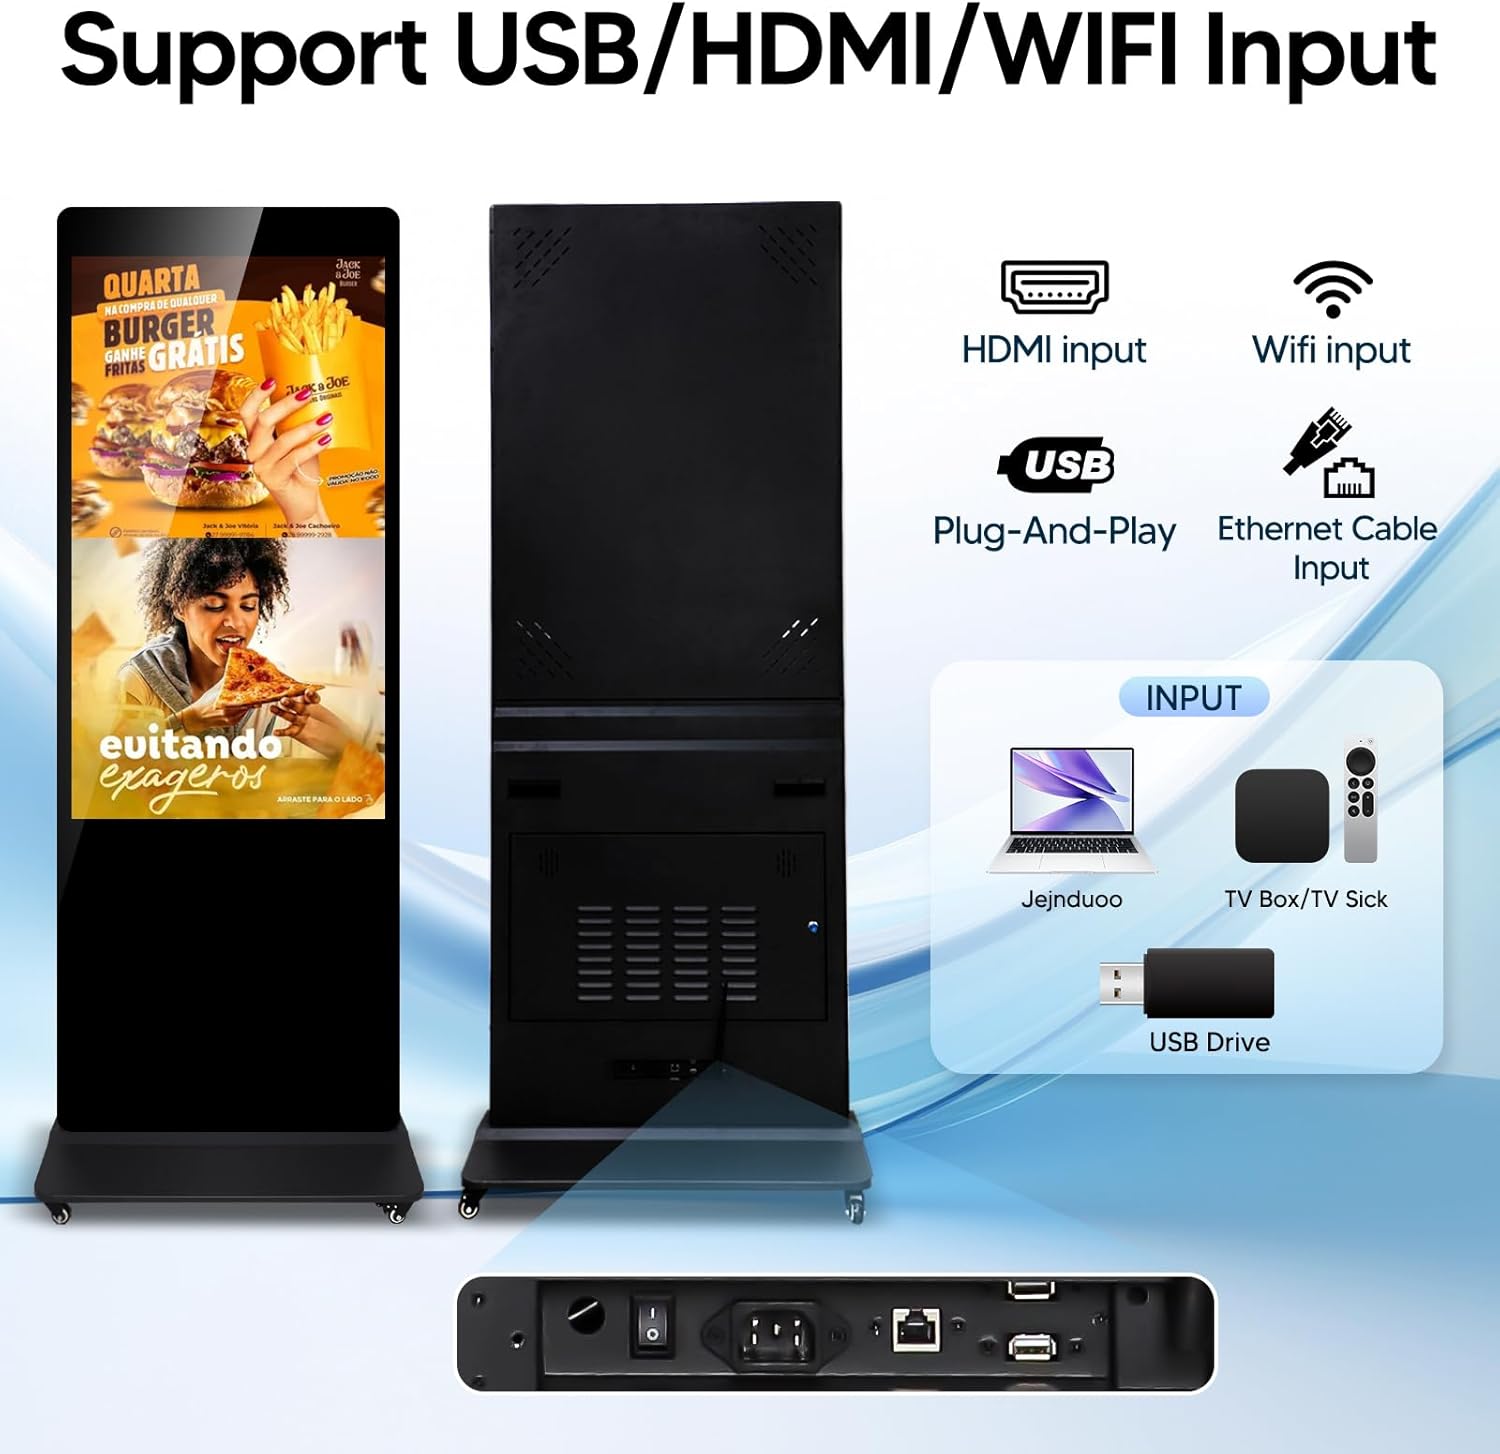
Figure 4: Rear input panel with HDMI, USB, WiFi, and Ethernet ports.
3. Operating Instructions
The RXFSP Digital Signage Kiosk offers flexible content playback and management options.
3.1 Power On/Off
- Ensure the power cord is securely connected.
- Locate the power switch on the back panel and toggle it to the 'ON' position.
- The display will power on and boot into the Android operating system.
3.2 Content Playback
- USB Plug-and-Play: Insert a USB flash drive containing media files (images, videos) into a USB port. The system is designed to auto-detect and play content.
- HDMI Input: Connect an external media source (e.g., laptop, media player) via the HDMI port. Select the HDMI input source from the kiosk's settings.
- Network Playback: Utilize the built-in Android 11.0 system and WiFi/Ethernet connectivity to access online content or content from a Content Management System (CMS).

Figure 5: Auto Play Digital Signage feature, allowing scheduled content display.

Figure 6: 7 Days/24 Hours Continuous Play with timing switch settings.
3.3 Intelligent Split Screen
The kiosk supports displaying multiple content types simultaneously using its intelligent split-screen function.
- Access the split-screen settings through the system menu.
- Choose from various pre-set split-screen modules.
- Assign different media (videos, images, text) to each window.

Figure 7: Intelligent Split Screen feature, showing various layout options for displaying multiple content types.
3.4 Content Management System (CMS)
For advanced content scheduling and remote management, the kiosk integrates with a CMS system.
- Remote Publishing: Upload and publish content to the kiosk from a remote location.
- Timed Tasks: Schedule content to play at specific times or on certain days.
- Monitor Data: Track playback status and device health.
- Automatic Switching: Configure automatic content rotation and transitions.
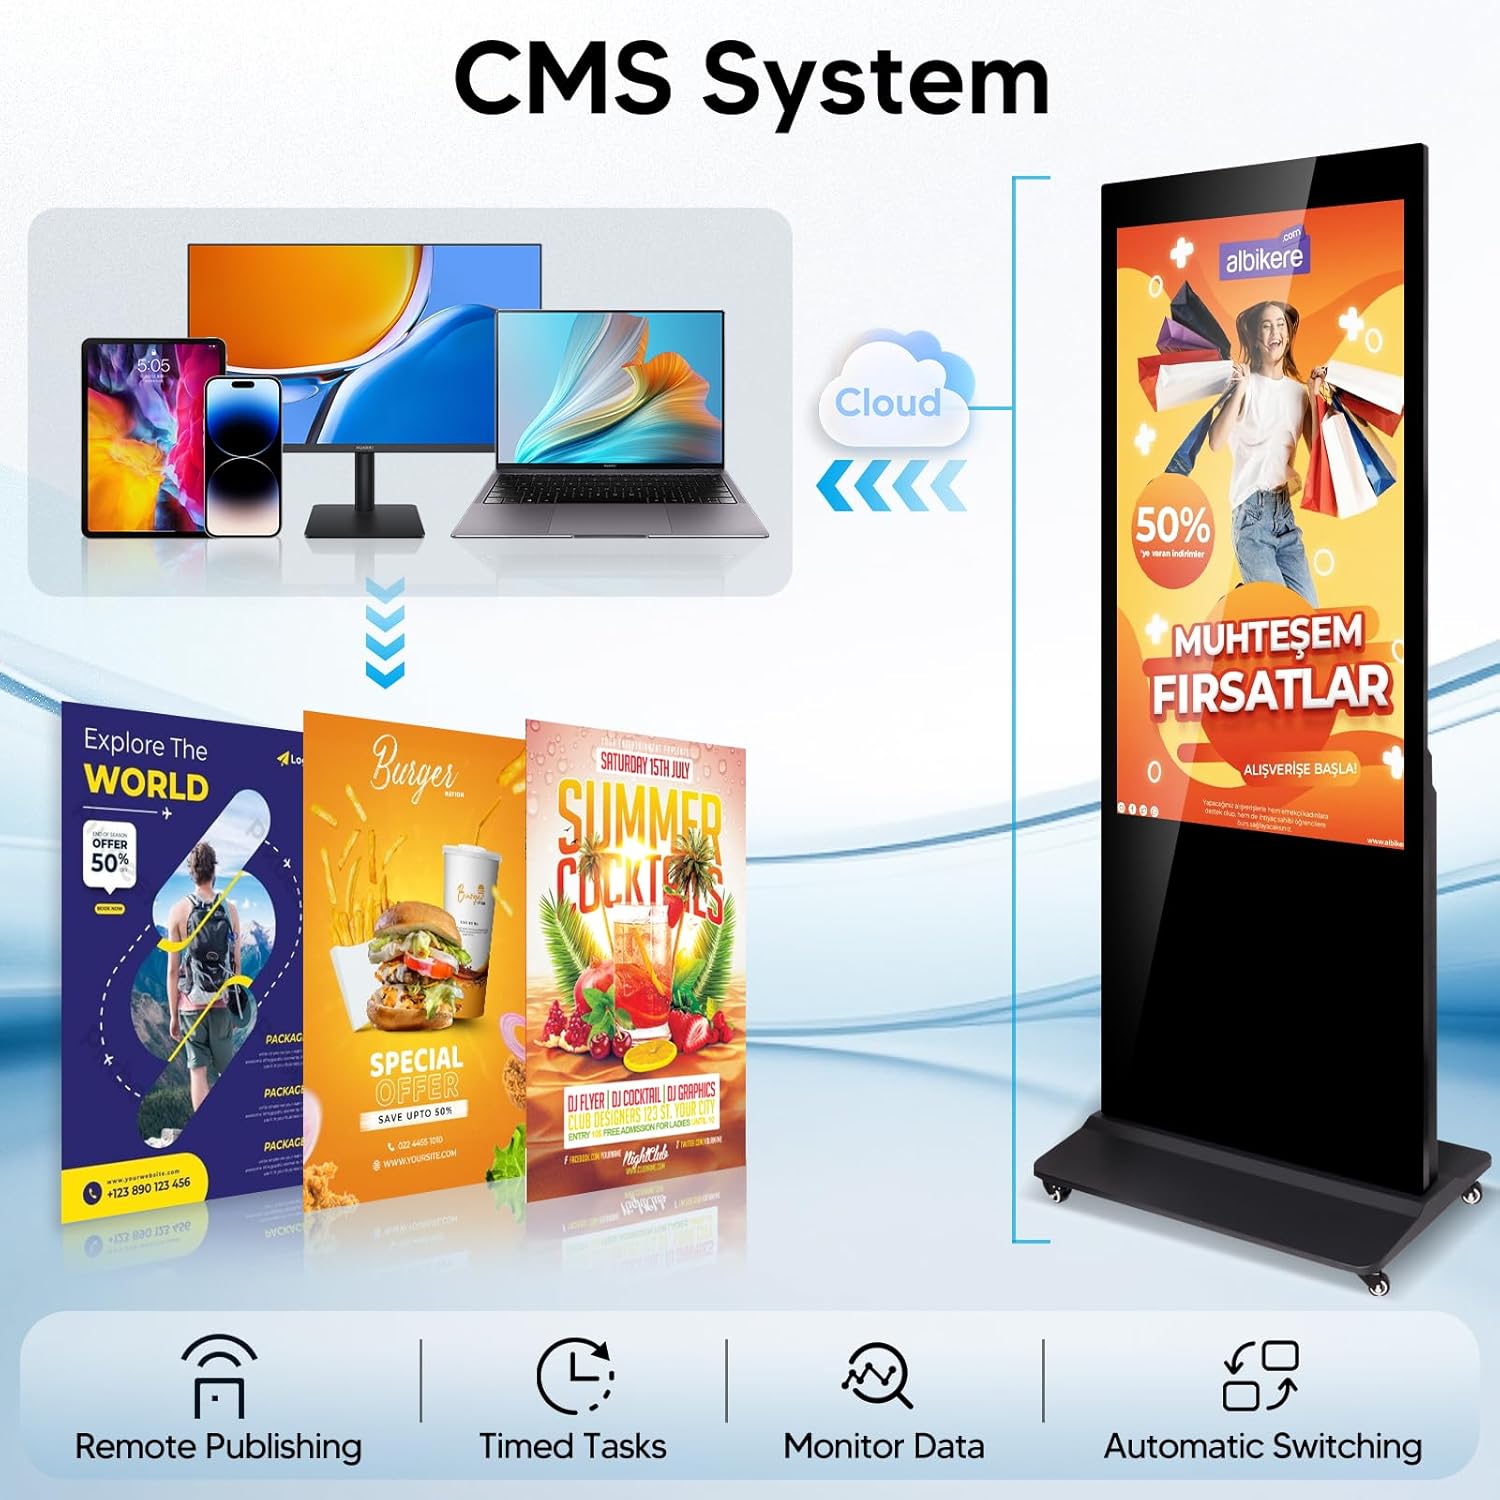
Figure 8: CMS System overview, detailing remote publishing, timed tasks, data monitoring, and automatic switching capabilities.
4. Maintenance
Regular maintenance ensures optimal performance and longevity of your digital signage kiosk.
- Cleaning: Use a soft, lint-free cloth to gently wipe the screen and exterior surfaces. Avoid abrasive cleaners or solvents. For stubborn marks, a slightly damp cloth with a mild, non-abrasive cleaner can be used, followed by a dry cloth.
- Ventilation: Ensure the ventilation slots on the kiosk are clear and unobstructed to prevent overheating.
- Software Updates: Periodically check for and install system updates for the Android operating system to maintain security and performance.
- Cable Management: Ensure all cables are neatly organized and not under tension to prevent damage.
5. Troubleshooting
This section addresses common issues you might encounter with your digital signage kiosk.
| Problem | Possible Cause | Solution |
|---|---|---|
| No Power | Power cord disconnected; Power switch off; Power outlet malfunction. | Check power cord connection; Ensure power switch is ON; Test power outlet with another device. |
| No Display/Black Screen | Kiosk is off; Input source not selected; HDMI cable loose/faulty. | Verify power is on; Select correct input source (e.g., HDMI, internal player); Check HDMI cable connection. |
| No Sound | Volume muted/low; External speakers not connected; Audio settings incorrect. | Increase volume; Connect external speakers if desired; Check audio output settings in Android. |
| Touchscreen Unresponsive | Temporary software glitch; Screen dirty; Calibration issue. | Restart the kiosk; Clean the screen thoroughly; Recalibrate touchscreen if option is available in settings. |
| WiFi Connectivity Issues | WiFi antenna loose; Out of range; Incorrect password; Router issue. | Ensure WiFi antenna is securely attached; Move closer to router; Re-enter WiFi password; Restart router. |
6. Specifications
| Feature | Detail |
|---|---|
| Brand | RXFSP |
| Model Number | GGJ |
| Screen Size | 55 inch |
| Screen Type | Touch Screen |
| Operating System | Android 11.0 |
| RAM | 4GB |
| ROM (Storage) | 64GB |
| Resolution | 3840x2160 pixels (4K) |
| Brightness | 400cd/m² |
| Viewing Angle | 178° (IPS Panel) |
| Connectivity | 2.4+5G WiFi, Ethernet, Bluetooth, HDMI, USB |
| Product Dimensions | 17.72"D x 24"W x 71.26"H |
| Item Weight | 158.6 pounds |
| UPC | 768556841187 |
| Certifications | FCC, CE certified |

Figure 9: Key specifications of the Digital Signage Display.
7. Warranty and Support
RXFSP is committed to providing high-quality digital signage products and customer satisfaction.
- Warranty: This LCD advertising display comes with a 2-year warranty.
- Customer Service: A dedicated after-sales team is available to assist you with any queries or concerns regarding your product. Please refer to your purchase documentation for contact information.
Related Documents - GGJ
 |
Manuale Utente Essiccatore Alimentare YASHE GGJ-261B - Guida Completa Manuale utente completo per l'essiccatore alimentare YASHE GGJ-261B. Include istruzioni operative, precauzioni di sicurezza, informazioni tecniche, manutenzione e risoluzione dei problemi. |
 |
OSTBA GGJ-801 Electrical Appliance Safety and Overview Information about the OSTBA GGJ-801 electrical appliance, including important safety guidelines for safe operation and handling. |
 |
YASHE GGJ-261A Food Dehydrator User Manual Comprehensive user manual for the YASHE GGJ-261A Food Dehydrator, covering safe operation, technical specifications, parts, maintenance, and troubleshooting. |
 |
REEMIX GGJ-802 Food Dehydrator User Manual Comprehensive user manual for the REEMIX GGJ-802 Food Dehydrator, covering setup, operation, safety precautions, and troubleshooting for optimal food drying at home. |
 |
YASHE GGJ-261C Food Dehydrator User Manual Comprehensive user manual for the YASHE GGJ-261C Food Dehydrator, covering operation, safety precautions, technical specifications, cleaning, troubleshooting, and food drying methods. |
 |
AICOK GGJ-320A Food Dehydrator User Manual: Operation, Safety, and Preparation Guide This comprehensive user manual for the AICOK GGJ-320A food dehydrator provides detailed instructions on operation, safety precautions, technical specifications, food preparation methods for fruits, vegetables, meats, and nuts, cleaning, maintenance, and troubleshooting tips. |
Ask a question about this manual
Ask about setup, troubleshooting, compatibility, parts, safety, or missing instructions. Manuals+ will review the question and use this page’s manual context to help answer it.