1. Introduction
Thank you for choosing the Fuceter 5-in-1 Electric Knife Sharpener. This manual provides essential information for the safe and effective operation, maintenance, and care of your new sharpener. Please read these instructions thoroughly before first use and retain them for future reference.
2. Important Safety Instructions
- Always unplug the sharpener from the power outlet before cleaning or when not in use.
- Do not immerse the sharpener in water or any other liquid.
- Keep hands and fingers away from the sharpening slots during operation. Blades will be extremely sharp after sharpening.
- This appliance is not intended for use by persons (including children) with reduced physical, sensory, or mental capabilities, or lack of experience and knowledge, unless they have been given supervision or instruction concerning use of the appliance by a person responsible for their safety.
- Do not operate the sharpener with a damaged cord or plug, or if the appliance malfunctions or has been damaged in any manner.
- Use the sharpener on a stable, flat, and dry surface.
- Avoid sharpening blades that are excessively thick or severely damaged, as this may damage the sharpener.
- Ensure the knife is clean and dry before sharpening.
3. Product Overview
The Fuceter 5-in-1 Electric Knife Sharpener is designed to restore the sharpness of various cutting tools with ease and precision. It features multiple sharpening slots, adjustable rotational speeds, and an intuitive LCD display.
Components and Features
- LCD Screen: Displays power status, rotational speed (Low, Medium, High), and a 'CLEANOUT' reminder.
- 3 Rotational Speeds: Adjustable speeds to suit different sharpening needs.
- Diamond Abrasives: Utilizes 100% diamond abrasive wheels for effective sharpening.
- 5-in-1 Multifunctional Design: Supports sharpening for straight-edged knives, serrated knives, ceramic knives, scissors, and includes a removable ceramic polishing rod.
- Convertible Slot: Slot 5 can be adjusted for wider blades.
- Magnetic Blade Chip Adsorption Plate: Collects metal shavings for a cleaner workspace.

Image 1: The Fuceter 5-in-1 Electric Knife Sharpener in operation, showing a knife being sharpened.
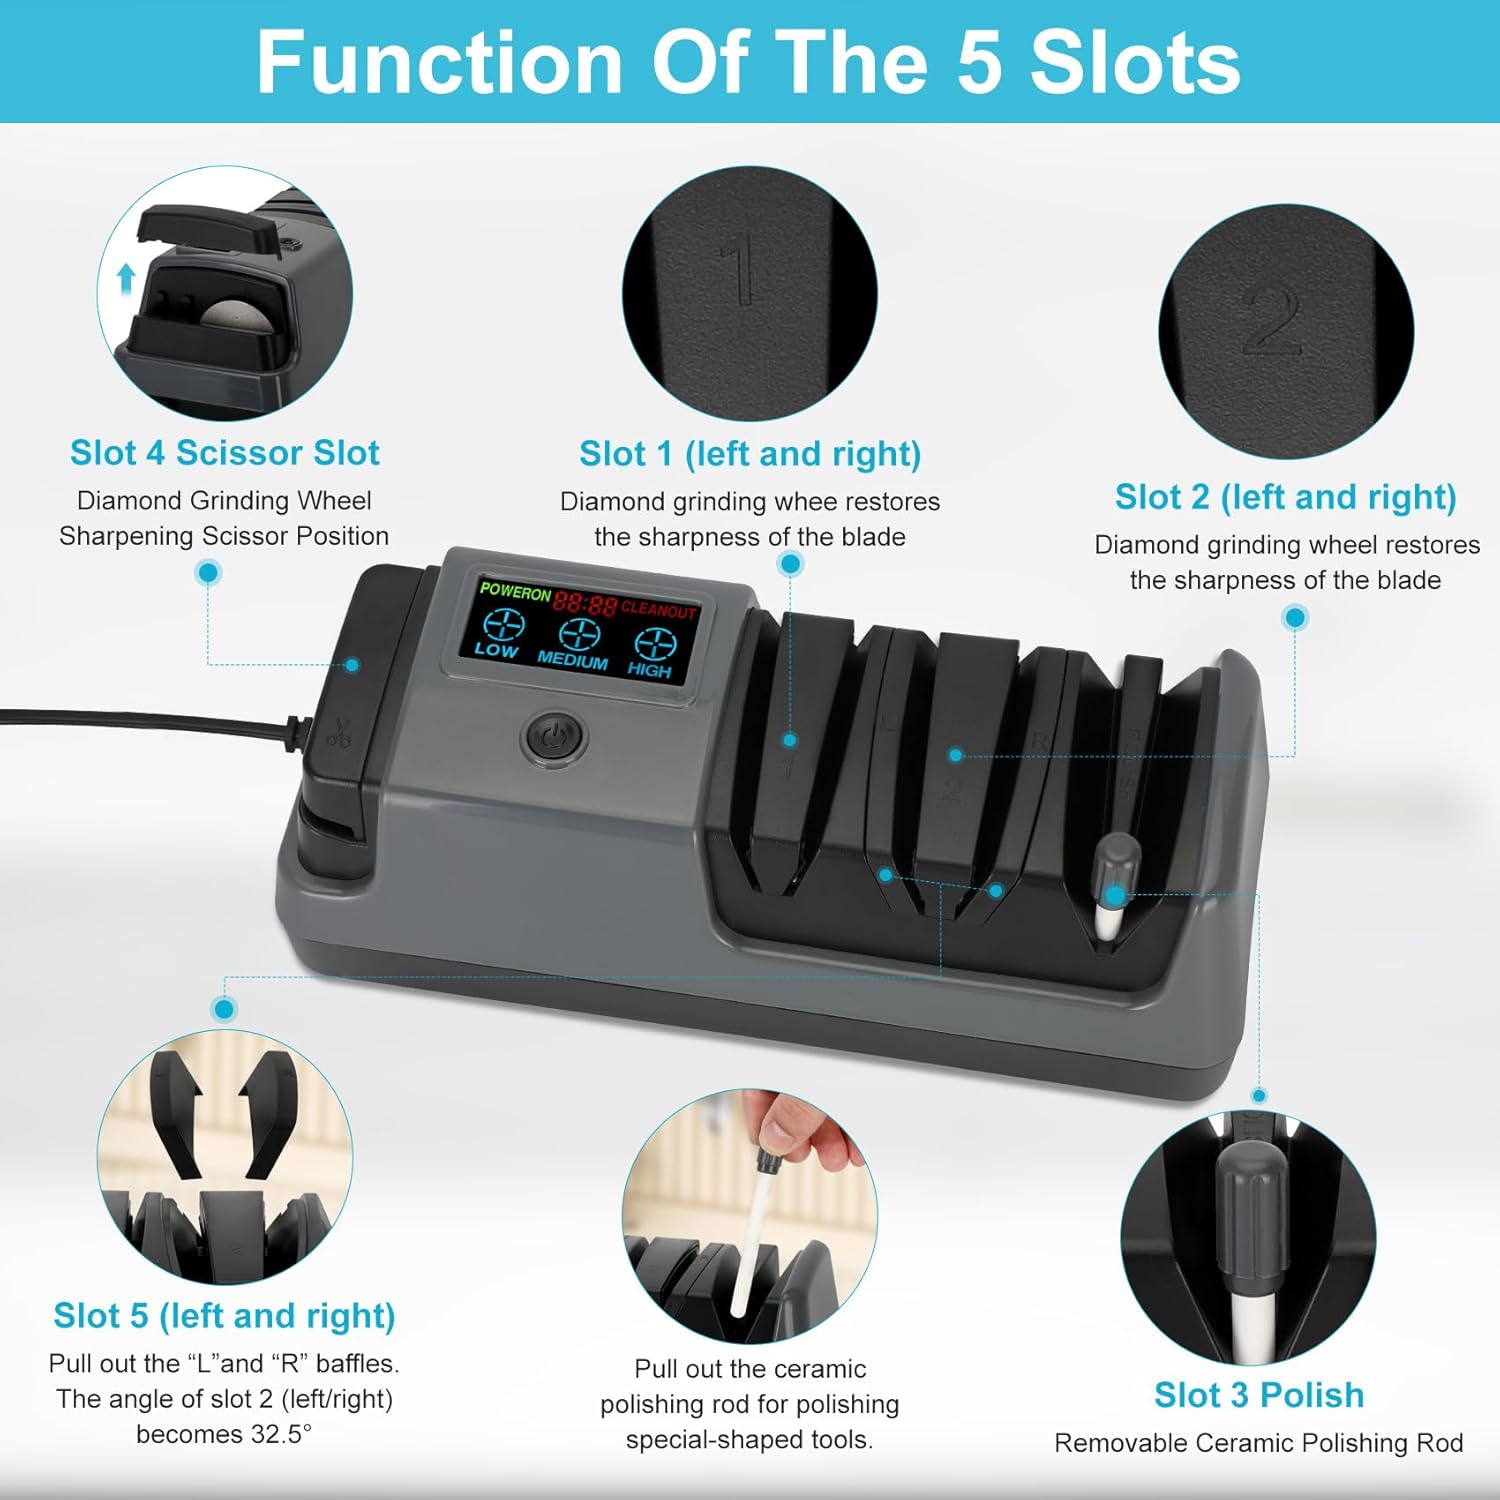
Image 2: A detailed diagram illustrating the function of each of the five sharpening slots.

Image 3: Close-up view of the LCD screen, showing the 'LOW', 'MEDIUM', and 'HIGH' speed indicators.
4. Setup
- Unpack the sharpener and ensure all components are present.
- Place the sharpener on a stable, non-slip, and dry surface.
- Plug the power cord into a standard electrical outlet. The LCD screen will illuminate.
5. Operating Instructions
General Sharpening Guidelines
- Always ensure the knife is clean and dry before sharpening.
- Press the power button to turn on the sharpener.
- Select the desired rotational speed using the speed adjustment buttons (Low, Medium, High) on the LCD panel.
- Insert the knife blade into the appropriate sharpening slot, ensuring it is centered.
- Pull the knife through the slot towards you, applying light, consistent pressure. Do not push the knife away from you.
- Repeat the pulling motion 3-5 times in each slot.
- For optimal results, alternate between the left and right sides of the blade in each slot.
Selecting Rotational Speed
- LOW: Suitable for fine sharpening or delicate blades.
- MEDIUM: General purpose sharpening for most knives.
- HIGH: For quickly restoring very dull or damaged blades.
Sharpening Different Blade Types

Image 4: Illustration of the 100% diamond abrasive wheels (360#, 600#, 1000#) used for sharpening and polishing.
Straight-Edged Knives (Slots 1 & 2)
- Begin with Slot 1 (coarse grinding) for very dull knives, or Slot 2 (medium grinding) for moderately dull knives.
- Pull the knife through the left side of the slot, then the right side, 3-5 times each.
- Finish with Slot 3 (polishing) for a refined edge.
Serrated Knives
The sharpener supports serrated knives. Use Slot 2 (medium grinding) with careful, light passes. Do not apply excessive pressure. Finish with Slot 3 (polishing) if desired.
Ceramic Knives
Ceramic knives can be sharpened using Slot 2 (medium grinding). Due to the hardness of ceramic, use a slow, consistent pull and avoid excessive force. Finish with Slot 3 (polishing).

Image 5: Demonstrates the sharpener's versatility with straight blade, ceramic, and serrated knives.
Scissors (Slot 4)
- Open the scissors fully.
- Insert one blade into Slot 4, ensuring the sharpening surface contacts the abrasive wheel.
- Pull the blade through the slot, maintaining a consistent angle.
- Repeat for the other blade.

Image 6: Examples of using the scissors slot for sharpening scissors, garden shears, and small axes.
Special-Shaped Tools and Polishing (Slot 3)
The sharpener includes a removable ceramic polishing rod in Slot 3. This rod can be used for polishing blades after sharpening or for sharpening special-shaped tools that do not fit into the other slots.
Convertible Slot for Wider Blades (Slot 5)
For wider blades such as chop bone knives or sushi knives, Slot 5 features removable baffles. Pull out the 'L' and 'R' baffles to enlarge the slot angle to 32.5 degrees, accommodating these larger tools.

Image 7: Demonstrates how to adjust the convertible slot (Slot 5) by removing baffles to sharpen wider blades like chop bone knives and sushi knives.
6. Maintenance and Cleaning
Cleaning the Unit
- Always unplug the sharpener before cleaning.
- Wipe the exterior of the sharpener with a soft, damp cloth. Do not use abrasive cleaners or immerse the unit in water.
- Ensure the sharpener is completely dry before storing or next use.
Emptying the Blade Chip Adsorption Plate
The sharpener is equipped with a magnetic blade chip adsorption plate at the bottom to collect metal shavings. Regularly empty this plate to maintain optimal performance and cleanliness.
- Unplug the sharpener.
- Locate the removable plate on the bottom of the unit.
- Open the plate and carefully dispose of the collected metal shavings.
- Close the plate securely before using the sharpener again.
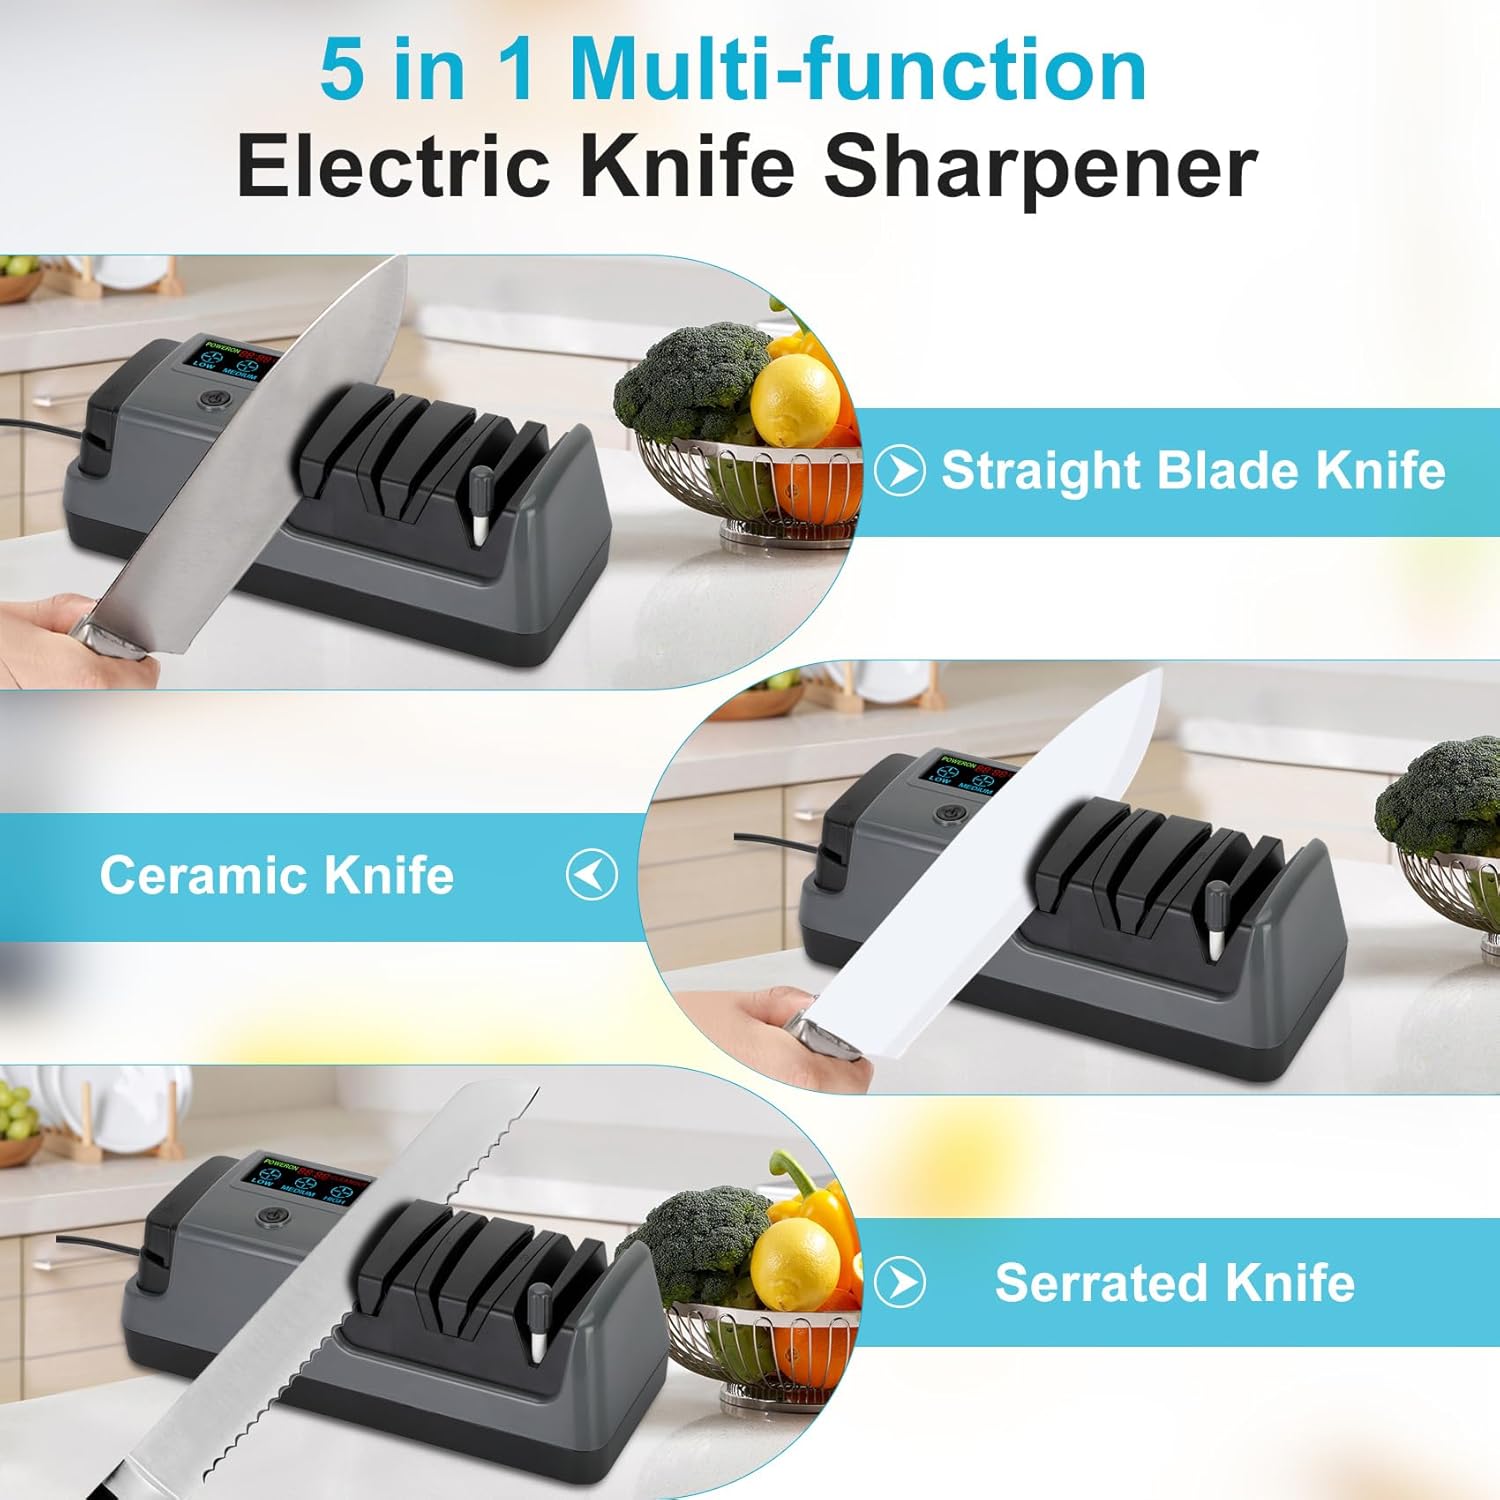
Image 8: View of the bottom of the sharpener, showing the magnetic blade chip adsorption plate being opened for cleaning.
Removable Ceramic Polishing Rod
The ceramic polishing rod can be removed for cleaning or replacement. Ensure it is securely reinserted before use.

Image 9: The removable ceramic polishing rod, shown both inserted into the sharpener and detached.
7. Troubleshooting
If you encounter issues with your Fuceter Electric Knife Sharpener, please refer to the following common problems and solutions:
| Problem | Possible Cause | Solution |
|---|---|---|
| Sharpener does not turn on. | Not plugged in; power outlet issue; power button not pressed. | Ensure the power cord is securely plugged in. Check the power outlet with another appliance. Press the power button firmly. |
| Knives are not sharpening effectively. | Incorrect slot used; insufficient passes; blade too dull; incorrect speed setting. | Ensure the correct slot is used for the blade type. Make 3-5 consistent passes per side. For very dull blades, use a higher speed setting and start with coarser slots (1 or 2). |
| Excessive noise during operation. | Blade not properly aligned; foreign object in slot; motor issue. | Ensure the blade is centered in the slot. Unplug and inspect slots for obstructions. If noise persists, contact customer support. |
| 'CLEANOUT' indicator on LCD. | Blade chip adsorption plate is full. | Unplug the sharpener and empty the magnetic blade chip adsorption plate as described in the Maintenance section. |
8. Specifications
| Feature | Detail |
|---|---|
| Brand | Fuceter |
| Model Number | 5 in 1 Electric Knife Sharpener |
| Material | Diamond, Ceramic |
| Color | Gray |
| Product Dimensions | 13.27"L x 5.47"W x 4.45"H |
| Item Weight | 2.57 Pounds |
| Grit Type | Medium (Diamond abrasives include 360#, 600#, 1000# for polishing) |
| Number of Items | 1 |
| Date First Available | August 12, 2024 |
9. Warranty and Customer Support
Fuceter is committed to providing high-quality products. This product comes with a standard manufacturer's warranty against defects in materials and workmanship under normal use. For specific warranty details, claims, or technical support, please refer to the contact information provided with your purchase or visit the official Fuceter website.
If you experience any issues or have questions regarding your Fuceter 5-in-1 Electric Knife Sharpener, please do not hesitate to contact our customer support team for assistance.