Important Safeguards
When using electrical appliances, basic safety precautions should always be followed to reduce the risk of fire, electric shock, and injury to persons. Read all instructions carefully before operating this air fryer.
- Do not touch hot surfaces. Use handles or knobs.
- To protect against electrical shock, do not immerse cord, plugs, or the main unit in water or other liquid.
- Close supervision is necessary when any appliance is used by or near children.
- Unplug from outlet when not in use and before cleaning. Allow to cool before putting on or taking off parts.
- Do not operate any appliance with a damaged cord or plug, or after the appliance malfunctions or has been damaged in any manner.
- Do not use outdoors.
- Do not let cord hang over edge of table or counter, or touch hot surfaces.
- Do not place on or near a hot gas or electric burner, or in a heated oven.
- Extreme caution must be used when moving an appliance containing hot oil or other hot liquids.
- Always attach plug to appliance first, then plug cord into the wall outlet. To disconnect, turn any control to 'off', then remove plug from wall outlet.
- Do not use appliance for other than intended use.
- Ensure the appliance is placed on a stable, heat-resistant surface, away from walls and other appliances to allow for proper air circulation.
Product Overview
The Generic 4.2-Quart Digital Air Fryer utilizes circular heat technology and a powerful 1500-watt heating system to cook food with little to no oil. Its user-friendly touchscreen controls allow for precise temperature and time adjustments.
Components
- Main Air Fryer Unit with Digital Touchscreen
- Removable Cooking Basket
- Removable Crisping Tray (PFOA-free non-stick)
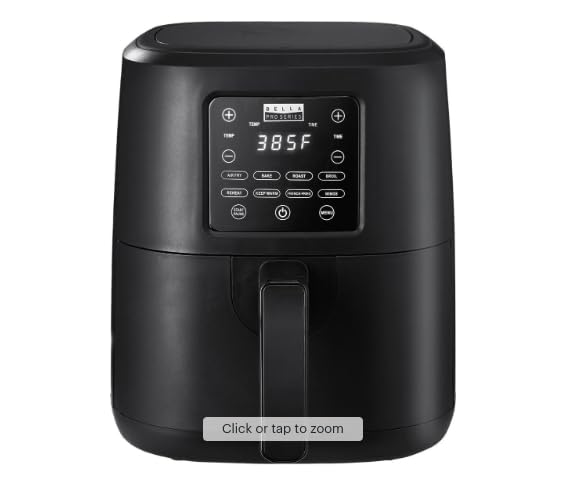
Figure 1: Generic 4.2-Quart Digital Air Fryer with the cooking basket pulled out, showing the interior cavity and the digital control panel.

Figure 2: The removable cooking basket and the separate crisping tray, designed for easy cleaning and optimal air circulation.
Before First Use & Setup
- Unpack: Carefully remove all packaging materials, stickers, and labels from the air fryer.
- Clean Components: Wash the cooking basket and crisping tray with hot water, dish soap, and a non-abrasive sponge. Rinse thoroughly and dry completely. The basket and tray are dishwasher-safe. Wipe the interior and exterior of the main unit with a damp cloth.
- Placement: Place the air fryer on a stable, level, heat-resistant surface. Ensure there is at least 6 inches (15 cm) of clear space around the back and sides of the appliance to allow for proper ventilation. Do not place it directly against a wall or under cabinets.
- Initial Run: For the first use, it is recommended to run the air fryer empty for about 10-15 minutes at 350°F (175°C) to eliminate any manufacturing odors. A slight smell or smoke may occur, which is normal and will dissipate. Ensure the area is well-ventilated.
Operating Instructions
Cooking Process
- Prepare Food: Prepare your ingredients as desired. For best results, lightly coat food with oil if specified in recipes.
- Place Food: Insert the crisping tray into the cooking basket. Place the food evenly on the crisping tray. Do not overfill the basket; ensure there is enough space for air circulation.
- Insert Basket: Slide the cooking basket back into the main air fryer unit until it clicks securely into place.
- Power On: Plug the air fryer into a grounded electrical outlet. The digital display will illuminate. Press the Power button to turn the unit on.
- Set Temperature and Time: Use the temperature control buttons (usually '+' and '-') to set the desired cooking temperature (up to 400°F). Use the time control buttons to set the cooking duration (up to 60 minutes).
- Start Cooking: Press the Start/Pause button to begin the cooking cycle. The fan and heating element will activate.
- Shake/Flip (Optional): For even cooking, especially with smaller items like fries or nuggets, pull out the basket halfway through the cooking time and gently shake or flip the food. Reinsert the basket to resume cooking.
- Completion: The air fryer will beep when the cooking time is complete and automatically shut off (60-minute auto shut-off timer). Carefully pull out the basket and transfer the cooked food to a serving plate.
- Power Off: Press the Power button to turn off the unit if it hasn't automatically. Unplug the appliance from the wall outlet after use.

Figure 3: A hand interacting with the digital touchscreen control panel to set cooking parameters.
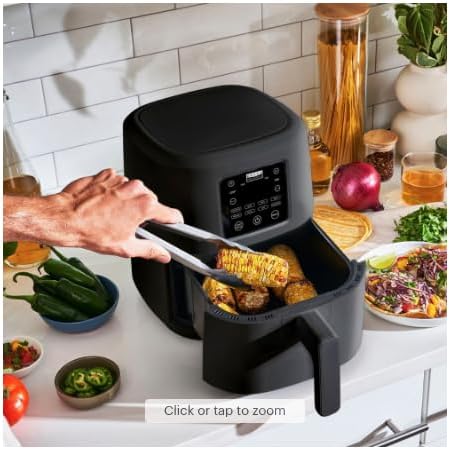
Figure 4: A hand using tongs to carefully place food, such as corn on the cob, into the air fryer's cooking basket.
Cooking Tips
- Preheating: For best results, preheat the air fryer for 3-5 minutes at the desired cooking temperature before adding food.
- Oil Usage: While air frying requires little to no oil, a light spray or toss with oil can enhance crispiness and flavor for many foods.
- Batch Cooking: For larger quantities of food, cook in smaller batches to ensure even cooking and crispiness. Overcrowding the basket can lead to uneven results.
- Frozen Foods: Most frozen foods can be cooked directly in the air fryer. Refer to package instructions for recommended temperatures and times, adjusting as needed.
- Homemade Fries: For homemade fries, soak potato sticks in cold water for 30 minutes, then pat dry thoroughly before lightly tossing with oil and air frying.
Cleaning and Maintenance
Regular cleaning ensures optimal performance and extends the life of your air fryer.
- Unplug and Cool: Always unplug the air fryer from the power outlet and allow it to cool completely before cleaning.
- Clean Basket and Tray: The cooking basket and crisping tray are dishwasher-safe. Alternatively, wash them in hot, soapy water with a non-abrasive sponge. For stubborn food residue, soak them in warm water for about 10 minutes before cleaning.
- Clean Interior: Wipe the interior of the air fryer with a damp cloth or non-abrasive sponge. If necessary, use a mild dish soap. Ensure no water enters the heating element.
- Clean Exterior: Wipe the exterior of the air fryer with a damp cloth. Do not use harsh abrasive cleaners or scouring pads, as they may damage the finish.
- Storage: Ensure all parts are clean and dry before storing the air fryer. Store it in a cool, dry place.
Troubleshooting
| Problem | Possible Cause | Solution |
|---|---|---|
| Air fryer does not turn on. | Not plugged in; power outlet malfunction; unit not assembled correctly. | Ensure the power cord is securely plugged into a working outlet. Check if the cooking basket is fully inserted. |
| Food is not cooked evenly. | Basket is overcrowded; food not shaken/flipped. | Cook in smaller batches. Shake or flip food halfway through cooking. |
| White smoke coming from the appliance. | Grease residue from previous use; excessive oil on food. | Clean the basket and crisping tray thoroughly. Use less oil on food. Ensure no food particles are stuck to the heating element. |
| Food is not crispy. | Basket is overcrowded; insufficient oil; temperature too low. | Cook in smaller batches. Lightly coat food with oil. Increase cooking temperature or time slightly. |
Specifications
| Feature | Detail |
|---|---|
| Model Name | Air Fryer |
| Capacity | 4.2 Quarts (3.6 lbs food capacity) |
| Output Wattage | 1500 Watts |
| Max Temperature | 400 Degrees Fahrenheit |
| Control Method | Touchscreen |
| Timer | 60-minute auto shut-off |
| Product Dimensions (D x W x H) | 12"D x 10"W x 10"H |
| Material | Non-stick, Plastic (Outer), Aluminum (Inner) |
| Dishwasher Safe Parts | Cooking pan and crisping tray |
| Recommended Uses | Air Fry, Bake, Broil, Reheat, Roast |
Warranty and Support
For warranty information or technical support, please refer to the documentation included with your purchase or contact the manufacturer directly. Keep your proof of purchase for any warranty claims.