92 inch 16:9
User Manual: 92 inch Fresnel ALR Fixed Frame Projector Screen
Model: 92 inch 16:9 | Brand: Generic
Product Overview
The 92-inch Fresnel ALR Fixed Frame Projector Screen is engineered to deliver superior visual excellence for home theater and professional presentation environments. Utilizing advanced Fresnel optical technology, this screen efficiently focuses light from standard projectors while minimizing ambient light interference, ensuring bright, clear, and high-contrast images.

Figure 1: The 92-inch Fresnel ALR Fixed Frame Projector Screen seamlessly integrated into a home theater environment, showcasing its sleek design and large display area.
Key Features
- High Gain Ambient Light Suppression: Features advanced Fresnel lens technology with a gain of up to 1.8, providing clear and vivid images even in well-lit environments.

Figure 2: Illustration of Fresnel technology effectively rejecting ambient light and directing projector light towards the viewer for enhanced clarity.
- PET Base with Eight-Layer Construction: Crafted from high-performance PET material with an eight-layer design for superior optical performance, enhanced brightness, contrast, and excellent ambient light rejection.
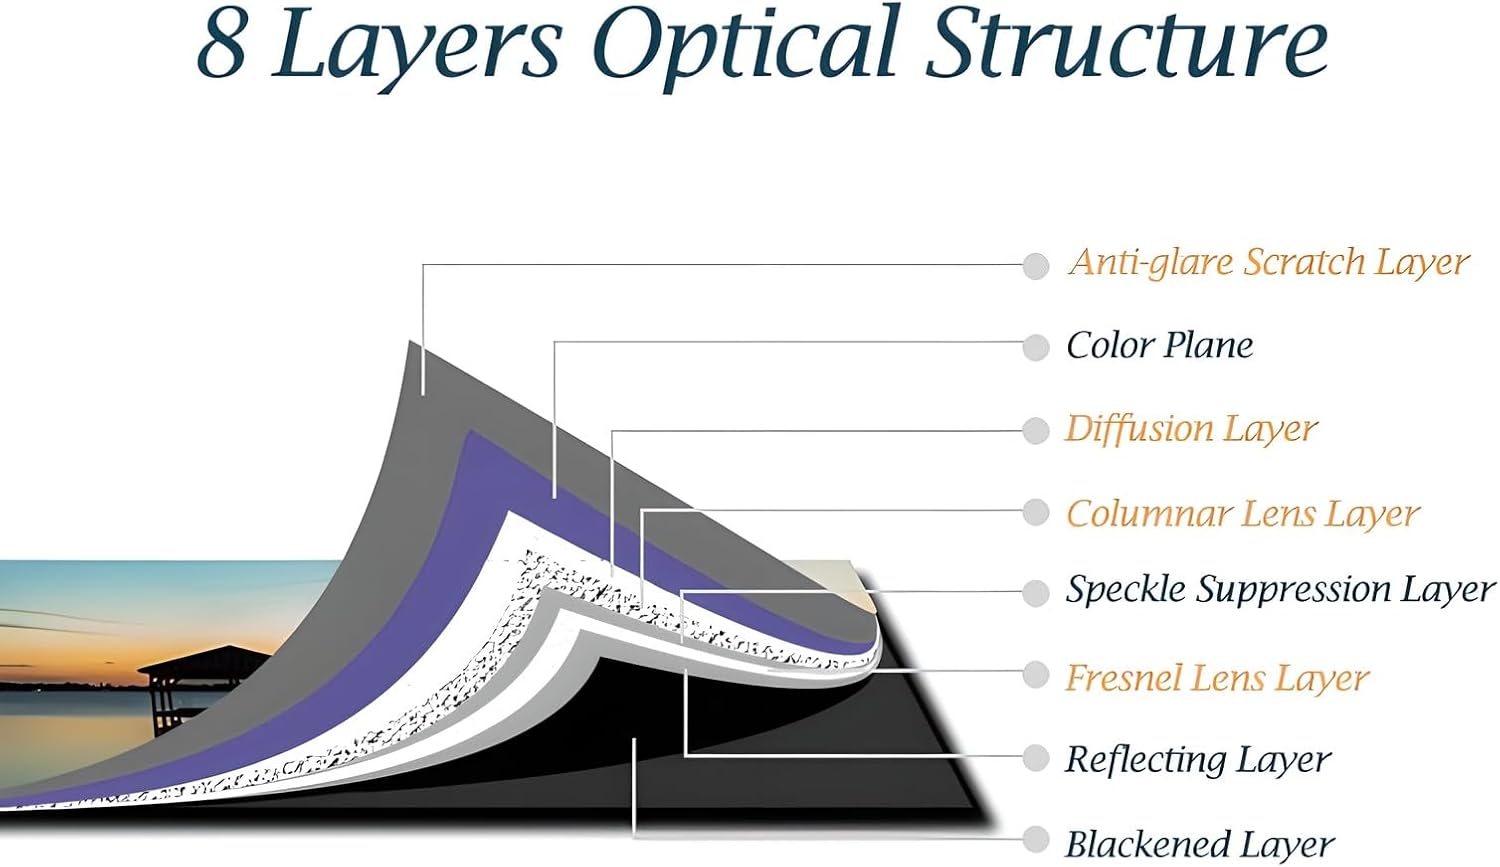
Figure 3: Detailed breakdown of the screen's eight-layer optical structure, highlighting the specialized layers for optimal image quality.
- LCD TV-Like Picture Quality: Delivers vibrant colors and high contrast, offering an outstanding viewing experience comparable to LCD TVs.

Figure 4: Example of the screen's ability to produce vivid and rich colors, showcasing its high-quality display capabilities.
- Dual Frame in Aluminum Alloy: A robust dual-frame system with aluminum alloy and springs ensures a taut, flat screen surface. It is stable, lightweight, and durable, featuring an ultra-thin black velvet border that enhances contrast and absorbs stray light.
- Compatibility: Specifically designed for Standard Projectors. This screen is NOT compatible with ultra-short throw projectors to ensure optimal projection without distortion.
Visual Comparison
Video 1: A side-by-side comparison demonstrating the superior image quality and ambient light rejection of the Fresnel ALR screen compared to a normal projector screen in a lit room.
Video 2: A demonstration showcasing the projection effect and clarity of the screen with various vibrant content, highlighting its visual performance.
Setup and Installation Guide
Follow these steps carefully to assemble and mount your projector screen. It is recommended to have at least two people for installation.
Installation Video Tutorial
Video 3: Comprehensive installation instructions for the fixed frame projector screen, covering frame assembly, screen attachment, and wall mounting.
Step-by-Step Assembly
- Install the Main Frame:
- Spread the matting cloth on a clean, flat surface. Place the frame components and accessories on it.
- Connect the long sides of the frame using the provided screws and connectors. Ensure they are securely fastened.
- Connect the four corners of the frame, screwing them into place to form a complete rectangular frame.
- Once assembled, carefully move the main frame aside to prepare for screen installation.
- Install the Screen Curtain:
- Unroll the screen curtain. Place it on the matting cloth with the front side down and the back side (labeled) facing up.
- Insert the fiberglass tubes into the four sides of the curtain. These tubes are essential for spring tensioning.
- Place the assembled main frame onto the screen curtain.
- Embed the support rod in the middle of the main frame.
- Use the springs to mount the curtain onto the main frame. Important: Install the springs on the four corners first. Then, proceed to install the springs on each side. You may need to pull the curtain out hard as it is designed to be tight for ideal flatness. The curtain material is strong and elastic.
- After all springs are hung, check and adjust the tension to ensure the screen is perfectly flat. Make sure each side of the curtain is pulled out to the back by approximately 2 cm.
- Turn over the curtain to check and adjust the flatness. Gently smooth out any uneven areas with your hands.
- Install the Border Frame:
- Place the border frame components and accessories near the main frame.
- Insert the nuts into the separate long sides of the border frame. Connect two parts with the connector to complete the long side.
- Put the long sides of the border frame over the main frame.
- Insert the connection accessory into the short side of the border frame, then insert it into the long side. Screw in all connections.
- Align the frame, press it tightly, and then screw in the remaining screws.
- Finally, install the hook. The hook is used to prevent the long side from sagging due to gravity. Push the middle of the border frame closer to the main frame, then install the hook. Note: After installation, the hook may be a little loose, which is normal.
- Wall Mounting:
- Mark and drill holes on the wall. The height of the drill holes should be calculated as: "the screen height" - 9cm + "the height of the screen from the ground".
- Insert wall plugs into the drilled holes and mount the hanging brackets securely.
- The distance between the two brackets should be 2/3 of the width of the screen and be kept horizontal.
- With two people, carefully lift and hang the assembled screen onto the wall brackets.
Operating Instructions
This projector screen is designed for optimal performance with standard throw projectors. Ensure your projector is positioned correctly to fill the screen area without distortion.
- Projector Placement: Position your standard throw projector at the recommended distance from the screen to achieve the desired image size and focus. Avoid placing the projector too close or too far, as this can affect image clarity and screen coverage.
- Ambient Light Control: While the ALR screen is designed to reject ambient light, minimizing direct light sources (e.g., direct sunlight, bright room lights) will further enhance contrast and color vibrancy for the best viewing experience.
- Viewing Angle: The Fresnel ALR screen offers excellent viewing angles, but optimal performance is achieved when viewers are positioned within the recommended viewing cone.
Maintenance
To maintain the pristine condition and optimal performance of your projector screen, follow these simple cleaning and care guidelines:
- Cleaning the Screen Surface:
- Use a soft, lint-free microfiber cloth.
- For light dust, gently wipe the screen surface.
- For stubborn marks, slightly dampen the cloth with clean water. Do not use harsh chemicals, abrasive cleaners, or solvents, as these can damage the screen material.
- Wipe gently in one direction, avoiding circular motions that might leave streaks.
- Frame Care: Wipe the aluminum frame with a soft, dry cloth to remove dust.
- Storage (if applicable): If the screen needs to be disassembled and stored, ensure it is rolled carefully and stored in its original packaging or a protective cover in a cool, dry place away from direct sunlight and extreme temperatures.
Troubleshooting
| Problem | Possible Cause | Solution |
|---|---|---|
| Wrinkles or uneven surface on screen | Insufficient tension during assembly; improper fiberglass tube insertion. | Ensure all springs are correctly hooked and the fiberglass tubes are fully inserted. Re-tension springs if necessary, pulling firmly. |
| Poor image quality (blurry, dim) | Incorrect projector type (e.g., ultra-short throw); improper projector placement; excessive ambient light. | Verify your projector is a standard throw model. Adjust projector distance and focus. Reduce ambient light in the viewing area. |
| Screen sagging (long side) | Hook not installed or improperly installed. | Ensure the anti-sagging hook is correctly installed in the middle of the long side of the border frame. |
Product Specifications
- Model Number: 92 inch 16:9
- Brand: Generic
- Material: Polyethylene Terephthalate (PET), Aluminum
- Mounting Type: Wall Mount
- Product Dimensions: 80.94"W x 45.87"H
- Display Dimensions: 80.16"W x 45.08"H
- Item Weight: 32 pounds
- Manufacturer: WomTeam
- ASIN: B0DCSCY8MZ
- Date First Available: July 2, 2024
Warranty and Support
For warranty information, technical support, or any inquiries regarding your 92 inch Fresnel ALR Fixed Frame Projector Screen, please contact the manufacturer or your retailer directly. Refer to your purchase documentation for specific contact details.
Note: Please follow the included installation instructions carefully to ensure proper setup. If you encounter any difficulties during installation, contact us for professional assistance.
Ask a question about this manual
Ask about setup, troubleshooting, compatibility, parts, safety, or missing instructions. Manuals+ will review the question and use this page’s manual context to help answer it.