WINDHORSE W2B
WINDHORSE 14-inch Electric Bike W2B User Manual
Model: W2B
1. Introduction
This manual provides essential information for the safe operation, assembly, and maintenance of your WINDHORSE 14-inch Electric Bike W2B. Please read this manual thoroughly before using the product and retain it for future reference.

Image 1: The WINDHORSE 14-inch Electric Bike W2B. This compact electric bike features a sturdy frame, 14-inch wheels, and an integrated battery, designed for urban commuting and leisure.
2. Safety Guidelines
Always prioritize safety when operating your electric bike. Failure to follow these guidelines may result in injury or damage to the product.
- Wear a helmet and appropriate safety gear at all times.
- Ensure all components are securely fastened before each ride.
- Familiarize yourself with local traffic laws and regulations for electric bikes.
- Do not operate the bike under the influence of alcohol or drugs.
- Avoid riding in adverse weather conditions or on slippery surfaces.
- Regularly inspect brakes, tires, and battery for proper function.
3. Package Contents
Verify that all items are present upon unboxing:
- WINDHORSE Electric Bike W2B (main unit)
- Battery Charger (Adapter, AC Line)
- Pedals (2)
- Tool Kit
- Reflector
- User Manual (this document)
- Rear Basket
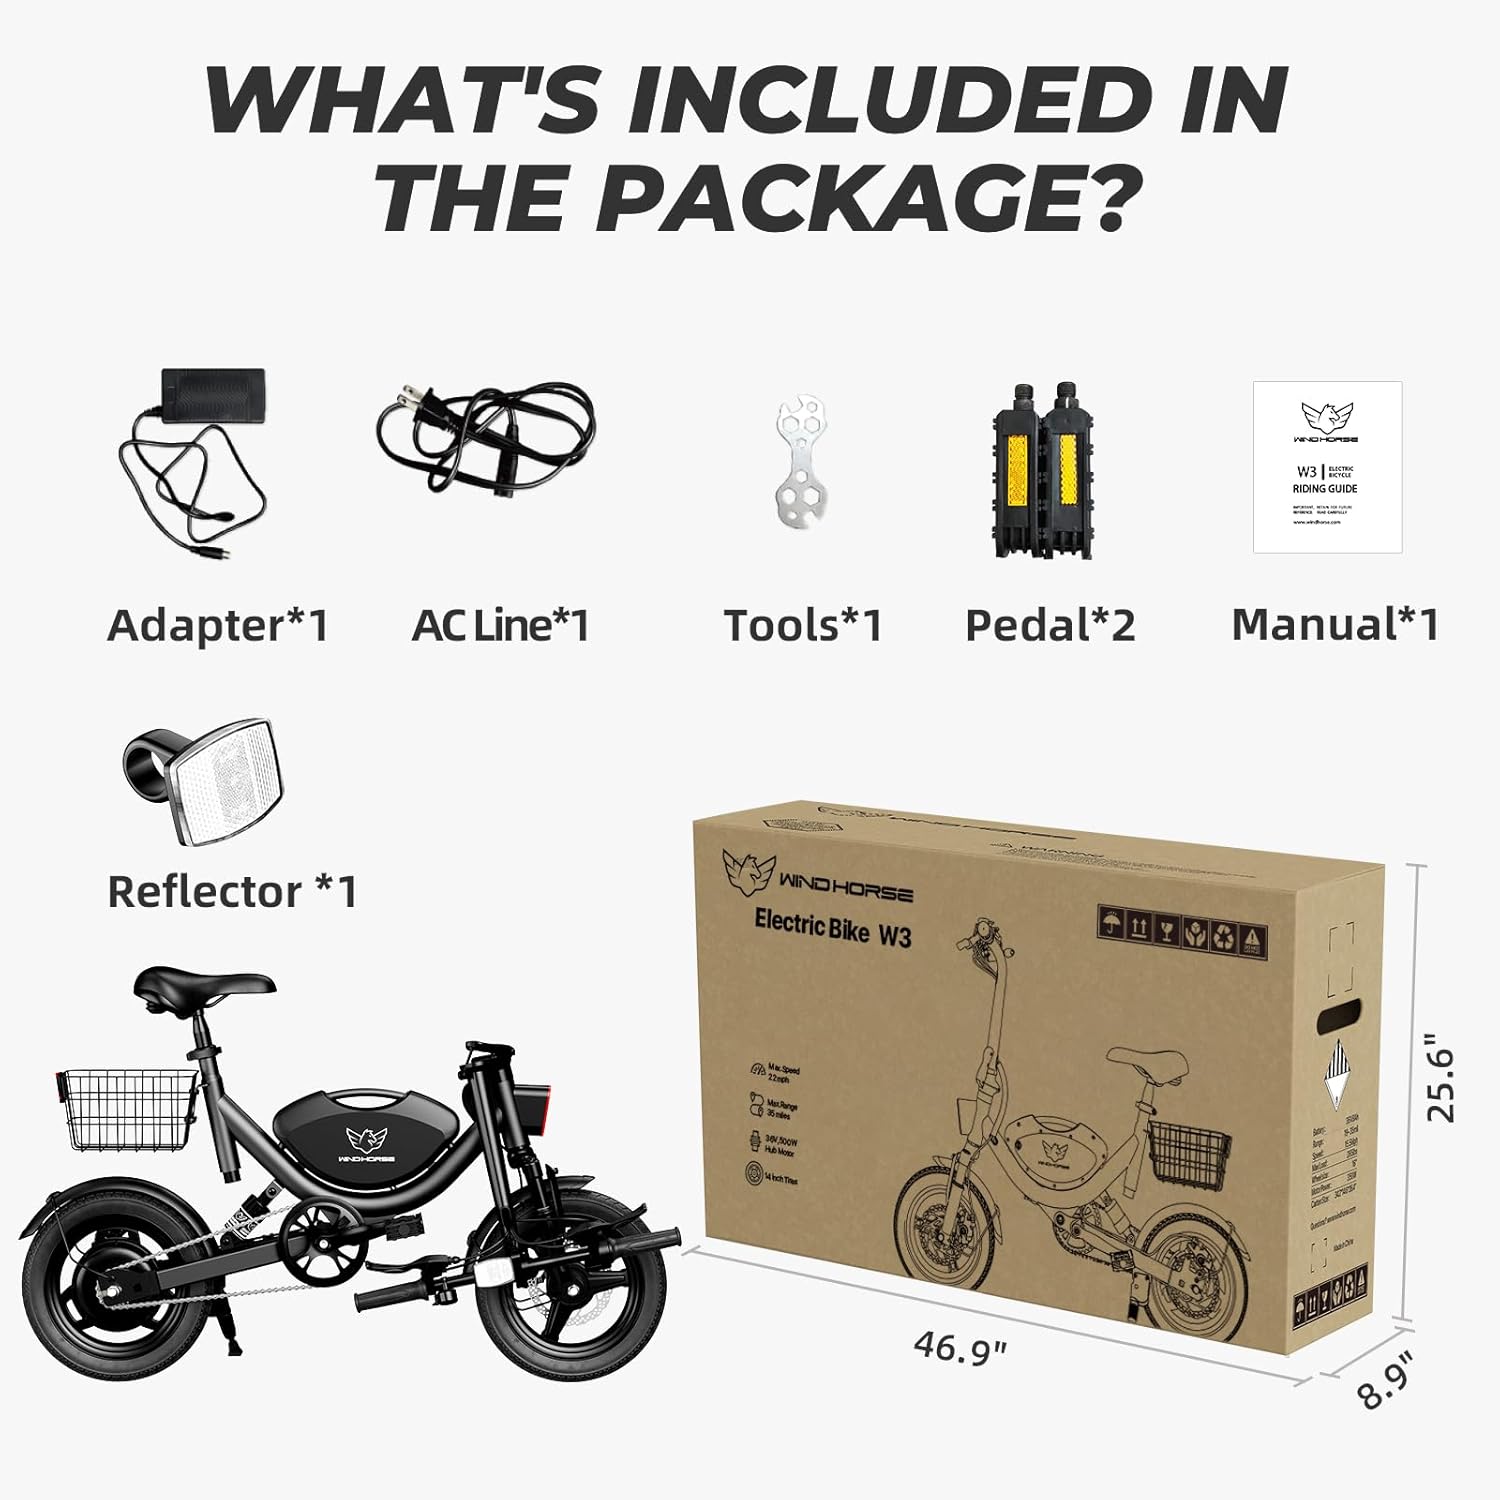
Image 2: Contents of the WINDHORSE Electric Bike W2B package. This image displays the main bike unit, charger, tools, pedals, reflector, and user manual, ensuring all components are accounted for.
4. Setup and Assembly
Your WINDHORSE Electric Bike W2B comes mostly pre-assembled. Follow these steps to complete the setup:
4.1 Unboxing and Unpacking
- Carefully open the packaging box.
- Remove the bicycle from its packaging.
- Remove all protective cotton and ties from the bike components.
Video 1: F01 Assembly video. This video demonstrates the initial unboxing and removal of protective packaging from a similar electric bike model, providing a visual guide for starting the assembly process.
4.2 Attaching the Kickstand
- Loosen the foot pedal screw on the kickstand.
- Attach the kickstand to the ebike frame using the two provided bolts.
- Tighten the bolts securely with an Allen wrench.
4.3 Installing the Front Wheel
- Remove the fixing rod from the front fork.
- Take out the axle from the accessory box, remove one side nut and washer.
- Insert the axle into the center of the front wheel.
- Install the shaft sleeve, shaft washer, and nut onto the axle.
- Install the front wheel onto the fork. Ensure the fork is attached to the axle and the disc is placed in the middle of the brake caliper.
- Tighten the nuts at both ends in a clockwise direction with a wrench.
4.4 Adjusting the Stem
- Loosen the bolts on the stem and rotate the stem to align with the front wheel.
- Tighten the 3 bolts already on the stem to secure the stem in place.
4.5 Installing the Handlebar
- Loosen the four screws from the ebike stem.
- Place the handlebar into the stem and adjust the angle of the stem to ensure the handlebar is level.
- Tighten the four screws to secure the handlebar.
4.6 Installing the Saddle
- Open the quick release clamp under the seat post.
- Insert the seat post into the frame.
- Adjust the seat height to your preference.
- Lock the quick release clamp and make sure the seat is fastened in place.
4.7 Installing the Pedals
- Identify the left (L) and right (R) pedals.
- The left pedal is tightened counterclockwise.
- The right pedal is tightened clockwise.
- Ensure pedals are securely tightened.
4.8 Attaching Waterproof Cover and Nutcap
- Attach the nut cap to the rear wheel nut.
- Attach the waterproof cover to the headtube.
4.9 Connecting Throttle Wiring
- Connect the throttle wiring properly.
- Remove the throttle screw, install the throttle, and tighten the screw.
5. Operating Your Electric Bike
Your WINDHORSE Electric Bike W2B offers both pedal-assist and pure electric modes.
5.1 Powering On/Off
- Insert the key into the battery lock.
- Turn the key to the "ON" position to activate the battery.
- Press and hold the power button on the handlebar display to turn the bike on.
- Repeat the process to turn off the bike.
Video 2: Battery and display activation. This short video illustrates how to insert the key and turn on the electric bike's battery, showing the display illuminating to indicate power is active.
5.2 Riding Modes
- Pedal-Assist Mode: The motor provides assistance as you pedal. Adjust the assist level via the handlebar controls.
- Pure Electric Mode (Throttle): Use the throttle to engage the motor without pedaling.
- Manual Mode: Ride the bike like a traditional bicycle without motor assistance.
5.3 Folding and Unfolding
The bike features a foldable design for easy storage and transport.
- To fold: Lower the seat and handlebars. Release the frame hinge lock and fold the bike in half. Secure with the safety pin.
- To unfold: Release the safety pin, unfold the frame, and secure the hinge lock. Adjust seat and handlebars to desired riding position.
6. Maintenance
Regular maintenance ensures the longevity and safe operation of your electric bike.
- Battery Care: Charge the battery regularly, even when not in use, to maintain its lifespan. Avoid fully discharging the battery.
- Tire Pressure: Check tire pressure before each ride. Maintain recommended PSI for optimal performance and safety.
- Brakes: Inspect brake pads and cables regularly. Adjust or replace as needed to ensure effective stopping power.
- Chain: Keep the chain clean and lubricated to prevent rust and ensure smooth operation.
- General Cleaning: Clean the bike with a damp cloth. Avoid high-pressure washing directly on electrical components.
7. Troubleshooting
| Problem | Possible Cause | Solution |
|---|---|---|
| Bike does not power on | Battery is off or discharged; loose connections. | Ensure battery key is in "ON" position. Charge battery. Check all electrical connections. |
| Motor not assisting | Pedal-assist level too low; throttle not engaged; motor connection issue. | Increase pedal-assist level. Engage throttle. Check motor wiring. |
| Brakes feel weak | Worn brake pads; loose brake cables. | Inspect and replace brake pads if worn. Adjust brake cable tension. |
8. Specifications
| Feature | Detail |
|---|---|
| Brand | WINDHORSE |
| Model Name | W2B |
| Bike Type | Electric Bike |
| Motor | 715W Peak Brushless Motor (500W Rated) |
| Max Speed | 22 MPH |
| Battery | 36V 8.0Ah (288 Wh) Lithium Battery |
| PAS Range | Up to 30 Miles |
| Pure Electric Range | Up to 20 Miles |
| Wheel Size | 14 Inches |
| Frame Material | Carbon Steel |
| Suspension Type | Dual |
| Brake Style | Dual Disc Brake |
| Maximum Load Capacity | 330 lbs |
| Item Dimensions (LxWxH) | 57 x 14.2 x 40.5 inches |
| Bicycle Weight | 50.7 lbs |

Image 3: Detailed dimensions and specifications of the WINDHORSE Electric Bike W2B. This diagram provides key measurements and load capacities for the bike.
9. Warranty and Support
The WINDHORSE Electric Bike W2B comes with a limited warranty. For specific warranty details and support, please refer to the official product documentation or contact WINDHORSE customer service.
- Warranty Type: Limited
- EU Spare Part Availability Duration: 1 Years
- For assistance, please visit the WINDHORSE Store on Amazon or contact their customer service directly.