1. Important Safety Information
Please read all instructions carefully before assembly and use. Keep this manual for future reference.
- Weight Limit: Do not exceed a total weight of 500 pounds on the bed frame.
- Sharp Edges: Exercise caution around all edges, especially near the LED lights and metal components, to prevent injury.
- Level Surface: Assemble and use the bed frame on a flat, level surface to ensure stability.
- Children: Keep small parts away from children during assembly. This product is not a toy.
- Power: Ensure the charging station and LED lights are properly connected to a suitable power source. Do not overload the outlets.
2. Package Contents
Before beginning assembly, verify that all components are present and undamaged. Refer to the included assembly guide for a detailed parts list.
- Headboard with integrated charging station and LED lights
- Footboard
- Side rails
- Metal support slats
- Assembly hardware (screws, bolts, washers, Allen wrench)
- Installation Manual
3. Setup and Assembly
The JURMERRY Queen Bed Frame is designed for straightforward assembly. All parts are numbered for easy identification. An installation video is available; please refer to the included assembly guide for details on accessing it.
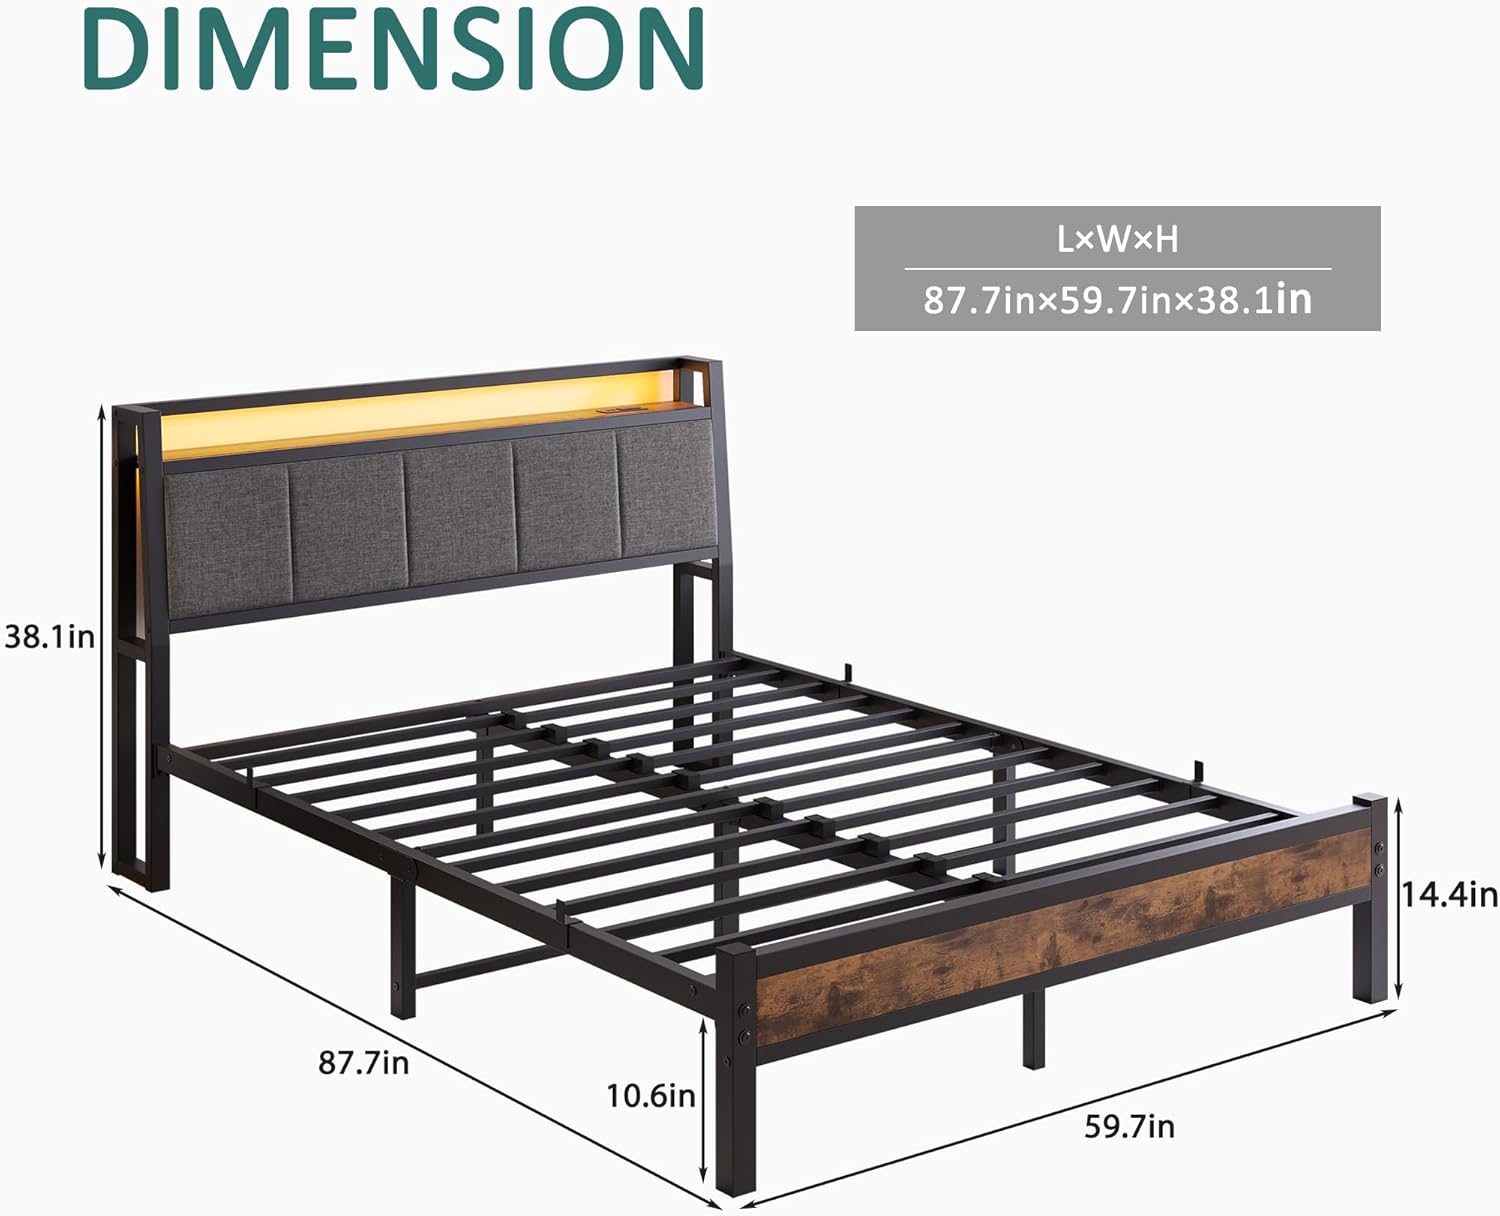
Figure 3.1: Bed Frame Dimensions. The overall dimensions are approximately 87.7 inches (L) x 59.7 inches (W) x 38.1 inches (H). The bed frame stands 10.6 inches off the ground, and the footboard height is 14.4 inches.

Figure 3.2: Assembled Bed Frame Overview. This image displays the robust metal slat support system and the headboard with its integrated storage shelf and charging station.
Assembly Steps:
- Unpack Components: Carefully remove all parts from the packaging and lay them out on a clean, soft surface to prevent scratches.
- Assemble Headboard: Attach the headboard components as per the instructions in the manual. Ensure the upholstered sections and the charging station are correctly oriented.
- Connect Side Rails: Securely attach the side rails to the headboard and footboard using the provided hardware.
- Install Support Slats: Place and secure the metal support slats across the bed frame. Ensure they are evenly spaced and firmly attached to provide adequate mattress support.
- Final Tightening: Once all components are in place, carefully tighten all screws and bolts. Do not overtighten.

Figure 3.3: Headboard Upholstery and Assembly Detail. The headboard features a skin-friendly, soft-touch resilience sponge. Slats are designed for easy installation by simply inserting them into pre-existing slots.
4. Operating Instructions
4.1 Charging Station
The headboard features an integrated charging station for convenient access to power.

Figure 4.1: Charging Station Detail. The charging station includes 2 USB ports (5V/2A) and 2 standard AC outlets (125V/12A) for charging various electronic devices.
- Power Connection: Ensure the bed frame's power cord is securely plugged into a functional wall outlet.
- USB Ports: Use the 5V/2A USB ports to charge mobile phones, tablets, and other USB-powered devices.
- AC Outlets: Use the 125V/12A AC outlets for devices requiring standard wall power.
- Overload Protection: Avoid plugging in high-power appliances that exceed the charging station's capacity to prevent damage or electrical hazards.
4.2 LED Lights
The headboard is equipped with LED lights to provide ambient illumination.
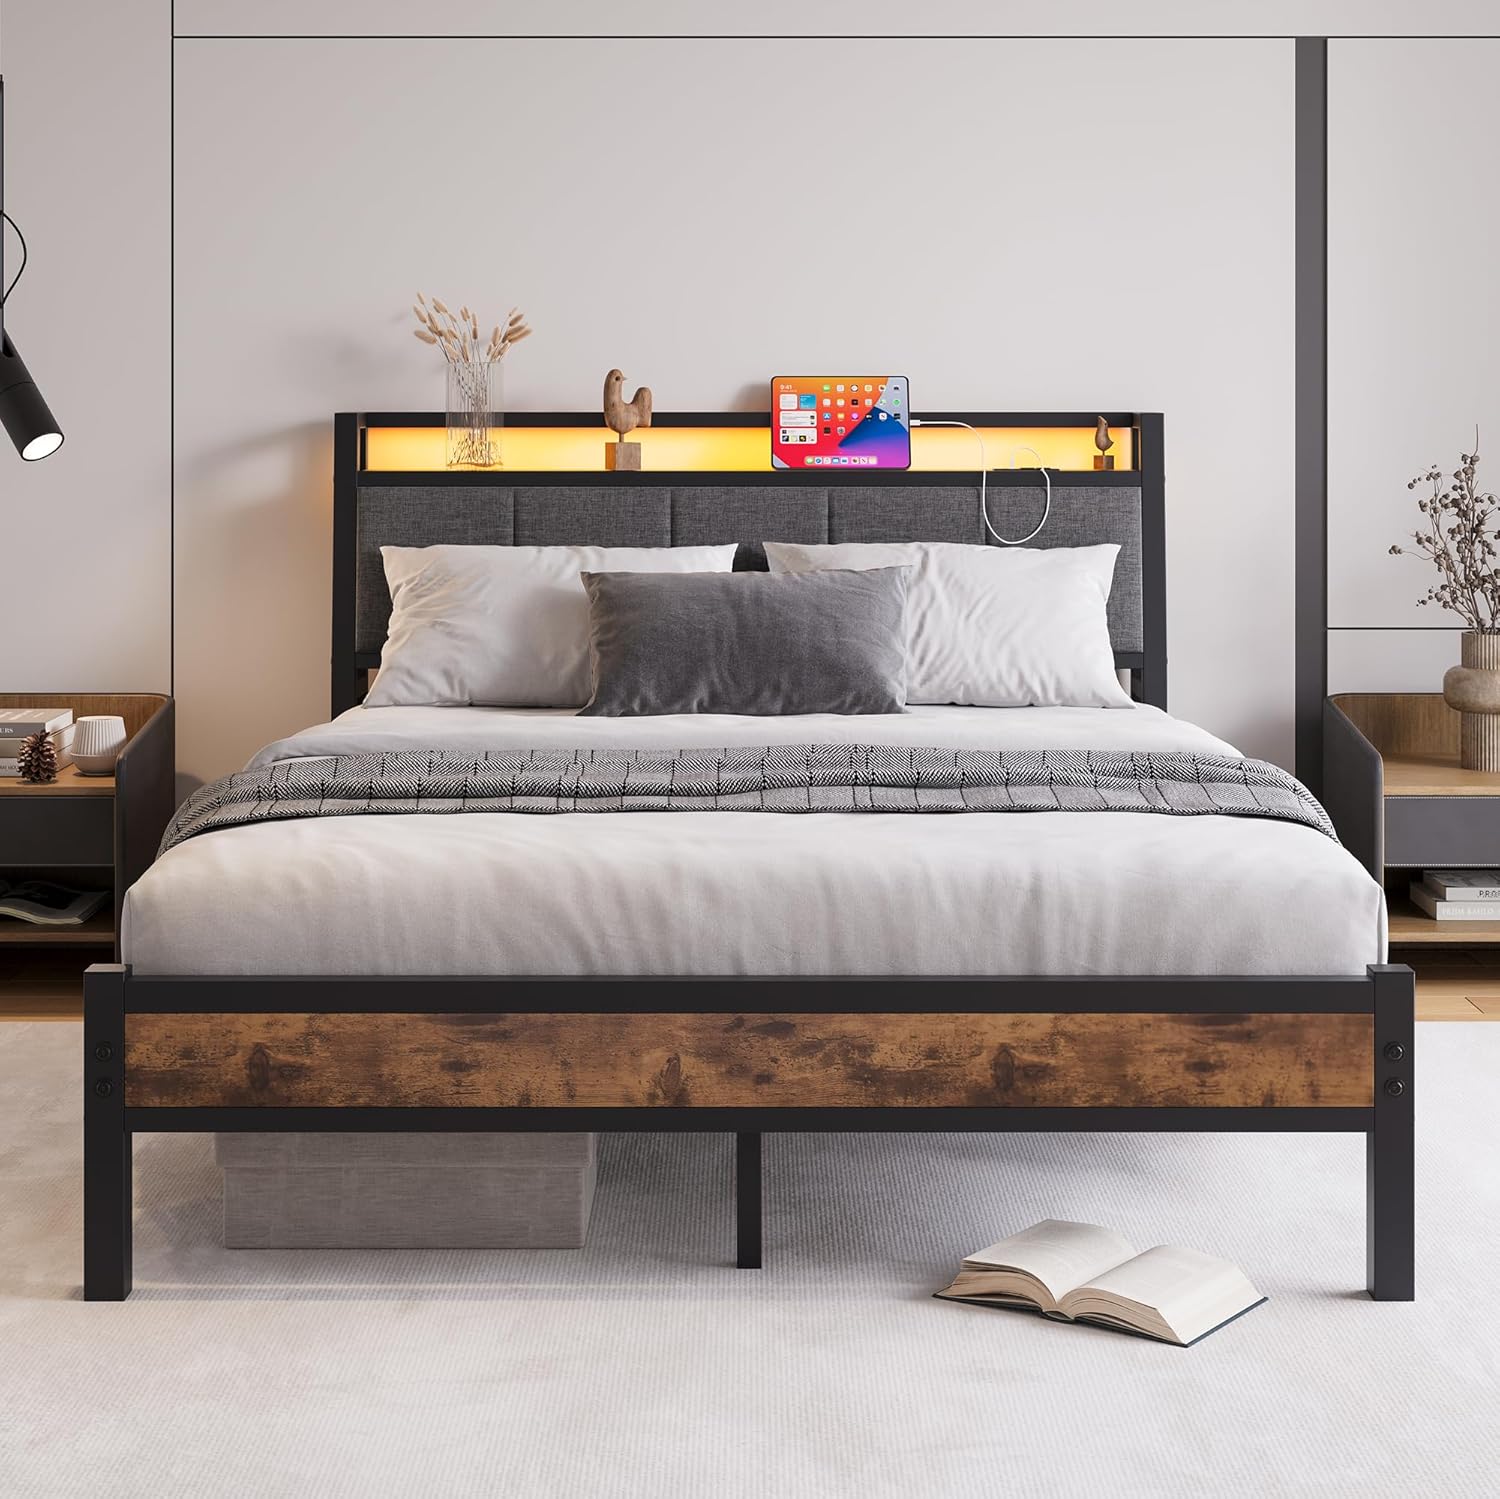
Figure 4.2: Complete Bed Frame with LED Lights. The LED lights integrated into the headboard provide soft, ambient lighting.
- Activation: The LED lights are typically controlled by a switch located on the headboard or via a remote control (if included). Refer to the assembly guide for specific control methods.
- Brightness/Color: Depending on the model, you may be able to adjust brightness or color settings.
5. Maintenance
Regular maintenance will help prolong the life and appearance of your bed frame.
- Cleaning Metal Parts: Wipe metal surfaces with a soft, damp cloth. Avoid abrasive cleaners or harsh chemicals that could damage the finish.
- Cleaning Upholstered Headboard: For general cleaning, vacuum the upholstered fabric with a brush attachment. For spills, blot immediately with a clean, dry cloth. For stubborn stains, use a mild fabric cleaner according to its instructions, testing on an inconspicuous area first.
- Checking Connections: Periodically check all bolts and screws to ensure they remain tight. Retighten if necessary to maintain stability and prevent noise.
- Charging Station: Keep the charging ports free of dust and debris.
6. Troubleshooting
If you encounter issues with your bed frame, refer to the following common solutions:
| Problem | Possible Cause | Solution |
|---|---|---|
| Bed frame is wobbly or noisy | Loose bolts or screws | Check and tighten all assembly hardware. Ensure all slats are properly seated. |
| Charging station not working | No power, loose connection, or overloaded circuit | Ensure the bed frame's power cord is securely plugged into a working wall outlet. Check for tripped circuit breakers. Reduce the number of devices plugged in. |
| LED lights not turning on | No power, switch off, or faulty connection | Verify the bed frame is powered. Check the LED light switch. If issues persist, contact customer support. |
| Parts missing or damaged | Shipping error or manufacturing defect | Do not proceed with assembly. Contact JURMERRY customer support immediately for replacement parts. |
7. Specifications
| Feature | Detail |
|---|---|
| Brand | JURMERRY |
| Model Number | 1037 |
| Size | Queen |
| Product Dimensions (L x W x H) | 87.7" x 59.7" x 38" |
| Item Weight | 57 pounds |
| Material | Metal (Frame), Wood (Headboard), Upholstered Fabric |
| Color | Black |
| Finish Type | Painted |
| Special Features | Charging Station (2 USB, 2 AC Outlets), LED Lights, Storage Shelves |
| Compatible Mattress Size | Queen |
| Assembly Required | Yes |
| Ground To Item Distance | 10.6 Inches |
| Storage Options | Headboard shelves |
| USB Output | 5V/2A (2 ports) |
| AC Outlet Output | 125V/12A (2 outlets) |
8. Warranty and Support
For warranty information, please refer to the documentation included with your purchase or contact JURMERRY customer support directly. Keep your purchase receipt as proof of purchase.
Customer Support:
If you have any questions, require assistance with assembly, or need to report missing/damaged parts, please contact JURMERRY customer service through the retailer where the product was purchased or via the official JURMERRY website.