Introduction
Thank you for choosing the HOROX 80mm Aperture 500mm Refractor Telescope. This manual provides detailed instructions for the assembly, operation, maintenance, and troubleshooting of your new telescope. Please read this manual carefully before use to ensure proper setup and optimal viewing experience. Keep this manual for future reference.
Package Contents
Verify that all items listed below are present in your package:
- Telescope Optical Tube (80mm Aperture, 500mm Focal Length)
- Adjustable Tripod
- K20mm Eyepiece (25x Magnification)
- K9mm Eyepiece (55x Magnification)
- Diagonal Prism
- Finderscope
- Phone Adapter
- Accessory Tray
- Backpack for storage and transport
- Instruction Manual

Figure 1: All components included in the HOROX Telescope package.
Setup Instructions
Follow these steps to assemble your telescope:
1. Assemble the Tripod
- Unfold the tripod legs and extend them to your desired height. Ensure the tripod is stable on a flat surface.
- Attach the accessory tray to the center brace of the tripod.

Figure 2: The stable, adjustable tripod.
2. Attach the Telescope Optical Tube
- Locate the mounting screw on the tripod head.
- Align the telescope optical tube with the tripod head and secure it using the mounting screw. Ensure it is firmly attached but do not overtighten.
3. Install the Finderscope
- Slide the finderscope into its bracket on the main telescope tube.
- Tighten the small screws on the bracket to hold the finderscope in place.

Figure 3: Finderscope attachment.
4. Insert the Diagonal Prism
- Remove the dust cap from the focuser tube.
- Insert the diagonal prism into the focuser tube and secure it with the small thumbscrew. The diagonal prism provides a more comfortable viewing angle.
5. Insert an Eyepiece
- Select either the K20mm or K9mm eyepiece. The K20mm eyepiece provides lower magnification and a wider field of view, ideal for locating objects. The K9mm eyepiece offers higher magnification for detailed observation.
- Insert the chosen eyepiece into the diagonal prism and secure it with the thumbscrew.

Figure 4: K20mm and K9mm eyepieces.
6. Attach Phone Adapter (Optional)
- Attach your smartphone to the phone adapter.
- Mount the phone adapter with your phone onto the eyepiece. Adjust the phone's camera to align with the eyepiece for photography.

Figure 5: Phone adapter for capturing images.
Operating Your Telescope
Focusing
Once an object is centered in your eyepiece, slowly turn the focus knob until the image is sharp and clear. For best results, start with the K20mm eyepiece for a wider field of view, then switch to the K9mm eyepiece for higher magnification and finer detail.
Using the Finderscope
The finderscope has a wider field of view than the main telescope, making it easier to locate objects. Look through the finderscope and center the desired object in its crosshairs. Once centered, the object should be visible in the main telescope's eyepiece.
Changing Magnification
To change magnification, simply remove the current eyepiece and insert a different one. Remember that higher magnification reduces the field of view and requires more precise focusing.
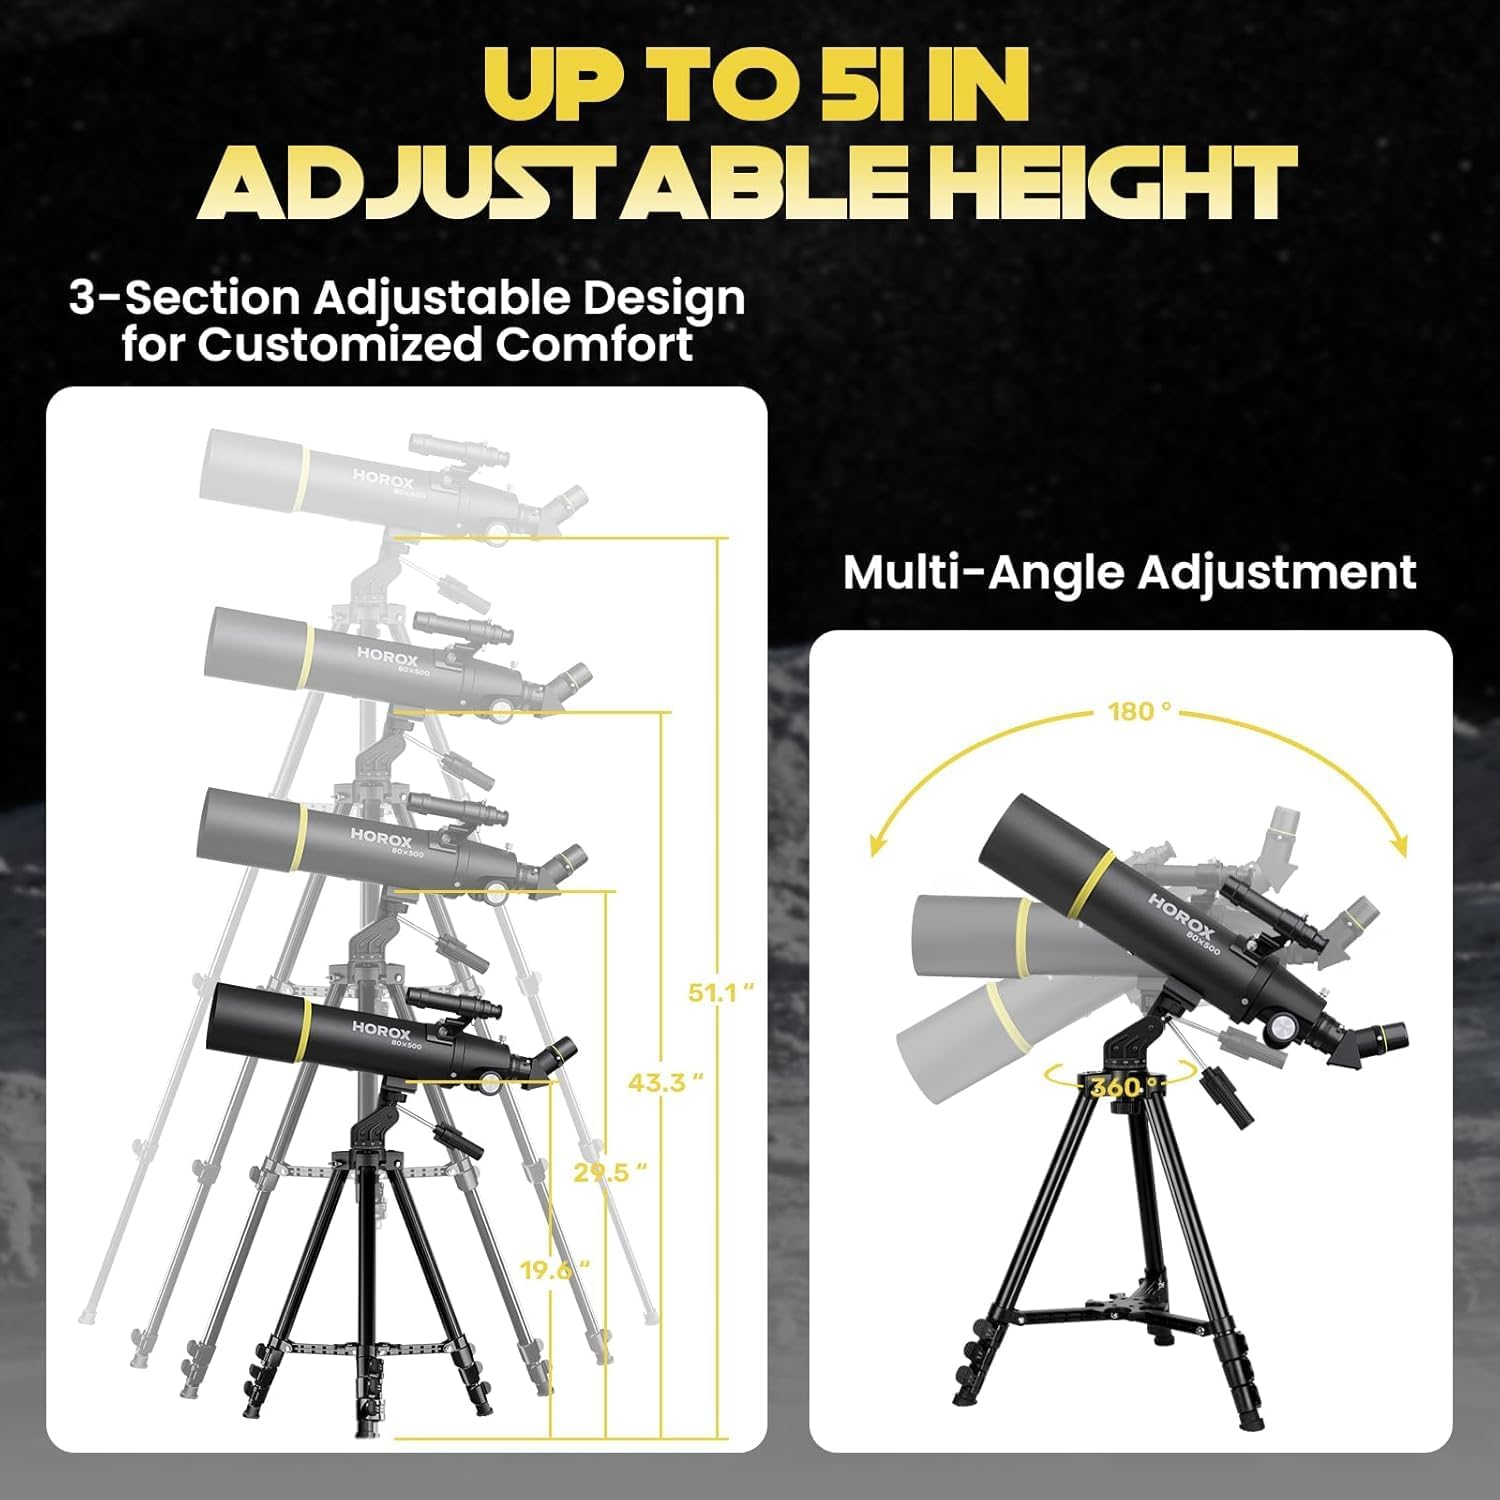
Figure 6: Magnification comparison with K20mm and K9mm eyepieces.
Observing Celestial Objects
For astronomical observations, choose a dark location away from city lights. Allow your eyes to adjust to the darkness for at least 20 minutes. Start with the lowest magnification eyepiece (K20mm) to locate objects, then switch to higher magnification (K9mm) for detailed views of the Moon, planets, and brighter deep-sky objects.

Figure 7: Stargazing with the HOROX telescope.
Observing Terrestrial Objects
Your telescope can also be used for terrestrial viewing (observing objects on Earth). Note that the diagonal prism will correct the image vertically but may still show a horizontally inverted image. This is normal for astronomical telescopes and does not affect viewing quality.

Figure 8: Terrestrial viewing with image correction.
Maintenance and Care
- Cleaning Lenses: Use a soft, lint-free cloth specifically designed for optical lenses. Breathe lightly on the lens to fog it, then gently wipe in a circular motion. Avoid touching the lens surfaces with your fingers.
- Dust Caps: Always keep the dust caps on the telescope's objective lens and eyepieces when not in use to prevent dust accumulation.
- Storage: Store the telescope in a dry, cool place, preferably in its provided backpack, to protect it from dust and moisture.
- Avoid Extreme Temperatures: Do not expose the telescope to sudden or extreme temperature changes, as this can cause condensation and potentially damage optical components.
Troubleshooting
| Problem | Possible Cause | Solution |
|---|---|---|
| Image is blurry or out of focus. | Focus knob not adjusted correctly; eyepiece not fully inserted. | Adjust the focus knob slowly. Ensure the eyepiece is fully inserted and secured. |
| Cannot find objects. | Finderscope not aligned; starting with too high magnification. | Align the finderscope with the main telescope. Start with the K20mm eyepiece to locate objects. |
| Image is dim or dark. | Light pollution; high magnification in poor conditions; dirty lenses. | Move to a darker viewing location. Use lower magnification. Clean lenses carefully. |
| Image is upside down or reversed. | Normal for astronomical viewing; diagonal prism not used for terrestrial viewing. | For astronomical viewing, this is normal. For terrestrial viewing, ensure the diagonal prism is correctly installed. |
| Tripod is unstable. | Legs not fully extended or locked; uneven surface. | Ensure tripod legs are fully extended and locked. Place on a firm, level surface. |
Product Specifications
| Model Number | 80H |
| Optical Design | Refractor |
| Aperture | 80mm |
| Focal Length | 500mm |
| Eyepieces Included | K20mm (25x), K9mm (55x) |
| Finderscope | Reflex |
| Mount Type | Altazimuth Mount |
| Tripod Material | High-quality aluminum alloy |
| Adjustable Tripod Height | Up to 51 inches (approx. 130 cm) |
| Product Dimensions | 44 x 13.02 x 31 cm (packaged) |
| Item Weight | 3.12 kg |
Warranty and Customer Support
HOROX provides a lifetime warranty for this telescope upon registration. Our team of technical experts is available to provide exceptional service and support for any inquiries or issues you may encounter.
For support, please contact us at: info@horox.co
Please include your model number (80H) and a detailed description of your issue when contacting support.