Leo Jaymz RB
Leo Jaymz DIY Electric Bass Guitar Kit User Manual
Model: RB
1. Introduction
This user manual provides detailed instructions for assembling, operating, maintaining, and troubleshooting your Leo Jaymz DIY Electric Bass Guitar Kit (Model: RB). This kit is designed for enthusiasts who wish to build their own electric bass guitar, featuring a roasted ash wood body, maple neck, and laurel wood fingerboard. All necessary components and hardware are included, with plug-in wiring to simplify the assembly process.
2. Kit Components
Before beginning assembly, ensure all components listed below are present in your kit. Refer to the image for visual identification of parts.

Figure 2.1: Overview of all included components for the Leo Jaymz DIY Electric Bass Guitar Kit. This image displays the roasted ash wood body, maple neck with laurel wood fingerboard, pickguard, bridge, tuning pegs, pickups, potentiometers, output jack, strings, and various screws and small parts.
The kit includes:
- Roasted Ash Wood Body (RB style)
- Roasted Maple Neck with Laurel Wood Fingerboard (20 frets, triangle inlay)
- Pickups (H-H configuration)
- Bridge (Hard Tail)
- Tuning Pegs
- Control Plate with Potentiometers and Knobs
- Output Jack
- Pickguard
- Guitar Strings (Nickel)
- All necessary hardware (screws, ferrules, etc.)
- Wiring harness with plug-in connectors
- Copper Foil Tape
- Allen Wrench
- Audio Cable

Figure 2.2: Detailed view of the bass guitar body, highlighting the pre-drilled holes and routed cavities for pickups, electronics, and the neck joint. This design simplifies assembly by eliminating the need for additional drilling or routing.
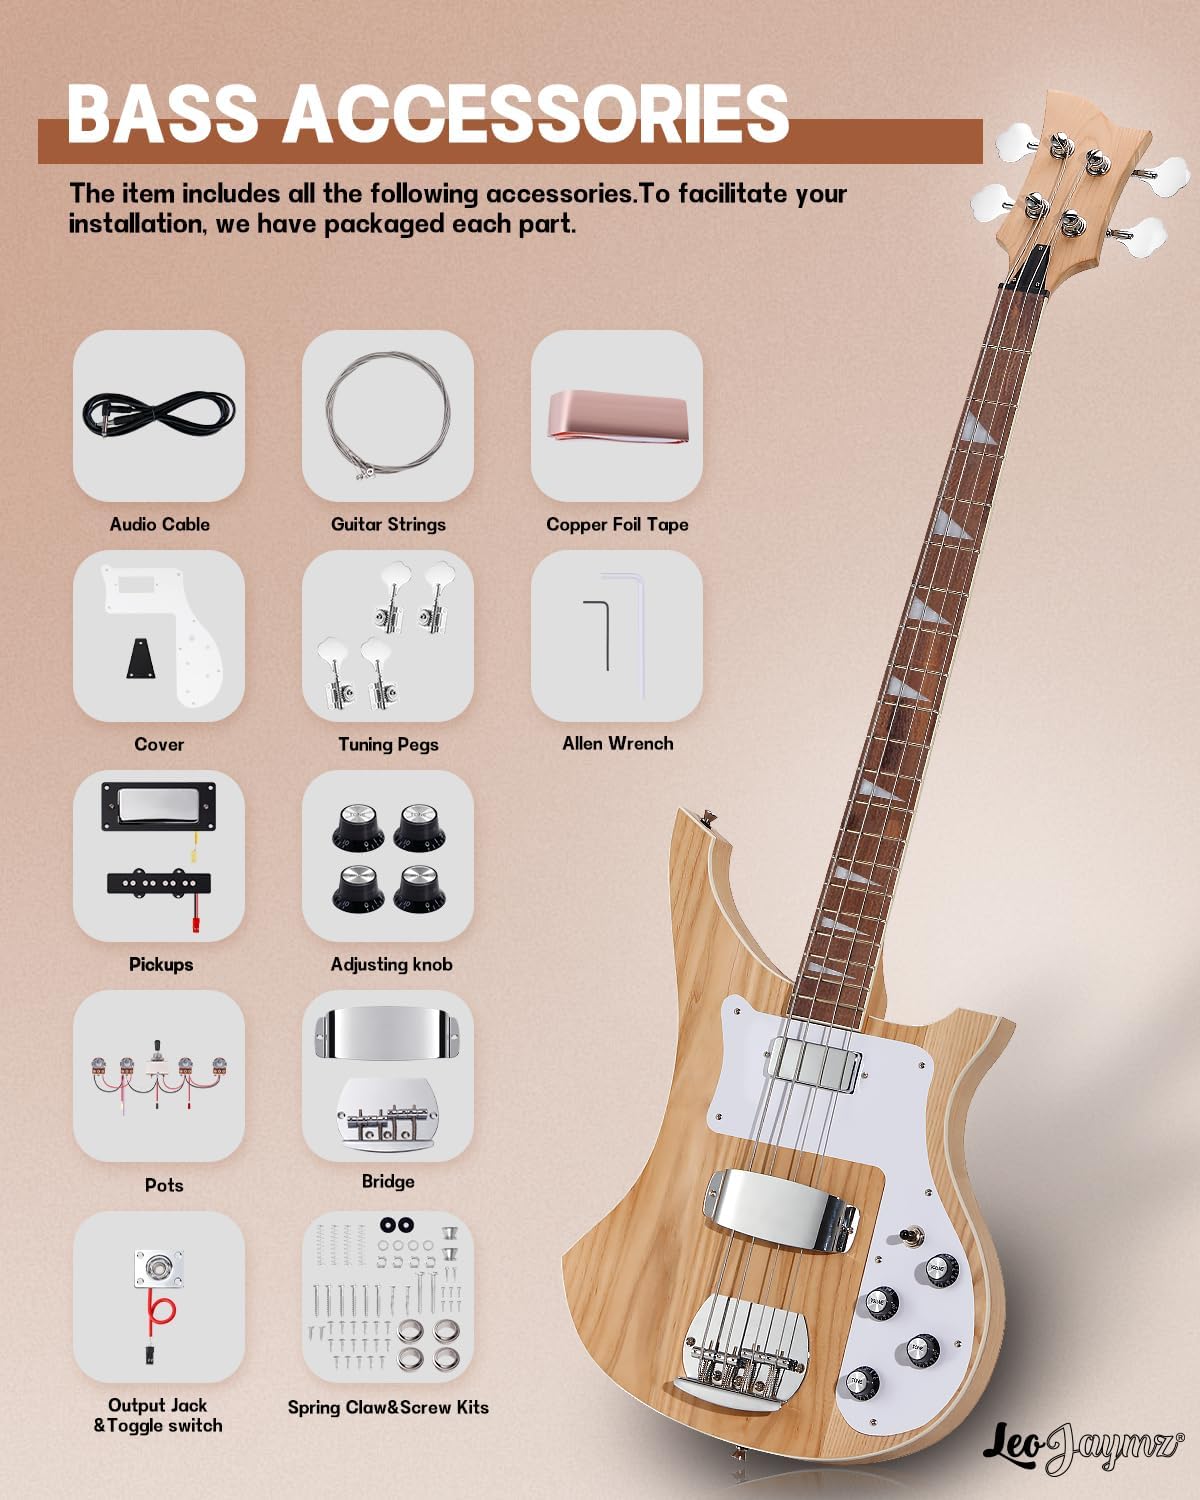
Figure 2.3: A comprehensive display of all bass guitar accessories included in the kit. This includes the audio cable, guitar strings, copper foil tape, the pickguard, tuning pegs, an Allen wrench, pickups, adjusting knobs, potentiometers (pots), the bridge, output jack, and various spring claw and screw kits.

Figure 2.4: Detailed view of the maple headstock, featuring pre-installed tuning pegs and the smooth finish of the laurel wood fingerboard. The headstock is shaped and ready for machine head installation.

Figure 2.5: Multiple views of the maple neck, showcasing its profile and the laurel wood fingerboard with triangle inlays. The neck is designed for optimal playability and sustain.
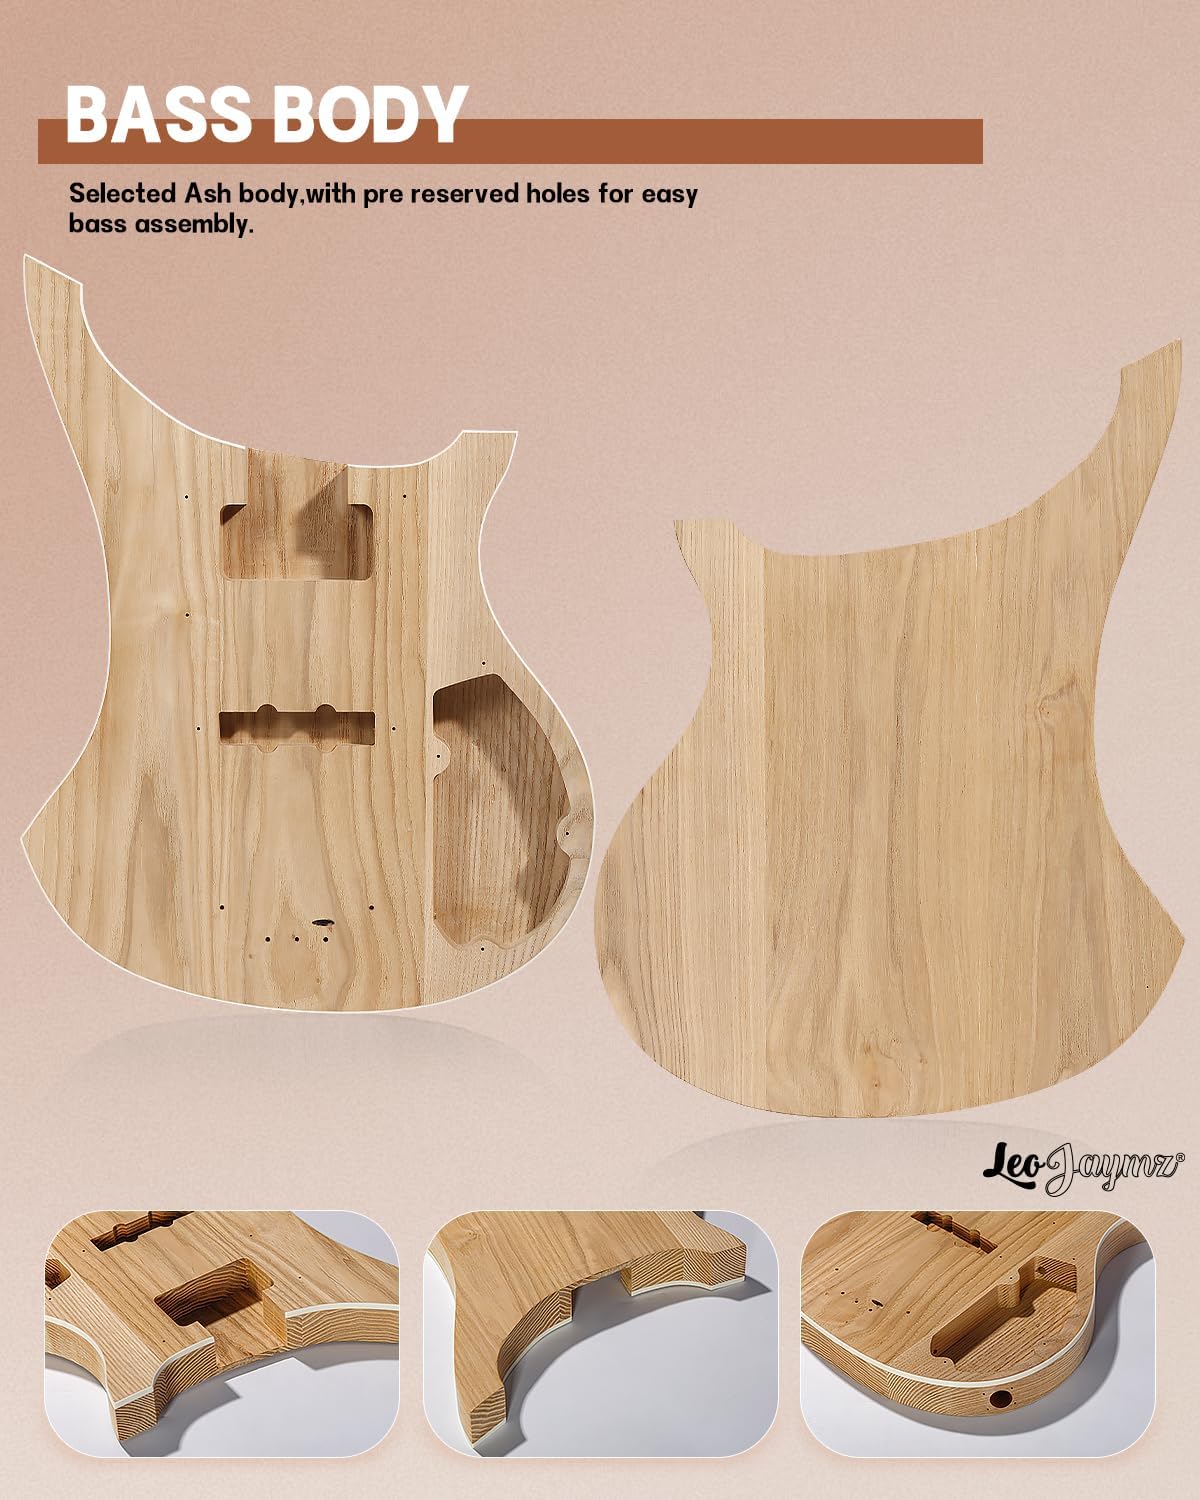
Figure 2.6: Front and back perspectives of the roasted ash wood bass body. This image also includes close-up views of the precisely routed neck pocket and the output jack cavity, demonstrating the pre-drilled nature of the body for straightforward assembly.
3. Assembly Instructions
Follow these steps carefully to assemble your electric bass guitar. It is recommended to work on a clean, soft surface to prevent damage to components.
3.1. Body Preparation
- Apply Copper Foil Tape: For noise reduction, apply the provided copper foil tape to the inside of the pickup cavities and the control cavity. Ensure good contact for shielding.
- Install Bridge: Position the bridge on the body according to the pre-drilled holes. Secure it with the provided screws.
3.2. Neck Attachment
- Attach Neck to Body: Carefully align the neck with the neck pocket on the body. Ensure a snug fit.
- Secure Neck: Using the neck plate and screws, attach the neck to the body. Tighten screws evenly to ensure proper alignment and stability.
3.3. Electronics Installation
The wiring harness features plug-in connectors, eliminating the need for soldering.
Figure 3.1: Illustration of the simple plug-in connections for electronics, demonstrating how wires connect without soldering. This image shows the pre-drilled cavities in the bass body, designed for easy insertion of components.
- Install Pickups: Place the pickups into their respective cavities. Connect the pickup wires to the main wiring harness using the plug-in connectors.
- Install Control Plate/Pots: Mount the potentiometers (volume/tone knobs) and the output jack onto the control plate. Connect these to the wiring harness.
- Connect Output Jack: Route the output jack through its designated hole and secure it. Connect its wires to the harness.
- Grounding: Ensure all necessary components (bridge, control cavity) are properly grounded to the main circuit to minimize noise. The copper foil tape aids in this.
- Secure Control Plate: Once all connections are made, carefully place the control plate over the cavity and secure it with screws.
3.4. Hardware Installation
- Install Tuning Pegs: Insert the tuning pegs into the holes on the headstock. Secure them with the provided nuts and washers.
- Attach Pickguard: Align the pickguard with the pre-drilled holes on the body and secure it with screws.
- Install Knobs: Push the control knobs onto the potentiometer shafts.
3.5. Stringing and Initial Setup
- Install Strings: Thread the provided nickel strings through the bridge and up to the tuning pegs. Wind them securely around the posts.
- Rough Tuning: Tune the bass to standard E-A-D-G (or desired tuning) using an electronic tuner.
- Action Adjustment: Adjust the bridge saddles to achieve desired string height (action).
- Intonation Adjustment: Fine-tune the intonation by adjusting the saddle position for each string so that the fretted note at the 12th fret matches the harmonic at the 12th fret.
- Truss Rod Adjustment: If necessary, adjust the truss rod using the provided Allen wrench to achieve proper neck relief. This should be done carefully and incrementally.
4. Operation
Once assembled and set up, your Leo Jaymz electric bass guitar is ready for use. Familiarize yourself with its controls.
4.1. Connecting to an Amplifier
Use the provided audio cable to connect the bass guitar's output jack to an amplifier's input. Ensure the amplifier's volume is low before plugging in to avoid sudden loud noises.
4.2. Controls Overview
- Volume Knobs: Control the output volume of individual pickups or the overall instrument.
- Tone Knobs: Adjust the treble frequencies, allowing you to brighten or darken the sound.
- Pickup Selector Switch (if applicable): Selects which pickup(s) are active (e.g., neck, bridge, or both).
Experiment with different settings to find your preferred sound. The H-H (humbucker-humbucker) pickup configuration offers a powerful and versatile tone suitable for various music genres.
5. Maintenance
Regular maintenance will ensure the longevity and optimal performance of your bass guitar.
- Cleaning: Wipe down the body, neck, and strings with a soft, dry cloth after each use to remove sweat and grime. For deeper cleaning, use guitar-specific cleaning products.
- String Replacement: Replace strings regularly, typically every 1-3 months depending on usage, to maintain tone and playability.
- Fretboard Care: Periodically clean and condition the laurel wood fretboard with a suitable fretboard oil to prevent drying and cracking.
- Hardware Inspection: Periodically check all screws and hardware for tightness. Loose components can affect tuning stability and tone.
- Storage: Store the bass guitar in a stable environment, away from extreme temperature fluctuations and humidity, to prevent wood warping. A gig bag or hard case is recommended.
6. Troubleshooting
This section addresses common issues you might encounter and their solutions.
| Problem | Possible Cause | Solution |
|---|---|---|
| No Sound / Low Output |
|
|
| Excessive Hum or Buzz |
|
|
| Poor Tuning Stability |
|
|
| Fret Buzz |
|
|
7. Specifications
| Feature | Detail |
|---|---|
| Model | RB |
| Body Material | Roasted Ash Wood |
| Neck Material | Roasted Maple |
| Fingerboard Material | Laurel Wood |
| Number of Frets | 20 |
| Fretboard Inlay | Triangle |
| Pickup Configuration | H-H (Humbucker-Humbucker) |
| Bridge System | Hard Tail |
| Number of Strings | 4 |
| Wiring | Plug-in (no soldering required) |
| Dimensions (L x W x H) | 36 x 23 x 3.5 inches (assembled, approx.) |
| Item Weight | 14.52 pounds (kit weight) |
8. Warranty and Support
Leo Jaymz stands behind the quality of its products. For specific warranty information and support, please refer to the documentation included with your purchase or visit the official Leo Jaymz store on Amazon:
Visit the Leo Jaymz Store on Amazon
For technical assistance or inquiries regarding missing/damaged parts, please contact Leo Jaymz customer service through the Amazon platform or their official website.
Ask a question about this manual
Ask about setup, troubleshooting, compatibility, parts, safety, or missing instructions. Manuals+ will review the question and use this page’s manual context to help answer it.