skytex ZJRG-PF00005W-RS1
skytex Automatic Pet Feeder User Manual
Model: ZJRG-PF00005W-RS1
Introduction
Thank you for choosing the skytex Automatic Pet Feeder. This device is designed to provide convenient and reliable feeding for your cats and dogs, ensuring they receive fresh, healthy dry food on a consistent schedule. Please read this manual thoroughly before operation to ensure proper use and maintenance.

Image: The skytex Automatic Pet Feeder, a white unit with a transparent food reservoir, a control panel, and a stainless steel food bowl. Dry kibble is visible inside the reservoir and bowl.
Product Features
- Large Capacity: 6L food reservoir, suitable for cats and dogs.
- Flexible Feeding Schedule: Program up to 6 meals per day, with 0-20 servings per meal.
- Anti-Clogging Design: Supports dry food kibble sizes from 3-18mm, with an automatic inversion mechanism to prevent jams.
- Dual Power Supply: Operates via 5V DC adapter or 4 AA batteries (not included) for uninterrupted feeding during power outages.
- Voice Recording: Record a 10-second message to call your pet at meal times.
- Freshness Preservation: Features a secure twist-lock lid and a desiccant pouch to keep food fresh.
- Pet-Safe Design: Automatic locking top and non-slip silicone base prevent pets from accessing food or tipping the feeder.
Setup Guide
- Unpack the Feeder: Carefully remove all components from the packaging. Ensure all parts are present: main feeder unit, food reservoir, lid, stainless steel bowl, and power adapter.
- Assemble the Feeder:
- Place the main feeder unit on a flat, stable surface.
- Insert the stainless steel bowl into the designated slot at the base of the feeder.
- Attach the food reservoir to the top of the main unit, ensuring it clicks securely into place.
- Open the lid and insert the desiccant pouch into its holder to maintain food freshness.

Image: A close-up view of the feeder's lid with a desiccant pouch being inserted into its designated slot, illustrating the freshness preservation feature.
- Power Connection:
- Connect the 5V DC power adapter to the feeder's power port and plug it into a wall outlet.
- For battery backup, open the battery compartment at the bottom of the feeder and insert 4 AA batteries (not included). This ensures continuous operation during power outages.

Image: A split image showing the feeder connected to a power cord on one side and operating on battery power during a simulated power outage on the other, highlighting the dual power supply feature.
- Fill the Food Reservoir: Open the lid and pour dry pet food into the reservoir. Ensure the kibble size is between 3-18mm to prevent clogging. Close the lid securely.
- Initial Power On: The feeder will power on automatically once connected to power. The display will light up.
Operating Instructions
Control Panel Overview

Image: A detailed view of the feeder's control panel, showing the digital display and buttons labeled with their functions: Decrease, Augment, Long press to unlock, Recorded AT, Time and meal settings, and Meal settings.
- "-" Button: Decrease value.
- "+" Button: Increase value.
- Lock Button: Long press to unlock the control panel.
- Microphone Button: Record voice message.
- Star Button: Access time and meal settings.
- Food Drop Button: Access meal settings.
Setting Time and Meals
- Unlock the Panel: Long press the Lock button until the display unlocks.
- Set Current Time: Press the Star button to enter time setting mode. Use the "-" and "+" buttons to adjust the hour and minute. Press Star again to confirm each setting.
- Program Feeding Schedule:
- After setting the time, press the Food Drop button to enter meal setting mode.
- You can set up to 6 meals per day. For each meal, use "-" and "+" to set the feeding time (hour and minute) and the number of servings (0-20).
- Press the Food Drop button to move to the next meal setting or to save and exit.

Image: The pet feeder positioned next to a cat, with an overlay illustrating its scheduling capabilities: up to 6 meals per day, up to 20 portions per meal, 6L capacity, and compatibility with dry food sizes from 2-18mm.
- Record Voice Message: Press the Microphone button. Hold it down to record your 10-second message. Release to stop recording. The feeder will play this message 3 times at scheduled feeding times and once for manual feeding.

Image: A golden retriever puppy and a kitten sitting next to the pet feeder, with a speech bubble indicating a voice message "Hey Baby! It's time to eat!" and sound waves emanating from the feeder, demonstrating the 10-second voice recording feature.
- Manual Feeding: Briefly press the Food Drop button to dispense one serving manually.
Maintenance
- Cleaning:
- Unplug the feeder and remove any remaining food.
- Detach the food reservoir and the stainless steel bowl. These parts can be washed with mild soap and water. Rinse thoroughly and dry completely before reassembling.
- Wipe the main unit with a damp cloth. Do not immerse the main unit in water.
- Desiccant Replacement: Replace the desiccant pouch every 1-2 months, or as needed, to ensure optimal food freshness.
- Battery Check: Periodically check the AA batteries (if used) and replace them when low to ensure continuous operation during power interruptions.
- Food Type: Only use dry pet food. Do not use wet food, canned food, or treats larger than 18mm in diameter, as this can cause clogging.

Image: An illustration showing recommended kibble sizes (4mm, 8mm, 12mm, up to 18mm) and compatible food types (Dry Food, Mixed Food, Freeze Dried Food, Air-Dried Food). A note advises against using wet food or kibble over 18mm.
Troubleshooting
| Problem | Possible Cause | Solution |
|---|---|---|
| Feeder not dispensing food. |
|
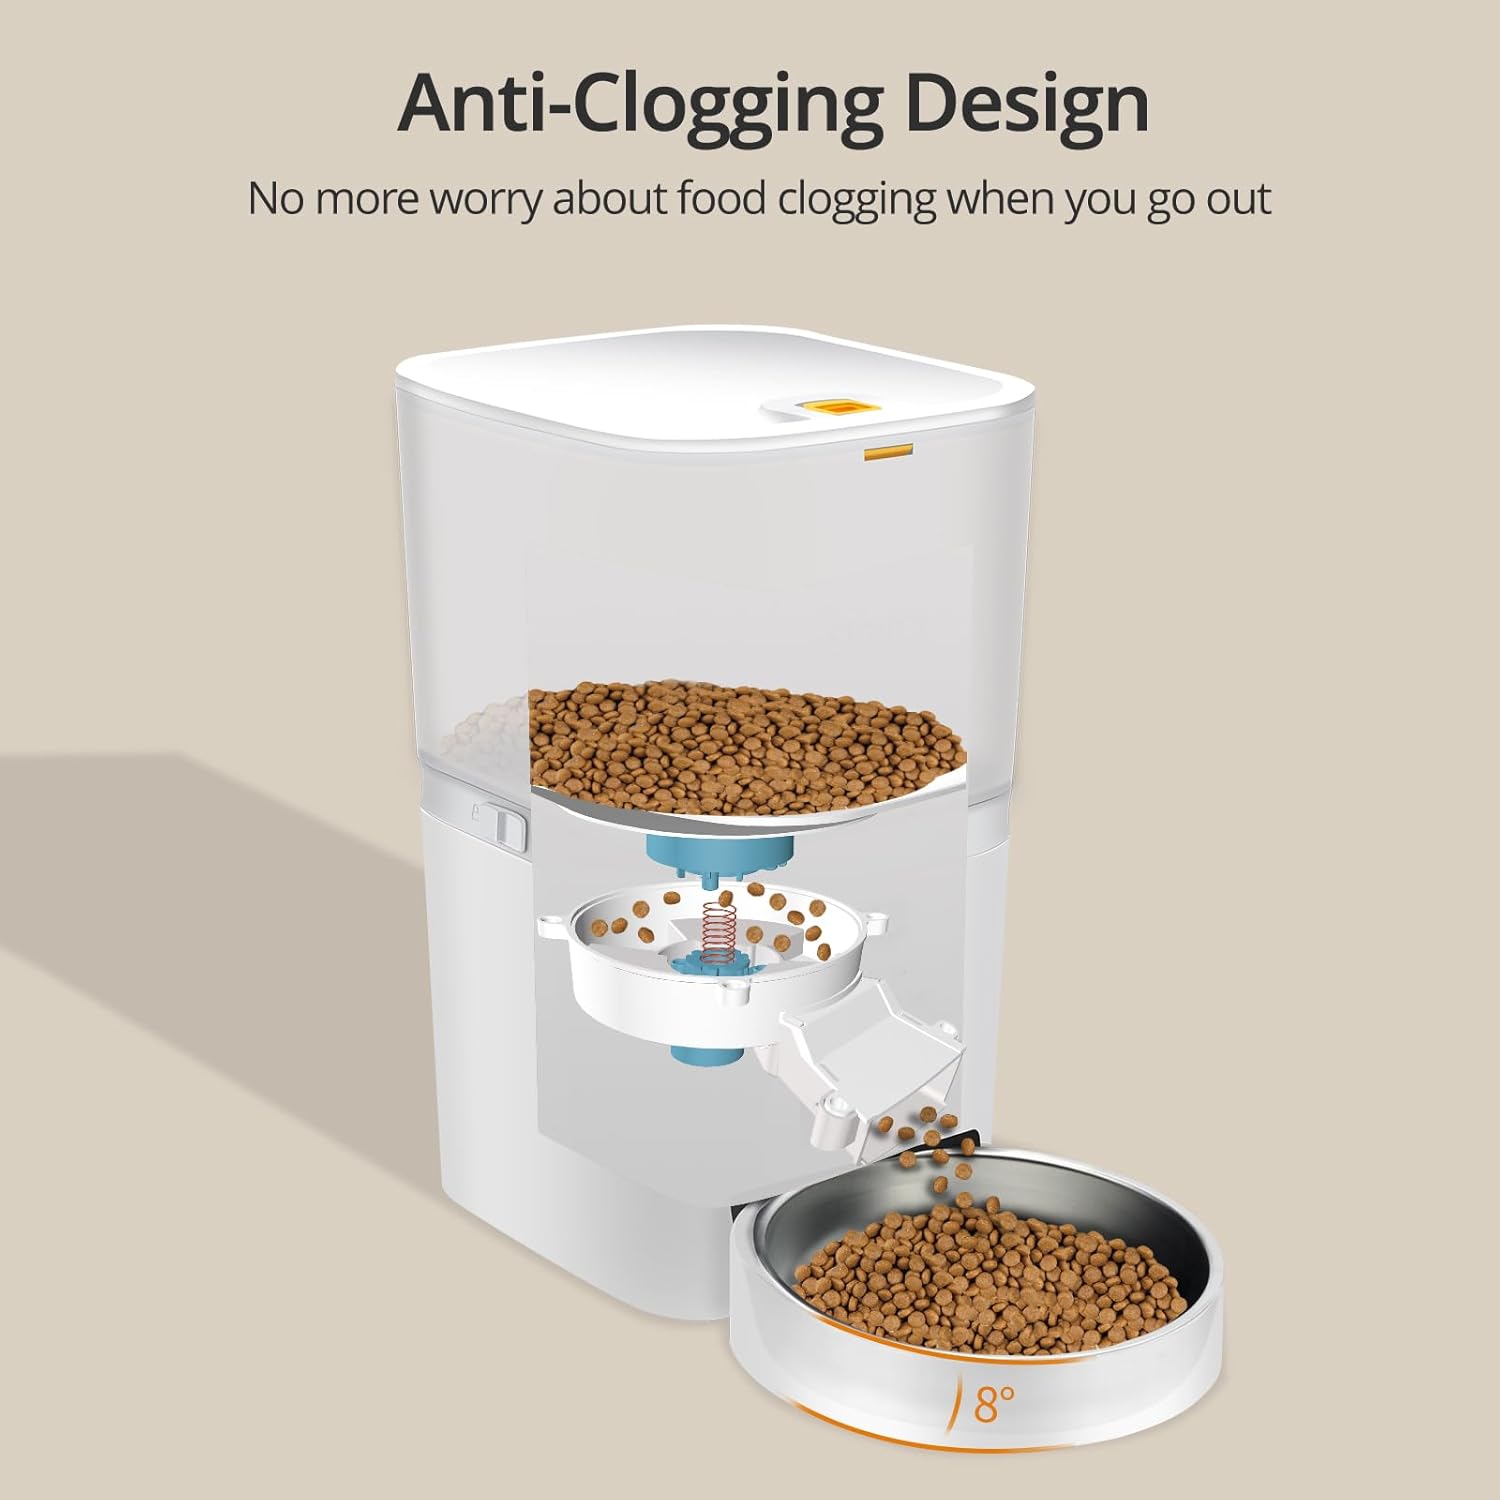 Image: An internal diagram of the feeder highlighting its anti-clogging design, showing how the rotor mechanism prevents food jams and ensures smooth dispensing. |
| Voice recording not playing. |
|
|
| Feeder not holding schedule after power loss. |
|
|
| Pets accessing food from the top. |
|
 Image: Two cats attempting to open the feeder, with an inset showing the safety lock mechanism, demonstrating how the design prevents pets from accessing the food reservoir. |
Specifications
| Model Name | Automatic Cat Feeder |
| Model Number | ZJRG-PF00005W-RS1 |
| Brand | skytex |
| Capacity | 6 Liters |
| Dimensions (L x W x H) | 8.27 x 7.59 x 12.99 inches |
| Item Weight | 4.09 pounds |
| Material | Polyester (component) |
| Power Supply | 5V DC Adapter, 4 x AA Batteries (not included) |
| Compatible Kibble Size | 3-18mm dry food |
| Max Meals Per Day | 6 |
| Max Servings Per Meal | 20 |
Warranty and Support
The skytex Automatic Pet Feeder comes with a 2-year manufacturer's warranty from the date of purchase. This warranty covers defects in materials and workmanship under normal use.
For technical support, troubleshooting assistance, or warranty claims, please contact skytex customer service. Refer to the product packaging or the official skytex website for the most up-to-date contact information.
Please retain your proof of purchase for warranty validation.
Ask a question about this manual
Ask about setup, troubleshooting, compatibility, parts, safety, or missing instructions. Manuals+ will review the question and use this page’s manual context to help answer it.