Introduction
Thank you for choosing the Neoteck 4 inch Digital Caliper. This precision measuring instrument is designed for accurate internal, external, depth, and step measurements. Constructed from hardened stainless steel, it offers durability and stable readings. Its large LCD display provides clear, instant readings, with easy conversion between metric (millimeters) and imperial (inches) units.
This manual provides detailed instructions for the proper use, setup, and maintenance of your digital caliper to ensure optimal performance and longevity.
Package Contents
- 1 x Neoteck 4 inch Digital Caliper
- 1 x Durable Plastic Storage Case
- 1 x LR44 Battery (pre-installed)
- 1 x Spare LR44 Battery
- 1 x Mini Screwdriver (for battery compartment)
Product Overview
Familiarize yourself with the components of your digital caliper:

Image: Product diagram showing internal measuring jaws, external measuring jaws, ON/OFF switch, locking screw, LCD display, battery compartment, inch/metric conversion switch, zero switch, inch and metric scale, and depth rod.
- External Measuring Jaws: Used for measuring external dimensions.
- Internal Measuring Jaws: Used for measuring internal dimensions.
- Depth Rod: Used for measuring depth.
- Step Measuring Faces: Used for measuring step dimensions.
- LCD Display: Shows measurement readings.
- ON/OFF Switch: Powers the caliper on or off.
- Zero Switch: Sets the display to zero at any point.
- mm/inch Conversion Switch: Toggles between millimeter and inch units.
- Locking Screw: Secures the caliper jaws in position for holding a measurement.
- Battery Compartment: Houses the LR44 battery.
Setup
1. Battery Installation
Your Neoteck Digital Caliper comes with a pre-installed LR44 battery. If the display does not turn on or shows a low battery indicator, you may need to replace it.
- Locate the battery compartment cover on the back of the LCD display unit.
- Use the provided mini screwdriver to gently remove the battery compartment cover.
- Remove the old LR44 battery.
- Insert a new LR44 battery with the positive (+) side facing upwards.
- Replace the battery compartment cover and secure it with the screw.

Image: The large LCD display and the battery compartment area, indicating where the LR44 battery is located.
2. Initial Power On
Press the ON/OFF button to turn on the caliper. The LCD display should light up and show a reading.
Operating Instructions
1. Zeroing the Caliper
Before taking any measurement, ensure the caliper is properly zeroed for accuracy.
- Close the measuring jaws completely, ensuring they are clean and free of debris.
- Press the ZERO button. The display should now read "0.00mm" or "0.000in".
- The caliper can be zeroed at any point along its travel to measure relative distances.

Image: A close-up of the digital caliper's display and control buttons, illustrating the zeroing function.
2. Unit Conversion (mm/inch)
To switch between metric (millimeters) and imperial (inches) units:
- Press the mm/inch button. The display will instantly switch between the two units.
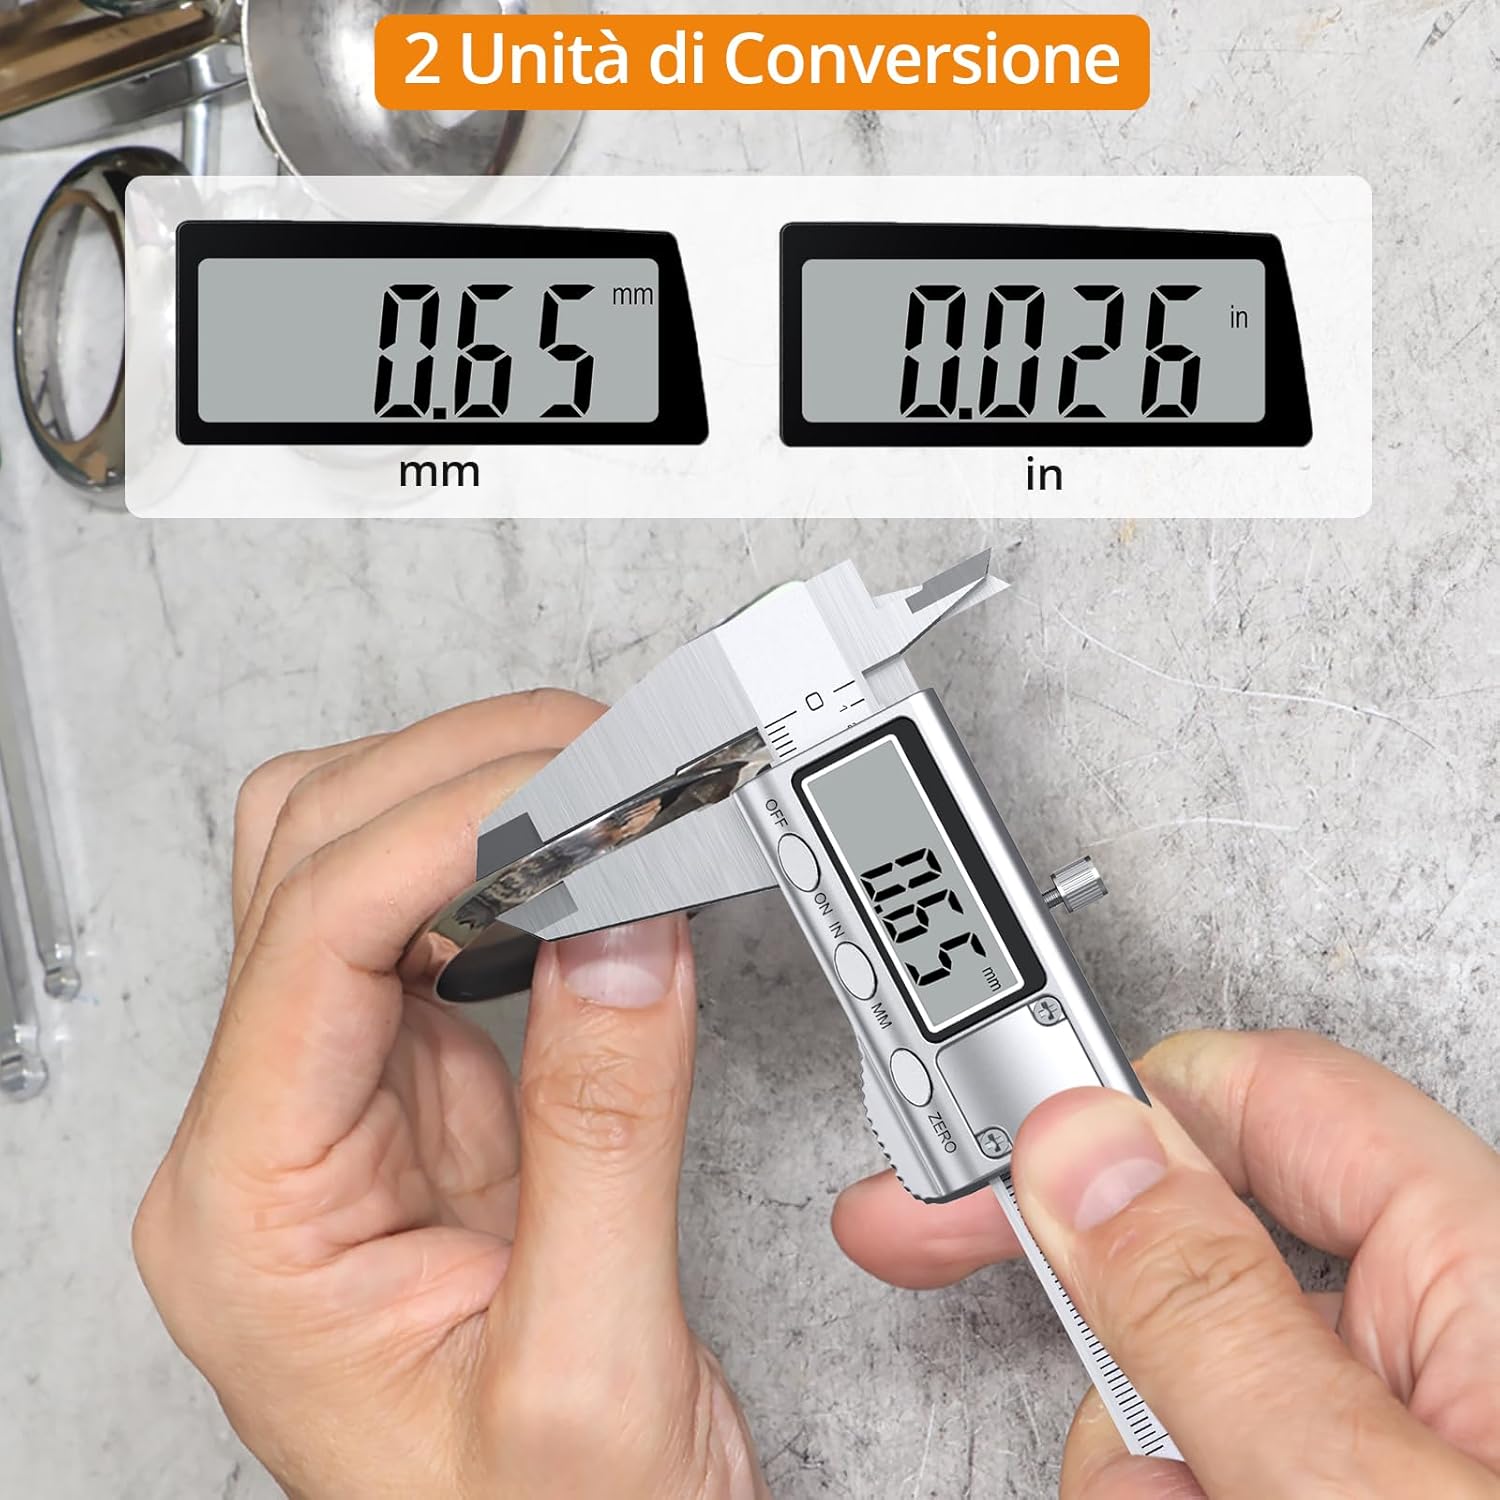
Image: The digital caliper display showing a measurement in both millimeters (mm) and inches (in), demonstrating the unit conversion feature.
3. Taking Measurements
The Neoteck Digital Caliper supports four types of measurements:

Image: A visual guide demonstrating how to perform internal diameter, external diameter, depth, and step measurements with the digital caliper.
- External Measurement:
Place the object between the external measuring jaws. Gently close the jaws until they make firm contact with the object. Read the measurement on the LCD display.
- Internal Measurement:
Insert the internal measuring jaws into the opening of the object. Open the jaws until they make firm contact with the inner surfaces. Read the measurement on the LCD display.
- Depth Measurement:
Place the end of the main beam on the top surface of the object. Extend the depth rod into the hole or recess until its end touches the bottom. Read the measurement on the LCD display.
- Step Measurement:
Place the step measuring face of the caliper against the higher surface of the step. Extend the movable jaw until its step measuring face rests on the lower surface. Read the measurement on the LCD display.
4. Locking a Measurement
To hold a measurement for later reading or transfer:
- Once the desired measurement is achieved, tighten the locking screw located on the top of the slider. This will prevent the jaws from moving.
- Loosen the screw to release the jaws.

Image: The digital caliper in use, highlighting the locking screw for securing measurements.
Maintenance
Proper maintenance ensures the accuracy and longevity of your digital caliper.
- Cleaning: Keep the caliper clean and dry. Wipe the measuring surfaces with a clean, lint-free cloth after each use. Avoid using solvents or harsh chemicals.
- Storage: Store the caliper in its protective plastic case when not in use to prevent damage from impacts or dust.
- Battery Replacement: Replace the LR44 battery when the display becomes dim or shows a low battery indicator. Refer to the "Battery Installation" section for instructions.
- Avoid Force: Do not apply excessive force to the jaws or drop the caliper, as this can affect its accuracy.
Troubleshooting
| Problem | Possible Cause | Solution |
|---|---|---|
| Display is blank or dim. | Low or dead battery. | Replace the LR44 battery. Ensure it is inserted correctly. |
| Inaccurate readings. |
|
|
| Jaws are stiff or difficult to move. | Dirt or lack of lubrication on the sliding mechanism. | Clean the sliding mechanism. A very small amount of light machine oil can be applied if necessary, then wipe off excess. |
Specifications
| Feature | Detail |
|---|---|
| Brand | Neoteck |
| Model | 4 inch |
| Material | Stainless Steel |
| Measuring Range | 0-100mm (0-4 inches) |
| Resolution | 0.01mm (0.0005 inches) |
| Accuracy | ±0.02mm (±0.001 inches) |
| Display | LCD |
| Power Source | 1 x LR44 Battery (included) |
| Functions | External, Internal, Depth, Step Measurement |
| Conversion | Metric/Imperial |
Warranty and Support
Neoteck products are manufactured to high-quality standards. For any questions, technical support, or warranty claims, please contact Neoteck customer service through the retailer where the product was purchased or visit the official Neoteck website for contact information.
Please retain your proof of purchase for warranty purposes.