1. Introduction
This manual provides detailed instructions for the setup, operation, maintenance, and troubleshooting of your Maxtang MTN-6900HX Mini PC. Please read this manual thoroughly before using the device to ensure proper functionality and safety. The Maxtang MTN-6900HX is a compact, high-performance mini PC featuring an AMD Ryzen 9 6900HX processor, designed for various applications including everyday computing, photo editing, video editing, and gaming.

Image 1.1: Front view of the Maxtang MTN-6900HX Mini PC. This image shows the compact design of the device.
2. Safety Information
- Always disconnect the power adapter before cleaning or performing any maintenance.
- Do not expose the device to water, moisture, or extreme temperatures.
- Ensure proper ventilation to prevent overheating. Do not block the air vents.
- Use only the provided power adapter or a compatible replacement.
- Avoid dropping or subjecting the device to strong impacts.
- Do not attempt to open or repair the device yourself. Refer to qualified service personnel.
3. Package Contents
Verify that all items are present in the package:
- 1x Maxtang MTN-6900HX Mini PC (No RAM, No SSD, No OS)
- 1x HDMI Cable
- 1x Power Adapter
- 1x Power Cord
- 1x VESA Mount
- 4x Mounting Screws
- 1x Product Manual (this document)
4. Product Overview
The Maxtang MTN-6900HX Mini PC features a comprehensive set of ports and internal expansion options. Familiarize yourself with the device's layout before proceeding with installation.
4.1 External Ports

Image 4.1: Detailed diagram of the Maxtang MTN-6900HX Mini PC's front and rear ports.
Front Panel:
- USB 3.2: Two USB 3.2 Gen2 ports (10Gbps) for high-speed data transfer.
- USB-C (USB 3.2 10Gb): One USB-C port for data transfer.
- Audio: 3.5mm audio jack for headphones or speakers.
- RESET: Reset button.
- Power Button: To power on/off the device.
Rear Panel:
- DC-in (Power input): Connect the power adapter here.
- HDMI: One HDMI port for video output (up to 4K@60Hz).
- Air vents: For heat dissipation.
- DP: One DisplayPort for video output (up to 8K@60Hz).
- USB 4.0: Two USB4 ports (40Gbps, 100W PD, 8K video output).
- USB 2.0: One USB 2.0 port.
- LAN RJ45 2.5G: One 2.5 Gigabit Ethernet port for wired network connection.
- Kensington lock: Security slot.
4.2 Internal Components

Image 4.2: Internal view of the Mini PC, highlighting the M.2 2280 NVMe SSD slots and DDR5 SO-DIMM slots.
The Mini PC supports:
- M.2 2280 NVMe SSD: Two PCIe Gen4 2280 slots for NVMe SSDs, supporting up to 4TB each (total 8TB).
- DDR5 SO-DIMM: Two dual-channel DDR5 SO-DIMM slots, supporting up to 64GB RAM.
- WiFi/Bluetooth Module: One M.2 slot for a WiFi and Bluetooth module (pre-installed or user-installable depending on configuration).
5. Hardware Installation (RAM & SSD)
This Mini PC is shipped without RAM, SSD, or an operating system. Follow these steps to install the necessary components.
5.1 Installing RAM (DDR5 SO-DIMM)

Image 5.1: Illustration of installing DDR5 SO-DIMM modules into the memory slots.
- Power Off: Ensure the Mini PC is powered off and disconnected from the power source.
- Open Case: Carefully open the Mini PC case. Refer to the specific model's instructions for case removal.
- Locate Slots: Identify the two DDR5 SO-DIMM slots on the motherboard.
- Insert RAM: Align the notch on the DDR5 SO-DIMM module with the key in the slot. Insert the module at a 45-degree angle and push down firmly until the side clips snap into place, securing the module.
- Repeat: If installing two modules for dual-channel operation, repeat for the second slot.
5.2 Installing NVMe SSD (M.2 2280)
Image 5.2: View of the M.2 2280 NVMe SSD slots, indicating where to install storage.
- Locate Slots: Identify the M.2 2280 NVMe SSD slots on the motherboard.
- Insert SSD: Gently slide the M.2 SSD into the slot, ensuring the gold contacts are fully engaged.
- Secure SSD: Once inserted, push down the end of the SSD and secure it with the provided screw.
- Close Case: After installing all components, carefully close the Mini PC case.
6. Initial Setup and Operating Instructions
6.1 Connecting Peripherals
- Display: Connect your monitor(s) to the HDMI, DisplayPort, or USB4 ports using the appropriate cables.
- Keyboard/Mouse: Connect your USB keyboard and mouse to the available USB ports.
- Network: For a wired connection, connect an Ethernet cable to the 2.5GbE LAN port. For wireless, ensure your WiFi module is installed.
- Power: Connect the power adapter to the DC-in port on the Mini PC, then plug the power cord into an electrical outlet.
6.2 Powering On and OS Installation
- Power On: Press the power button on the front panel. The power indicator should illuminate.
- BIOS/UEFI: Upon first boot, you may need to enter the BIOS/UEFI settings (usually by pressing Del or F2 during startup) to configure boot options or verify hardware detection.
- Operating System Installation: Since the device comes without an OS, you will need to install one. Prepare a bootable USB drive with your preferred operating system (e.g., Windows 11 Pro 64-bit or Linux 64-bit). Insert the USB drive and follow the on-screen instructions to install the OS onto your NVMe SSD.
6.3 Display Configuration
The Mini PC supports multiple displays, including triple screen output via HDMI, DisplayPort, and USB4.

Image 6.1: Example setup showing the Mini PC connected to three external displays.
- Connect up to three monitors using the HDMI (4K@60Hz), DisplayPort (8K@60Hz), and USB4 (4K@60Hz) ports.
- After OS installation, you can configure display settings (resolution, orientation, extended/duplicate desktop) within your operating system's display settings.
6.4 Network Connectivity
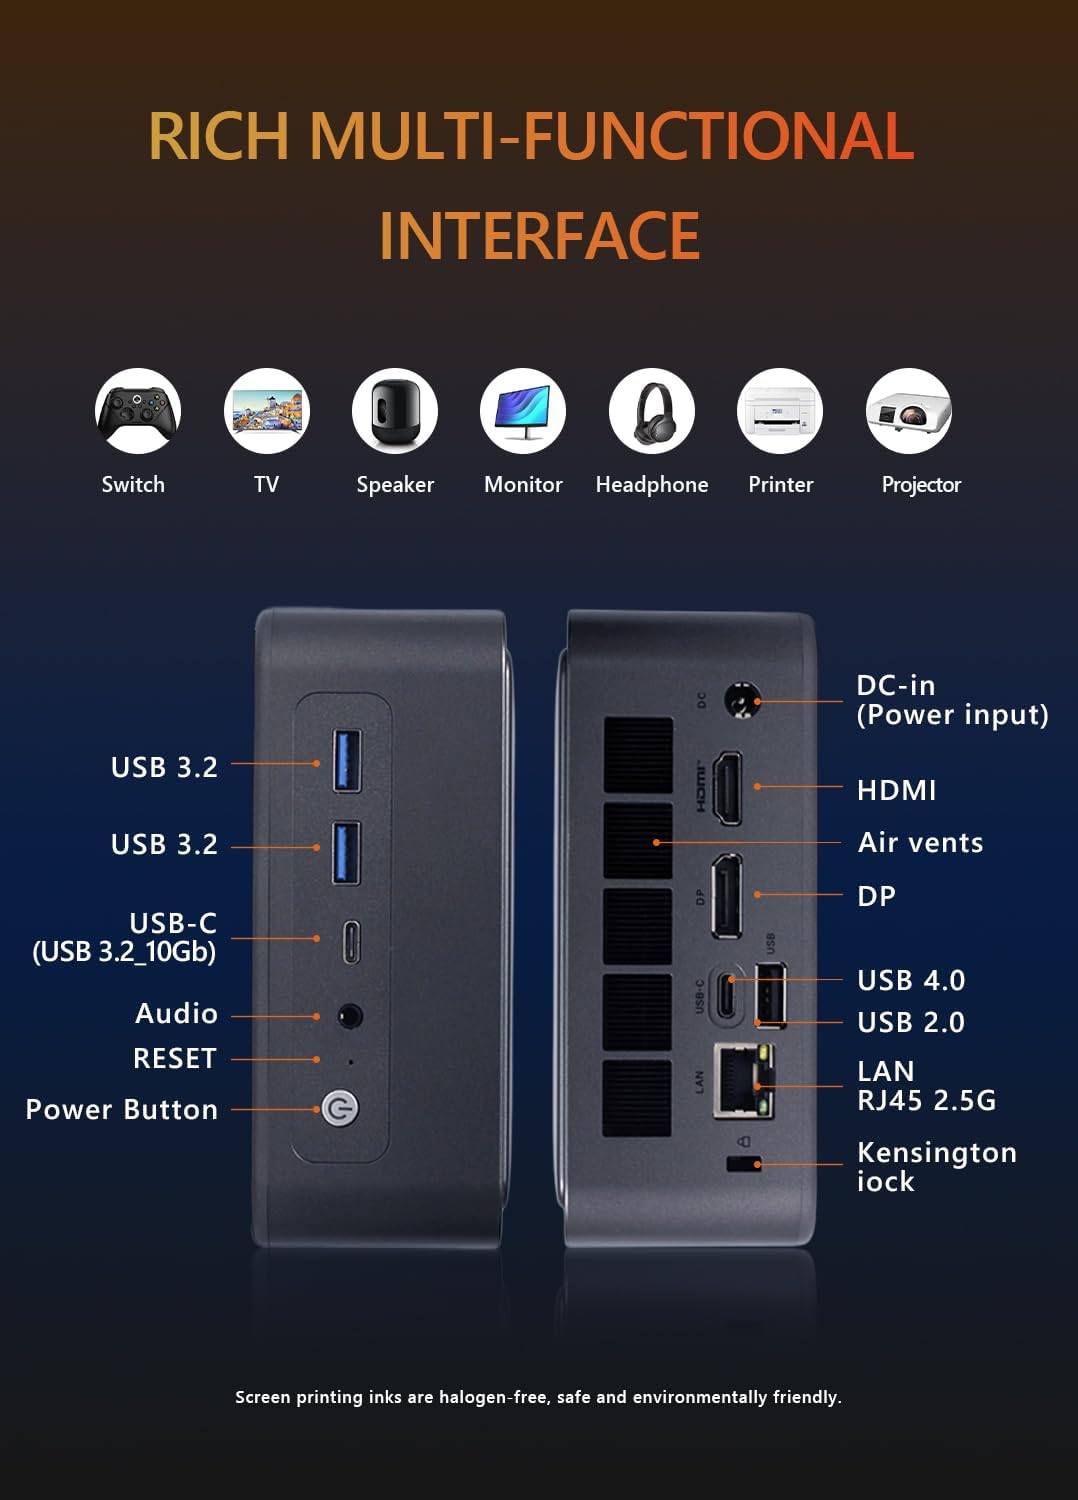
Image 6.2: Visual representation of the Mini PC's network capabilities, including 2.5GbE LAN, WiFi 6, and Bluetooth 5.2.
- Wired LAN: Connect an Ethernet cable to the 2.5GbE RJ45 port for a stable and high-speed wired network connection.
- Wi-Fi: If a Wi-Fi module is installed, connect to your wireless network through the operating system's network settings. The device supports Wi-Fi 6.
- Bluetooth: If a Bluetooth module is installed, pair Bluetooth devices (e.g., headphones, keyboards) through the operating system's Bluetooth settings. The device supports Bluetooth 5.2.
7. Maintenance
- Cleaning: Use a soft, dry cloth to clean the exterior of the Mini PC. For dust in vents, use compressed air. Do not use liquid cleaners directly on the device.
- Software Updates: Regularly update your operating system, drivers, and applications to ensure optimal performance and security.
- Ventilation: Ensure the Mini PC is placed in a well-ventilated area and that its air vents are not obstructed to prevent overheating.
- Data Backup: Periodically back up important data to an external storage device or cloud service.
8. Troubleshooting
If you encounter issues with your Mini PC, refer to the following common troubleshooting steps:
- No Power:
- Check if the power adapter is securely connected to both the Mini PC and the electrical outlet.
- Ensure the power outlet is functional.
- Try a different power outlet.
- No Display:
- Verify that the monitor is powered on and the correct input source is selected.
- Ensure the video cable (HDMI, DP, USB4) is securely connected to both the Mini PC and the monitor.
- Try a different video cable or monitor if available.
- Operating System Not Booting:
- Confirm that RAM and SSD are correctly installed as per Section 5.
- Check BIOS/UEFI settings to ensure the boot order is correct and the SSD is detected.
- If installing a new OS, ensure the bootable USB drive is properly created and selected as the boot device.
- No Network Connection:
- For wired connections, check the Ethernet cable and router/modem status.
- For Wi-Fi, ensure the Wi-Fi module is installed and drivers are updated. Check your Wi-Fi network settings in the OS.
- Overheating:
- Ensure the Mini PC's vents are clear and not obstructed.
- Place the device in a location with good airflow.
- Clean dust from the vents regularly.
9. Specifications
Detailed technical specifications for the Maxtang MTN-6900HX Mini PC:
| Feature | Specification |
|---|---|
| Model Name | MTN-6900HX |
| Processor | AMD Ryzen 9 6900HX (8 Cores/16 Threads, up to 4.9GHz) |
| Graphics | AMD Radeon Graphics (Radeon 680M) |
| Memory (RAM) | Dual Channel DDR5 SO-DIMM, Max 64GB (User-installed) |
| Storage | 2x M.2 2280 NVMe PCIe Gen4 SSD slots, Max 4TB each (User-installed) |
| Operating System | No OS pre-installed (Supports Windows 10/11 64-bit, Linux 64-bit) |
| Video Output | 1x HDMI (4K@60Hz), 1x DisplayPort (8K@60Hz), 2x USB4 (4K@60Hz) |
| USB Ports | 2x USB4 (40Gbps), 2x USB 3.2 Gen2 (10Gbps), 1x USB 2.0 |
| Network | 1x 2.5GbE RJ45 LAN, Wi-Fi 6, Bluetooth 5.2 |
| Audio | 1x 3.5mm Audio Jack |
| Power Input | 19V/20V DC-in |
| Dimensions | 127 mm x 135 mm x 55 mm |
| Additional Features | Kensington Lock slot, VESA Mount support |
9.1 Processor Details

Image 9.1: Details of the AMD Ryzen 9 6900HX processor, including core count, threads, boost clock, and L3 cache.
9.2 Graphics Details

Image 9.2: Specifications for the integrated AMD Radeon 680M graphics, including shader count and GPU memory.
10. Warranty and Support
Warranty: This product comes with a 12-month product warranty from the date of order. Please retain your proof of purchase for warranty claims.
Customer Service: For technical support or warranty inquiries, please contact Maxtang customer service. Refer to your purchase platform or the Maxtang official website for contact details.
Manufacturer Contact Information: 6/F, Bldg 3, Honghui Industrial Park, Liuxian 2nd Road, Bao'an Dist, Shenzhen, China 518101