XRDZYXGS XR-JM001
XRDZYXGS Automatic Chicken Coop Door User Manual
Model: XR-JM001
Introduction
The XRDZYXGS Automatic Chicken Coop Door is designed to provide a secure and convenient solution for managing your poultry. Featuring multiple operating modes including light sensor, timer, manual, and remote control, it ensures your chickens are safely enclosed at night and released in the morning. Its robust construction, anti-pinch mechanism, and dual charging options (solar and USB) make it a reliable addition to any chicken coop setup.

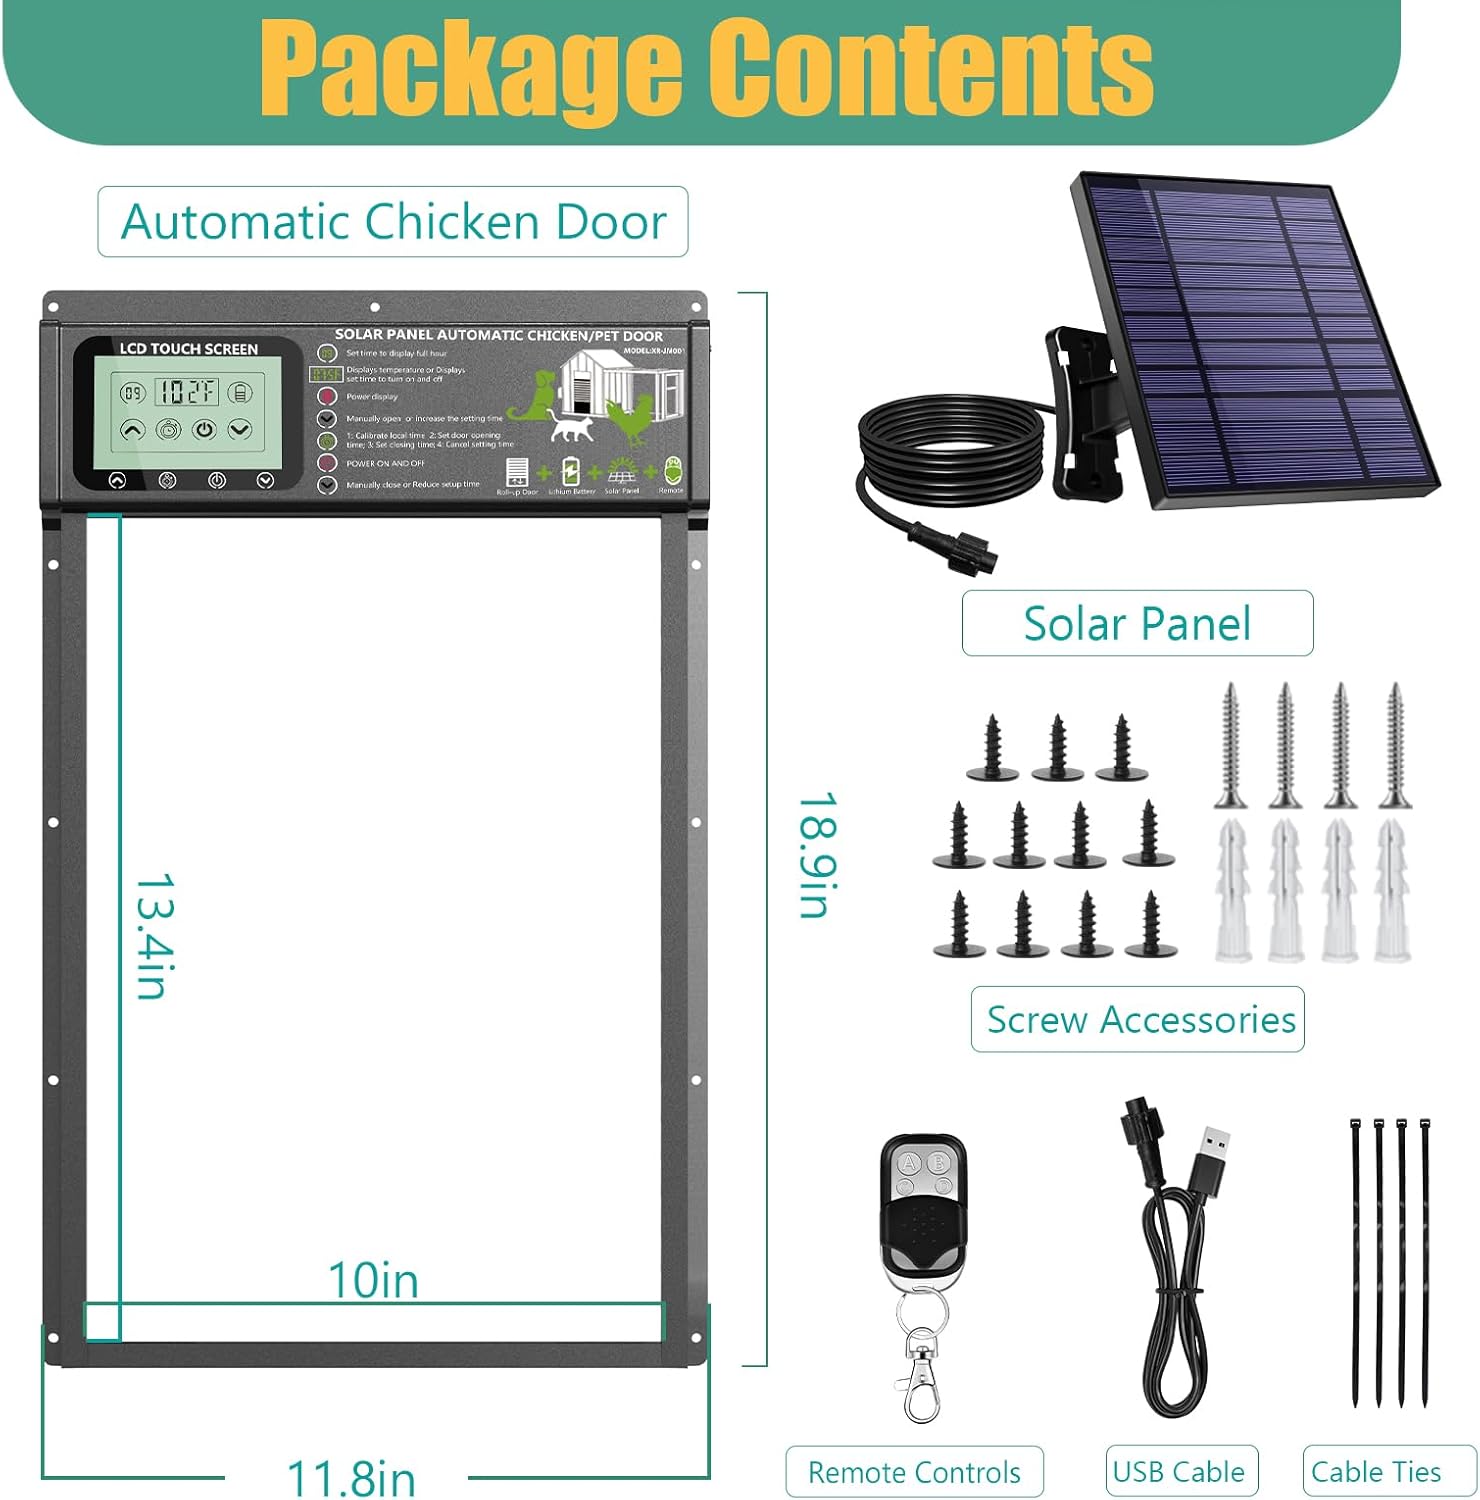
Package Contents
Please verify that all items listed below are included in your package:
- Automatic Chicken Door Unit
- Solar Panel
- Remote Control
- USB Charging Cable
- Screw Accessories (various screws and wall anchors)
- Cable Ties
Setup and Installation
Follow these steps for proper installation of your automatic chicken coop door:
- Step 1: Mark the Opening. Measure and mark the desired opening size on your chicken coop wall according to the dimensions of the door unit. Ensure the marked area is clear of obstructions.
- Step 2: Cut the Opening. Carefully use appropriate tools to cut out the marked position on the coop wall. Ensure the edges are smooth and free of splinters.
- Step 3: Install the Door Unit. Position the automatic chicken door unit into the cut opening. Secure the door to the coop wall using the provided screw accessories. Ensure it is level and firmly attached.
- Step 4: Connect Solar Panel. Install the solar panel in a location that receives maximum direct sunlight throughout the day. Connect the solar panel cable to the main chicken door unit. Use cable ties to manage excess wiring neatly.

Operating Instructions
Control Modes
The chicken coop door offers four distinct operating modes for flexible control:
- Light Sensor Mode: The door automatically opens at dawn when it detects sufficient light and closes at dusk when darkness is detected.
- Timer Control Mode: Set specific opening and closing times. The door will operate precisely according to your programmed schedule.
- Remote Control Mode: Use the provided remote control to manually open or close the door from a distance. Button 'A' turns on power, 'B' turns off, 'C' opens, and 'D' closes.
- Manual Control Mode: Directly use the up and down arrow keys on the chicken door's touch screen to open and close the door.

LCD Display Overview
The integrated LCD touch screen provides essential information and allows for easy programming:
- Time Display: Shows the current time in full hours.
- Temperature Display: Indicates the ambient temperature.
- Power Display: Shows the current battery level.
- Up Arrow: Manually opens the door or increases setting time.
- Down Arrow: Manually closes the door or reduces setting time.
- Power Button: Turns the unit ON or OFF.
- Timer/Settings Button: Used to calibrate local time, set door opening time, set closing time, and cancel settings.

Charging Options
The automatic chicken coop door is equipped with a built-in 6000mAh large capacity battery, ensuring continuous operation. It supports two charging methods:
- Solar Charging: The included solar panel automatically charges the battery during sunny days, providing an eco-friendly and continuous power supply.
- USB Charging: For cloudy days or when solar charging is insufficient, the unit can be charged via a USB cable (DC5V*1A USB charger recommended).
A fully charged battery can power the door for approximately 8-10 days.

Maintenance
To ensure optimal performance and longevity of your chicken coop door, regular maintenance is recommended:
- Cleaning: Periodically clean the door tracks and the main unit to prevent dirt, debris, or ice buildup from obstructing movement. Use a soft, damp cloth.
- Battery Check: Monitor the battery level via the LCD display. Ensure the solar panel is clean and free of obstructions to maximize charging efficiency.
- Sensor Cleaning: Keep the light sensor clean to ensure accurate dawn and dusk detection.
- Weather Resistance: The unit is designed to be waterproof and durable in various weather conditions (from -15°F to 140°F). However, extreme conditions may affect battery performance.

Troubleshooting
Refer to the table below for common issues and their solutions:
| Problem | Possible Cause | Solution |
|---|---|---|
| Door not opening/closing | Low battery; Obstruction in track; Incorrect settings; Sensor dirty/blocked. | Charge battery (USB or solar); Clear tracks of debris; Verify timer/light sensor settings; Clean light sensor. |
| Remote control not working | Remote battery dead; Out of range; Interference. | Replace remote battery; Move closer to the door unit; Reduce sources of interference. |
| Door closes on chicken (Anti-pinch not working) | Sensor obstruction; Malfunction. | Ensure the anti-pinch sensor area is clear; Contact customer support if issue persists. |
| Inaccurate timekeeping | Internal clock drift. | Recalibrate local time using the LCD display settings. |
Specifications
| Feature | Detail |
|---|---|
| Model Number | XR-JM001 |
| Brand | XRDZYXGS |
| Product Dimensions | 29.97 x 12.7 x 48.01 cm (11.8 x 5 x 18.9 inches) |
| Weight | 3.5 kg |
| Material | Aluminium Alloy |
| Power Source | Built-in 6000mAh Rechargeable Battery (Solar/USB Charging) |
| Control Modes | Light Sensor, Timer, Remote Control, Manual |
| Special Features | Waterproof, Anti-Pinch Function, LCD Touch Screen |
| Operating Temperature | -15°F to 140°F |
Safety Information
The XRDZYXGS Automatic Chicken Coop Door is designed with safety in mind:
- Anti-Pinch Function: Equipped with a built-in sensor, the door will automatically stop and retract if it detects an obstruction (like a chicken) under the door during closing, preventing injury.
- Predator Protection: The robust design and automatic closing mechanism help protect your poultry from common predators such as raccoons, foxes, and weasels.
- Secure Installation: Ensure the door is securely mounted to prevent accidental detachment or tampering.


Warranty and Support
For warranty information, technical support, or any inquiries regarding your XRDZYXGS Automatic Chicken Coop Door, please contact the manufacturer or the seller directly through your purchase platform. Keep your proof of purchase for warranty claims.
Ask a question about this manual
Ask about setup, troubleshooting, compatibility, parts, safety, or missing instructions. Manuals+ will review the question and use this page’s manual context to help answer it.