1. Introduction
This manual provides detailed instructions for the installation, operation, and maintenance of your LEDIARY 22-inch Caged Ceiling Fan with Light. This fan features an industrial caged design, a quiet motor, and convenient remote control functionality, including 6 fan speeds, timing options, and a reversible motor for year-round use. Please read this manual thoroughly before installation and use to ensure safe and efficient operation.

Image 1.1: LEDIARY 22-inch Caged Ceiling Fan with Light in a living space, illustrating airflow.
2. Safety Information
To reduce the risk of electric shock, fire, or personal injury, always follow these basic safety precautions:
- Read all instructions before installing the fan.
- Ensure the electrical supply is disconnected at the main fuse box or circuit breaker before installation or servicing.
- All electrical connections must be in accordance with local codes, ordinances, or national electrical codes. If you are unfamiliar with electrical wiring, consult a qualified electrician.
- The fan must be mounted with a minimum of 7 feet (2.1 meters) clearance from the trailing edge of the blades to the floor.
- Ensure the mounting structure can support the weight of the fan (approximately 10.88 pounds).
- Do not insert objects into the fan blades while the fan is operating.
- This fan is suitable for indoor and outdoor (covered) use. Do not expose to direct water spray.
3. Package Contents
Verify that all components are present before beginning installation:
- Caged Ceiling Fan Unit
- Remote Control (2 AAA batteries included)
- Down Rods (2 lengths provided)
- Installation Accessories (screws, wire nuts, etc.)
- User Manual
Note: E26 standard base bulbs are not included and must be purchased separately. The fan requires 4 bulbs.
4. Specifications
| Brand | LEDIARY |
| Model | B0DCGDRS44 |
| Color | Walnut |
| Material | Metal |
| Style | Farmhouse |
| Product Dimensions | 22"L x 22"W x 9.3"H |
| Indoor/Outdoor Usage | Indoor, Outdoor (Covered) |
| Power Source | DC |
| Installation Type | Semi Flush Mount (Downrod Mount) |
| Control Method | Remote Control |
| Light Source Type | LED or Incandescent |
| Number of Light Sources | 4 |
| Voltage | 12 Volts (DC) |
| Bulb Base | E26 |
| Max Incandescent Wattage | 60W per bulb |
| Max LED Wattage | 10W per bulb |
| Brightness | 1500 lumen (total, depending on bulbs) |
| Item Weight | 10.88 pounds |
| Special Feature | Timer, Reversible Motor |

Image 4.1: Product dimensions and recommended room size (49-100 sq ft).
5. Setup and Installation
Installation of this ceiling fan requires electrical wiring knowledge. It is recommended to consult a qualified electrician for installation to ensure safety and proper function.
5.1 Pre-Installation Checks
- Ensure power is OFF at the circuit breaker.
- Verify all package contents are present.
- Prepare necessary tools (screwdriver, wire strippers, ladder, etc.).
5.2 Mounting the Fan
The fan comes with two down rods (4-inch and 8-inch) to accommodate different ceiling heights. Choose the appropriate length for your installation. The mounting bracket should be securely attached to a ceiling joist or an outlet box rated for fan support.
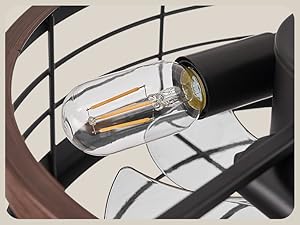
Image 5.1: Detail of the fan's canopy and downrod attachment.
5.3 Electrical Connections
Connect the fan's electrical wires to the household wiring according to the provided wiring diagram in the full instruction manual. Ensure all connections are secure with wire nuts. The fan is designed for a single set of electrical wires, meaning a wall switch will typically control only the power to the unit, while the remote controls fan and light functions independently.
5.4 Attaching the Fan Body and Light Kit
Carefully attach the fan body to the downrod and mounting bracket. Install the 4 E26 base bulbs (not included) into their sockets. Secure the caged light fixture to the fan body.
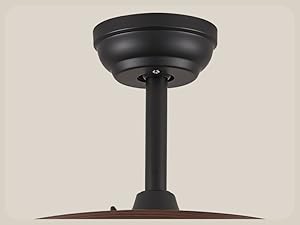
Image 5.2: Detail of the fan's caged light fixture.
6. Operating Instructions
The LEDIARY ceiling fan is operated using the included remote control. Ensure the remote has 2 AAA batteries installed (included).

Image 6.1: Remote control for the LEDIARY ceiling fan.
6.1 Remote Control Functions
- Light ON/OFF: Press the light button to turn the lights on or off.
- Fan Speed: Buttons 1-6 control the fan speed, from lowest (1) to highest (6).
- Timing: Set the fan to turn off automatically after 1, 2, 4, or 8 hours.
- Forward/Reverse: Changes the direction of the fan blades for summer or winter mode.
- No Beep: A dedicated button to disable the beeping sound when operating the remote.

Image 6.2: Overview of remote control functions.
6.2 Fan Speed Settings
The fan offers 6 distinct speed settings to suit your comfort needs:
- Low Wind (Gear 1-2): Ideal for gentle air circulation, suitable for sleeping.
- Medium Wind (Gear 3-4): Provides comfortable airflow for reading or light activities.
- High Wind (Gear 5-6): Strong airflow for rapid cooling or ventilation.

Image 6.3: Fan speed recommendations for various activities.
6.3 Timing Function
Use the timer function to automatically turn off the fan after a set period. Available settings are 1 hour, 2 hours, 4 hours, and 8 hours. This feature is useful for energy saving and convenience, especially during sleep.

Image 6.4: Timing switch and quiet operation features.
6.4 Reversible Motor (Summer/Winter Mode)
The fan features a reversible motor to optimize air circulation for different seasons:
- Summer Mode (Clockwise Rotation): Creates a downward draft, providing a cooling effect.
- Winter Mode (Reverse Rotation): Draws air upwards, circulating warm air trapped near the ceiling and promoting heat distribution.
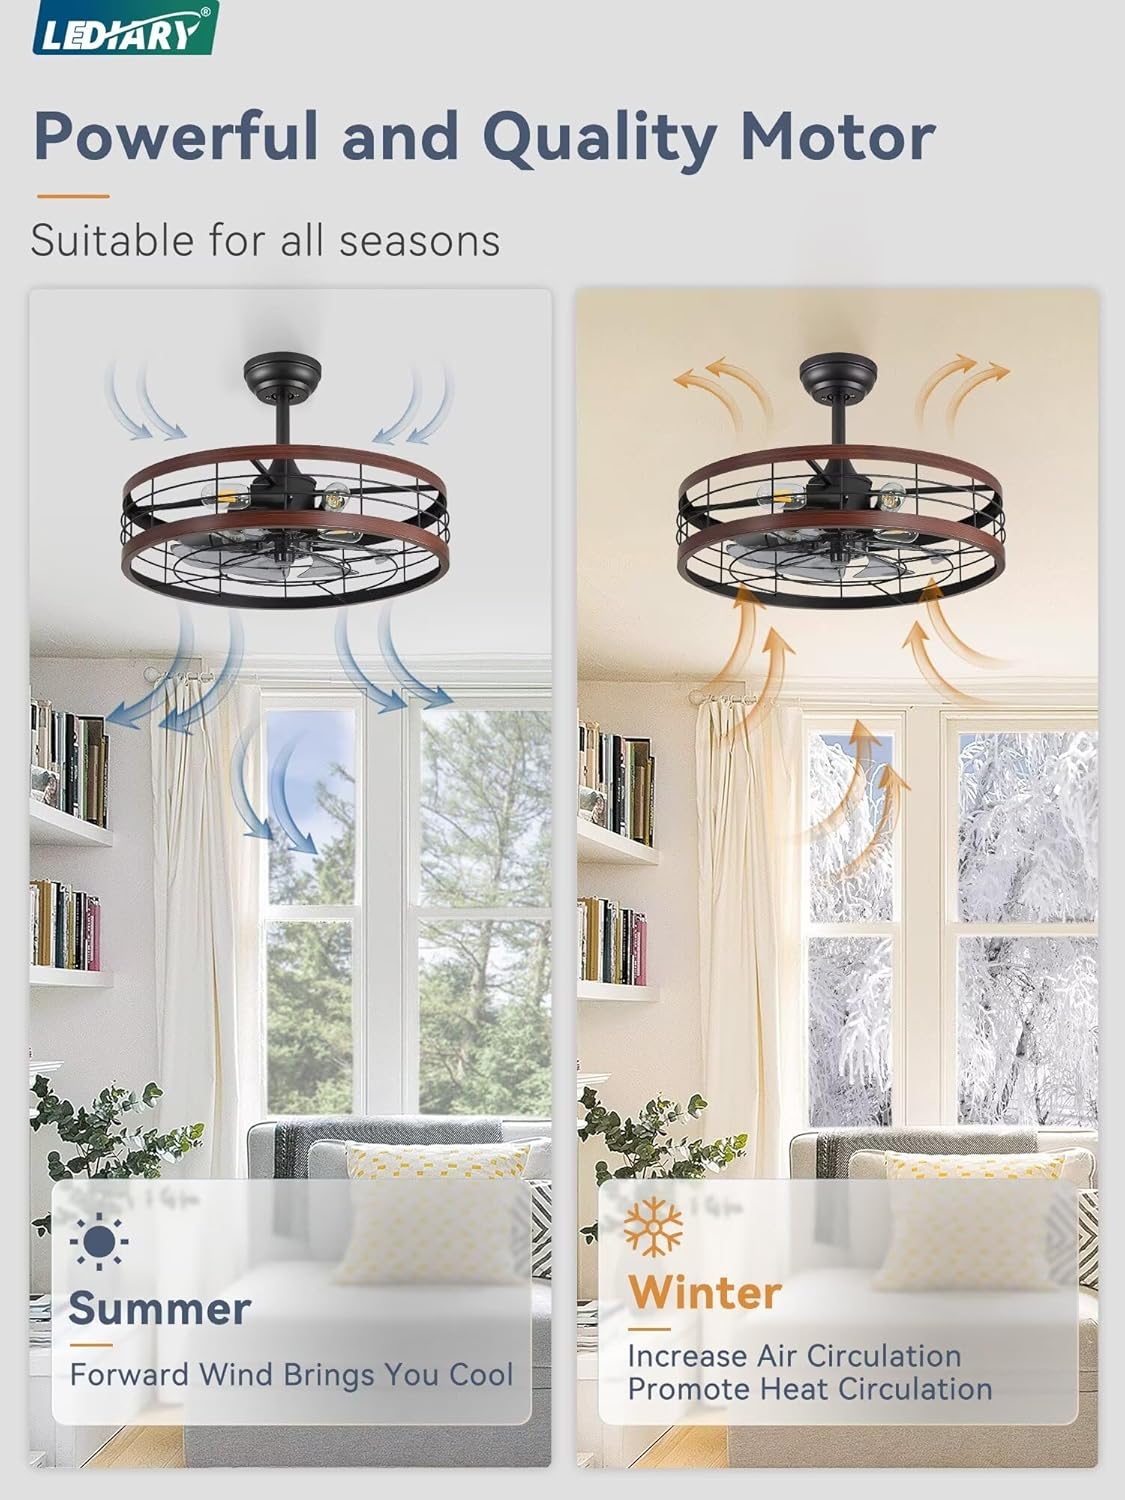
Image 6.5: Summer and Winter mode airflow directions.
6.5 Quiet Operation
The fan is designed for quiet operation, with sound levels typically around 30dB, comparable to a quiet library environment. This ensures minimal disturbance, making it suitable for bedrooms and other quiet spaces.

Image 6.6: Decibel levels for quiet operation.
7. Maintenance
Regular maintenance helps ensure the longevity and optimal performance of your ceiling fan.
7.1 Cleaning
- Always disconnect power before cleaning.
- Use a soft, damp cloth to wipe down the fan blades and metal cage. Avoid abrasive cleaners that may damage the finish.
- Do not use water directly on the fan motor or electrical components.
7.2 Bulb Replacement
The fan uses 4 E26 standard base bulbs. When replacing bulbs:
- Ensure power is OFF and bulbs have cooled down.
- Unscrew old bulbs and screw in new ones.
- Do not exceed the maximum wattage: 60W for incandescent bulbs or 10W for LED bulbs per socket.

Image 7.1: E26 bulb base detail.
8. Troubleshooting
If you encounter issues with your fan, refer to the following common problems and solutions:
- Fan does not operate: Check that the power supply is connected and the circuit breaker is on. Ensure remote control batteries are functional and correctly inserted.
- Lights do not turn on: Verify bulbs are correctly installed and not burnt out. Check power supply.
- Fan wobbles: Ensure all mounting screws are tightened. Check that the downrod is securely attached.
- Remote control not responding: Replace remote batteries. Ensure there are no obstructions between the remote and the fan receiver.
- Beeping sound from fan: Use the 'No Beep' button on the remote control to disable the sound.
For issues not resolved by these steps, please contact customer support.
9. Warranty and Support
The LEDIARY 22-inch Caged Ceiling Fan with Light comes with a 2-year warranty from the date of purchase, covering defects in materials and workmanship.
For technical support, warranty claims, or any questions regarding your product, please contact LEDIARY customer service. We offer 24-hour online technical support to assist you with any problems.
Please have your model number (B0DCGDRS44) and purchase information ready when contacting support.