Introduction
This manual provides detailed instructions for the installation, operation, and maintenance of your Gopper 12-inch Ultra Quiet Bathroom Exhaust Fan with 6500K LED Light. Please read this manual thoroughly before beginning any procedures to ensure safe and efficient use of the product.
The Gopper bathroom exhaust fan is designed for ventilating, exhausting, and dehumidifying spaces up to 100 sq. ft. It features a powerful 120 CFM airflow and operates at an ultra-quiet 1.0 Sone noise level. The integrated 6500K LED light provides bright, cool white illumination. This energy-efficient unit is suitable for various residential applications, including bathrooms, laundry rooms, and bedrooms.

Image: The Gopper 120CFM TurboFlow Vent Fan effectively removes air from a modern bathroom setting.
Safety Information
WARNING: To reduce the risk of fire, electric shock, or injury to persons, observe the following:
- Read all instructions and safety information before installing or using this fan.
- All electrical work must be performed by a qualified electrician in accordance with all applicable codes and standards.
- Always disconnect power at the service panel before working on or near the fan.
- Do not use this fan with any solid-state speed control device.
- This product is not intended for use in kitchens or areas where grease or oil may accumulate.
- Do not install the product directly above a shower or bathtub unless it is connected to a GFCI-protected branch circuit.
- Ensure the product is properly grounded.
- Do not damage hidden electrical wiring or utilities when making ceiling cuts.
- Do not install in a ceiling with less than 3mm gap between the switch and the ceiling.
- This product is not intended for use by persons (including children) with reduced physical, sensory, or mental capabilities, or lack of experience and knowledge, unless they have been given supervision or instruction concerning use of the product by a person responsible for their safety.
- Young children should be supervised to ensure that they do not play with the appliance.
Parts & Specifications
Included Components:
- Bathroom Exhaust Fan Unit with LED Light
- Aluminum Foil Tube (Duct)
- Clamps (2)
- Air Vent (Draft Stopper)
- Wire Connectors
- Mounting Screws
- Product Instructions Manual
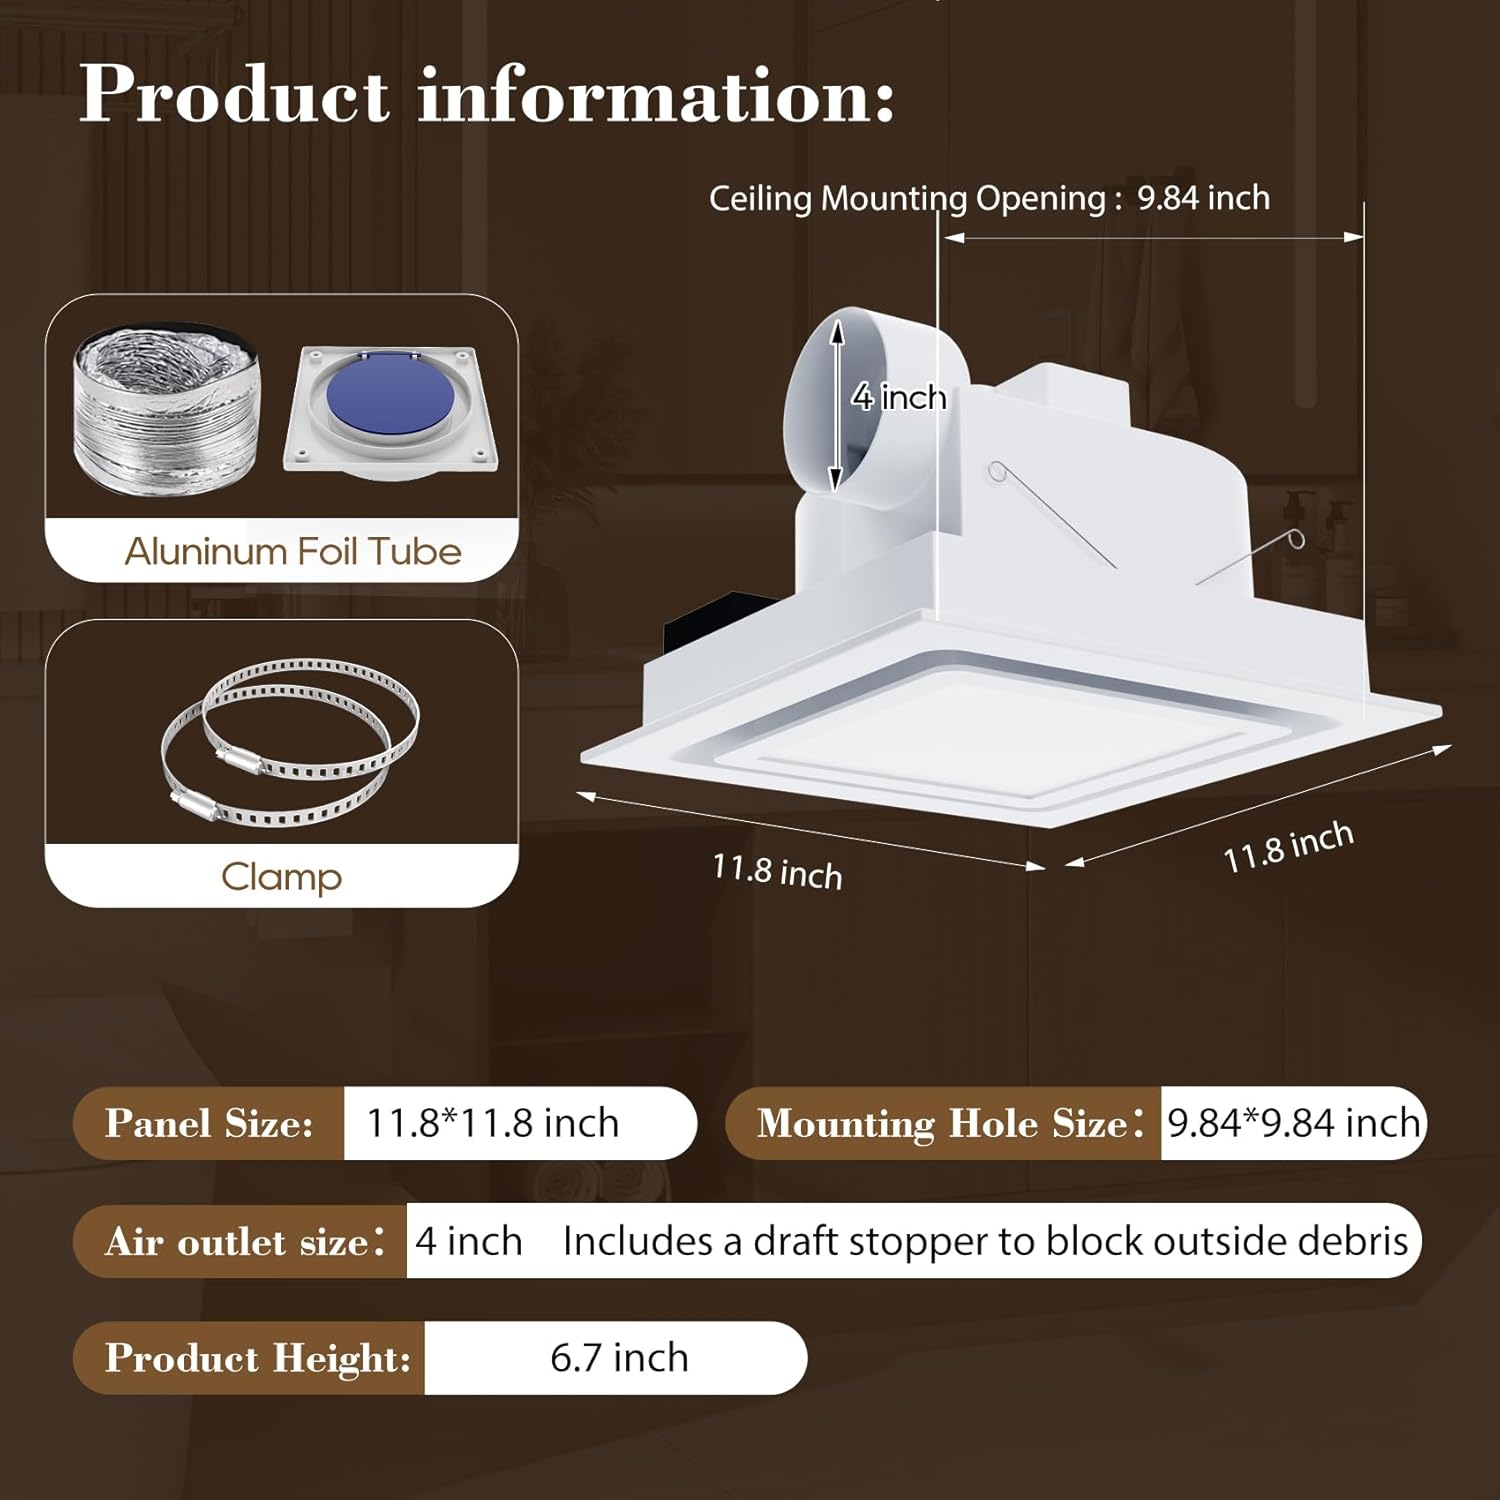
Image: Key components of the Gopper Bathroom Exhaust Fan, including the main unit, ducting, and connectors.
Product Specifications:
| Feature | Detail |
|---|---|
| Brand | Gopper |
| Model Name | Bathroom Exhaust Fan with Light |
| Product Dimensions | 12"D x 12"W x 6.7"H |
| Panel Size | 11.8" x 11.8" (30cm x 30cm) |
| Mounting Hole Size | 9.8" x 9.8" (24.8cm x 24.8cm) |
| Duct Diameter | 4.0" (10cm) |
| Air Flow Capacity | 120 CFM (Cubic Feet Per Minute) |
| Noise Level | 1.0 Sones |
| LED Light Color Temperature | 6500K (Cool White, non-adjustable) |
| LED Light Lumens | 1500 LM |
| Wattage | 42 watts |
| Voltage | 110 Volts |
| Power Source | AC |
| Room Type | Bathroom, Bedroom, Garage, Laundry Room, Living Room |
| Mounting Type | Ceiling Mount |
| Material | Metal, Plastic |
| Energy Efficiency | Energy Star Certified |

Image: The fan is suitable for rooms up to 100 square feet, ensuring effective ventilation.
Installation
Note: All electrical work should be carried out by a licensed and qualified electrician. Ensure power is disconnected at the circuit breaker before beginning installation.
Pre-Installation Steps:
- Verify Dimensions: Confirm that your ceiling opening matches the required mounting hole size of 9.8" x 9.8" (24.8cm x 24.8cm). The panel size is 11.8" x 11.8" (30cm x 30cm).
- Prepare Wiring: Ensure you have separate wiring for the fan and light if you wish to control them independently. The fan requires a 110V power supply.
- Ducting: Prepare the 4-inch ducting for connection to the fan unit.
Tool-Free Ceiling Installation (3 Steps):
- Snap: Position the fan unit into the prepared ceiling opening. The unit is designed for a secure fit.
- Lock: Secure the fan unit to the ceiling using the provided mounting screws. Ensure it is firmly attached to the wood frame or ceiling joists for stability.
- Done: Insert the light panel into the fan housing. The LED power wire needs to be connected to the switch separately or connected in parallel to the fan power.

Image: Visual guide for the simple three-step installation process: Snap the unit into place, Lock it with screws, and then the installation is Done.
Wiring Diagram:
The fan and light can be controlled separately. The fan motor has its own wiring (black, white, green for ground), and the LED light has separate wiring (blue, brown, green for ground). Connect these to your wall switches as per local electrical codes. Modern wire connectors are provided for ease of installation.
Video: This video provides a general overview of the Gopper Bathroom Exhaust Fan with Light, demonstrating its features and quiet operation.
Operating Instructions
The Gopper Bathroom Exhaust Fan is designed for straightforward operation. It features a single speed for ventilation and a fixed color temperature LED light.
- Fan Operation: Activate the fan using the dedicated wall switch. The fan will operate at 120 CFM, effectively removing moisture and odors from the room.
- Light Operation: Activate the 6500K LED light using its dedicated wall switch. The light provides 1500 lumens of bright, cool white illumination. The color temperature is non-adjustable.
- Quiet Performance: The fan operates at a low noise level of 1.0 Sones, ensuring a quiet environment.

Image: The fan's 1.0 Sone operation ensures a quiet environment, barely perceptible to the human ear.

Image: The powerful exhaust quickly removes shower steam, preventing foggy mirrors.
Maintenance
Regular maintenance ensures optimal performance and extends the lifespan of your exhaust fan. Always disconnect power at the circuit breaker before performing any maintenance.
- Cleaning the Grille and Cover: Switch off power at first. Remove the fan cover and grille. Wash them in warm water with a brush and neutral cleaner. Do not use water over 60°C, petrol, benzene, thinner, or any other organic solvent to clean. Do not allow water to enter the motor.
- Cleaning the Fan Blades: Wipe the fan blades with a soft cloth. Do not rinse them in water.
- Reassembly: Once all parts are dry, reassemble the fan cover and grille.
Troubleshooting
If you experience issues with your Gopper Bathroom Exhaust Fan, consider the following:
- Fan Not Operating: Check the power supply and ensure the circuit breaker is not tripped. Verify all wiring connections are secure.
- Light Not Working: Ensure the light's power wire is correctly connected and the switch is functional.
- Excessive Noise: Check for any obstructions in the fan blades or ducting. Ensure the fan is securely mounted to prevent vibrations.
- Poor Ventilation: Verify that the ducting is not blocked or kinked. Ensure the fan size is appropriate for your room's square footage (up to 100 sq. ft.).
If problems persist, contact a qualified electrician or the manufacturer's support for assistance.
Warranty & Support
Gopper provides lifetime service for this product. The quality and structure of each bathroom fan meet regional, national, and international industry standards, ensuring reliability and service life. For any inquiries or support needs, please refer to the contact information provided with your purchase or on the Gopper website.
