Important Safety Information
- Ensure the mixer is connected to a power source with the correct voltage as specified.
- Do not expose the unit to rain or moisture to prevent fire or electric shock.
- Do not open the casing. Refer all servicing to qualified personnel.
- Keep the unit away from heat sources and direct sunlight.
- Always use the provided power adapter. If a replacement is needed, ensure it matches the original specifications.
Product Overview
The Kmise 16 Channel Digital Audio Mixer (Model J121) is designed for professional audio mixing, offering a comprehensive set of features for various applications. It includes multiple input/output options, advanced sound processing capabilities, and versatile connectivity.
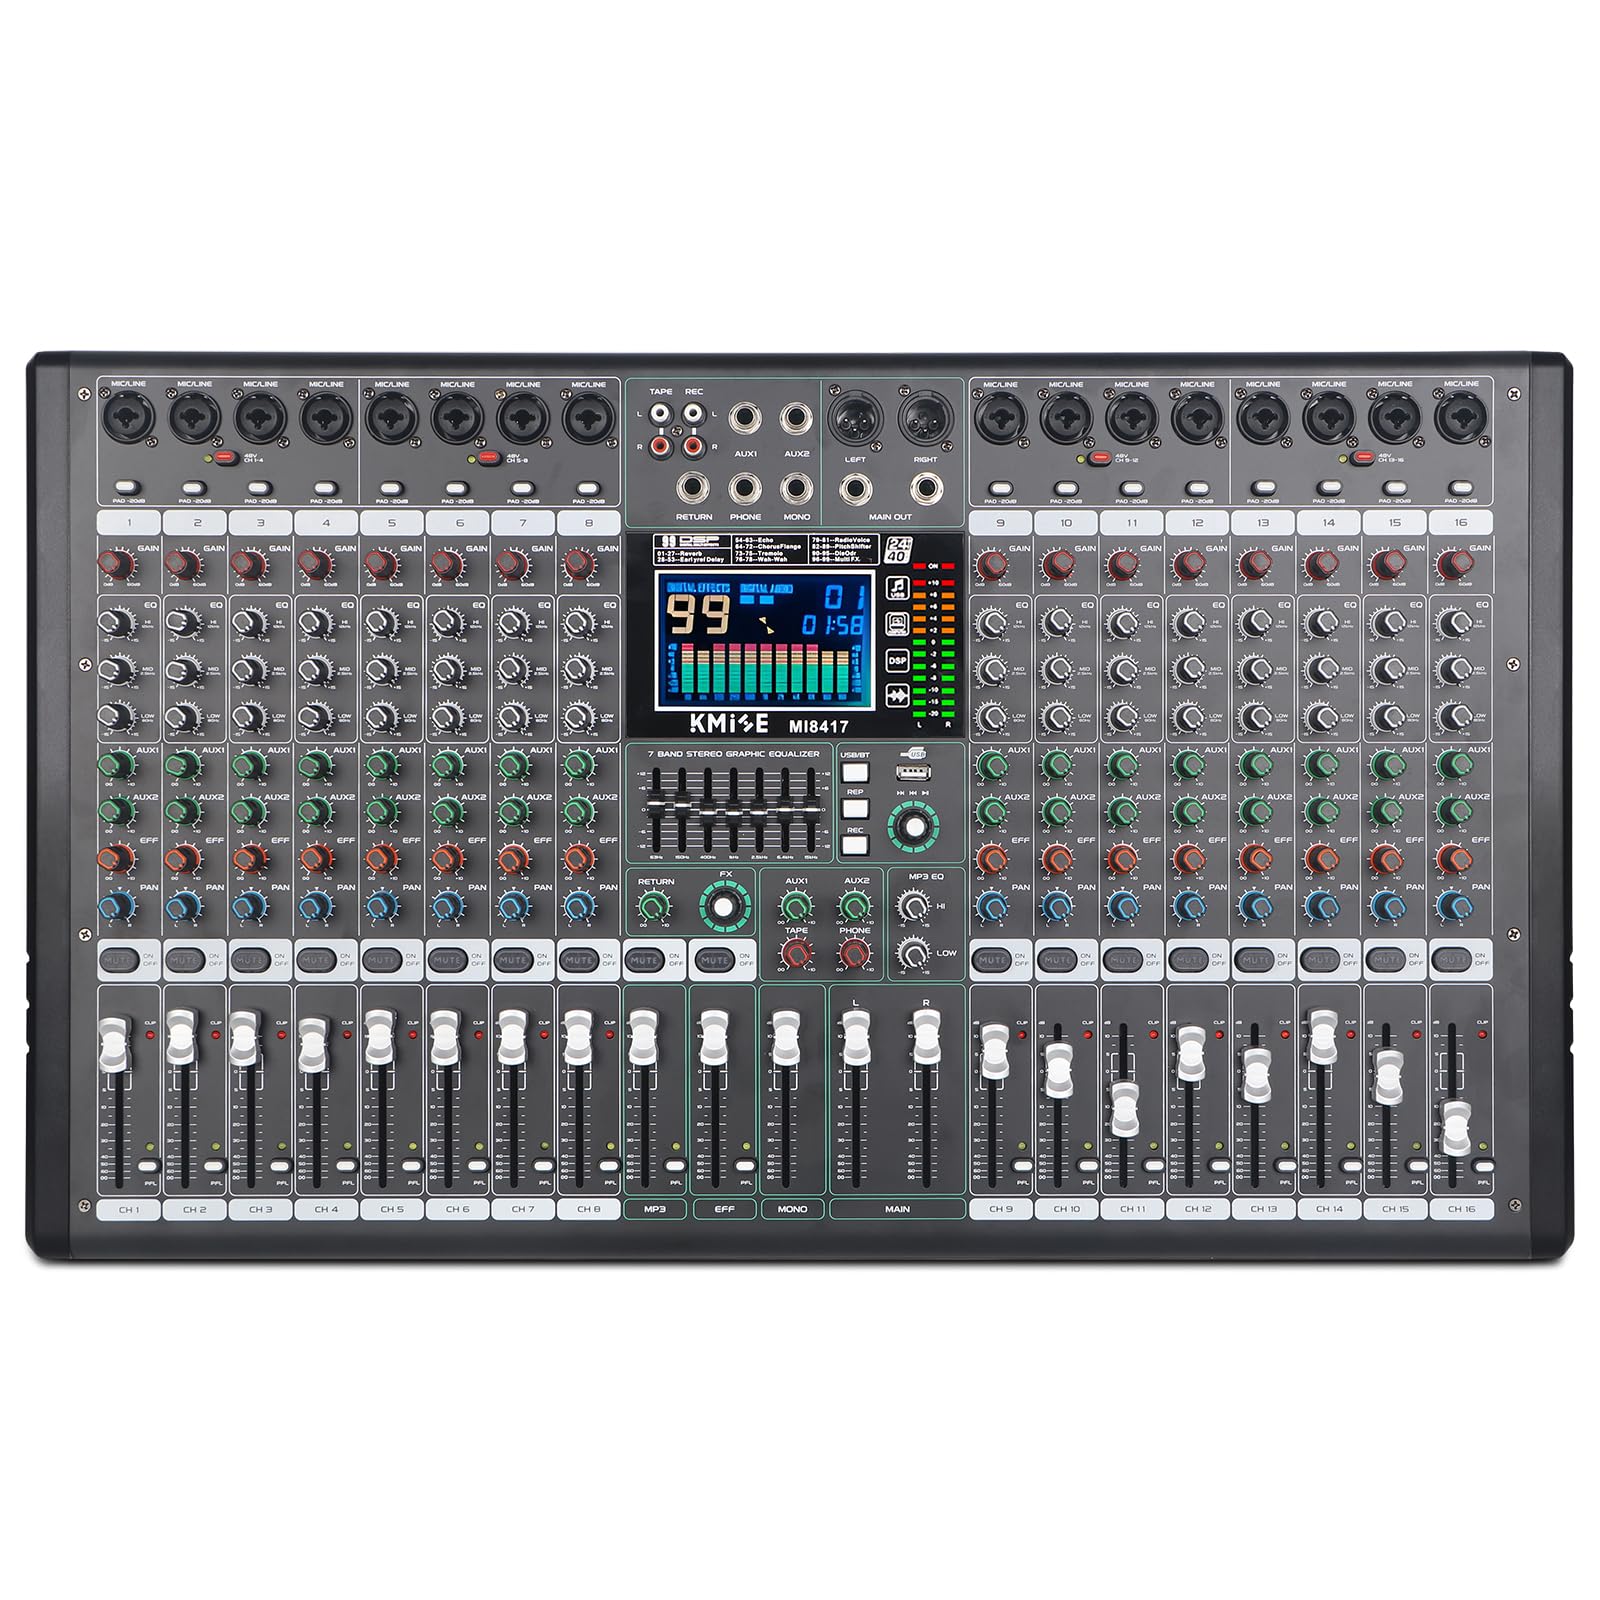
Figure 1: Front view of the Kmise 16 Channel Digital Audio Mixer, highlighting the 48V phantom power feature and overall layout. This mixer supports various condenser microphones for high-performance sound reduction.
Key Features:
- 16 Channels: Multiple inputs for microphones and line-level instruments.
- 48V Phantom Power: For condenser microphones.
- 7-Band EQ: On each channel for precise frequency adjustments.
- 24-bit DSP Multi-Effects Processor: With 99 built-in effects.
- Bluetooth Connectivity: For wireless audio streaming.
- USB/SD/FM/WMA Output: Versatile media playback and recording options.
- Comprehensive I/O: XLR, 1/4'' inputs/outputs, RCA, Send/Return, Headphone jack.
- LED Display: For monitoring levels and settings.
Setup Guide
- Unpacking: Carefully remove the mixer from its packaging. Inspect for any signs of damage. Ensure all accessories, including the power cable, are present.
- Power Connection: Connect the provided power cable to the mixer's power input and then to a suitable electrical outlet. Ensure the mixer's power switch is in the OFF position before connecting.
- Initial Power On: Turn on the mixer using the power switch. The LED display should illuminate.
- Connecting Microphones:
- For dynamic microphones, connect via XLR or 1/4" input.
- For condenser microphones, connect via XLR and activate the +48V PHANTOM POWER button for the respective channel. Ensure the microphone is connected before activating phantom power.
- Connecting Line-Level Devices: Connect instruments, media players, or other line-level devices to the 1/4" or RCA inputs as appropriate.
- Output Connections: Connect your main speakers or recording devices to the XLR or 1/4" (L/R) main outputs. Use the headphone jack for monitoring.

Figure 2: Connectivity diagram illustrating how to connect microphones, instruments (guitar, drums, keyboard), and external devices like computers, phones, and audio interfaces to the mixer.
Operating Instructions
Channel Controls:
Each channel on the mixer features dedicated controls for precise audio adjustment:
- GAIN: Adjusts the input sensitivity for the connected microphone or instrument.
- EQ (High, Mid, Low): 3-band equalizer for shaping the tone of each channel.
- AUX: Sends signal to external effects processors or monitor mixes.
- FX: Sends signal to the internal DSP effects processor.
- PAN: Adjusts the stereo position of the channel.
- VOLUME FADER: Controls the output level of the channel to the main mix.
- PEAK LED: Indicates when the input signal is too high, potentially causing distortion. Adjust GAIN to prevent clipping.
7-Band Graphic Equalizer:

Figure 3: Detailed view of the 7-band stereo graphic equalizer, allowing precise frequency shaping from 63Hz to 15kHz.
The mixer features a 7-band stereo graphic equalizer. Use the faders to boost or cut specific frequency bands (63Hz, 150Hz, 400Hz, 1KHz, 2.5KHz, 6.4KHz, 15KHz) to fine-tune the overall sound of your mix.
Bluetooth (BT) Connection:

Figure 4: The mixer's built-in wireless Bluetooth playback feature, enabling easy connection to mobile phones and other devices for audio streaming.
- Press the "MODE" button on the media player section until "BT" appears on the LED display.
- On your smartphone or Bluetooth-enabled device, search for available Bluetooth devices.
- Select "Kmise Mixer" (or similar name) from the list to pair.
- Once connected, you can stream audio wirelessly from your device to the mixer. Adjust the media player volume and main mix volume as needed.
USB/SD/FM/WMA Playback and Recording:

Figure 5: The mixer's USB/Computer support, allowing connection of external USB drives, computers, or flash memory devices for mixing and recording.
- USB/SD Playback: Insert a USB flash drive or SD card into the respective slot. Use the media player controls (Play/Pause, Next, Previous, Mode) to navigate and play audio files (MP3, WMA).
- USB Recording: Connect the mixer to a computer via a USB cable. The mixer will be recognized as an audio interface. Use your preferred Digital Audio Workstation (DAW) software to record the main mix output.
- FM Radio: Select FM mode on the media player. The mixer can tune into FM radio stations.
DSP Effects Processor:

Figure 6: A visual representation of the 99 DSP effects, categorized into Reverb, Delay, Echo, Chorus Flange, Tremolo, Wah-Wah, Radio Voice, Pitch Shifter, DisOdr, and Multi FX.
The mixer includes a 24-bit DSP multi-effects processor with 99 preset effects. To apply an effect:
- Use the "FX" knob on each channel to send the desired amount of signal to the effects processor.
- Use the "PROGRAM" knob on the main effects section to select an effect number (01-99) from the LED display.
- Adjust the "FX RETURN" fader to control the overall level of the effect in the main mix.
The effects include various reverbs, delays, echoes, chorus, flanger, tremolo, wah-wah, radio voice, pitch shifter, and multi-effects combinations.
Maintenance
- Cleaning: Use a soft, dry cloth to clean the mixer's surface. Avoid abrasive cleaners or solvents.
- Storage: When not in use, store the mixer in a cool, dry place, away from dust and extreme temperatures.
- Cable Management: Ensure all cables are neatly organized and not under strain to prevent damage to connectors and ports.
- Ventilation: Do not block the ventilation openings on the mixer to prevent overheating.
Troubleshooting
| Problem | Possible Cause | Solution |
|---|---|---|
| No Power | Power cable not connected, faulty power cable, power outlet issue. |
|
| No Sound Output | Main volume fader down, channel fader down, incorrect input/output connections, mute engaged. |
|
| Distorted Sound | Input gain too high, output level too high, faulty cable. |
|
| Bluetooth Not Connecting | Mixer not in BT mode, device too far, previously paired device interfering. |
|
| 48V Phantom Power Not Working | Phantom power not activated for the channel, faulty microphone. |
|
Specifications
| Brand | Kmise |
| Model Number | J121-xxxyyyywz |
| Number of Channels | 16 |
| Connectivity Technology | USB, Bluetooth |
| Power Source | Corded Electric |
| Item Weight | 17.71 pounds (8.05 Kilograms) |
| Package Dimensions | 28 x 17.8 x 5.8 inches |
| DSP Effects | 99 built-in effects (Reverb, Delay, Echo, Chorus, etc.) |
| EQ | 7-band graphic EQ on each channel, 3-band EQ on all channels |
| Phantom Power | +48V |

Figure 7: Dimensions of the mixer: approximately 25.9 inches wide by 15.1 inches deep. Note: Minor deviations may occur due to manual measurement.
Warranty and Support
Kmise products are designed for reliability and performance. For warranty information, please refer to the warranty card included with your product or visit the official Kmise website.
For technical support, troubleshooting assistance, or inquiries about replacement parts, please contact Kmise customer service through their official channels. Please have your model number (J121-xxxyyyywz) and purchase information ready when contacting support.
Online Resources: For additional support and product updates, visit the Kmise Store on Amazon.


