PHEZEN RT-QA1744X-WUYA-08
User Manual: Car Stereo Radio Receiver
Brand: PHEZEN
Model: RT-QA1744X-WUYA-08
For Toyota Vios Yaris 2007-2012
1. Introduction
This manual provides comprehensive instructions for the installation, operation, and maintenance of your PHEZEN 9-inch Touch Screen Car Radio Receiver. This unit is designed specifically for Toyota Vios and Yaris models from 2007 to 2012, offering advanced features such as CarPlay, Android Auto, WiFi, GPS Navigation, Bluetooth, FM Radio, Steering Wheel Control (SWC), and support for a backup camera.
Please read this manual thoroughly before installation and use to ensure proper operation and to maximize your experience with the product.

Figure 1.1: PHEZEN Car Stereo Radio Receiver installed in a vehicle dashboard.
2. Safety Information
Observe the following safety precautions to prevent injury or damage to the device:
- Do not attempt to disassemble or modify the unit. This may cause electric shock or other hazards.
- Ensure all wiring connections are secure and properly insulated to prevent short circuits.
- Install the unit in a location that does not obstruct the driver's view or interfere with vehicle operation.
- Do not operate the unit in a way that distracts you from driving. Always prioritize road safety.
- Consult a professional for installation if you are unsure about any steps.
- Keep the unit away from water and excessive moisture.
3. What's in the Box
Upon opening the package, verify that all the following components are included:
- PHEZEN 9-inch Car Stereo Radio Receiver
- Power Cable
- RCA Input/Output Cables
- 2x USB Cables
- Camera Input Cable
- GPS Antenna
- Instruction Manual (this document)
- Backup Camera (if included with your specific package)

Figure 3.1: Included components of the PHEZEN Car Stereo system.
4. Specifications
| Feature | Specification |
|---|---|
| Model Name | 9 inch Android 13.0 Car Radio |
| Item Model Number | RT-QA1744X-WUYA-08 |
| Display Size | 9 Inches |
| Operating System | Android 13 |
| CPU | 4-core |
| RAM | 2GB |
| ROM | 32GB |
| Connectivity Technology | Bluetooth, USB, Wi-Fi |
| Special Features | CarPlay, Android Auto, GPS Navigation, FM Radio, Steering Wheel Control, Backup Camera Support |
| Voice Command | Microphone, Touchscreen |
| Audio Output Mode | Stereo |
| Mounting Type | Dashboard Mount |
| Product Dimensions | 14.96 x 11.42 x 5.51 inches |
| Item Weight | 3.42 pounds |
5. Installation Guide
This section outlines the general steps for installing the car stereo. Professional installation is recommended if you are unfamiliar with car audio wiring.
5.1 Pre-Installation Steps
- Disconnect Battery: Before starting, disconnect the negative terminal of your vehicle's battery to prevent electrical shorts.
- Remove Old Unit: Carefully remove the existing car stereo and dashboard trim. Refer to your vehicle's specific service manual for detailed instructions on trim removal.
- Inspect Wiring: Identify the vehicle's wiring harness for power, ground, speaker outputs, and antenna connections.
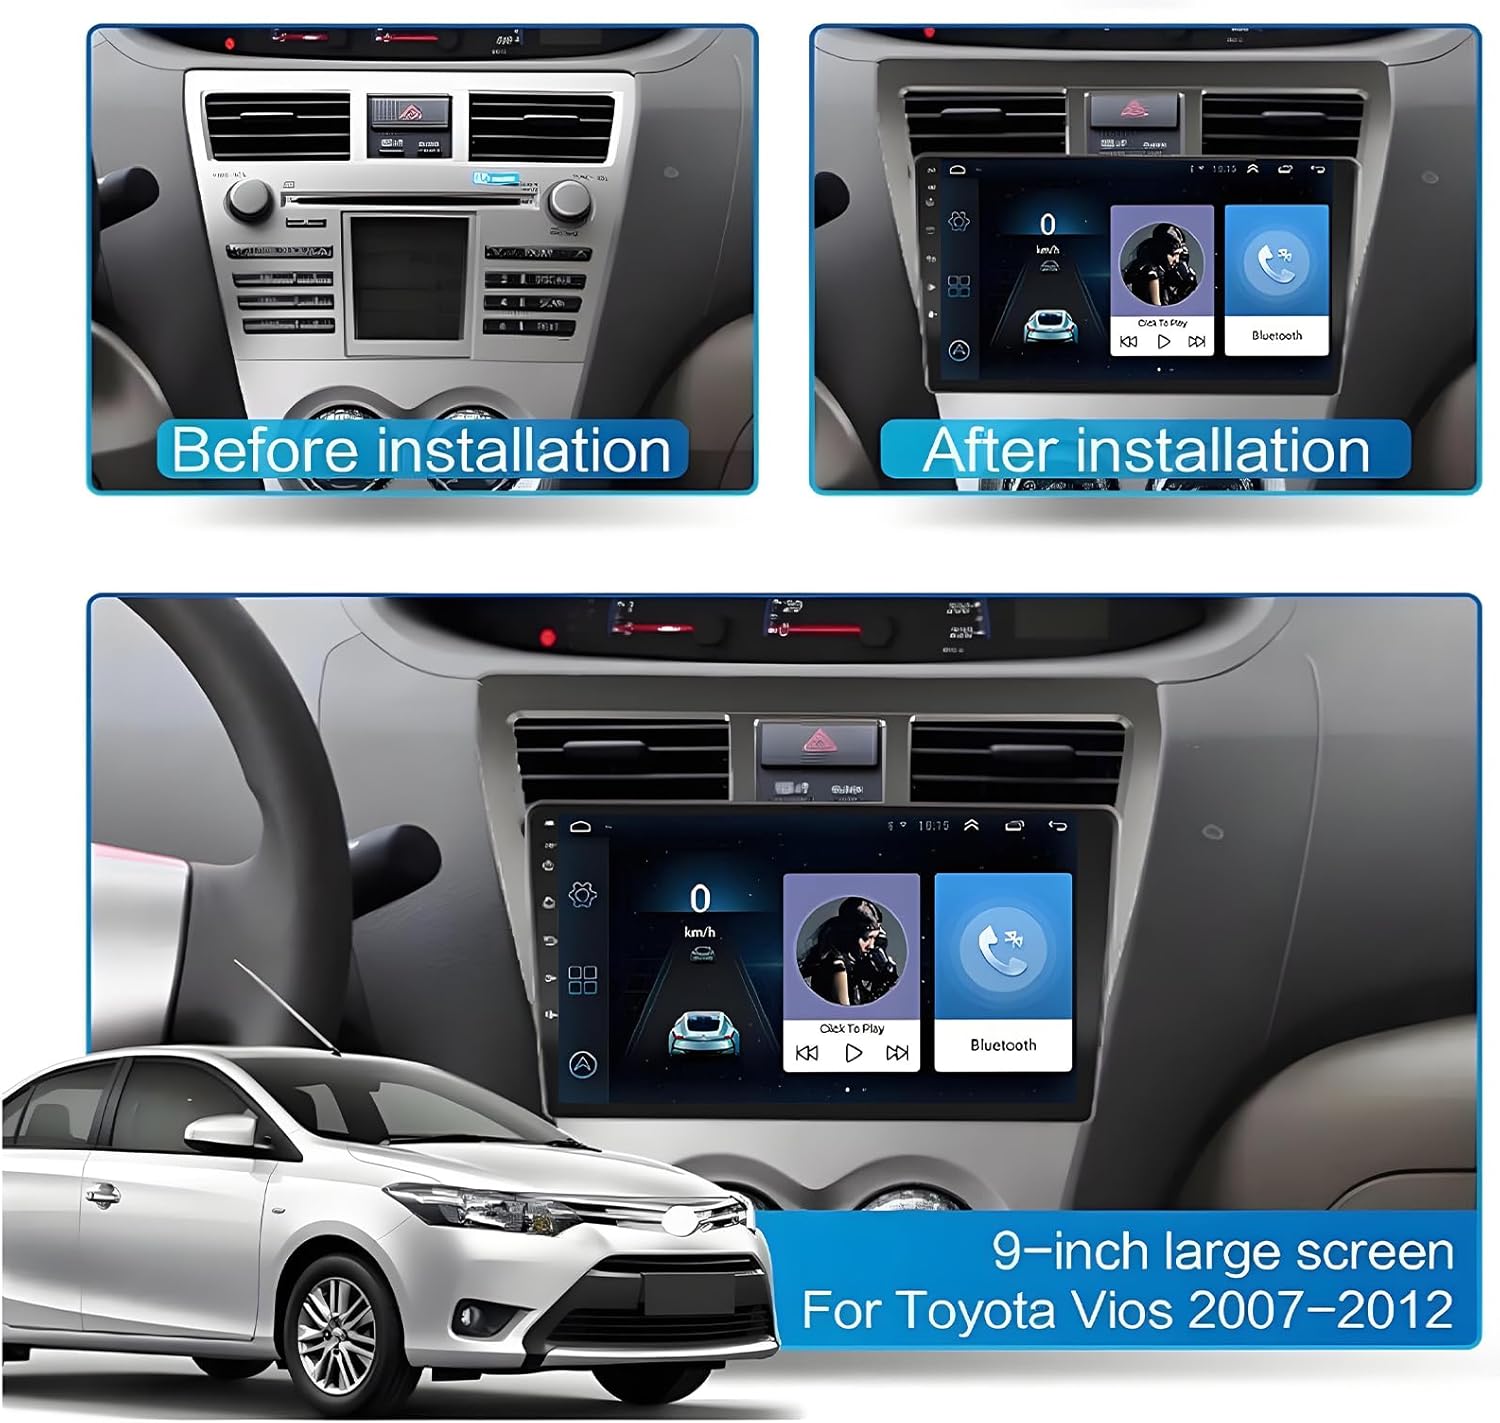
Figure 5.1: Dashboard appearance before and after stereo installation.
5.2 Wiring Connections
Connect the provided cables to the corresponding ports on the new stereo and your vehicle's wiring harness. Ensure all connections are firm and correctly matched.
- Power Cable: Connect the main power harness. This typically includes constant power (yellow), accessory power (red), and ground (black).
- Speaker Wires: Connect the speaker output wires to your vehicle's speaker wiring. Pay attention to positive and negative terminals for each speaker.
- GPS Antenna: Connect the GPS antenna and route it to a location with a clear view of the sky (e.g., dashboard, A-pillar).
- USB Cables: Connect the USB extension cables and route them to a convenient location for connecting USB devices.
- RCA Input/Output: Connect any external amplifiers or video monitors using the RCA cables.
- Camera Input: If installing a backup camera, connect its video output to the camera input cable on the stereo. Ensure the camera's power is connected to the reverse light circuit for automatic activation.

Figure 5.2: Rear connections of the car stereo unit.
5.3 Mounting the Unit
Once all connections are made, carefully slide the new stereo into the dashboard opening. Secure it using the mounting brackets and screws provided with the unit or your vehicle's original hardware. Reinstall any removed dashboard trim pieces.
After installation, reconnect the vehicle's battery and proceed to the initial setup.
6. Initial Setup
After powering on the unit for the first time, you may need to perform some initial configurations:
- Language Selection: Choose your preferred language from the system settings.
- Date and Time: Set the correct date and time. This can often be synchronized automatically via GPS or network connection.
- Wi-Fi Connection: Connect the unit to a Wi-Fi hotspot (e.g., from your smartphone) to enable online features, map updates, and app downloads. Navigate to Settings > Network & Internet > Wi-Fi.
- Steering Wheel Control (SWC) Learning: If your vehicle has steering wheel controls, you will need to configure them. Go to Settings > Steering Wheel Control and follow the on-screen instructions to map the buttons.
- Screen Calibration: If the touch response is inaccurate, perform a screen calibration from the system settings.
7. Operating Instructions
7.1 CarPlay & Android Auto
This unit supports both wireless and wired CarPlay and Android Auto, allowing seamless integration with your smartphone. Connect your phone via Bluetooth and Wi-Fi (for wireless) or USB (for wired) to display your phone's interface on the car stereo screen. You can use voice commands (Siri or Google Assistant) for navigation, calls, music, and other apps.

Figure 7.1: CarPlay and Android Auto interfaces on the 9-inch display.
7.2 GPS Navigation
The built-in GPS module supports both offline and online navigation. For offline maps, you may need to download map data to the unit's internal storage. For online navigation, ensure the unit is connected to Wi-Fi. Access the navigation application from the main menu and enter your destination.

Figure 7.2: GPS Navigation and Wi-Fi Hotspot features.
7.3 Bluetooth Functionality
Connect your smartphone via Bluetooth for hands-free calling and audio streaming (A2DP). To pair a device, go to the Bluetooth settings, enable Bluetooth, and search for available devices. Select your phone from the list and confirm the pairing code.
- Hands-Free Calling: Make and receive calls directly from the stereo. The built-in microphone ensures clear communication.
- Music Playback: Stream audio from your phone's music library or streaming apps to the car stereo speakers.
7.4 FM/RDS Radio
Access the FM radio function to listen to your favorite stations. The unit features an RDS (Radio Data System) function, which can display station information, song titles, and traffic updates where available. You can save preset stations for quick access.

Figure 7.3: Bluetooth, FM/RDS Radio, and Audio Equalizer settings.
7.5 Steering Wheel Control (SWC)
If your vehicle is equipped with steering wheel controls, you can configure them to operate the stereo. This allows you to control volume, track skipping, answer calls, and more without taking your hands off the wheel. Refer to the "Initial Setup" section for SWC learning instructions.
7.6 Backup Camera Display
The unit supports a backup camera (if installed). When the vehicle is shifted into reverse gear, the display will automatically switch to the camera's view, providing a clear image of the area behind your vehicle. The camera typically features a wide-angle lens, night vision, and is waterproof for optimal visibility in various conditions.

Figure 7.4: Reversing Display and Steering Wheel Control interface.
7.7 Audio Equalizer (EQ)
Customize your audio experience using the built-in equalizer. You can select from various preset sound effects (e.g., Pop, Rock, Jazz) or manually adjust frequency bands to achieve your preferred sound quality.
8. Maintenance
- Cleaning: Use a soft, dry cloth to clean the display and unit exterior. For stubborn smudges on the screen, use a screen cleaner specifically designed for electronic displays. Do not use abrasive cleaners or solvents.
- Software Updates: Periodically check for software updates via the system settings (requires Wi-Fi connection). Updates can improve performance, add new features, and fix bugs.
- Avoid Extreme Temperatures: Do not expose the unit to extreme hot or cold temperatures for prolonged periods, as this can affect its performance and lifespan.
9. Troubleshooting
If you encounter issues with your car stereo, refer to the following common problems and solutions:
| Problem | Possible Solution |
|---|---|
| Unit does not power on. | Check power cable connections (constant 12V, accessory 12V, ground). Verify vehicle's fuse for the stereo. |
| No sound from speakers. | Check speaker wire connections. Ensure volume is not muted or set to zero. Verify audio output settings. |
| GPS signal is weak or inaccurate. | Ensure GPS antenna is properly connected and placed in a location with a clear view of the sky. Update map data if necessary. |
| Bluetooth device cannot connect. | Ensure Bluetooth is enabled on both the stereo and your device. Delete previous pairings and try re-pairing. Restart both devices. |
| Steering Wheel Controls not working. | Perform the SWC learning process again in the settings menu. Ensure the SWC wires are correctly connected. |
| Backup camera not displaying. | Check the camera input cable connection. Verify the camera's power supply and ground. Ensure the reverse trigger wire is connected. |
| Touch screen unresponsive or inaccurate. | Perform screen calibration from the system settings. Restart the unit. |
If the problem persists after trying these solutions, please contact customer support.
10. Warranty and Support
For any questions or issues regarding your PHEZEN car stereo, please contact the seller or manufacturer's customer support. As per product information, support is available, and messages will typically be responded to within 24 hours.
Please retain your proof of purchase for warranty claims. Specific warranty terms and conditions may vary; refer to your purchase documentation or contact the seller for details.
For further assistance, you may also refer to any available online video guides provided by the seller, which can assist with connection and screen calibration.
Ask a question about this manual
Ask about setup, troubleshooting, compatibility, parts, safety, or missing instructions. Manuals+ will review the question and use this page’s manual context to help answer it.