1. Introduction
This manual provides essential information for the safe and efficient operation, maintenance, and troubleshooting of your Bielmeier 20V Cordless Drill and 236-Piece Tool Set. Please read this manual thoroughly before first use and retain it for future reference.
The Bielmeier 20V Cordless Drill and 236-Piece Tool Set is designed for various household tasks, DIY projects, and general repairs. It includes a powerful 20V cordless drill and a comprehensive collection of hand tools and accessories.
2. Safety Information
Always follow basic safety precautions to reduce the risk of fire, electric shock, and personal injury.
- Read all instructions: Familiarize yourself with the tool's operation and safety guidelines.
- Wear appropriate safety gear: Always wear safety glasses, gloves, and hearing protection when operating the drill.
- Keep work area clean and well-lit: Cluttered or dark areas invite accidents.
- Avoid dangerous environments: Do not use power tools in damp or wet locations, or where flammable liquids or gases are present.
- Secure workpiece: Always clamp or otherwise secure the workpiece to prevent movement during drilling.
- Do not overreach: Maintain proper footing and balance at all times.
- Disconnect power: Always remove the battery pack before making any adjustments, changing accessories, or storing the tool.
- Use correct tool for the job: Do not force a small tool or attachment to do the job of a heavy-duty tool.
- Store idle tools: When not in use, tools should be stored in a dry, high, or locked-up place, out of reach of children.
3. Package Contents
Your Bielmeier 20V Cordless Drill and 236-Piece Tool Set includes the following items:
- 20V Cordless Drill
- 1500mAh Lithium-Ion Battery
- Battery Charger
- 12-inch Pink Tool Bag
- Assorted Drill Bits
- Screwdrivers (various sizes)
- Pliers (various types)
- Hammer
- Measuring Tape
- Utility Knife
- Adjustable Wrench
- Hex Key Set
- Level
- Scissors
- Fasteners and other accessories

4. Setup and Charging
4.1. Charging the Battery
- Ensure the battery is securely inserted into the charger.
- Plug the charger into a standard electrical outlet.
- The indicator light on the charger will show the charging status. A full charge typically takes approximately two hours.
- Once fully charged, disconnect the charger from the outlet and remove the battery.
Note: It is recommended to fully charge the battery before first use to ensure optimal performance and battery life.
4.2. Installing/Removing the Battery
- To Install: Align the battery pack with the base of the drill handle and slide it in until it clicks securely into place.
- To Remove: Press the battery release buttons on the sides of the battery pack and slide the battery out of the drill handle.
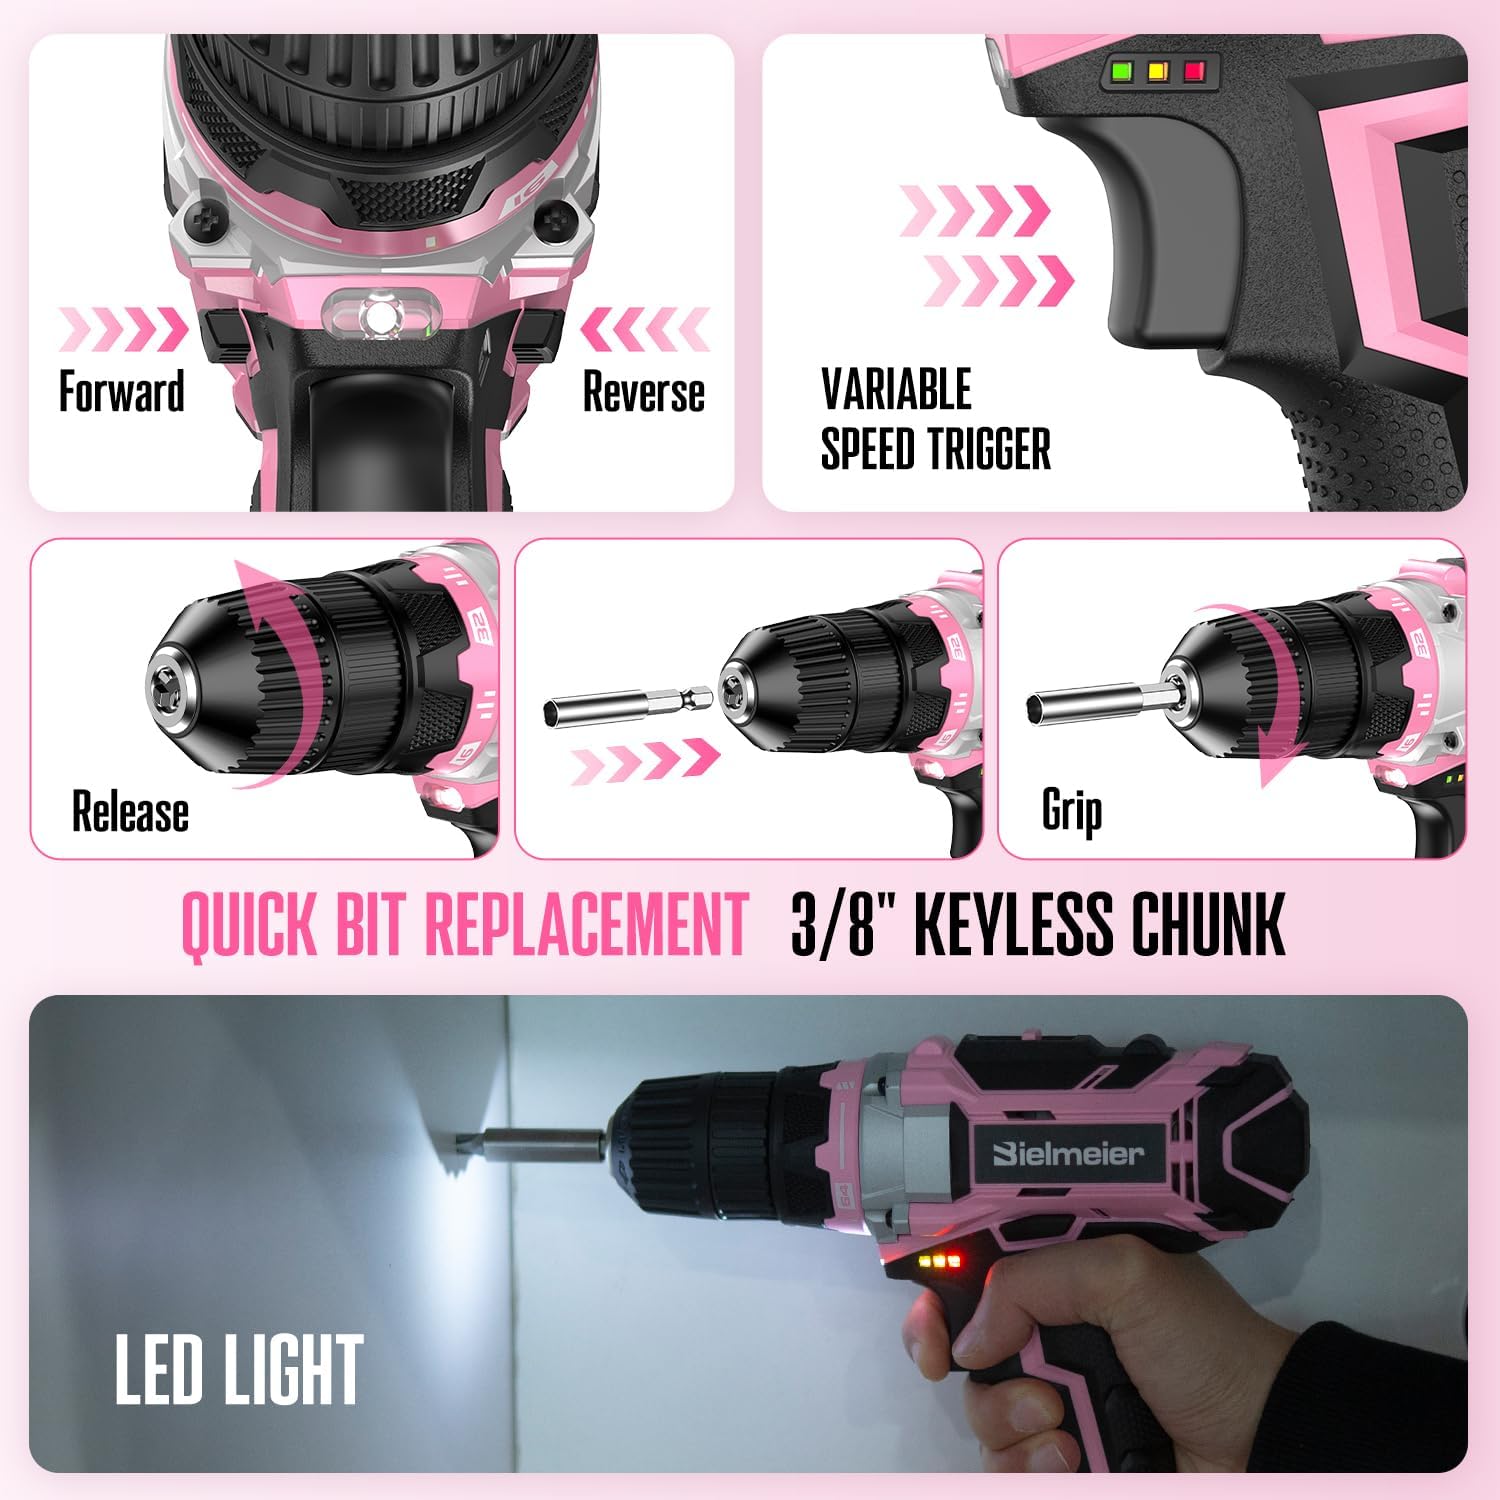
4.3. Attaching Drill Bits and Accessories
- Ensure the drill is off and the battery is removed.
- Rotate the chuck counter-clockwise to open the jaws.
- Insert the desired drill bit or accessory into the chuck.
- Rotate the chuck clockwise to tighten the jaws firmly around the bit. Ensure the bit is centered and secure.
5. Operating Instructions
5.1. Power Drill Operation
- Forward/Reverse Switch: Located above the trigger, push left for forward rotation (drilling/driving screws) and right for reverse rotation (removing screws). Center position locks the trigger for safety.
- Variable Speed Trigger: Squeeze the trigger to start the drill. The speed increases with greater pressure on the trigger.
- LED Light: The integrated LED light illuminates the work area when the trigger is pressed.
- Torque Adjustment: The collar behind the chuck allows adjustment of the torque setting (64+1 positions, max 32N.m). Use lower settings for driving screws into softer materials and higher settings for harder materials or drilling.
- 2-Speed Setting: A switch on top of the drill allows selection between two speed ranges. Position 1 is for lower speed, higher torque applications (e.g., driving screws). Position 2 is for higher speed, lower torque applications (e.g., drilling).

5.2. Using Hand Tools
The tool set includes a variety of hand tools for different tasks:
- Screwdrivers: Use the appropriate head type (Phillips, flathead) and size for screws.
- Pliers: For gripping, bending, or cutting wires. Select the correct type (e.g., needle-nose, slip-joint) for the task.
- Hammer: For driving nails or light demolition. Always wear safety glasses.
- Measuring Tape: For accurate measurements.
- Utility Knife: For cutting various materials. Always use with caution and retract the blade when not in use.
- Adjustable Wrench: For tightening or loosening nuts and bolts. Adjust the jaw opening to fit the fastener.
- Level: For ensuring surfaces are horizontal or vertical.

6. Maintenance
- Cleaning: Regularly clean the drill and hand tools with a dry or slightly damp cloth. Do not use harsh chemicals or abrasive cleaners.
- Storage: Store all tools in the provided tool bag in a dry, secure location, away from direct sunlight and extreme temperatures. Ensure the battery is removed from the drill before storage.
- Battery Care: Do not store batteries in a discharged state. Recharge them periodically if not used for extended periods.
- Inspection: Periodically inspect tools for wear, damage, or loose parts. Replace damaged components immediately.
7. Troubleshooting
| Problem | Possible Cause | Solution |
|---|---|---|
| Drill does not start. | Battery not charged or not properly inserted. Trigger lock engaged. | Charge battery fully and ensure it is securely inserted. Disengage the trigger lock by centering the forward/reverse switch. |
| Loss of power during operation. | Battery charge is low. Overload protection activated. | Recharge the battery. Reduce pressure on the drill or use a lower speed/torque setting. |
| Bit slips in chuck. | Chuck not tightened sufficiently. Bit shank is dirty or damaged. | Ensure chuck is tightened firmly. Clean or replace the drill bit. |
| Excessive sparks from motor. | Normal operation for brushed motors (slight sparks). Excessive sparks may indicate worn carbon brushes. | Slight sparks are normal. If sparks are excessive or accompanied by smoke/smell, discontinue use and contact customer support. |
8. Specifications
- Model: BCDK-236
- Voltage: 20V
- Battery Type: Lithium-Ion
- Battery Capacity: 1500mAh (2000 Milliamp Hours)
- Max Torque: 32 N.m
- Torque Settings: 64+1
- Speed: 2-speed settings, up to 1500 RPM
- Chuck Size: 3/8" Keyless
- Item Weight: Approximately 2.6 lbs (drill only), 11.51 pounds (full kit)
- Product Dimensions: 7.8 x 4.5 x 7.6 inches (drill)
- Included Components: 20V Cordless Drill, 1x Battery, 1x Charger, 1x Tool Bag, 236 Pcs Accessories (Drill Bits, Screwdrivers, Pliers, Hammer, etc.)
9. Warranty and Support
The Bielmeier 20V Cordless Drill and 236-Piece Tool Set comes with a one-year warranty from the date of purchase. This warranty covers defects in materials and workmanship under normal use.
For warranty claims, technical support, or any issues encountered during use, please contact Bielmeier customer service. Our team aims to respond within 24 hours.
Please refer to your purchase documentation for specific contact details or visit the official Bielmeier website.
10. Product Videos
Watch these official videos for visual guidance on using your Bielmeier tool set.
No official seller videos are available for embedding at this time.


