1. Introduction
Thank you for choosing the DLisiting White Computer Desk. This manual provides essential information for the safe and correct assembly, operation, and maintenance of your new desk. Please read these instructions thoroughly before beginning assembly and retain them for future reference.

Image 1.1: The DLisiting White Computer Desk, featuring a monitor stand, integrated power outlets, and storage shelves.
2. Important Safety Information
Please read and follow all safety instructions to prevent injury or damage to the product.
- Assembly: Ensure the desk is properly assembled according to these instructions. All fasteners must be securely tightened.
- Weight Limits: Do not exceed the listed weight limits for the desktop, shelves, and drawers. Overloading can cause structural failure and injury.
- Two-Person Assembly: It is recommended that two people assemble the desk to reduce the risk of injury and ensure proper alignment of components.
- Stability: Place the desk on a level surface. Use the adjustable leg pads to ensure stability and prevent wobbling.
- Electrical Safety: The built-in power outlet strip is UL Listed. Do not overload the outlets. Ensure all electrical connections are secure and away from liquids.
- Children: Keep small parts and packaging materials away from children during assembly.
3. Package Contents
Before assembly, verify that all components are present and undamaged. If any parts are missing or damaged, please contact customer support.

Image 3.1: An illustration detailing the dimensions and various components of the desk, including the monitor stand, main desktop, shelves, and fabric drawers.
Included Components:
- Desktop Panel with Monitor Stand
- Side Shelf Unit (3 shelves)
- Fabric Drawers (2 units)
- Metal Frame Legs and Support Bars
- Built-in Power Outlet Strip (3 AC outlets, 2 USB ports)
- Headphone Hook
- Adjustable Leg Pads
- Assembly Hardware (screws, bolts, etc.)
- Assembly Tool (Allen wrench)
- LED Light Strip with Remote/App Control
4. Assembly Instructions
Assembly typically takes approximately 20 minutes with two people. A detailed instruction manual and all necessary tools are provided. No additional tools are required.
4.1. Preparation
- Clear a spacious area for assembly.
- Unpack all components and lay them out on a soft, clean surface to prevent scratches.
- Identify all parts against the provided parts list in the separate assembly guide.
4.2. Step-by-Step Assembly
Refer to the separate graphical assembly guide included in your package for detailed illustrations. The general steps are as follows:
- Attach the metal frame legs to the desktop panel. Ensure all screws are finger-tightened initially.
- Install the side shelf unit. This unit is reversible and can be installed on either the left or right side of the desk to suit your preference. The shelves also offer three different height options for customization.
- Insert the fabric drawers into their designated slots.
- Attach the monitor stand to the desktop.
- Install the built-in power outlet strip into its designated cutout on the desktop.
- Attach the headphone hook to the side of the desk.
- Once all components are in place, fully tighten all screws using the provided tool.
- Screw in the adjustable leg pads at the bottom of each leg.
- Apply the LED light strip to the underside of the monitor stand or desired location.

Image 4.1: The side cabinet with shelves can be installed on either the left or right side of the desk, offering flexible configuration options.
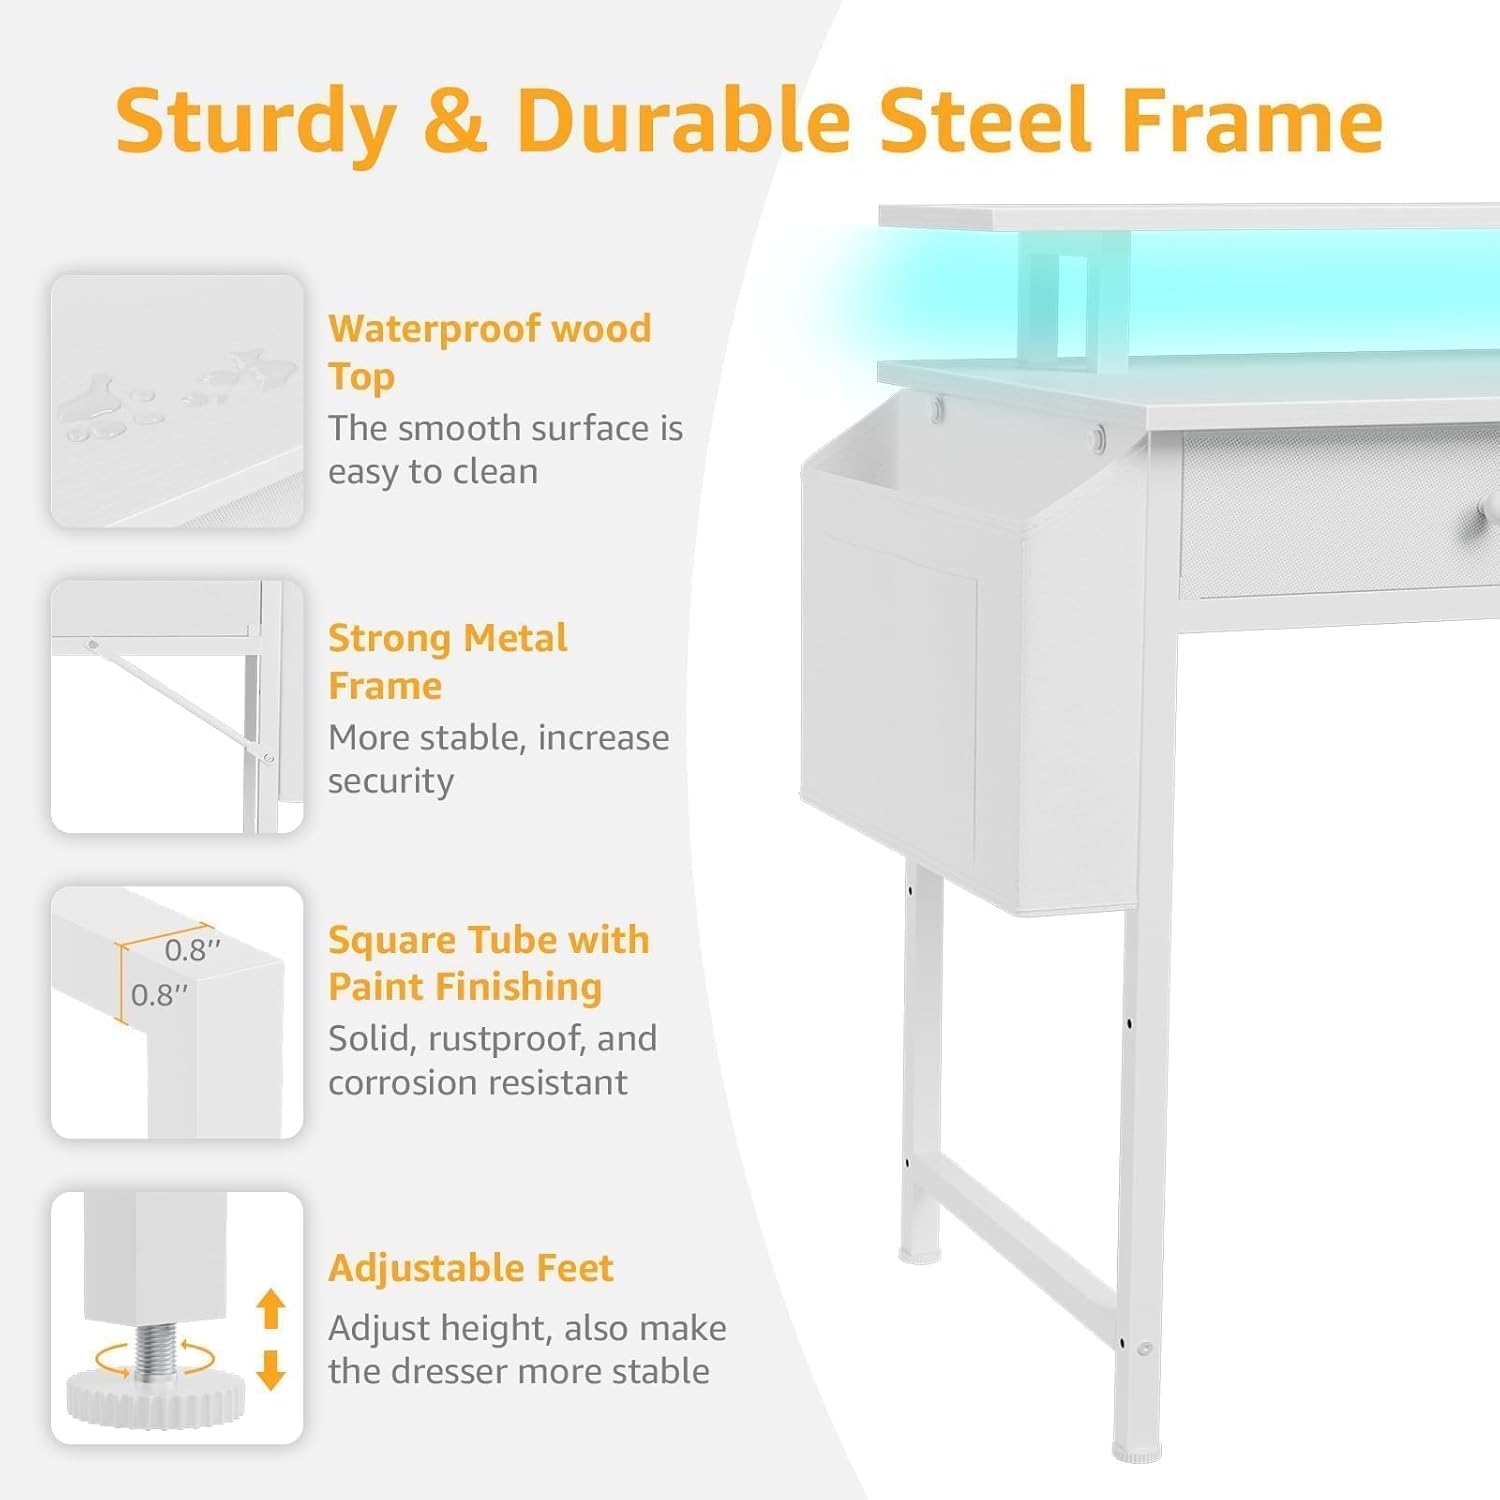
Image 4.2: Details of the desk's construction, highlighting the strong metal frame, square tube with paint finishing for durability, and adjustable feet for stability on uneven floors.
5. Operating Instructions
5.1. Built-in Power Outlet Strip
The desk includes a built-in power strip with 3 AC outlets (125V/12A) and 2 USB ports (5V/2A) for convenient charging and powering of your devices. The power cord is 6.5 feet long.
- Plug the desk's main power cord into a wall outlet.
- Connect your devices to the AC outlets or USB ports as needed.
- Do not exceed the maximum electrical load of 12A for the AC outlets.

Image 5.1: The integrated power strip provides convenient access to 3 AC power outlets and 2 USB charging ports, with a 6.5-foot power cord.
5.2. RGB LED Lights
The desk features an RGB LED light strip for customizable ambient lighting. Control the lights using the provided remote control or a dedicated mobile application.
- Ensure the LED strip is properly connected to its power source.
- Use the remote control to turn the lights on/off, change colors, adjust brightness, and select various modes (static, jump, flash, fade).
- For advanced customization, download the recommended mobile application (refer to the LED light strip's separate instructions for app details). The app typically offers over 60,000 colors, built-in microphone sync, music sync, and timing functions.

Image 5.2: The RGB LED strips can be controlled via a remote or a mobile application, offering a wide range of colors and dynamic lighting modes.
5.3. Storage Features
- Fabric Drawers: The two fabric drawers provide enclosed storage for office supplies, documents, or personal items.
- Shelves: The three open shelves offer additional storage and display space. Their height can be adjusted during assembly.
- Headphone Hook: Use the removable iron hook to hang headphones, bags, or other accessories, keeping your desktop clear.

Image 5.3: The desk includes two spacious fabric drawers designed for organizing items and maintaining a tidy workspace.

Image 5.4: The desk features removable iron hooks for hanging items and a side storage bag, enhancing organization and maximizing desktop space.
6. Maintenance
6.1. Cleaning
- The desk surface is made of P2 particle wood board with scratch-resistant, anti-collision, and waterproof properties.
- Wipe the desk surface with a soft, damp cloth. Avoid abrasive cleaners or harsh chemicals that could damage the finish.
- For spills, wipe immediately to prevent staining.
- Clean the metal frame with a damp cloth as needed.
6.2. General Care
- Periodically check all screws and fasteners to ensure they remain tight. Re-tighten if necessary.
- Avoid placing extremely hot or cold items directly on the desk surface without protection.
- Do not drag the desk when moving it; lift it to prevent damage to the legs and floor.
7. Troubleshooting
7.1. Desk is Wobbly
- Ensure the desk is on a level surface.
- Adjust the leg pads at the bottom of each leg to stabilize the desk.
- Check all assembly screws and bolts to ensure they are fully tightened.
7.2. LED Lights Not Working
- Verify that the LED strip is correctly connected to its power source and that the power source is plugged into a working outlet.
- Check the remote control battery.
- Ensure the LED strip controller is properly connected.
7.3. Power Outlets Not Functioning
- Ensure the desk's main power cord is securely plugged into a functional wall outlet.
- Check if the wall outlet itself is working by plugging in another device.
- Avoid overloading the power strip; disconnect some devices if the total load exceeds 12A.
8. Product Specifications
| Feature | Detail |
|---|---|
| Brand | DLisiting |
| Model Number | LST-YJX-2D3SMS47-White |
| Product Dimensions (D x W x H) | 18.9" x 47.2" x 35.1" |
| Color | White |
| Material | Engineered Wood (Top), Metal (Base) |
| Item Weight | 37.29 Pounds |
| Number of Drawers | 2 (Fabric) |
| Number of Shelves | 3 |
| Power Outlets | 3 AC (125V/12A), 2 USB (5V/2A) |
| LED Lights | RGB, App/Remote Control |
| Special Features | Monitor Stand, Reversible Shelves, Headphone Hook, Adjustable Feet |
| Assembly Required | Yes (Recommended 2 people) |
| UL Listed | Yes (for power strip) |
9. Warranty and Customer Support
9.1. Warranty Information
This DLisiting product comes with a limited warranty. Please refer to the warranty card included in your package for specific terms, conditions, and duration of coverage. The warranty typically covers manufacturing defects and material flaws under normal use.
9.2. Customer Support
For any questions, missing parts, assembly assistance, or warranty claims, please contact DLisiting customer support. Contact information can usually be found on the product packaging, the separate assembly guide, or the retailer's website where the product was purchased.
Please have your model number (LST-YJX-2D3SMS47-White) and purchase information ready when contacting support.