1. Introduction
This manual provides detailed instructions for the installation, operation, maintenance, and troubleshooting of your Veise VE019 Fingerprint Smart Lever Lock. Please read this manual thoroughly before installation and use to ensure proper function and safety.
The Veise VE019 Smart Lever Lock offers multiple access methods including fingerprint, app control, user authorization, IC card, password, code sharing, and backup key. It is designed for enhanced security and convenience in residential and light commercial settings.
2. What's in the Box
Verify that all components are present before beginning installation:
- Fingerprint Smart Lock with Handle (Exterior & Interior assembly)
- Mechanical key X2
- Key Fob X2
- Screws (various sizes for different components)
- Latch
- Strike
- Mounting Plate
- Installation Manual
- User Manual
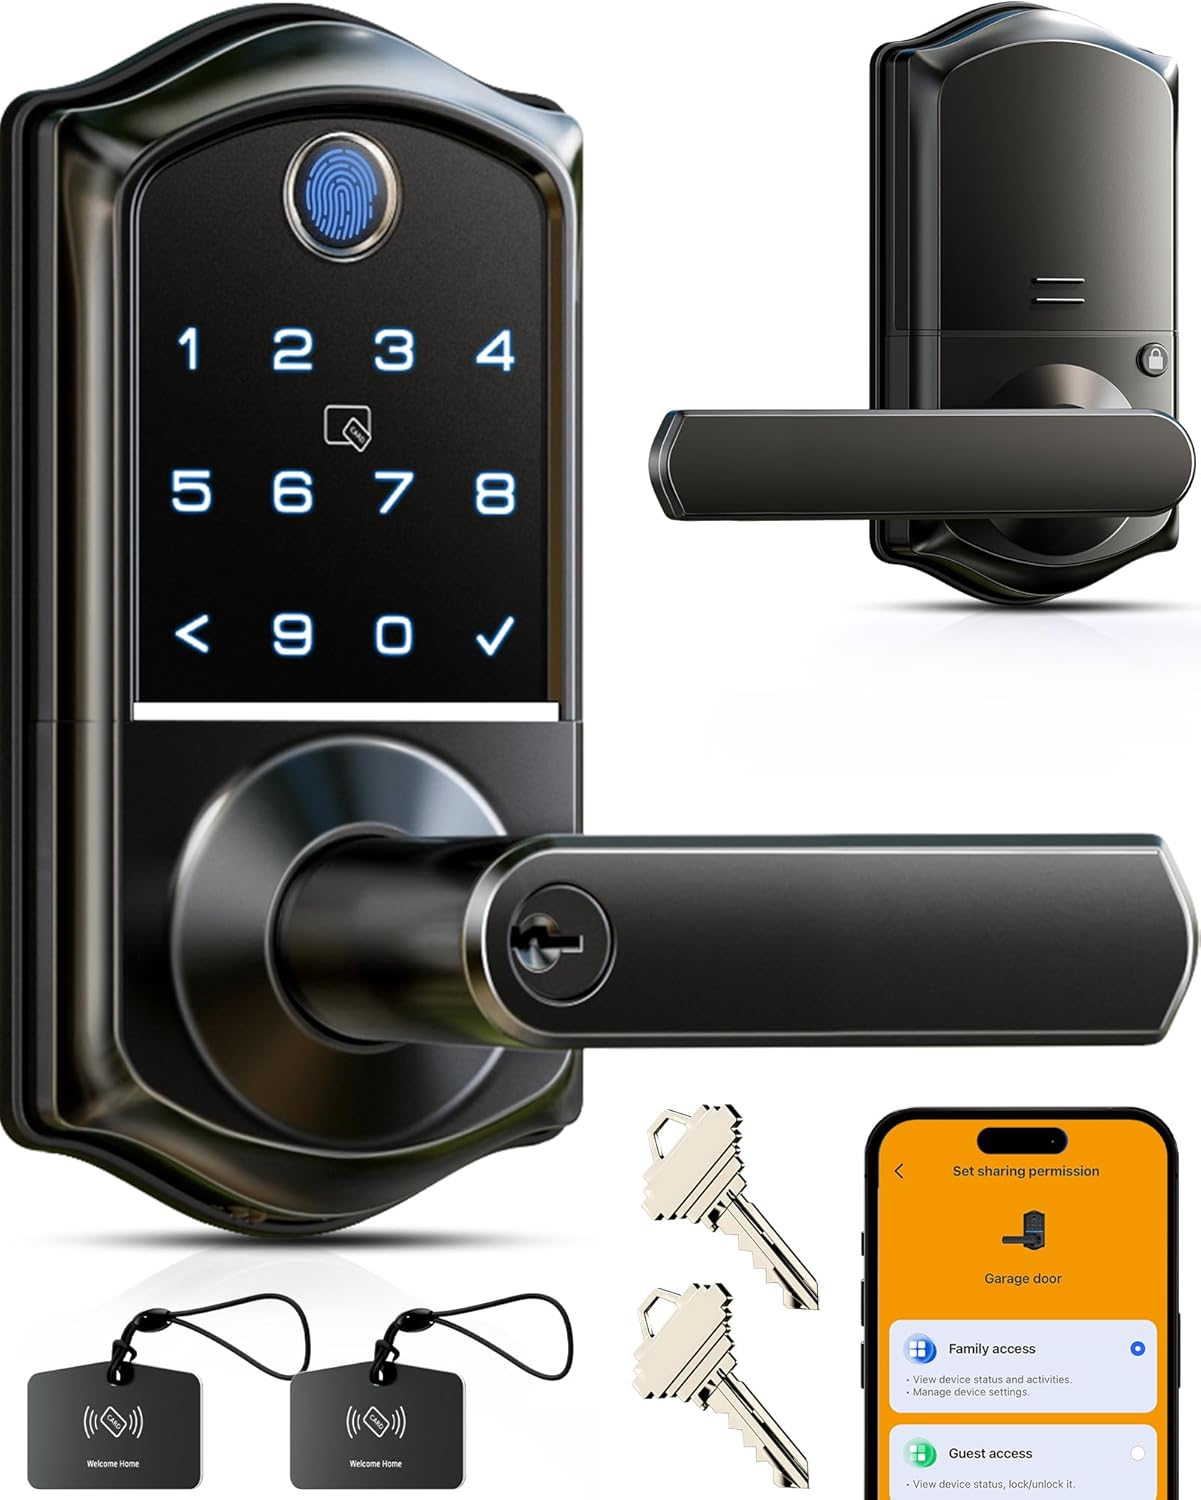
Image: All components included with the Veise VE019 Smart Lever Lock.
3. What You Will Need (Not Included)
- 4 AA batteries (Alkaline recommended)
- Phillips head screwdriver
Important: Do not insert batteries until the lock is fully installed and tested.
4. Setup and Installation
It is strongly recommended to keep the door open while installing the lock. Do not close the door before inserting the batteries.
4.1 Measure the Dimensions
Before installation, measure your door's dimensions to ensure compatibility. Refer to the provided template in the installation manual for precise measurements.

Image: Detailed door measurement guide for proper fit.
4.2 Installation Methods
The Veise VE019 supports three installation methods depending on your door's existing setup:
- Installed On the Single Hole: For doors with a single bore hole.
- Installed Above the Deadbolt: For doors with an existing deadbolt, ensuring at least 38mm (1.51") clearance above.
- Installed Below the Deadbolt: For doors with an existing deadbolt, ensuring at least 110mm (4.37") clearance below.

Image: Visual representation of the three possible installation configurations.
4.3 Install the Latch and Strike
Install the latch into the door edge. Ensure the latch square hole is centered. Install the strike plate on the door frame, aligning its direction with the latch. Use the provided screws.
Video: How to Install & Test Your Lock (Part 1 - Latch & Strike)
4.4 Adjust Handle Direction
Adjust the handle direction for both the exterior and interior assemblies to match your door's handing (left or right). Use the provided hex wrench to tighten the handle screws once the correct direction is set. Ensure handles move freely.
4.5 Install Exterior and Interior Assemblies
Route the cable from the exterior assembly through the door and insert the torque blade through the latch. Secure the mounting plate to the door. Connect the cable to the interior assembly, ensuring excess cable is tucked away. Attach the interior assembly to the mounting plate and tighten all screws. Do not insert the mechanical key until installation is complete.
Video: How to Install & Test Your Lock (Part 2 - Assemblies)
4.6 Insert Batteries
Once both assemblies are securely installed, insert 4 AA alkaline batteries into the interior assembly and attach the battery cover. The lock is now powered on.
5. Operating the Lock
5.1 Unlocking Methods
The Veise VE019 offers multiple ways to unlock your door:
- Fingerprint: Place your registered fingerprint on the sensor. (Requires prior fingerprint registration via app).
- Keypad Code: Enter your master code or a user code on the keypad.
- IC Card: Swipe a registered IC card over the card reader.
- Mobile App: Use the KK Home App to remotely unlock the door.
- Mechanical Key: Insert the backup key into the keyhole and turn the handle.
Video: Multiple Ways to Lock & Unlock
5.2 Locking Methods
You can lock your door using the following methods:
- One-Touch Locking: Press and hold any button on the keypad for 2 seconds to lock the door.
- Auto-Lock: The lock will automatically lock after 30 seconds by default (customizable via app).
- Interior Lock Button: Press the lock button on the interior assembly.
5.3 KK Home App Features
The KK Home App provides comprehensive control and management for your smart lock:
- Remote Grant & Create Code: Remotely grant permanent, temporary, recurring, or one-time access permissions.
- User Management: Add, modify, or delete user access permissions.
- Activity Logs: View real-time logs of lock activity by date.
- Remote Lock/Unlock: Control your lock from anywhere (requires Veise G1 Gateway, sold separately).
- Voice Control: Integrate with Alexa or Google Home for voice commands (requires Veise G1 Gateway).
Video: Get Start with Your KK Home APP
6. Maintenance
6.1 Battery Replacement
The lock requires 4 AA batteries. It features a low battery alert to notify you when replacement is needed. Replace all batteries simultaneously for optimal performance.
6.2 Emergency Power
In case of complete battery depletion, the lock includes a Type-C emergency power port for temporary unlocking. This port is for power only and does not support data transfer.
6.3 Care and Cleaning
Clean the lock with a soft, dry cloth. Avoid abrasive cleaners or solvents that could damage the finish or electronic components.
7. Troubleshooting
7.1 Lock Not Responding
Check battery levels and replace if necessary. Ensure the cable connections inside the lock are secure and not pinched.
7.2 Fingerprint Not Recognized
Ensure your finger is clean and dry. Try re-registering your fingerprint in the app. Try different angles when scanning.
7.3 Resetting the Lock
To reset the lock to factory settings, use the reset tool (or a thin pin) to press and hold the reset button for 5 seconds. You will hear voice prompts confirming the reset. After resetting, the lock automatically recognizes left and right doors.
Video: How to reset the lock
8. Specifications
| Feature | Detail |
|---|---|
| Brand | Veise |
| Model Name | VE019 |
| Lock Type | Keypad |
| Material | Aluminum |
| Color | Matte Black |
| Item Weight | 3.34 pounds |
| Product Dimensions | 5.9 x 5.33 x 5.76 inches |
| Batteries Required | 4 AA batteries (Alkaline) |
| Connectivity Protocol | Bluetooth, WiFi (Veise G1 WiFi Gateway Required) |
9. Warranty & Support
Veise offers a 1-year warranty on this product. For technical assistance or any questions, please contact Veise US-based customer support:
- Toll Free: +1 (855) 400-3853 (USA) (Monday-Friday 9:00 AM - 5:00 PM PST)
- Email: support@iveise.com (24/7 email service)
You can also refer to the detailed User Manual (PDF) and Installation Manual (PDF) available for download from the product's Amazon page for additional information.