1. Introduction
This manual provides essential information for the safe and effective operation, setup, and maintenance of your haxiaoer 145A MIG Welder. This versatile 3-in-1 machine supports Gasless MIG, Lift TIG (requires an additional torch), and Stick welding, making it suitable for various welding tasks.
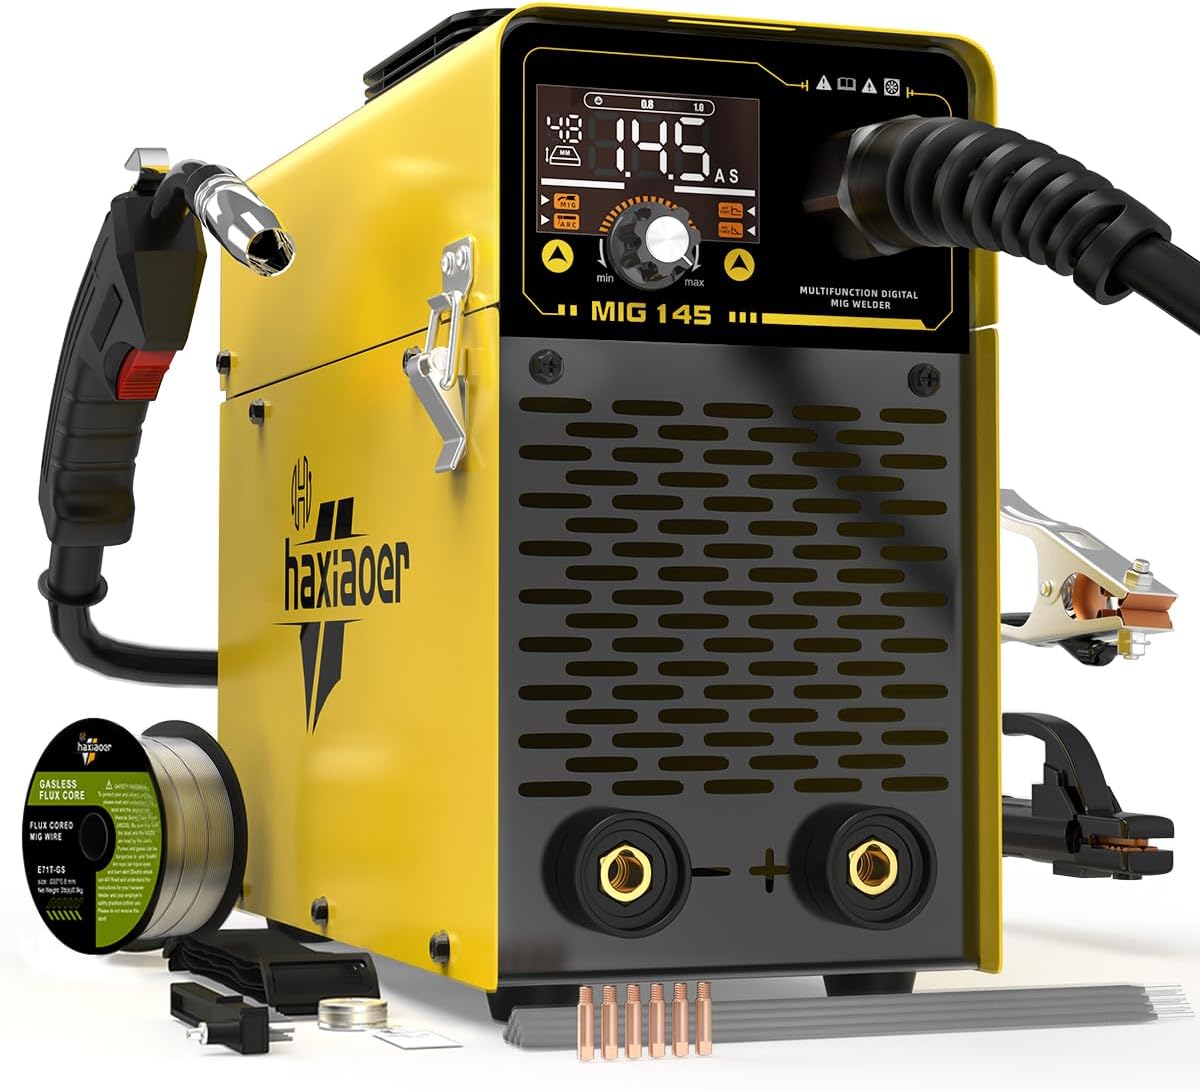
Image 1.1: The haxiaoer 145A MIG Welder, a compact and portable multi-process welding machine.
2. Important Safety Instructions
Always prioritize safety when operating welding equipment. Failure to follow these instructions can result in serious injury or death.
- Wear Protective Gear: Always use a welding helmet with appropriate shade, flame-resistant clothing, welding gloves, and safety shoes.
- Ventilation: Ensure adequate ventilation to remove welding fumes, which can be hazardous to your health.
- Fire Prevention: Keep a fire extinguisher nearby. Remove flammable materials from the welding area.
- Electrical Safety: Ensure the welder is properly grounded. Do not operate in wet conditions. Disconnect power before performing any maintenance or changing accessories.
- Arc Rays: Protect eyes and skin from arc rays, which can cause burns.
- Hot Parts: Welding equipment and welded materials become extremely hot. Allow them to cool before handling.
The haxiaoer 145A MIG Welder includes built-in safety features such as automatic voltage compensation, overcurrent protection, overload protection, and overheat protection. A cooling fan automatically activates to prevent overheating. These features enhance operational safety and extend the machine's lifespan.

Image 2.1: Illustration of the internal components and safety features, including IGBT technology, cooling fan, and various protections.
3. Package Contents
Verify that all items listed below are present in your package:
- 1 x haxiaoer 145A MIG Welder
- 1 x 1.5m Power Cord
- 1 x 1.5m 10-25 Ground Clamp
- 1 x 1.8m 10-25 Welding Handle Clamp (Electrode Holder)
- 1 x 2.0M 15AK MIG Welding Torch (Installed)
- 1 x 0.5KG 0.8MM Flux-Cored Wire
- 1 x 0.8/0.9 K-type Wire Feed Wheel
- 2 x 0.8 Conductive Nozzles
- 2 x 0.9 Conductive Nozzles
- 2 x 1.0 Conductive Nozzles (total 6 nozzles including those on the gun)
- 1 x Simple Slag Hammer / Brush
- 1 x Backstrap (Shoulder Strap)
- 10 x 2.5mm Welding Rods
- 1 x Instruction Manual

Image 3.1: All components included in the haxiaoer 145A MIG Welder package.
4. Product Features
The haxiaoer 145A MIG Welder is designed for efficiency and ease of use, offering several key features:
- Multi-Process Capability: Supports Gasless MIG, Lift TIG, and Stick welding.
- IGBT Inverter Technology: Provides a stable arc and deeper weld penetration.
- Digital Display: Clear and intuitive interface for monitoring welding parameters.
- Synergic Control: Automatically adjusts voltage and wire feed speed based on selected wire thickness and amperage.
- Portable Design: Lightweight (approximately 14.87 lbs) with a handle and shoulder strap for easy transport.

Image 4.1: Visual representation of the three welding processes: Lift TIG, Stick, and Flux Core MIG.

Image 4.2: The clear and straightforward digital user panel for mode and parameter selection.

Image 4.3: Diagram illustrating the synergy control feature, which matches wire feed speed and voltage to metal thickness.

Image 4.4: The compact dimensions and lightweight design of the welder, highlighting its portability.
5. Initial Setup
5.1 Power Connection
- Ensure the welder is switched off before connecting to power.
- Connect the 1.5m power cord to a standard 110V AC power outlet.
- Verify the power source meets the welder's requirements (110V, 50-60Hz).
5.2 Wire Spool Installation (for MIG Welding)
- Open the side panel of the welder.
- Place the 0.5KG 0.8MM flux-cored wire spool onto the spindle.
- Secure the spool with the spool spacer, spring, washer, and spool lock.
- Feed the wire through the flared wire guide and into the wire feeder mechanism.
- Ensure the correct 0.8/0.9 K-type wire feed wheel is installed for your wire size.

Image 5.1: Steps for installing the welding wire spool and feeding the wire into the mechanism.
5.3 Connecting Welding Accessories
- Ground Clamp: Connect the 1.5m ground clamp cable to the appropriate terminal on the welder (usually the negative terminal for MIG/Stick, or positive for Lift TIG depending on polarity). Securely attach the clamp to the workpiece or welding table to ensure a good electrical connection.
- MIG Welding Torch: The 2.0M 15AK MIG welding torch is pre-installed. Ensure it is securely connected.
- Electrode Holder (for Stick Welding): Connect the 1.8m electrode holder clamp to the appropriate terminal on the welder (usually the positive terminal for DC+).
- Lift TIG Torch (Optional): If performing Lift TIG, connect a compatible Lift TIG torch (not included) to the appropriate terminals as per the torch's instructions and the welder's manual.
6. Operating Instructions
6.1 General Control Panel Overview
The welder features an intuitive control panel for selecting welding modes and adjusting parameters.

Image 6.1: Detailed breakdown of the control panel buttons and display elements.
- Screen Display: Shows current settings, welding mode, and other information.
- Welding Mode Selection: Buttons to switch between MIG, ARC (Stick), and TIG modes.
- Automatic Plate Thickness: Indicates recommended settings based on material thickness.
- Welding Wire Settings: Adjustments for wire diameter.
- MMA Settings: Specific settings for Stick welding (e.g., Hot Start, Arc Force).
- Current Knob: Adjusts the welding current (amperage).
6.2 Gasless Flux Core MIG Welding
- Select the MIG mode on the control panel.
- Ensure flux-cored wire is correctly installed and fed.
- Adjust the current knob according to the material thickness and desired weld. The synergic control will assist in setting optimal voltage and wire feed speed.
- Pull the trigger on the MIG torch to begin welding. Maintain a consistent travel speed and arc length.
6.3 Stick (MMA) Welding
- Select the ARC (Stick) mode on the control panel.
- Insert the appropriate welding rod (e.g., E6013, E6010, E6011) into the electrode holder. Note: E7018 rods cannot be used with this machine.
- Adjust the current knob based on the rod diameter and material thickness.
- Strike an arc by lightly touching and then lifting the rod from the workpiece.
6.4 Lift TIG Welding
- Select the TIG mode on the control panel.
- Connect a Lift TIG torch (not included, ASIN: B0F1CHCG4W) and ensure proper gas connection if using gas-shielded TIG.
- Adjust the current knob.
- To initiate the arc, gently touch the tungsten electrode to the workpiece and then lift it slightly.

Image 6.2: Connection diagrams for Gasless Flux Core MIG, Stick, and Lift TIG welding modes.

Image 6.3: Examples of weld beads achieved with MIG, MMA (Stick), and Lift TIG modes on steel.
7. Maintenance Guidelines
Regular maintenance ensures the longevity and optimal performance of your welder.
- Cleaning: Periodically clean the exterior of the welder with a dry cloth. Use compressed air to clear dust and debris from the internal components and cooling vents. Ensure the power is disconnected before cleaning.
- Cable Inspection: Regularly inspect all cables (power, ground, torch) for cuts, fraying, or damage. Replace damaged cables immediately.
- Torch Maintenance: For MIG, regularly check and replace worn contact tips and nozzles. For Stick, ensure the electrode holder jaws are clean and grip rods securely. For TIG, inspect and sharpen tungsten electrodes as needed.
- Wire Feeder: Keep the wire feeder mechanism clean and free of debris. Ensure the wire feed roller is appropriate for the wire size and is not worn.
- Storage: Store the welder in a dry, clean environment, away from excessive dust and moisture.
8. Troubleshooting Common Issues
This section addresses common operational problems. For issues not listed, contact customer support.
| Problem | Possible Cause | Solution |
|---|---|---|
| No power to welder | Power cord disconnected, circuit breaker tripped, faulty outlet | Check power cord connection, reset circuit breaker, test outlet |
| No arc / Weak arc | Poor ground connection, incorrect settings, worn contact tip (MIG), damp electrodes (Stick) | Ensure solid ground connection, verify current/voltage settings, replace contact tip, use dry electrodes |
| Wire feeding issues (MIG) | Incorrect wire feed tension, clogged liner, wrong drive roller, tangled wire spool | Adjust tension, clean/replace liner, ensure correct drive roller, untangle wire |
| Overheat protection activated | Exceeded duty cycle, blocked cooling vents | Allow welder to cool down, clear any obstructions from vents |
| Poor weld quality | Incorrect settings, improper technique, contaminated workpiece | Adjust parameters, practice technique, clean workpiece thoroughly |
9. Technical Specifications
| Specification | Value |
|---|---|
| Model | MIG145 |
| Manufacturer | haxiaoer |
| Part Number | HXC400D |
| Item Weight | 14.87 pounds |
| Package Dimensions | 17.63 x 12.95 x 7.36 inches |
| Power Source | AC/DC |
| Voltage | 110 Volts |
| Material | Metal |
| Protection Class | IP21S |
| Insulation Class | F |
| Cooling Method | Gas Cool |
| Max Output Current | 145A |
| Duty Cycle (MIG) | 30% at 145A, 60% at 112A, 100% at 87A |
| Duty Cycle (ARC) | 30% at 145A, 60% at 112A, 100% at 87A |

Image 9.1: Detailed technical parameters and duty cycle information for the MIG145 welder.
10. Warranty and Customer Support
haxiaoer provides reliable customer support and warranty coverage for your product.
- Warranty: This product comes with a 3-year warranty.
- Money-Back Guarantee: A 30-day money-back guarantee is offered to ensure your satisfaction.
- Customer Service: A professional customer support team is available 24/7 to assist with any questions or concerns. Please contact us via Amazon email for assistance.