XWXLIJV XWXLIJV
XWXLIJV Pipe Pipeline Inspection Camera User Manual
Model: XWXLIJV
1. Product Overview
The XWXLIJV Pipe Pipeline Inspection Camera is a versatile endoscope system designed for detailed visual inspection in various environments, including automotive, pipeline, and air conditioning systems. It features a high-definition LCD color monitor, a sensitive camera with adjustable LED illumination, and robust waterproof capabilities.
Key Features:
- Equipped with a 4.3-inch high-definition 1080p screen for real-time video viewing.
- Memory card slot for capturing photos and recording videos, supporting 180-degree image rotation.
- High-sensitivity 8mm diameter camera for clear image quality in diverse working conditions.
- Built-in 8 adjustable LED lights to enhance visibility in dark or dimly lit areas.
- IP67 waterproof rating, allowing use in underwater or humid environments.
- Integrated 3000 mAh rechargeable lithium battery, chargeable via any USB device.
- Supports 11 languages for broad usability.

Figure 1: XWXLIJV Pipe Pipeline Inspection Camera System.
2. Package Contents
Please check the package carefully to ensure all items are present:
- 1 x Handheld Inspection Endoscope Unit
- 1 x USB Charging Cable
- 1 x Protective Cap
- 1 x Mirror Attachment
- 1 x Hook Attachment
- 1 x Magnet Attachment
- 1 x Reset Pin
- 1 x User Manual

Figure 2: Included accessories and main unit.
3. Specifications
| Parameter | Value |
|---|---|
| Item Type | Inspection Endoscope |
| Material | ABS Plastic |
| Display | 4.3in LCD Color Screen |
| Camera Resolution | 1920 x 1080P |
| Battery Capacity | 3000mAh (Built-In) |
| Viewing Angle | 70 Degree |
| Languages Supported | Chinese, English, Korean, German, Italian, Dutch, Portuguese, Russian, Spanish (11 languages total) |
| Focal Length (FL) | 4cm - 500cm |
| Waterproof Rating | IP67 |
| Camera Diameter | Approx. 8mm / 0.3in |
| Working Time | About 4 Hours |
| Charging Time | 2.5 Hours |
| Item Weight | 1.76 ounces |
| Model Number | XWXLIJV |
4. Setup
Follow these steps to set up your inspection camera:
- Charge the Device: Before first use, fully charge the built-in 3000 mAh lithium battery. Connect the provided USB charging cable to the device's charging port and to any standard USB power source (e.g., computer USB port, USB wall adapter). The charging time is approximately 2.5 hours.

Figure 3: Charging the device.
- Insert Memory Card (Optional): If you wish to take photos or record videos, insert a compatible memory card (not included) into the designated memory card slot on the device. Ensure the card is inserted correctly.
- Connect Camera Probe: Ensure the camera probe is securely connected to the main display unit.
- Attach Accessories (Optional): Depending on your inspection needs, you can attach the protective cap, mirror, hook, or magnet to the camera tip.
5. Operating Instructions
Familiarize yourself with the device controls and functions:
- Power On/Off: Press and hold the power button (usually marked with a power symbol) to turn the device on or off. The 4.3-inch LCD screen will illuminate.
- Live View: Once powered on, the screen will display the live feed from the camera probe.
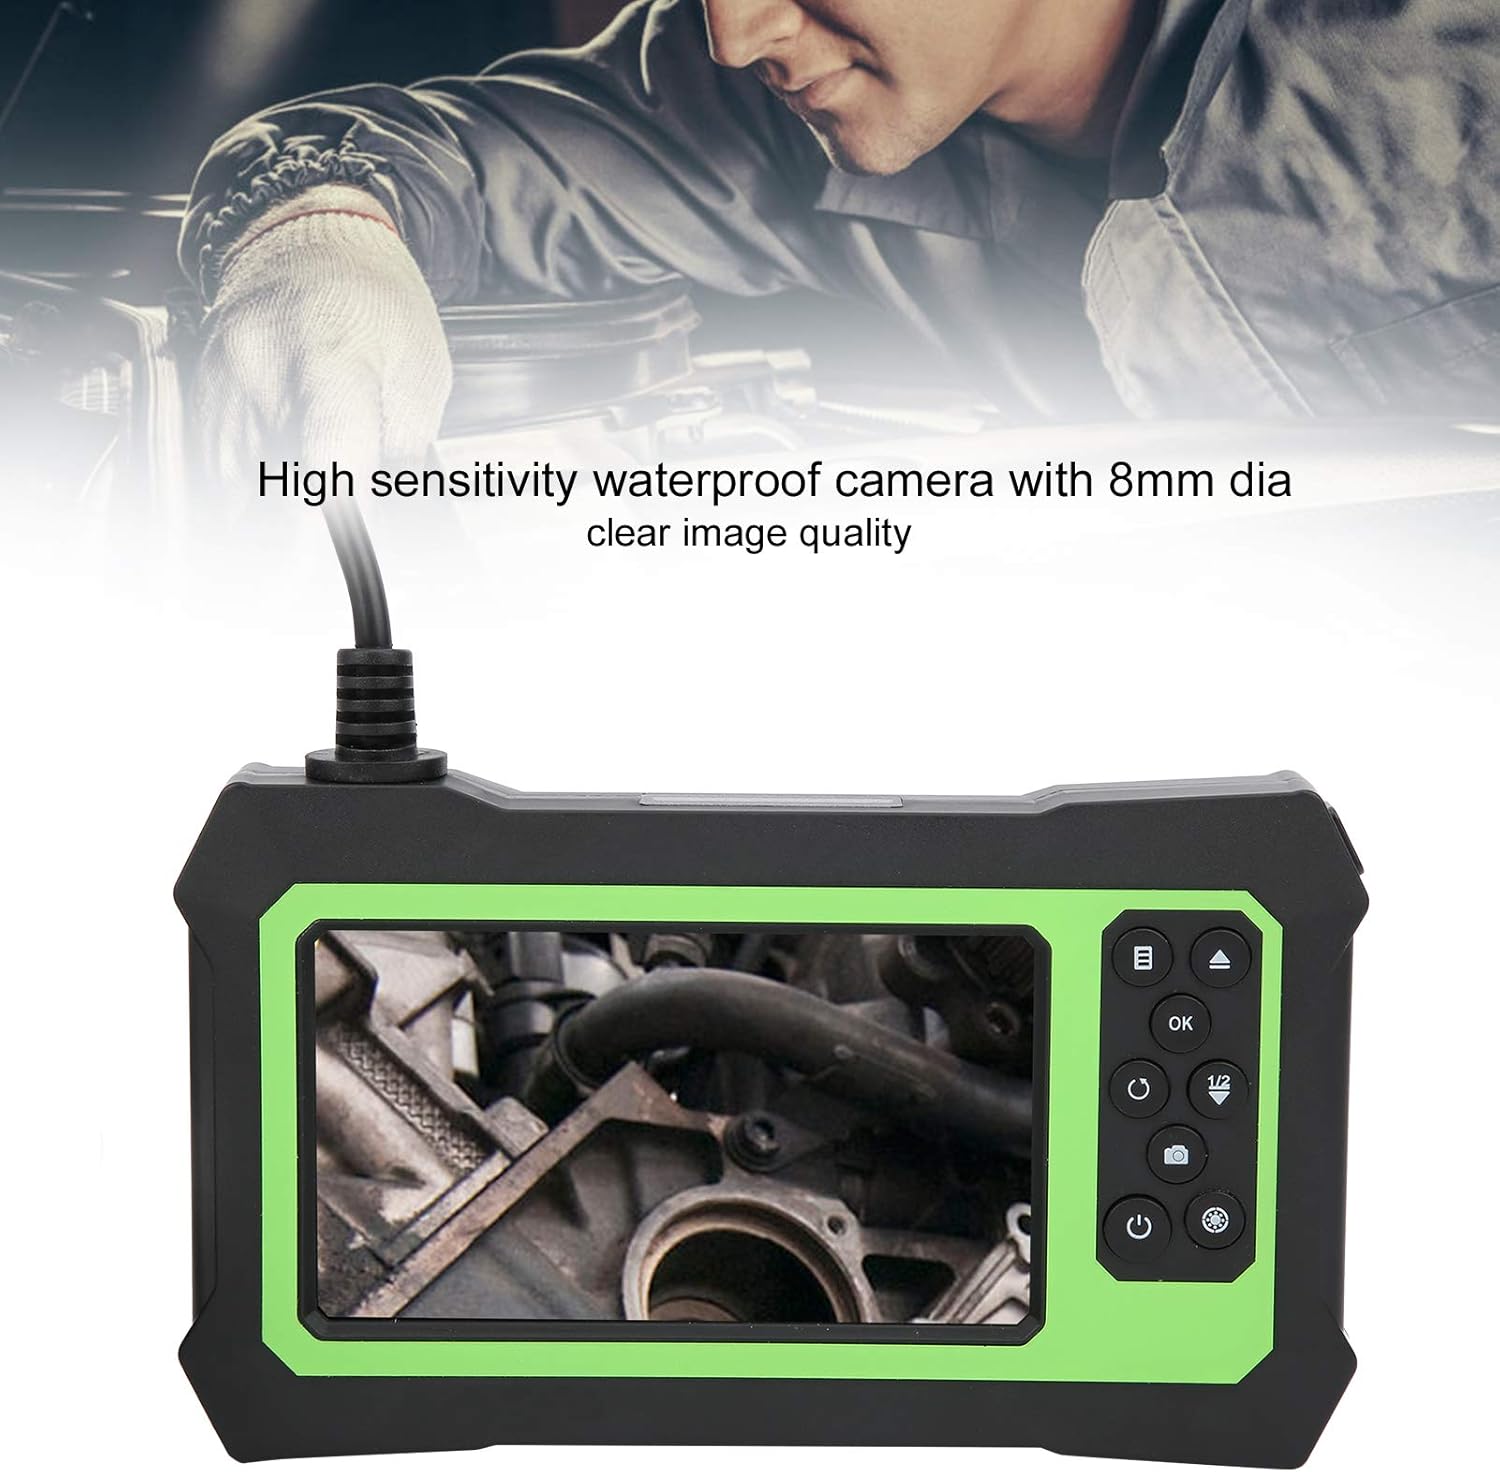
Figure 4: Live view on the LCD screen.
- Adjust LED Lights: Use the dedicated button (often marked with a light bulb symbol or similar) to adjust the brightness of the 8 built-in LED lights on the camera tip. This helps illuminate dark inspection areas.

Figure 5: Camera tip with illuminated LEDs.

Figure 6: Detail of the 8 adjustable LED lights.
- Capture Photos/Record Videos: Press the photo/video button (often marked with a camera or video camera icon) to capture still images or start/stop video recording. Ensure a memory card is inserted to save files.
- Image Rotation: The device supports 180-degree image rotation. Use the designated button (check manual for specific icon) to rotate the image on the screen for better viewing angles.
- Language Settings: Navigate through the menu (refer to the device's on-screen interface) to select your preferred language from the 11 supported options.
- Application: Carefully insert the camera probe into the area you wish to inspect. The 8mm diameter camera and flexible cable allow access to confined spaces. The IP67 rating ensures safe operation in wet conditions.

Figure 7: Common applications for the inspection camera.
6. Maintenance
Proper maintenance ensures the longevity and optimal performance of your inspection camera:
- Cleaning: After each use, especially in dirty or wet environments, gently wipe the camera probe and cable with a soft, damp cloth. For the main unit, use a dry, soft cloth. Do not use abrasive cleaners or solvents.
- Water Resistance: The camera probe is IP67 waterproof. While it can be used in water, avoid submerging the main display unit. After use in wet conditions, ensure the camera probe and cable are dry before storage.

Figure 8: IP67 waterproof function.
- Storage: Store the device in a cool, dry place, away from direct sunlight and extreme temperatures. Coil the cable neatly to prevent kinks or damage.
- Battery Care: To prolong battery life, avoid fully discharging the battery frequently. If storing for an extended period, charge the battery to about 50% every few months.
7. Troubleshooting
If you encounter issues with your inspection camera, refer to the following common problems and solutions:
| Problem | Possible Cause | Solution |
|---|---|---|
| Device does not power on | Low battery; Loose connection | Charge the device fully; Ensure camera probe is securely connected. |
| No image on screen | Camera probe not connected; Damaged cable/camera | Check connection; Contact support if damaged. |
| Image is too dark | LED lights off or too dim | Adjust LED brightness using the dedicated button. |
| Cannot save photos/videos | No memory card; Memory card full or corrupted | Insert a memory card; Delete old files or format the card (backup important data first). |
| Screen frozen or unresponsive | Software glitch | Use the reset pin (included) to press the reset button (usually a small hole) on the device. |
8. Warranty and Support
For warranty information and technical support, please refer to the contact details provided with your purchase documentation or visit the official XWXLIJV website. Keep your purchase receipt as proof of purchase for any warranty claims.