CTIME JBS-PBTB-GZ1S1-33-4JGY2P
CTIME Mop and Narrow Bucket with 7-Color Scraper Wringer Set Instruction Manual
Brand: CTIME | Model: JBS-PBTB-GZ1S1-33-4JGY2P
1. Introduction
This manual provides instructions for the assembly, operation, maintenance, and troubleshooting of your CTIME Mop and Narrow Bucket with 7-Color Scraper Wringer Set. This system is designed for efficient wet and dry floor cleaning across various floor types and windows, featuring a hands-free washing and wringing mechanism.

Image 1.1: The CTIME Mop and Narrow Bucket with 7-Color Scraper Wringer Set.
2. Included Components
Please verify that all components listed below are present in your package:
- 1 x Mop Bucket with integrated wash and dry chambers
- 1 x Flat Mop Head
- 3 x Stainless Steel Mop Handle Sections (for assembly)
- 2 x Reusable Microfiber Mop Pads

Image 2.1: All components included in the CTIME Mop and Bucket Set.
3. Setup and Assembly
Follow these steps to assemble your CTIME Mop and Bucket system:
3.1 Mop Handle Assembly
- Connect the three stainless steel handle sections by twisting them together clockwise until secure.
- Attach the assembled handle to the mop head by screwing it into the designated port.
3.2 Mop Pad Installation
Refer to the diagram below for visual guidance on attaching the microfiber mop pad:

Image 3.1: Step-by-step guide for mop pad installation.
- Step 1: Identify the mop head (part 3, fixed end) and the mop pad (parts 1 and 2). Part 4 is the end that can be snapped.
- Step 2: Place the mop pad (parts 1 and 2) onto the fixed end of the mop head (part 3). Ensure not to place it on the snap end (part 4).
- Step 3: Flatten the microfiber fabric of the mop pad evenly across the mop head.
- Step 4: Break the snap end (part 4) open, then place the mop pad (parts 1 and 2) onto it and press to secure. The installation is complete.
4. Operating Instructions
4.1 Wet Mopping (Washing)
To wash the mop pad:
- Fill the designated wash chamber of the bucket with water and your preferred cleaning solution.
- Insert the mop head into the wash chamber.
- Move the mop head up and down several times. The internal scraper will remove dirt and hair from the mop pad.

Image 4.1: The mop being washed in the self-cleaning bucket's wash chamber.
4.2 Dry Mopping (Wringing)
To wring out excess water from the mop pad:
- After washing, move the mop head to the dry chamber of the bucket.
- Move the mop head up and down several times. The 7-color scraper will squeeze out water, leaving the mop pad damp for cleaning or nearly dry for polishing.
- Adjust the number of up-and-down motions to achieve the desired dryness level.

Image 4.2: The mop being wrung in the dry chamber, showing water being squeezed out.
4.3 General Cleaning Tips
- The 360° swivel mop head allows for easy cleaning under furniture and around obstacles.
- The narrow bucket design is ideal for fitting into tight spaces and corners, optimizing water usage.
- Use the mop for both wet cleaning to remove stains and dry cleaning to pick up dust and pet hair.
5. Maintenance
5.1 Cleaning Mop Pads
The microfiber mop pads are reusable. After each use, detach the mop pad from the mop head and rinse it thoroughly under running water. For deeper cleaning, the pads can be machine washed with similar colors. Do not use bleach or fabric softener. Air dry for best results.
5.2 Cleaning the Bucket
Empty the dirty water from the bucket after each use. Rinse the bucket thoroughly with clean water. The bucket's detachable design allows for easy cleaning of both chambers. Ensure the scraper mechanism is free of debris.
5.3 Storage
Store the mop and bucket in a dry place. The narrow design of the bucket allows for convenient storage in small spaces, such as corners or utility closets.

Image 5.1: The narrow bucket design allows for convenient storage in tight spaces.
6. Troubleshooting
| Problem | Possible Cause | Solution |
|---|---|---|
| Mop pad not cleaning effectively. | Mop pad is too dry or too dirty. | Ensure the mop pad is adequately wet in the wash chamber. Clean the mop pad thoroughly or replace it with a fresh one. |
| Difficulty wringing out water. | Mop head not properly aligned in the dry chamber; debris in scraper. | Ensure the mop head is fully inserted and aligned with the scraper. Check the scraper for any trapped debris and remove it. |
| Mop handle feels loose. | Handle sections are not fully tightened. | Twist the handle sections clockwise until they are securely fastened. |
| Water spills from bucket. | Bucket overfilled; vigorous mopping motion. | Do not overfill the bucket beyond the indicated maximum fill line. Use a controlled up-and-down motion when washing/wringing. |
7. Specifications
| Feature | Detail |
|---|---|
| Model Number | JBS-PBTB-GZ1S1-33-4JGY2P |
| Included Components | Mop, Bucket, 2 Microfiber Pads |
| Special Features | 360° Spin Mop Head, Detachable Bucket, Self-Wringing Scraper |
| Bucket Volume | 2.75 Gallons (approx. 10.4 Liters) |
| Bucket Dimensions (L x W x H) | 36.5 cm x 14.5 cm x 39.5 cm (14.37 in x 5.71 in x 15.55 in) |
| Mop Head Dimensions (L x W) | 33 cm x 12 cm (12.99 in x 4.72 in) |
| Mop Handle Length | 135 cm (53.15 in) |
| Materials | Plastic (Bucket, Mop Head), Stainless Steel (Handle) |
| Item Weight | 3.67 Pounds |
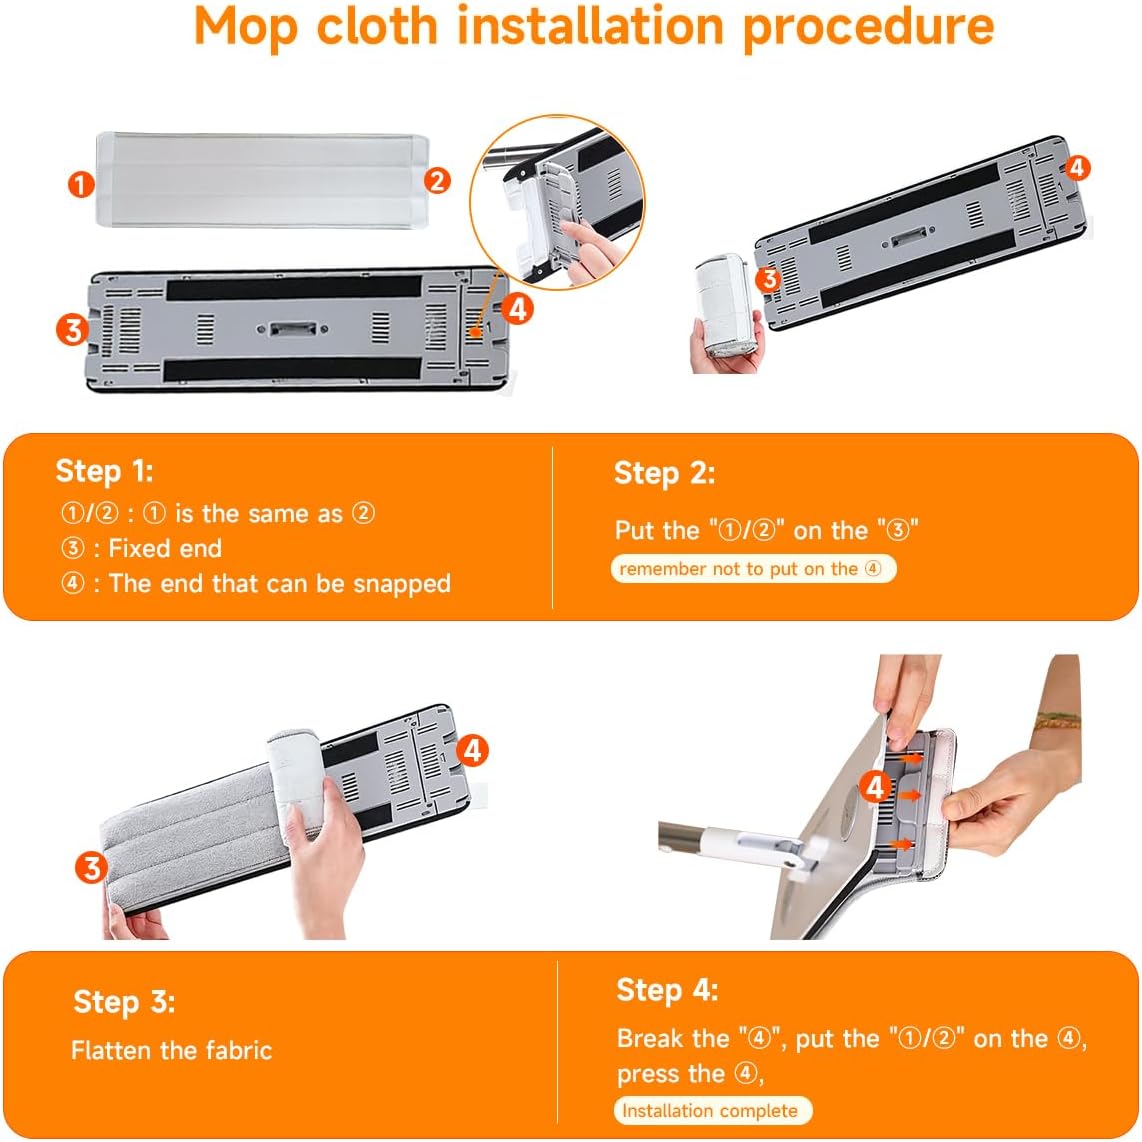
Image 7.1: Detailed dimensions of the CTIME Mop and Bucket system.
8. Warranty and Support
For any questions, concerns, or warranty information regarding your CTIME Mop and Narrow Bucket with 7-Color Scraper Wringer Set, please refer to the product packaging or contact CTIME customer support directly. Contact details can typically be found on the manufacturer's website or through your point of purchase.
Ask a question about this manual
Ask about setup, troubleshooting, compatibility, parts, safety, or missing instructions. Manuals+ will review the question and use this page’s manual context to help answer it.