kuayvan B0DCBYTHG7
User Manual for kuayvan Wireless CarPlay & Android Auto Car Screen
Model: B0DCBYTHG7
1. Introduction
Thank you for choosing the kuayvan Wireless CarPlay & Android Auto Car Screen. This device is designed to enhance your driving experience by integrating advanced connectivity, navigation, and safety features directly into your vehicle. With its 10.26-inch touch screen, 4K dash cam, and 1080p backup camera, it provides a comprehensive solution for modern in-car entertainment and assistance. This manual provides detailed instructions for setup, operation, maintenance, and troubleshooting to ensure optimal performance and longevity of your device.
2. Product Overview
2.1 Key Features
- Wireless CarPlay & Android Auto: Seamlessly integrate your smartphone for navigation, music, calls, and more.
- Smart Voice Control: Hands-free operation with Siri and Google Assistant for enhanced safety.
- 4K DVR Loop Recording & 1080p Backup Camera: Capture high-resolution video with wide-angle views and receive parking assistance. Includes a 64GB TF card.
- Mirror Link Functionality: Project your smartphone screen onto the car display for a cinematic experience.
- Multiple Audio Outputs: Connect via built-in speakers, AUX, FM transmitter, or Bluetooth for versatile audio playback.
- Easy Installation: Compatible with almost all cars, trucks, and vehicles, offering flexible mounting options.
2.2 Components
The kuayvan Wireless CarPlay & Android Auto Car Screen package includes the following components:
- 10.26-inch CarPlay Screen with Dash Cam (Main Unit)
- Car Charger Adapter
- User Manual
- Suction Cup Bracket
- Vertical Bracket with Strong Adhesive
- Rear 1080P Camera
- 64GB TF Card
- AUX Cable

Figure 2.2.1: Kuayvan 10.26-inch Wireless CarPlay and Android Auto Screen with 4K Dash Cam and Backup Camera. This image displays the main unit of the Kuayvan portable car screen, showing its large display, integrated dash camera, and the included backup camera, along with various mounting options and a 64GB TF card.

Figure 2.2.2: Package contents of the Kuayvan car screen system. This image displays all items included in the product package, such as the 10.26-inch CarPlay screen, car charger adapter, AUX cable, suction cup bracket, vertical bracket with strong adhesive, rear 1080P camera, and user manual.
3. Setup
3.1 Mounting the Device
The kuayvan car screen offers flexible mounting options to suit your vehicle's interior. Choose between the suction cup bracket for windshield or dashboard mounting, or the adhesive sticker bracket for a more permanent dashboard placement.
- Choose Location: Select a location on your dashboard or windshield that does not obstruct your view or interfere with airbags.
- Clean Surface: Ensure the mounting surface is clean and dry before attaching the bracket.
- Attach Bracket:
- For Suction Cup: Press the suction cup firmly against the surface and engage the lever to secure it.
- For Adhesive Sticker: Peel off the protective film from the adhesive base and firmly press it onto the desired surface for at least 30 seconds.
- Attach Main Unit: Slide the main unit onto the bracket until it clicks into place. Adjust the angle for optimal viewing.
- Install Rear Camera: Mount the 1080P rear camera at the back of your vehicle, ensuring a clear view. Route the cable to the main unit and connect it to the "Rear Camera In" port.

Figure 3.1.1: Various installation methods for the Kuayvan car screen. This image demonstrates the flexible installation options, including dashboard suction mount, adhesive sticker bracket, telescopic regulation, and windshield suction mount, allowing for easy and secure placement in different vehicles.
3.2 Powering On
Connect the provided car charger adapter to the Type-C power input on the main unit and plug the other end into your vehicle's 12-32V power outlet (cigarette lighter socket). The device will automatically power on when the vehicle's ignition is turned on.
3.3 Initial Setup and Connectivity
Upon first power-on, the device may guide you through an initial setup process. Follow the on-screen prompts to configure basic settings such as language and time.
3.3.1 Wireless CarPlay Connection (for iOS devices)
- On the car screen, select the "Apple CarPlay" icon.
- On your iPhone, go to Settings > Bluetooth and turn Bluetooth on.
- Pair your iPhone with the device's Bluetooth name (e.g., "SmartScreen").
- Confirm the pairing on both devices. Once connected, CarPlay will launch automatically.

Figure 3.3.1: Wireless Apple CarPlay Connection steps. This image illustrates the step-by-step process for connecting an iPhone to the car screen via wireless CarPlay, involving Bluetooth pairing and confirmation.
3.3.2 Wireless Android Auto Connection (for Android devices)
- On the car screen, select the "Android Auto" icon.
- On your Android phone, go to Settings > Bluetooth and turn Bluetooth on.
- Pair your Android phone with the device's Bluetooth name.
- Confirm the pairing on both devices. Android Auto will launch automatically.

Figure 3.3.2: Wireless Android Auto Connection steps. This image illustrates the step-by-step process for connecting an Android phone to the car screen via wireless Android Auto, involving Bluetooth pairing and confirmation.
3.3.3 Wireless Mirror Link (for iOS and Android devices)
Mirror Link allows you to display your phone's screen directly on the car screen.
- On the car screen, select the "Mirror Link" or "Airplay" icon.
- On your phone, enable Wi-Fi and connect to the Wi-Fi network broadcast by the car screen (usually named "SmartScreen" or similar).
- For iOS: Open Control Center, tap "Screen Mirroring," and select "SmartScreen."
- For Android: Use your phone's screen casting feature (e.g., Smart View, Cast, Wireless Display) and select the car screen device.

Figure 3.3.3: Wireless Mirror Link functionality of the Kuayvan car screen. This image illustrates the wireless mirror link feature, enabling users to project their smartphone screen onto the larger car display for enhanced viewing of content.

Figure 3.3.4: iOS Mirror Link connection steps. This image provides a visual guide for connecting an iOS device to the car screen using the Mirror Link feature, detailing the steps to enable Airplay and screen mirroring.
4. Operating Instructions
4.1 Using CarPlay and Android Auto
Once connected, the CarPlay or Android Auto interface will appear on the screen. You can navigate through applications using the touch screen. Access features like:
- Navigation: Use Apple Maps, Google Maps, or Waze for turn-by-turn directions.
- Music & Podcasts: Play audio from your favorite streaming services.
- Calls & Messages: Make and receive calls, and send messages hands-free.

Figure 4.1.1: Wireless Apple CarPlay and Android Auto interface. This image illustrates the wireless connectivity feature, showing how Apple CarPlay and Android Auto interfaces are displayed on the screen, along with a smartphone connecting via Bluetooth and Wi-Fi.
4.2 Smart Voice Control
Activate Siri (for iOS) or Google Assistant (for Android) by saying "Hey Siri" or "Hey Google," or by pressing the voice command button on the screen (if available). You can then issue commands such as:
- "Navigate to [address/destination]"
- "Play [song/artist]"
- "Call [contact name]"
- "Send a message to [contact name]"

Figure 4.2.1: GPS navigation and voice control features. This image highlights the integrated GPS navigation capabilities, supporting popular apps like Google Maps and Apple Maps, and demonstrates the voice control functionality for hands-free operation.
4.3 Dash Cam and Backup Camera Operation
The device continuously records footage from the 4K front dash cam and the 1080p rear backup camera onto the included 64GB TF card. The loop recording feature ensures older files are overwritten when the card is full.
- Driving Records: Footage is automatically saved in segments. In case of an impact, the G-sensor will lock the current recording to prevent it from being overwritten.
- Backup Camera: When you shift your vehicle into reverse, the screen will automatically display the rear camera view with dynamic parking assist lines to aid in safe parking.
- Viewing Footage: You can review recorded videos directly on the device's screen or by removing the TF card and viewing it on a computer.
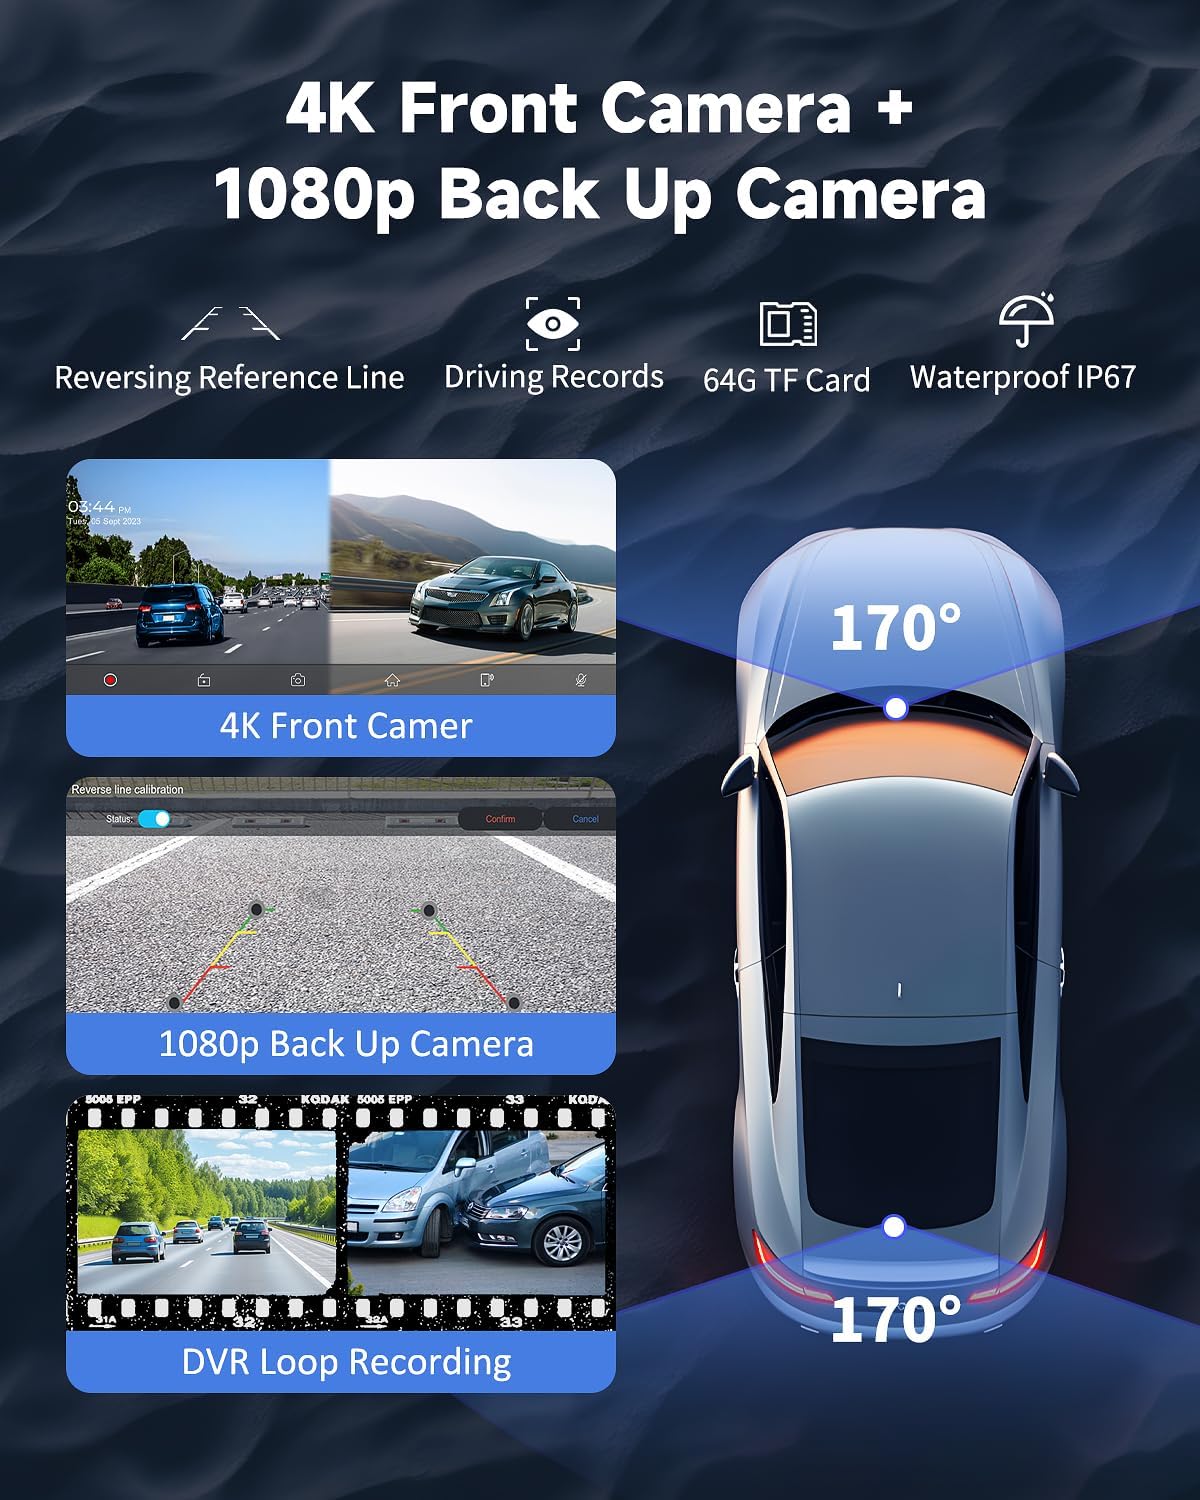
Figure 4.3.1: 4K front dash camera and 1080p backup camera features. This image showcases the dual camera system, featuring a 4K front dash cam and a 1080p rear backup camera with wide-angle views, reversing reference lines, and DVR loop recording capabilities.
4.4 Audio Output Options
The device offers several ways to output audio:
- Built-in Speaker: For direct audio playback from the unit.
- AUX Cable: Connect the provided AUX cable from the device's AUX port to your car's AUX input for high-quality audio through your vehicle's speakers.
- FM Transmitter: Tune the device to an unused FM frequency, then tune your car's radio to the same frequency to transmit audio wirelessly.
- Bluetooth 5.0 Stereo: Connect your phone to the device via Bluetooth for audio streaming, or connect the device to your car's Bluetooth system (if supported) for audio output.

Figure 4.4.1: Four audio output options. This image details the various audio output methods available, including the built-in speaker, AUX cable connection, FM transmission, and Bluetooth 5.0 stereo, allowing flexible integration with your vehicle's audio system.
5. Maintenance
5.1 Cleaning the Device
- Use a soft, lint-free cloth to gently wipe the screen and exterior.
- Do not use abrasive cleaners, alcohol, or solvents, as these can damage the screen or finish.
- Ensure the device is powered off and disconnected from power before cleaning.
5.2 TF Card Management
- The included 64GB TF card is designed for continuous loop recording.
- Periodically format the TF card (e.g., once a month) through the device's settings to maintain optimal recording performance and prevent data corruption.
- Always power off the device before inserting or removing the TF card to prevent data loss or card damage.
5.3 Software Updates
Check the manufacturer's website or contact customer support for information on available software updates. Keeping your device's firmware updated ensures you have the latest features and performance improvements.
6. Troubleshooting
| Problem | Possible Cause | Solution |
|---|---|---|
| Device does not power on. | No power from car outlet; loose connection; faulty adapter. | Check car's power outlet (e.g., by plugging in another device). Ensure the car charger adapter is securely plugged into both the device and the car outlet. Try a different car outlet if available. |
| CarPlay/Android Auto not connecting wirelessly. | Bluetooth/Wi-Fi off on phone; incorrect pairing; interference. | Ensure Bluetooth and Wi-Fi are enabled on your phone. Forget the device from your phone's Bluetooth settings and re-pair. Restart both the phone and the car screen. |
| No audio output. | Incorrect audio output mode selected; volume too low; loose AUX cable. | Check the audio output settings on the device and select the correct mode (Built-in Speaker, AUX, FM, Bluetooth). Increase volume on both the device and your car stereo. Ensure AUX cable is fully inserted. For FM, try a different frequency. |
| Dash cam not recording or footage is corrupted. | TF card full or corrupted; faulty TF card; incorrect settings. | Format the TF card through the device's settings. Try a different compatible TF card. Ensure loop recording is enabled. |
| Backup camera not displaying. | Loose camera connection; camera faulty; vehicle not in reverse. | Check the connection of the rear camera cable to the main unit. Ensure your vehicle is properly shifted into reverse. |
7. Specifications
| Feature | Detail |
|---|---|
| Brand | kuayvan |
| Model | B0DCBYTHG7 (P1-144K) |
| Screen Size | 10.26 Inches |
| Display Type | LED Color Screen |
| Front Camera Resolution | 4K (2160p) |
| Rear Camera Resolution | 1080p |
| Field of View | 180 Degrees (approx.) |
| Flash Memory Type | microSD (64GB TF card included) |
| Power Supply | Type-C 12-32V |
| Connectivity | Wireless CarPlay, Android Auto, Bluetooth, FM, AUX, USB |
| Mounting Type | Suction Mount, Adhesive Mount |
| Compatible Devices | Smartphone, Car, Truck |
| Parcel Dimensions | 30 x 14.3 x 11.4 cm |
| Weight | 1.12 kg |
8. Warranty and Support
For warranty information, technical support, or service inquiries, please contact kuayvan customer support. Refer to the contact details provided in the product packaging or on the official kuayvan website.
Please retain your purchase receipt as proof of purchase for warranty claims.
Ask a question about this manual
Ask about setup, troubleshooting, compatibility, parts, safety, or missing instructions. Manuals+ will review the question and use this page’s manual context to help answer it.