1. Introduction
This manual provides detailed instructions for the safe installation, operation, and maintenance of your Walrusled 4FT LED Wraparound Emergency Stairwell Light (Model: ZL-NSBLP36-4FT-CE). Please read this manual thoroughly before installation and retain it for future reference. Proper installation and adherence to these instructions are crucial for optimal performance and safety.
Safety Information
- Always turn off power at the circuit breaker before installation, maintenance, or servicing.
- Installation should be performed by a qualified electrician in accordance with national and local electrical codes.
- Do not attempt to modify or disassemble the fixture. There are no user-serviceable parts inside.
- Ensure the fixture is securely mounted to prevent falling.
- This product is designed for indoor and outdoor use (IP20 rated, meaning protected against solid objects over 12.5mm, but not against water).
2. Product Features
- Power Selectable: Choose between 20W (2500lm) or 40W (5000lm) to suit different lighting needs.
- Built-in Battery Backup: Provides over 200 minutes of emergency lighting (5W output) during power outages. Features a LiFePO4 battery (6.4V/3000mAh) with a lifespan of over 3 years.
- Emergency Test Switch: Includes a touch test switch and indicator lights for easy monitoring of battery status.
- High Performance: Constructed with a premium metal base for excellent heat dissipation and a milky PC cover for uniform, comfortable light.
- Wide Beam Angle: 120-degree beam angle ensures optimal light distribution.
- Energy Efficient: Up to 125lm/w high lumen efficiency, saving up to 75% energy.
- Long Lifespan: Over 54,000 hours of maintenance-free operation.
- Multiple Mounting Options: Supports surface mount, flush mount, and hanging mount.
- Certifications: CE, FCC, SAA & UKCA certified for safety and reliability.

Image: Overview of the Walrusled 4FT LED Wraparound Emergency Stairwell Light, highlighting its key features such as selectable wattage, battery backup, and certifications.
3. What's in the Box
Carefully unpack the box and ensure all components are present and undamaged. If any items are missing or damaged, please contact customer support.
- LED Wraparound Emergency Stairwell Light Fixture
- Mounting Hardware (screws, wall plugs, hanging ropes/discs for hanging mount)
- Instruction Manual

Image: Diagram illustrating the product dimensions and the included mounting accessories for quick and easy installation.
4. Specifications
| Feature | Specification |
|---|---|
| Model Name | ZL-NSBLP36-4FT-CE |
| Brand | Walrusled |
| Size | 4FT (49.21"L x 4.33"W x 3.45"H) |
| Wattage | 20W / 40W Selectable |
| Brightness | 2500lm (20W) / 5000lm (40W) |
| Color Temperature | 5000K (Noon White) |
| Voltage | 100-277V (AC) |
| Emergency Output | 5W |
| Emergency Duration | Over 200 minutes |
| Battery Type | LiFePO4 6.4V/3000mAh |
| Charging Time | 16 to 24 hours |
| Material | Metal, Polycarbonate |
| IP Rating | IP20 |
| Lifespan | Up to 54,000 hours |
| Certifications | CE, FCC, SAA, UKCA |
5. Setup and Installation
Important: Ensure power is OFF at the circuit breaker before beginning installation.
General Overview

Image: Exploded view of the fixture, detailing components such as the LED strips, battery, microwave sensor, and driver.
Wiring Methods
There are two primary wiring methods: Emergency Wiring (controlled by external wall switch or always ON) and Non-Emergency Wiring. Refer to the diagram below for correct connections.
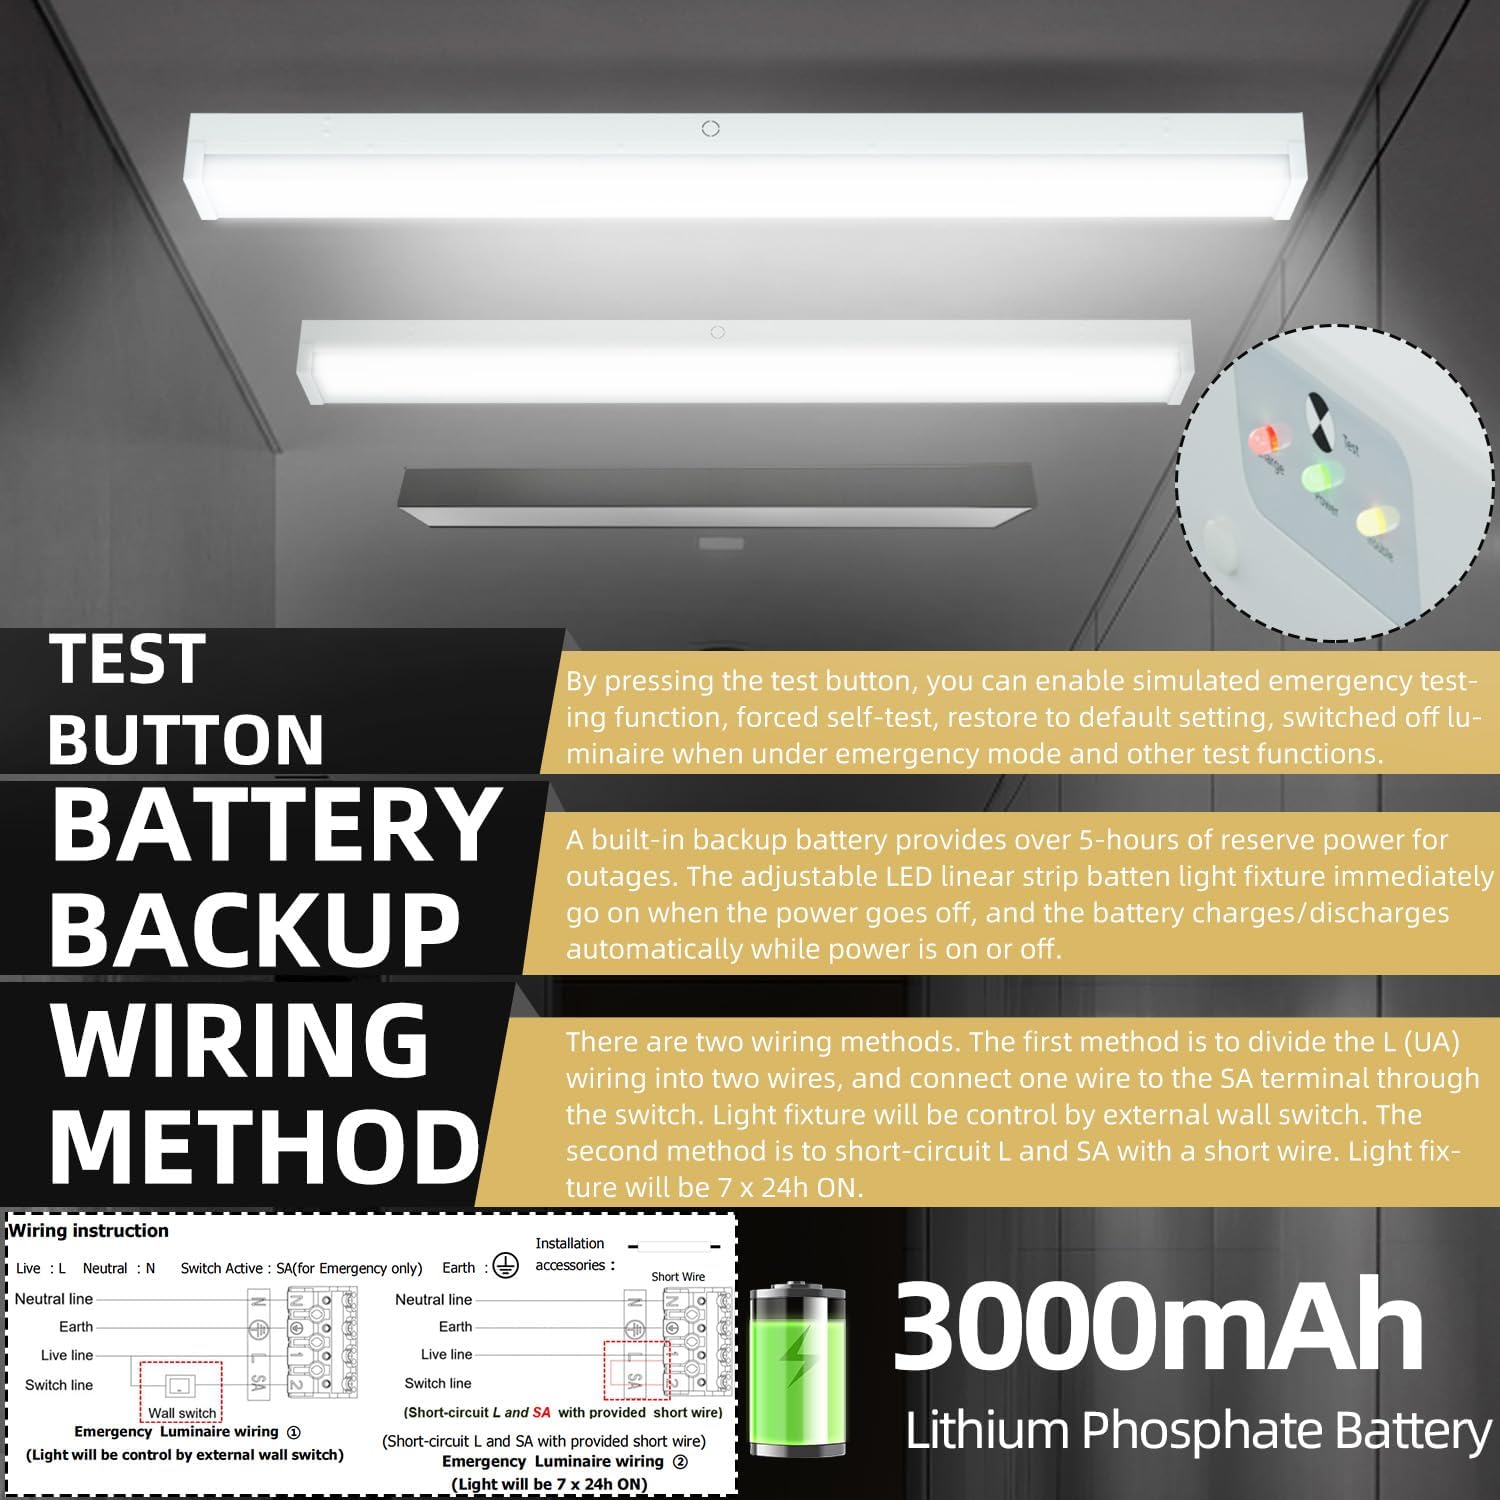
Image: Detailed wiring instructions for both emergency (wall switch controlled or 24h ON) and non-emergency operation.
Mounting Options
The fixture supports surface mount, flush mount, and hanging mount installations. Mounting accessories are included.

Image: Step-by-step visual guide for surface and suspension mounting.
Surface Mount Installation
- Drill 6mm holes on the ceiling at the corresponding positions for the luminaire bracket.
- Insert M6 wall plugs into the drilled holes.
- Pull the power cable into the luminaire bracket through the cable entry hole.
- Secure the luminaire bracket to the ceiling using the provided M4 screws.
- Connect the power cable to the terminal block on the luminaire bracket according to the correct wire sequence (N, L, Earth, SA).
- Secure the luminaire body to the bracket using the slings reserved on the bracket.
- Insert the female connector to the male connector on the control gear.
- Push the luminaire body up and align the position mark (triangle) on the luminaire body with the OPEN position mark (inverted triangle) on the luminaire bracket.
- Slide the luminaire body along the CLOSE arrow direction to move the position mark (triangle) to the CLOSE position mark (inverted triangle) on the luminaire bracket.
- Rotate the iron plate to the vertical position and tighten the screw to secure the fixture.
Video: Demonstration of the surface mount installation process for the Walrusled LED light fixture.
Hanging Mount Installation
- Mark the positions for the hanging rope discs on the ceiling.
- Drill 6mm holes at the marked positions.
- Insert M6 wall plugs into the holes.
- Fix the hanging rope discs to the ceiling with the provided M4 screws.
- Suspend the luminaire bracket using the hooks on the hanging ropes.
- Pull the power cable into the luminaire bracket through the cable entry hole.
- Follow steps 5-11 of the Surface Mount Installation for wiring and securing the luminaire body.
Video: Demonstration of the hanging mount installation process for the Walrusled LED light fixture.
6. Operating Instructions
Power and Lumen Selection
The fixture allows you to select between 20W (2500lm) and 40W (5000lm) output. This is typically done via a DIP switch located on the driver inside the fixture. Refer to the installation section for accessing the internal components.
Video: Instructions on how to adjust the power mode (full or half power) using the internal DIP switch.
Emergency Function and Indicators
The fixture includes a built-in battery backup for emergency lighting. The status of the emergency function is indicated by LED lights on the fixture.
- Red LED Indicator: ON = Battery is charging; OFF = Battery fully charged, main supply off, or battery disconnected.
- Green LED Indicator: ON = Main supply is on; OFF = Main supply is off.
- Yellow LED Indicator (Fault Indication):
- Continuously ON: Indicates normal operation.
- Slow Flash (4s ON, 1s OFF): Indicates self-test passed within 6 days.
- Fast Flash (0.5s ON, 0.5s OFF): Indicates latest self-test failed.
- OFF: Main supply off.
Test Button Functions
The test button allows you to check the emergency functions:
- Simulated Emergency Test: Press and hold the test button for more than 1.5 seconds. The luminaire will simulate a main power failure and enter emergency mode. Release the button to return to previous status.
- Force Self-Test: Press and hold the test button for more than 10 seconds. The luminaire will perform a self-test. Release the button to return to previous status until the self-test is finished. The yellow LED indicator will show the self-test result.
- Reset to Pre-settings: Press the test button 3 times within 3 seconds. All three LED indicators will flash 3 times synchronously, and the luminaire will enter default pre-settings mode.
- Switch Off Luminaire in Emergency Mode: Within 30 minutes after main power failure, press the test button 3 times in 3 seconds to switch off the luminaire.
Video: Detailed instructions on using the emergency test button and understanding the LED indicators.
Sensor Settings (For models with sensor)
If your model includes a sensor, settings can be adjusted via a remote controller or internal DIP switches. Refer to the specific instructions for your sensor type.
Remote Controller Settings
Parameters are successfully set when the luminaire flashes once after the corresponding button on the remote controller is pressed.
- Detection Sensitivity: Set to 25%, 50%, 75%, or 100% (0.5-1m, 1-2m, 3-4m, 4-6m detection areas respectively).
- Hold Time: The duration the luminaire remains at 100% brightness after motion ceases (e.g., 5s, 30s, 90s, 180s, 5min, 10min, 20min, 30min).
- Twilight Brightness Percentage: Set the percentage of full brightness when the luminaire dims to twilight (e.g., 20%, 40%, 60%, 100%).
- Twilight Stand-by Time: The duration the luminaire remains at twilight before switching off (e.g., 0s for direct switch off, 30s, 90s, or infinity for always keeping twilight).
- Light Sensor Threshold: The ambient lumen value at which the luminaire switches off if no motion is detected (e.g., 15lux, 50lux, or infinity to disable light sensing).
- Luminaire State: ON/OFF for constant on/off mode; Auto for sensor dimming with default parameters (100% sensitivity, 30s hold time, 20% twilight brightness, infinity twilight stand-by time).
Video: Guide to setting sensor parameters using the remote controller, including sensitivity, hold time, and twilight settings.
Alternative Sensor Settings (DIP Switch)
For some models, sensor data can be precisely set using DIP switches located on the sensor module. Refer to the diagram for specific combinations.
- Detection Area (Sensitive): Adjustable from 20% to 100% using DIP switches 1 and 2.
- Hold Time (Delay Time): Adjustable from 5s to 10min using DIP switches 3 and 4.
- Twilight Ratio: Adjustable from 20% to 100% using DIP switches 5 and 6.
- Twilight Time (Hold Time for 2-step dimming sensor): Adjustable from 0s to infinity using DIP switches 7 and 8.
Video: Explanation of alternative sensor settings using DIP switches for detection area, hold time, twilight ratio, and twilight time.
7. Maintenance
Regular maintenance ensures the longevity and optimal performance of your LED fixture.
- Cleaning: Clean the fixture regularly with a soft, dry cloth. Do not use abrasive cleaners or solvents, as they may damage the finish or electrical components.
- Inspection: Periodically inspect the fixture for any signs of damage, loose connections, or wear. If any issues are found, disconnect power and contact a qualified electrician or customer support.
- Emergency Battery Check: Perform the simulated emergency test function monthly to ensure the battery backup is operational. The yellow LED indicator will provide feedback on self-test results.
- Battery Replacement: The LiFePO4 battery has a lifespan of over 3 years. If the emergency function duration significantly decreases or the yellow LED indicates a fault after a self-test, the battery may need replacement by a qualified technician.
8. Troubleshooting
If you encounter issues with your fixture, refer to the following common troubleshooting steps:
| Problem | Possible Cause | Solution |
|---|---|---|
| Light does not turn on | No power supply, loose wiring, faulty switch, incorrect wiring. | Check circuit breaker. Verify all wiring connections are secure. Test the switch. Review wiring diagrams in Section 5. |
| Emergency function not working | Battery not charged, battery disconnected, faulty battery, emergency wiring issue. | Ensure main power is on for 16-24 hours to charge the battery. Check red LED indicator. Perform a force self-test (Section 6). Verify emergency wiring. |
| Light flickers | Unstable power supply, loose connection, incompatible dimmer (if applicable). | Check power source stability. Tighten all wiring connections. Ensure any dimmer used is LED compatible. |
| Sensor not detecting motion | Incorrect sensitivity setting, obstruction, faulty sensor. | Adjust sensor sensitivity (Section 6). Ensure no physical obstructions. Contact support if issue persists. |
| Light stays on/off unexpectedly | Incorrect hold time or twilight settings, light sensor threshold. | Review and adjust sensor settings (hold time, twilight brightness, twilight stand-by time, light sensor threshold) as per Section 6. |
If the problem persists after attempting these solutions, please contact Walrusled customer support.
9. Warranty and Support
Walrusled provides a one-year warranty for this product and 5-year technical support to ensure your satisfaction. If you experience any defects or require assistance, please contact our customer service team.
Contact Information: Please refer to the product packaging or the official Walrusled website for the most up-to-date contact details.
When contacting support, please have your model number (ZL-NSBLP36-4FT-CE) and purchase date readily available.