Introduction
This manual provides detailed instructions for the safe and proper installation, operation, and maintenance of your Bathlink Frameless Double Sliding Tub Shower Door. Please read all instructions carefully before beginning installation and retain this manual for future reference.
Safety Information
- This product is heavy and requires at least two people for safe installation.
- Always wear appropriate personal protective equipment, including safety glasses and gloves, when drilling or handling glass.
- Handle glass panels with extreme care to prevent damage or injury. Avoid impacts to the edges of the glass.
- Ensure all components are free from scratches or imperfections before installation. Contact customer support if any parts are damaged or missing.
- Verify that the wall structure can support the weight of the shower door.
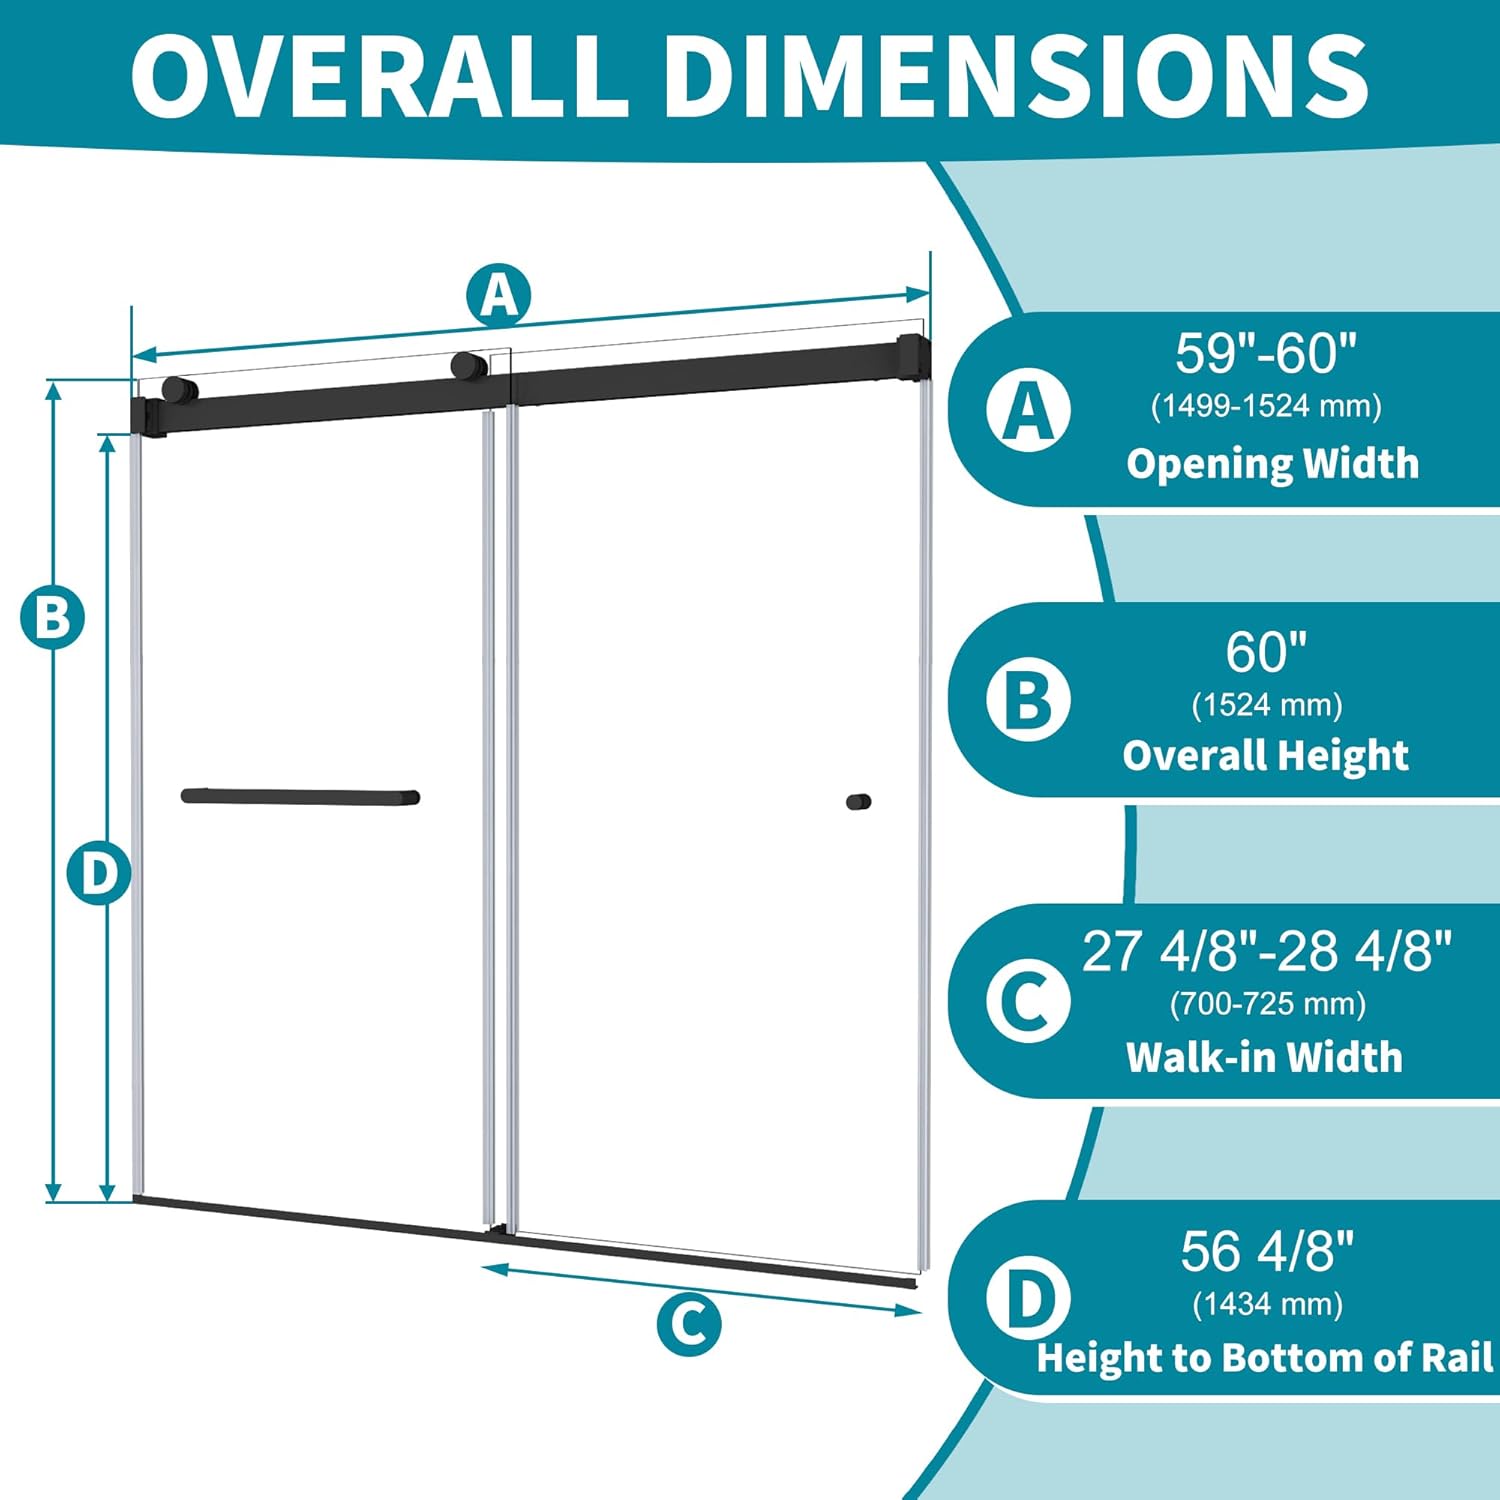
Product Dimensions
The Bathlink Frameless Double Sliding Tub Shower Door is designed for an adjustable width of 59 to 60 inches and an overall height of 60 inches. The walk-in width ranges from 27 4/8" to 28 4/8".
Installation Instructions
Before you begin, ensure you have all necessary tools and components. A detailed installation video is provided below for visual guidance.
Tools and Materials Required:
- Level
- Drill
- Screwdriver
- Measuring Tape
- Safety Glasses
- Rubber Mallet
- Pencil
- Caulk Gun and Silicone Sealant
Step-by-Step Installation:
- Unpack and Inspect: Carefully remove all components from the packaging. Lay out all parts and ensure that you have all items listed in the installation guide. Handle glass panels with care to prevent damage.
- Determine Height and Mark: Use the installation auxiliary tool to determine the required height. Cut the auxiliary tool to the correct length. Place the auxiliary tool 10mm from the edge of the tub/shower base, keep it vertical, and mark the drilling positions with a pencil. Carefully check the calibration before drilling.
- Drill Holes and Insert Wall Plugs: Drill holes at the marked positions using a Φ6mm drill bit. Insert the provided wall plugs into the drilled holes.
- Install Wall Connectors: Secure the wall connectors to the wall using ST5×35mm screws.
- Install Top Track: Place the top track into the wall connectors. Use a level to ensure it is perfectly horizontal. Tighten the set screws on the wall connectors to secure the track.
- Install Bottom Aluminum Profile: Install the bottom aluminum profile at a distance of 23.5mm from the edge of the tub/shower base. Center the bottom slider on the profile, mark the hole positions, and drill holes using a Φ6mm drill bit. Insert wall plugs and secure with ST4×25mm screws.
- Install Bottom Water Stopper: Apply sealant to the bottom water stopper and install it on the bottom aluminum profile of the door.
- Attach Rollers to Outer Glass Door: Attach the rollers to the top of the outer glass door. Lift the door and hook the rollers onto the top track. Ensure the door slides smoothly and check for any misalignment.
- Install Rollers on Inner Glass Door: Install the rollers on the inner glass door.
- Install Inner Glass Door: Lift the inner glass door with the rollers and bottom slider installed and place it into the track. Ensure the door slides smoothly and check for any misalignment.
- Install Handles: Attach the long stainless steel handle to the outer glass door and the inner round handle to the inner glass door.
- Adjust Rollers: Visually check if the bottom glass door is vertical. If it is not vertical, use a wrench to adjust the rollers until the door is vertical. Once vertical, attach the roller covers.
- Install Water-Sealing Strip: Install the water-sealing strip on the glass door edges to ensure a tight seal.
- Apply Silicone Sealant: Apply silicone sealant for waterproof sealing around the perimeter of the shower door where it meets the wall and tub/shower base. Do not get wet or use the shower within 24 hours to allow the sealant to cure properly.


Installation Video:
Official installation video for the Bathlink Frameless Double Sliding Tub Shower Door. This video provides a visual guide for each step of the installation process, from preparing tools to final sealing.
Operation
Your Bathlink Frameless Double Sliding Tub Shower Door features a double-sliding design for convenient access and space-saving functionality. Both glass panels can slide smoothly, allowing entry from either side.
- Sliding Mechanism: Gently push or pull the glass panels using the handles to open or close the shower door. The stainless steel rollers ensure smooth and quiet operation.
- Handles: The outer glass panel features a long stainless steel handle, which can also be used for hanging towels. The inner glass panel has a small circular handle for easy sliding from inside the shower.


Maintenance
Regular cleaning and maintenance will ensure the longevity and pristine appearance of your shower door.
- Glass Cleaning: The 5/16" (8mm) thick tempered glass is treated with a nano-coating, which helps water droplets flow rapidly down the surface without clinging. This makes the glass stain-resistant and easy to clean. Use a soft cloth and a mild, non-abrasive glass cleaner. Avoid harsh chemicals or abrasive pads that could damage the coating or glass.
- Hardware Cleaning: Clean the aluminum and stainless steel hardware with a soft, damp cloth. Avoid abrasive cleaners.
- Sealing Strips: Periodically check the water-retaining strips for wear or damage. Replace if necessary to maintain optimal sealing and prevent leaks.


Troubleshooting
If you encounter any issues with your shower door, please refer to the following common solutions. If the problem persists, contact customer support.
- Door Not Sliding Smoothly: Check the rollers for any debris or obstructions. Ensure the top track is clean. Verify that the rollers are properly tightened and adjusted as per installation step 12.
- Water Leakage: Inspect the silicone sealant around the perimeter of the shower door. Reapply sealant if any gaps or cracks are visible. Check the condition of the water-retaining strips and replace if worn or damaged. Ensure the shower belt (if installed) is correctly positioned.
- Door Misalignment: Re-check the vertical alignment of the glass doors and adjust the rollers as described in installation step 12. Ensure the top track is level.
Specifications
| Feature | Detail |
|---|---|
| Brand | Bathlink |
| Model Number | B0DCBQXRNG |
| Color | Brushed Nickel |
| Material | Aluminum, Glass |
| Style | Modern |
| Item Weight | 122.4 Pounds |
| Product Dimensions | 0.31 x 60 x 60 inches |
| Adjustable Width | 59 - 60 inches |
| Overall Height | 60 inches |
| Glass Thickness | 5/16" (8mm) |
| Glass Type | Easy-Clean Tempered Glass |
| Assembly Required | Yes |
| UPC | 616050970943 |
Warranty and Support
Bathlink is committed to providing quality products and customer satisfaction. For any questions regarding installation, parts, or product issues, please contact our customer support.
- Customer Support: If you need setup or replacement guidance, please use the 'Contact Seller' button on the product page where you made your purchase.
- Returns: This product is eligible for 30-day easy returns.
