1. Introduction
This manual provides detailed instructions for the installation, operation, and maintenance of your Irishom Wireless WiFi + GSM Home Alarm System. Please read this manual thoroughly before using the product to ensure proper functionality and safety.
The Irishom alarm system is designed to provide comprehensive security for your home or office. It features a 2.4-inch LCD TFT screen for intuitive operation, supports both WiFi and GSM networks for reliable communication, and allows remote control via a dedicated smartphone application. The system is compatible with smart home platforms like Alexa and Google Home, enhancing its integration into your smart ecosystem.
2. Package Contents
Verify that all items listed below are included in your package. If any items are missing or damaged, please contact customer support.
- 1 x Wireless Alarm Panel
- 2 x Wireless PIR Motion Sensors
- 5 x Wireless Door/Window Sensors
- 2 x Remote Controls
- 5 x RFID Cards
- 1 x Wired Siren
- 1 x PIR Sensor Bracket
- 1 x Set of Mounting Screws
- 1 x USB Charging Cable
- 1 x User Manual (English)

Image: Overview of the Irishom Wireless Alarm System components, showing the main panel, two PIR motion sensors, two door/window sensors, two remote controls, and two RFID key fobs.
3. Setup Guide
3.1. Alarm Panel Installation
- Power Connection: Connect the alarm panel to a power source using the provided DC 5V/1A adapter and USB charging cable. Ensure the built-in lithium battery is fully charged for backup power.
- SIM Card Installation (Optional GSM Functionality): If you intend to use the GSM functionality, insert a valid SIM card into the designated slot on the alarm panel. Ensure the SIM card is active and has sufficient credit for calls and SMS.
- Initial Power On: Press the power button to turn on the alarm panel. The LCD screen will illuminate, and voice prompts will guide you through the initial setup.
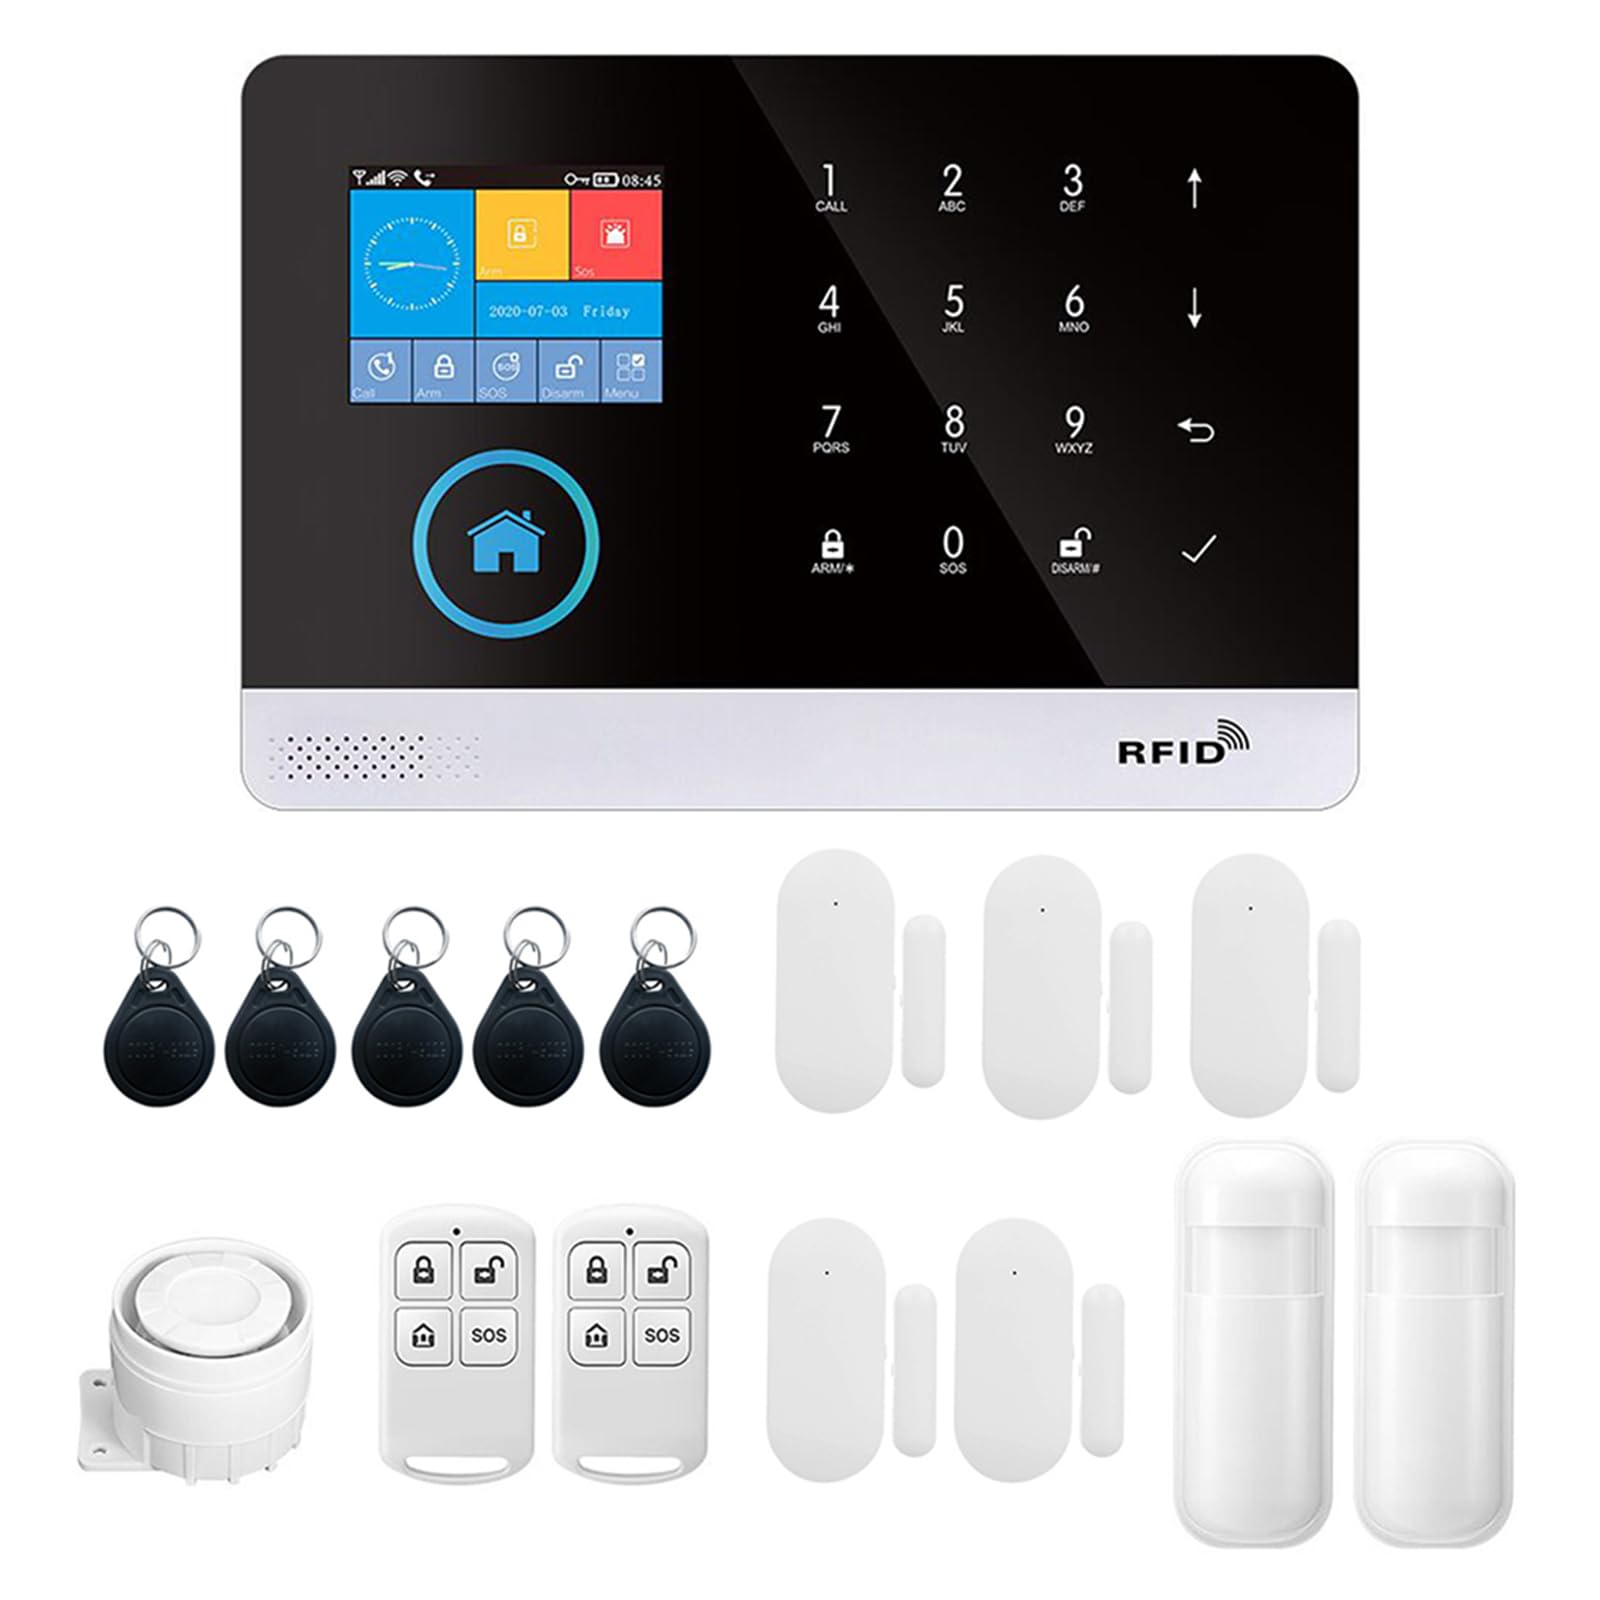
Image: Close-up of the Irishom alarm panel, showing the keypad, LCD screen, and RFID reader. This panel serves as the central control unit.
3.2. Network Configuration (WiFi)
- Download the App: Scan the QR code in the manual (or search "Tuya Smart" / "Smart Life" in your app store) to download the dedicated smartphone application.
- Register/Login: Create an account or log in to the application.
- Add Device: Follow the in-app instructions to add your alarm system. This typically involves putting the alarm panel into pairing mode (refer to the panel's voice prompts or on-screen instructions) and connecting it to your 2.4GHz WiFi network.
3.3. Sensor Pairing
The system supports up to 100 wireless defense zones. Follow these general steps to pair sensors:
- Enter Pairing Mode: On the alarm panel, navigate to the "Add Sensor" or "Pair Device" menu.
- Activate Sensor: For PIR motion sensors, install the AAA batteries and move in front of the sensor to trigger it. For door/window sensors, install the CR2450 battery and separate the two parts of the sensor. For remote controls, press any button.
- Confirmation: The alarm panel will typically emit a sound or display a message confirming successful pairing. Assign a zone name or number to each sensor for easy identification.
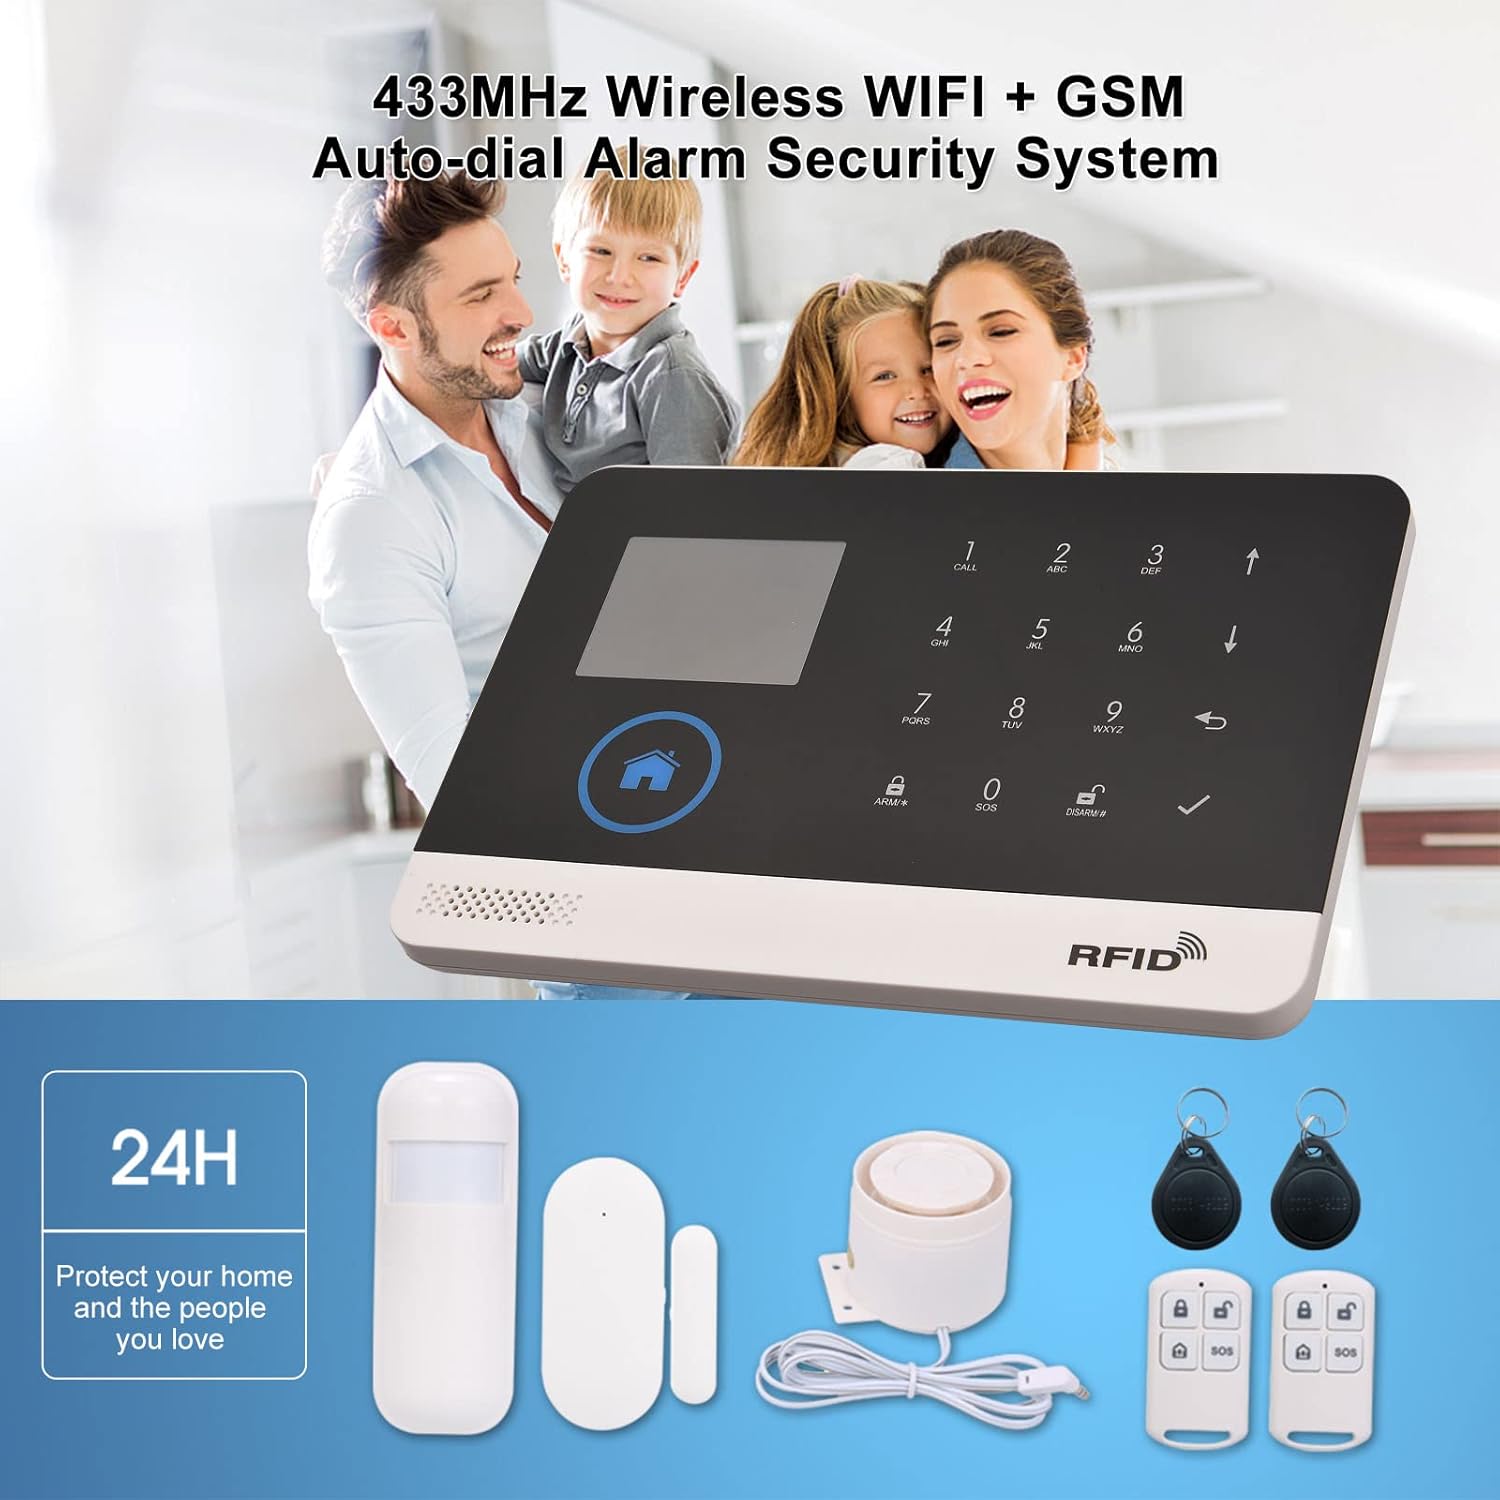
Image: The Irishom alarm system components laid out, including the main panel, PIR motion sensor, door/window sensor, wired siren, remote controls, and RFID cards. This illustrates the full kit.
3.4. RFID Card Pairing
To pair RFID cards for quick disarming:
- Enter RFID Pairing Mode: On the alarm panel, navigate to the "Add RFID" menu.
- Scan Card: Present the RFID card to the designated RFID reader area on the alarm panel.
- Confirmation: The panel will confirm successful pairing.
4. Operating Instructions
4.1. Arming and Disarming
- Arm (Away Mode): Press the "Arm" button on the alarm panel, remote control, or use the smartphone app. All configured sensors will be active.
- Home Arm (Stay Mode): Press the "Home Arm" button (if available) on the panel or remote. This typically arms perimeter sensors (e.g., door/window) while allowing movement within the home.
- Disarm: Enter your user password on the alarm panel, swipe an authorized RFID card, press the "Disarm" button on the remote control, or use the smartphone app.
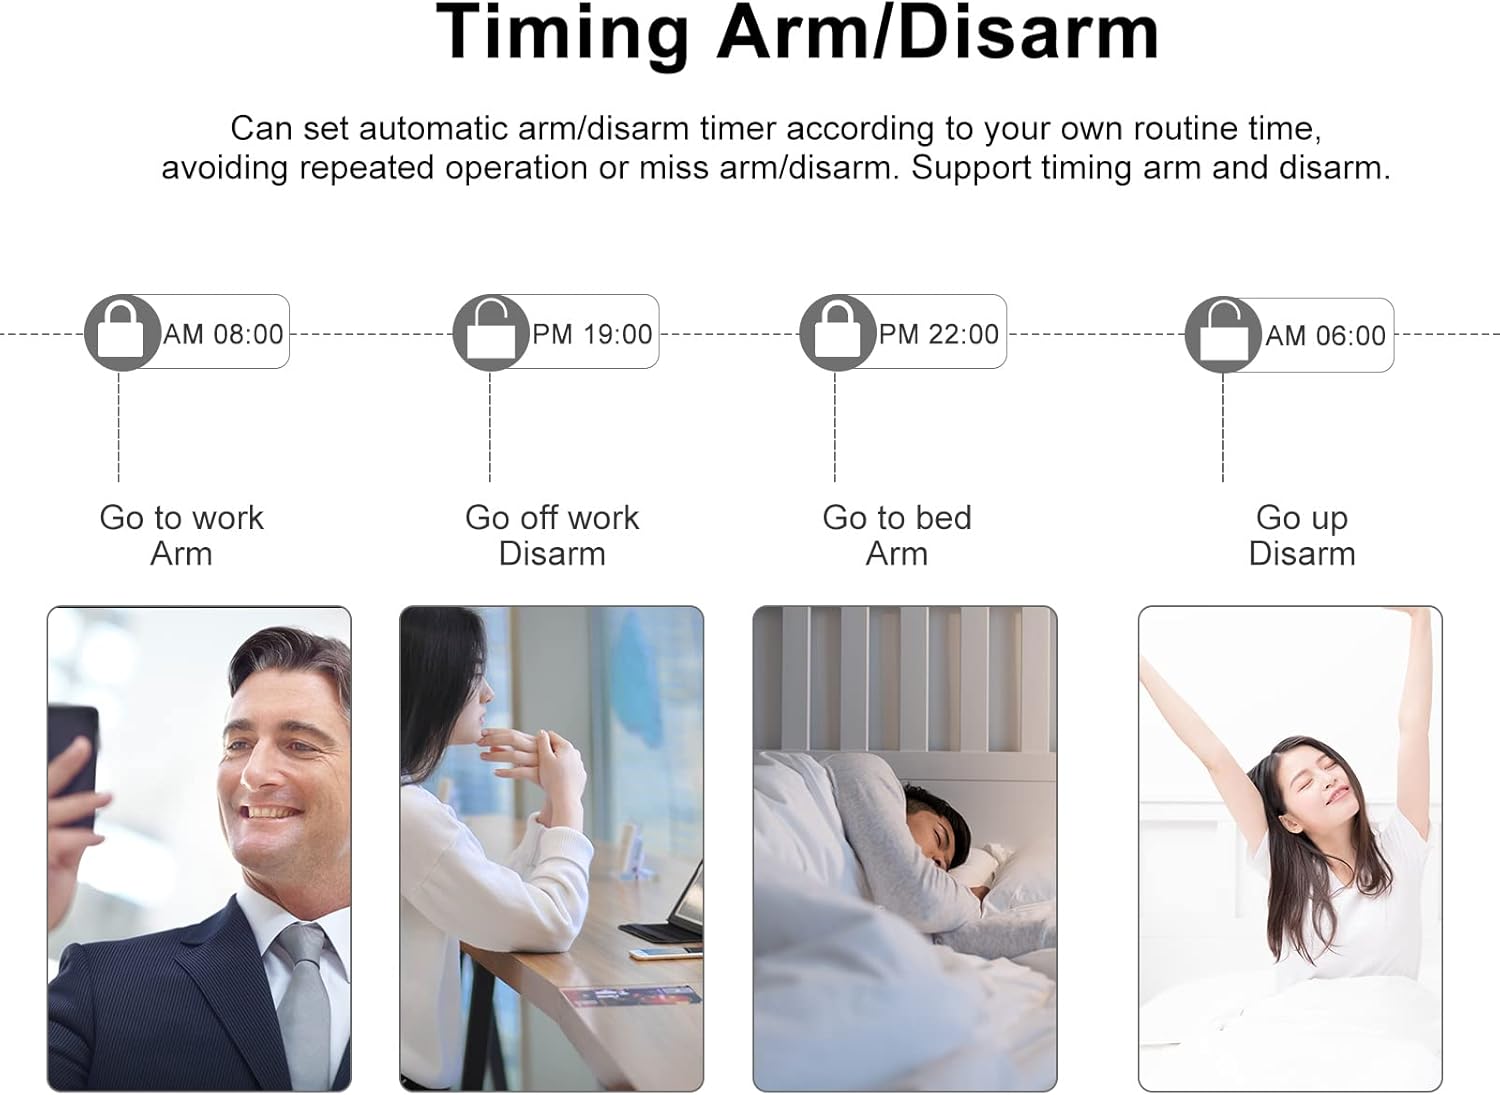
Image: A visual representation of the timing arm/disarm feature, showing a schedule for arming and disarming the system at different times of the day, such as for work, sleep, and waking up.
4.2. Emergency (SOS) Function
In an emergency, press the SOS button on the alarm panel or remote control. The system will immediately trigger the siren and send alerts to preset emergency contacts.
4.3. Remote Control via Smartphone App
The dedicated smartphone application allows you to:
- Arm and Disarm the system remotely.
- Receive real-time alarm notifications.
- Manage and configure sensors and accessories.
- View system status and event logs.
- Make calls directly from the alarm panel keypad (acting as a telephone).

Image: Depicts the alarm system's capability to send SMS notifications and make calls to preset numbers when an alarm is triggered. It shows a smartphone screen with alarm call and message interfaces.
4.4. Voice Control Integration
The system is compatible with Alexa and Google Home. To enable voice control:
- Link Account: In your Alexa or Google Home app, search for the "Tuya Smart" or "Smart Life" skill/service. Link your alarm system account.
- Discover Devices: Allow Alexa/Google Home to discover new devices.
- Voice Commands: You can now use voice commands to arm/disarm the system or check its status. For example, "Alexa, arm my home alarm" or "Hey Google, disarm the security system."

Image: Shows the Irishom alarm panel alongside an Amazon Echo (Alexa) and Google Home speaker, illustrating its compatibility with voice control assistants. Speech bubbles indicate example commands like "Alexa, turn on the Siren."
4.5. Timing Arm/Disarm
Set automatic arm/disarm schedules through the alarm panel settings or the smartphone app. This feature helps automate your security routine, preventing missed arming or disarming operations.
4.6. Voice Message and Alarm Recording
The system can record a 20-second voice message and alarm voice. This can be useful for personalized alerts or to capture audio during an alarm event.
5. Maintenance
- Battery Check: Regularly check the battery status of the alarm panel (built-in lithium battery) and all wireless sensors (PIR, door/window, remote controls). Replace batteries as needed to ensure continuous operation.
- Cleaning: Clean the alarm panel and sensors with a soft, dry cloth. Avoid using abrasive cleaners or solvents.
- Firmware Updates: Periodically check the smartphone app for any available firmware updates for the alarm panel. Updates can improve performance and add new features.
- Signal Strength: Ensure all wireless sensors maintain good signal strength with the main panel. Relocate sensors if signal issues occur.
6. Troubleshooting
6.1. System Not Arming/Disarming
- Check Power: Ensure the alarm panel is powered on and has sufficient battery.
- Correct Password/RFID: Verify you are using the correct user password or an authorized RFID card.
- Remote Control Battery: Replace batteries in remote controls if they are unresponsive.
- App Connectivity: Ensure your smartphone has internet access and the app is connected to the alarm system.
6.2. False Alarms
- PIR Sensor Placement: Ensure PIR sensors are not facing direct sunlight, heat sources, or areas with pets that might trigger them. Adjust sensitivity settings if available.
- Door/Window Sensor Alignment: Verify that the two parts of the door/window sensors are correctly aligned and within the specified gap when the door/window is closed.
- Environmental Factors: Strong air currents or vibrations can sometimes trigger sensors.

Image: An illustration showing the Irishom alarm system detecting an intruder within a house, with the PIR motion sensor highlighted in red, indicating detection. This visualizes the system's primary function.
6.3. No Notifications (SMS/App)
- GSM Signal: If using GSM, check the SIM card is properly installed and has network signal and credit.
- WiFi Connectivity: Ensure the alarm panel is connected to a stable WiFi network.
- App Permissions: Verify that the smartphone app has necessary notification permissions enabled on your phone.
- Preset Numbers: Confirm that the correct alarm phone numbers are configured in the system settings.
7. Technical Specifications
| Brand | Irishom |
| Model Number | PFA9601544366459DG |
| Power Adapter | DC 5V/1A |
| Working Current | <120mA |
| Standby Current | <80uA |
| Wireless Frequency | 433 MHz |
| Wireless Standard | IEEE802.11b/g/n 2.4G |
| Alarm Panel Battery | Li-ion DC 3.7V 500mAh (built-in) |
| PIR Sensor Battery | 3 x AAA 1.5V (included) |
| Door Sensor Battery | 1 x CR2450 3V (included) |
| Remote Control Battery | 2 x CR2025 3V (included) |
| Siren Volume | 110dB |
| RFID Support | Up to 10 pieces |
| Compatibility | Alexa, Google Home, IP cameras |
| Dimensions (Panel) | 22 x 15 x 8 cm (approximate package dimensions) |
| Weight | 660 g |
8. Warranty and Support
For warranty information and technical support, please refer to the contact details provided with your purchase documentation or visit the official Irishom website. Keep your purchase receipt as proof of purchase for warranty claims.