Introduction
Welcome to your new Deerneuf PR801W Solar Trail Camera. This manual provides detailed instructions for setting up, operating, and maintaining your camera to capture high-quality photos and videos of wildlife. Please read this manual thoroughly before using the camera to ensure proper function and longevity.
Product Overview
Key Features
- High-Resolution Capture: Records 8K 30FPS ultra HD video with audio and captures 60MP high-resolution photos.
- Advanced Night Vision: Equipped with 2 concealed 850nm low-glow infrared LEDs and a high-sensitive CMOS sensor for clear, low-noise black-and-white photos and videos at night.
- Dual Power System: Features an integrated solar panel with an 1800mAh rechargeable battery and supports 8 AA alkaline batteries (not included) as a backup power source for extended operation.
- Wireless Connectivity: Built-in low-power Wi-Fi and Bluetooth for smartphone app control, allowing live viewing, media download, and settings adjustment within approximately 45 feet.
- Fast Detection: 0.1-second trigger speed and a 120° detection angle with 3 adjustable PIR sensors to capture fast-moving subjects.
- Durable Design: IP66 waterproof rating and a robust ABS plastic shell ensure reliable operation in outdoor conditions, with an operating temperature range of -4℉ to 120℉.
Package Contents
- Trail Camera × 1
- Solar Panel × 1
- Nylon Strap × 1
- USB-DC Power Cable × 1
- USB-Type C Cable × 1
- Instruction Manual × 1
- 32GB SD Card (pre-installed)

Figure 1: Deerneuf PR801W Solar Trail Camera and its key features.
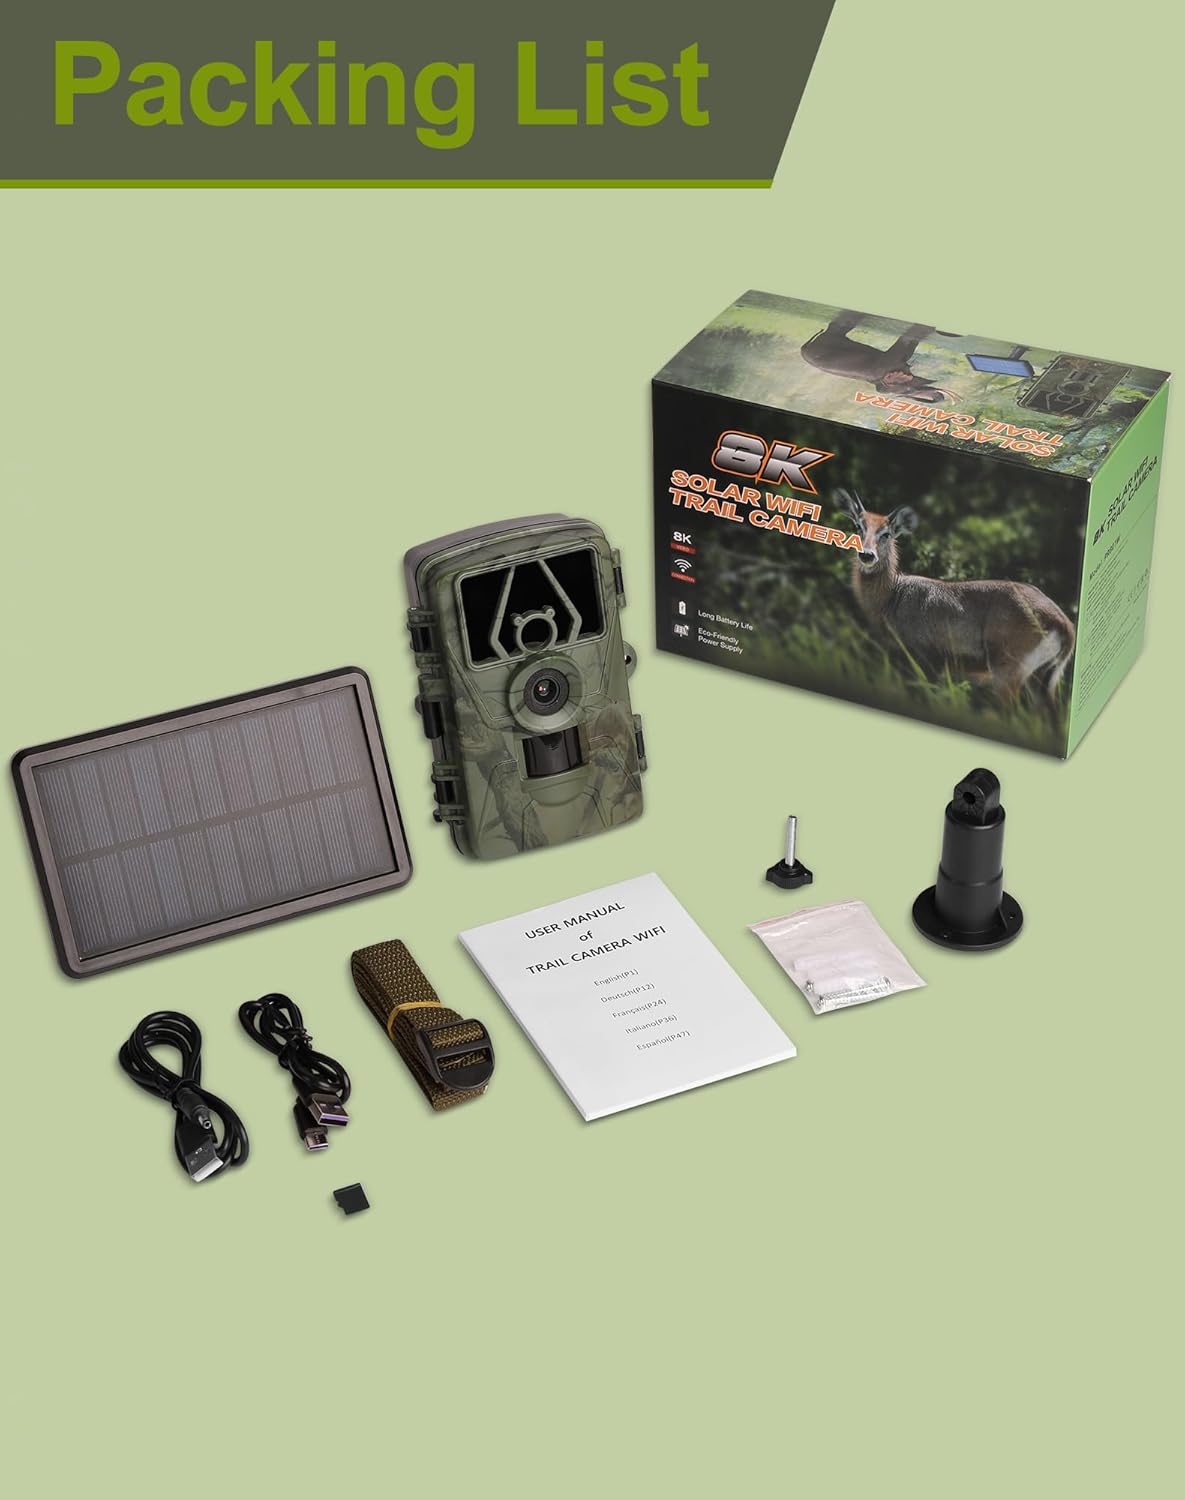
Figure 2: Included components in the Deerneuf PR801W package.
Setup
1. Power Supply
The camera offers flexible power options:
- Solar Power: The integrated solar panel charges the 1800mAh internal battery. Fully charge the solar panel for approximately 4 hours before first use. Adjust the solar panel's position and angle (360°) to maximize sunlight exposure.
- AA Battery Backup: Install 8 AA alkaline batteries (not included) into the camera's battery compartment. These batteries serve as a backup, ensuring continuous operation when the solar panel battery is depleted.
- DC 6V Mains Power: An optional DC 6V power adapter (not included) can be used for continuous power when available.

Figure 3: Overview of the three power supply methods.

Figure 4: Solar and battery dual power supply in action.

Figure 5: Charging the solar panel via USB-Type C cable.
2. SD Card Installation
A 32GB SD card is pre-installed in the camera. The camera supports SD cards up to 128GB. Ensure the SD card is properly inserted before use.
3. Initial Camera Configuration
Follow these steps for initial setup:
- Charge Solar Panel: Fully charge the solar panel (approx. 4 hours).
- Install AA Batteries: Install 8 AA alkaline batteries (recommended for backup).
- Insert SD Card: Ensure the pre-installed 32GB SD card is correctly seated.
- Connect Solar Panel: Connect the solar panel to the camera.
- Switch to TEST Mode: Open the camera and switch the mode selector to "TEST". The screen will turn on.
- Access Menu: Press the "MENU" button to access camera settings.
- Set Parameters: Adjust desired settings such as work time, photo/video resolution, and PIR sensitivity.
- Switch to ON Mode: After configuring settings, switch the mode selector to "ON". The screen will turn off after 10 seconds, and the camera will enter motion detection working mode.

Figure 6: Quick start steps for camera setup.

Figure 7: Explanation of camera modes (OFF, TEST, ON).
Operating Instructions
APP Control (Wi-Fi & Bluetooth)
The Deerneuf PR801W camera can be controlled via a smartphone app. Search for the "TrailCam Go" app (or similar, as specified in the camera's display) on your mobile device's app store.
- Connection: The camera uses its built-in low-power Wi-Fi and Bluetooth to connect to your phone. Note: This connection is to the camera's internal Wi-Fi hotspot, not your home Wi-Fi network.
- Range: The effective connection range between your phone and the camera is approximately 45 feet.
- Functions: Through the app, you can view live footage, preview and download photos and videos, and adjust camera parameters remotely.
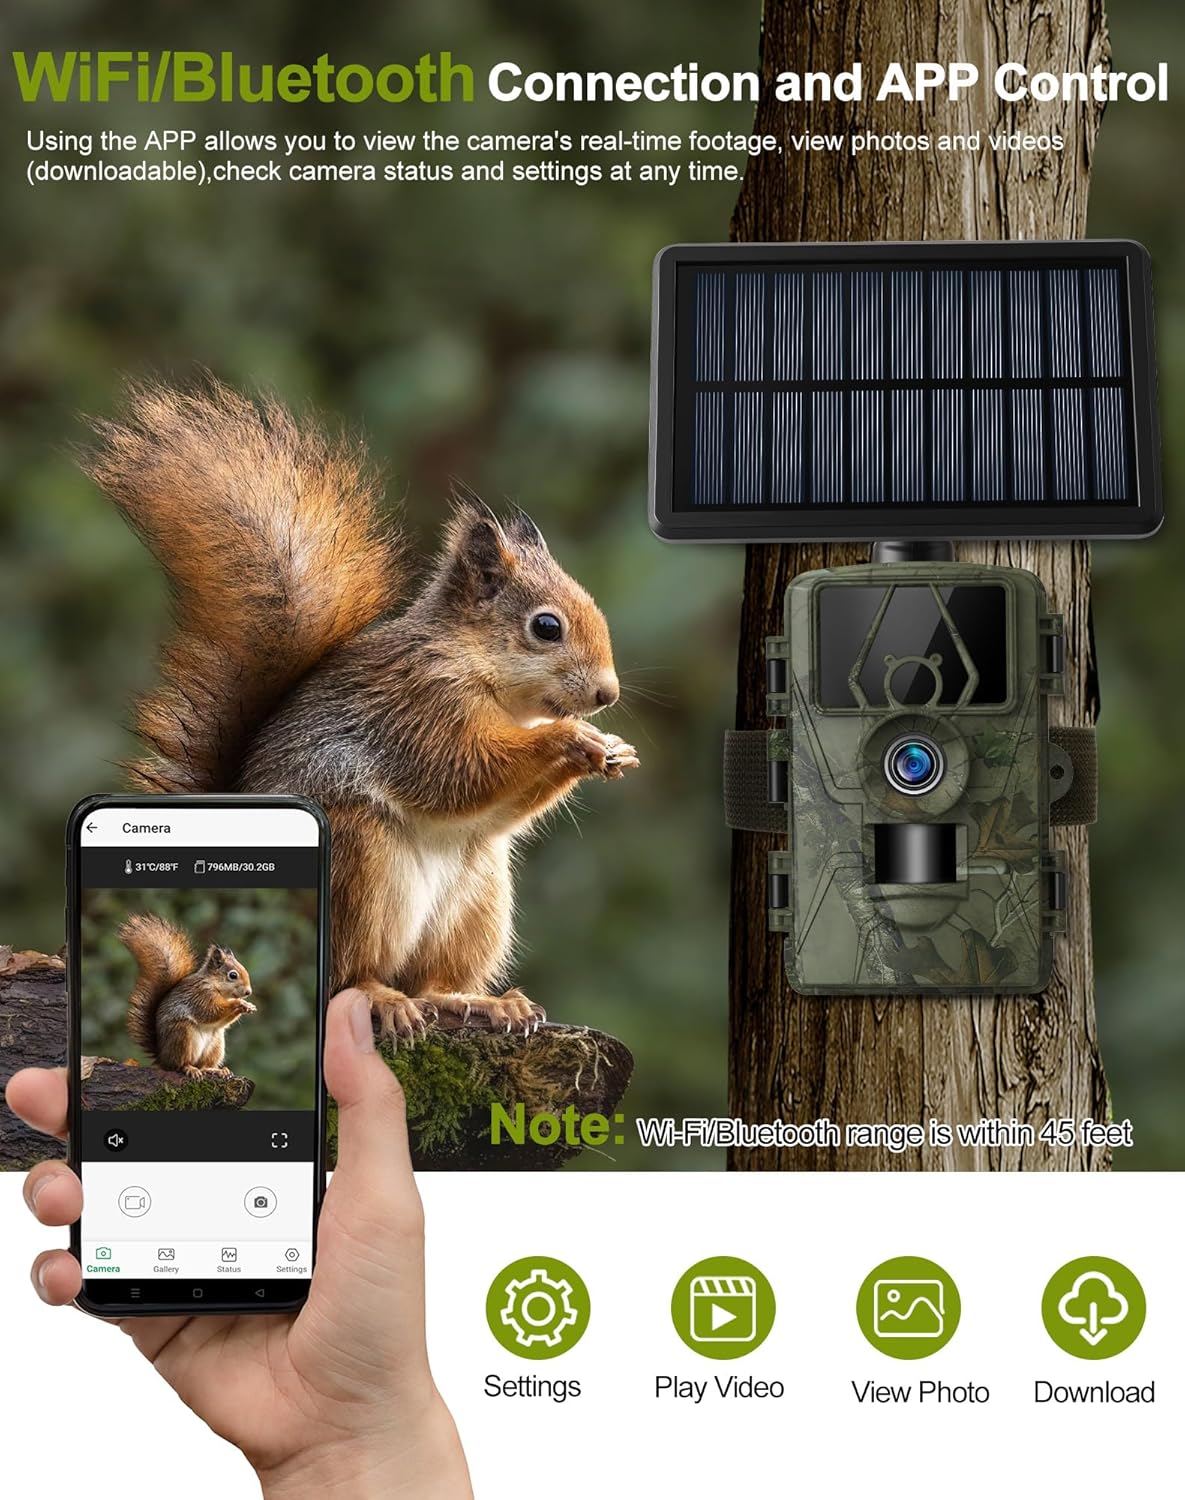
Figure 8: Connecting to the camera via Wi-Fi and Bluetooth for app control.
Capture Modes and Settings
- Video Resolution: Select from 8K, 4K, 2.7K, 1080P, or 720P at 30 frames per second.
- Photo Resolution: Capture still images up to 60MP.
- Trigger Speed: The camera activates in 0.1 seconds upon detecting motion.
- Detection Angle: A wide 120° detection angle ensures comprehensive coverage.
- PIR Sensors: Features 3 adjustable PIR sensors (low, medium, high sensitivity) to optimize motion detection.
- Night Vision: The 850nm low-glow IR LEDs provide clear black-and-white images and videos in low-light conditions without disturbing wildlife.

Figure 9: Camera lens and its 8K/60MP ultra-clear resolution capabilities.

Figure 10: The camera's 0.1-second fast trigger speed.
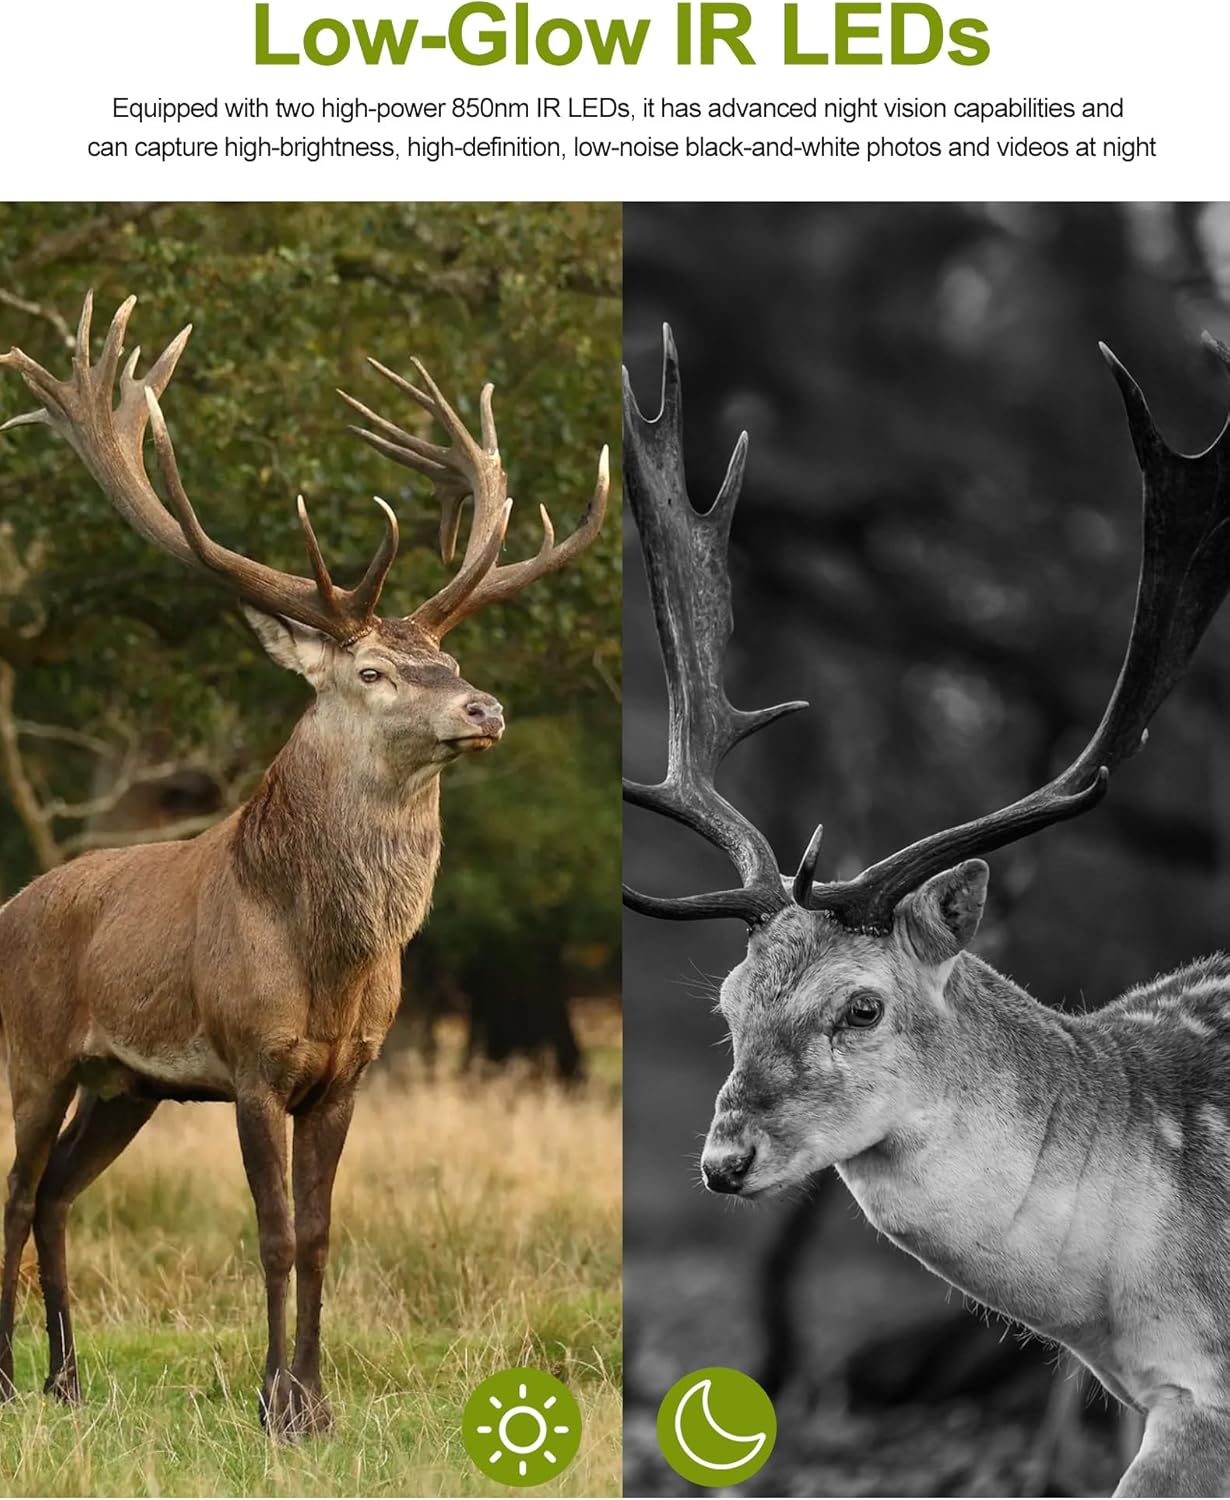
Figure 11: Night vision capabilities with low-glow IR LEDs.

Figure 12: The camera's 120-degree wide field of view.
Media Management
You can access and manage your captured photos and videos using several methods:
- Via Mobile App: Connect your smartphone to the camera's Wi-Fi hotspot using the "TrailCam Go" app to browse, preview, and download files directly to your phone.
- Via USB-C Cable: Connect the camera to a computer using the provided USB-Type C cable to transfer files.
- Via SD Card Reader: Remove the SD card from the camera and insert it into a compatible card reader connected to your computer to transfer files.

Figure 13: Methods for browsing and downloading media.
Specifications
| Feature | Specification |
|---|---|
| Model Number | PR801W |
| Video Resolution | 8K/4K/2.7K/1080P/720P (30FPS) |
| Photo Resolution | 60 MP |
| Trigger Speed | 0.1 Seconds |
| Detection Angle | 120 Degrees |
| Night Vision Range | 15 Meters |
| IR LEDs | 2 (850nm Low-Glow) |
| Power Source | Solar Powered (1800mAh battery) + AA Battery Powered (8x AA, not included) |
| Connectivity | Bluetooth, Wi-Fi (App Control) |
| Storage | Supports up to 128GB SD card (32GB included) |
| Water Resistance | IP66 Waterproof |
| Operating Temperature | -4℉ to 120℉ |
| Dimensions (L x W x H) | 5.31 x 3.54 x 2.76 inches |
| Weight | 8.3 ounces |
Maintenance
Cleaning
- Regularly wipe the camera lens, PIR sensors, and solar panel with a soft, dry, lint-free cloth to ensure optimal performance.
- Avoid using abrasive cleaners or solvents that could damage the camera's surfaces.
Waterproofing
- Before deploying the camera, ensure all latches and covers are securely closed to maintain its IP66 waterproof rating.
- Do not submerge the camera in water.

Figure 14: The camera's IP66 waterproof and weatherproof design.
Battery Care
- Keep the solar panel clean and free from obstructions to ensure efficient charging of the internal battery.
- Replace AA backup batteries when they are depleted to prevent interruption of camera operation.
Troubleshooting
Camera Not Powering On
- Check Solar Panel: Ensure the solar panel is receiving adequate sunlight and is charged.
- Verify AA Batteries: Confirm that 8 AA alkaline batteries are correctly installed and have sufficient charge.
- Mode Switch: Ensure the mode switch is set to "TEST" or "ON".
App Connection Issues
- Proximity: Ensure your smartphone is within approximately 45 feet of the camera.
- Wi-Fi Selection: Confirm you are connected to the camera's internal Wi-Fi hotspot, not your home Wi-Fi network.
- Restart: Try restarting the camera and your phone's Wi-Fi function.
Poor Image/Video Quality
- Clean Lens: Clean the camera lens and protective cover with a soft cloth.
- Lighting: Ensure sufficient ambient light for daytime recordings.
- Night Vision: Verify night vision settings are appropriate for the environment.
Motion Detection Not Working
- Camera Mode: Ensure the camera is in "ON" mode for motion detection.
- PIR Sensitivity: Adjust the PIR sensor sensitivity (low, medium, high) in the camera settings.
- Obstructions: Check for any physical obstructions blocking the PIR sensors or detection area.
Warranty and Support
Deerneuf is committed to providing excellent customer service and support for your product:
- 12-Hour Response: Expect a quick response to all inquiries within 12 hours.
- 30-Day Return/Exchange: Enjoy a worry-free return and exchange policy within 30 days of purchase.
- Lifetime Technical Support: Benefit from free professional technical support for the lifetime of your product.
For further assistance or to contact customer service, please refer to the contact information provided on the Deerneuf official website or your purchase documentation.