1. Introduction
Thank you for choosing the ORNIN Y320 Corded Landline Phone. This manual provides detailed instructions for the proper installation, operation, and maintenance of your new telephone. Please read this manual thoroughly before using the device to ensure optimal performance and longevity.
The ORNIN Y320 is a reliable, battery-free landline phone designed for ease of use in various environments, including homes, offices, and hotels. It features essential functions such as redial, hold, and an adjustable ringer tone.
2. Package Contents
Please verify that all items listed below are included in your package:
- Telephone body
- Telephone receiver
- Telephone cord (for connecting to the wall jack)
- Handset coiled cord (for connecting receiver to phone body)
- Mounting bracket (for desktop or wall installation)
3. Product Overview and Parts Identification
Familiarize yourself with the components of your ORNIN Y320 phone using the diagram below.

Figure 3.1: ORNIN Y320 Phone Components
This image displays the ORNIN Y320 phone with its main parts labeled numerically for easy identification. The top view shows the receiver, hook-switch, number keys, and function keys. The bottom view highlights the phone line port, P/T mode switch, ringer adjustment switch, and handset coiled line port.
- Receiver: The part held to the ear and mouth for communication.
- Hook-Switch: Automatically disconnects a call when the receiver is placed on it.
- Number Keys: Used for dialing telephone numbers.
- Function Keys: Includes PAUSE, MUTE, FLASH, and REDIAL buttons.
- Phone Line Port: Connects the phone to the wall telephone jack.
- P/T Mode Switch: Selects between Pulse (P) and Tone (T) dialing modes. (Typically set to 'T' for modern systems).
- Ring HIGH/LOW/OFF Switch: Adjusts the ringer volume or turns it off.
- Handset Coiled Line Port: Connects the coiled cord from the receiver to the phone body.
4. Setup and Installation
The ORNIN Y320 phone can be installed on a desktop or mounted on a wall.
4.1. Desktop Installation

Figure 4.1: Desktop Installation Steps
This image demonstrates the process of setting up the ORNIN Y320 phone for desktop use. It shows the mounting bracket being inserted into the designated 'DESK' area on the telephone base and secured by snapping the tabs into the slots.
- Locate the mounting bracket.
- Insert the protruding tab of the mounting bracket into the groove at the top of the telephone base, specifically in the area marked for 'DESK' use.
- Press down on the small tabs of the mounting bracket and snap them into the corresponding slots at the telephone base until it is securely fastened.
- Connect the handset coiled cord to the receiver and the phone body.
- Connect the telephone cord from the phone body to your wall telephone jack.
4.2. Wall-Mount Installation
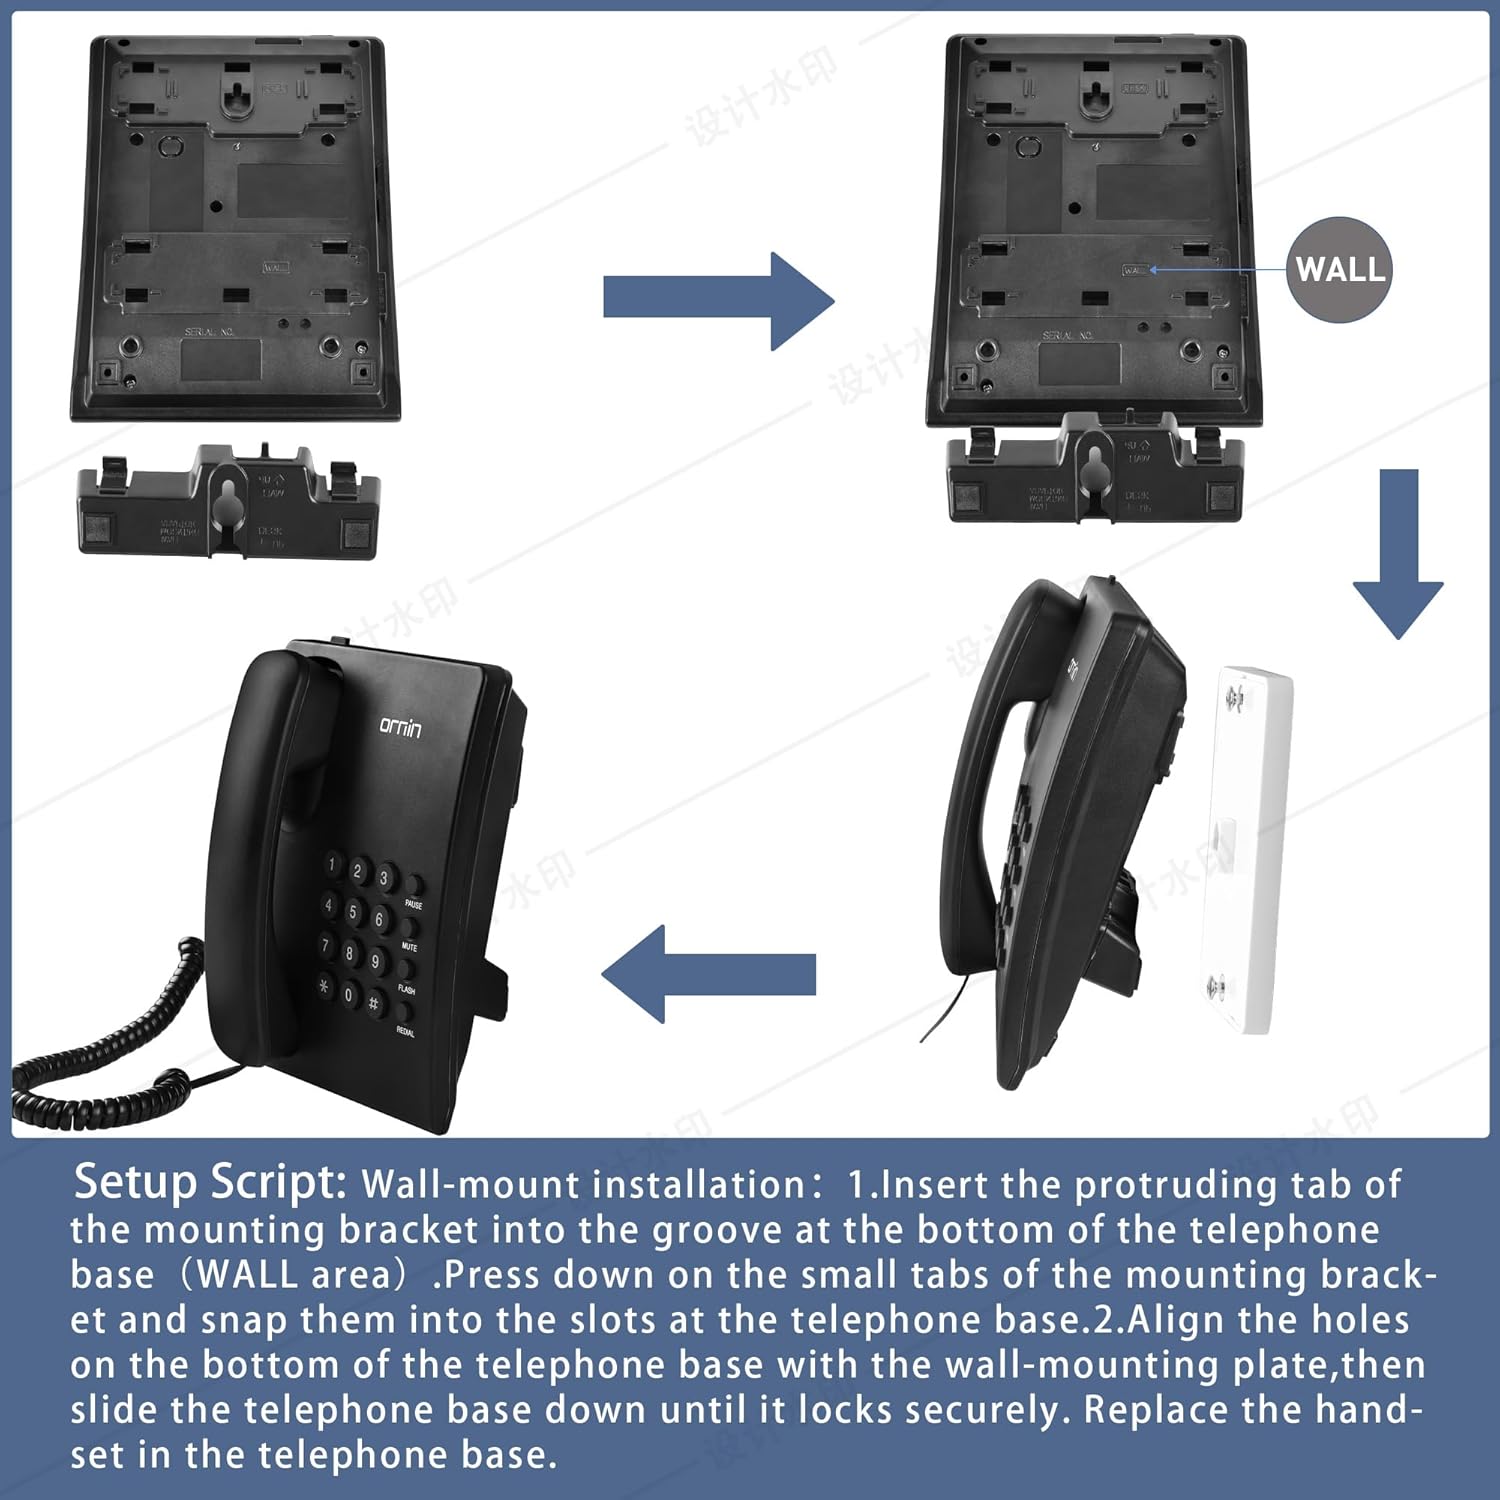
Figure 4.2: Wall-Mount Installation Steps
This image illustrates the procedure for wall-mounting the ORNIN Y320 phone. It shows the mounting bracket being attached to the wall, followed by the telephone base being aligned and slid onto the wall-mounting plate until it locks securely. The final step involves replacing the handset in the base.
- Locate the mounting bracket.
- Insert the protruding tab of the mounting bracket into the groove at the bottom of the telephone base, specifically in the area marked for 'WALL' use.
- Press down on the small tabs of the mounting bracket and snap them into the corresponding slots at the telephone base.
- Align the holes on the bottom of the telephone base with the wall-mounting plate (not included, typically part of the wall jack or a separate bracket).
- Slide the telephone base down until it locks securely onto the wall-mounting plate.
- Connect the handset coiled cord to the receiver and the phone body.
- Connect the telephone cord from the phone body to your wall telephone jack.
- Replace the handset in the telephone base.
5. Operation
5.1. Making a Call
- Lift the receiver.
- Listen for a dial tone.
- Dial the desired telephone number using the number keys.
- Once the call is complete, place the receiver back on the phone body.
5.2. Receiving a Call
- When the phone rings, lift the receiver to answer the call.
- Once the call is complete, place the receiver back on the phone body.
5.3. Redial Function
To redial the last number called:
- Lift the receiver.
- Press the REDIAL button. The phone will automatically dial the last number.
5.4. Mute Function
To temporarily mute your microphone during a call:
- During an active call, press the MUTE button. The other party will not be able to hear you.
- To resume the conversation, press the MUTE button again.
5.5. Hold Function
To place a call on hold:
- During an active call, press the PAUSE button. The call will be placed on hold.
- To resume the call, lift the receiver again or press the PAUSE button again (depending on the specific implementation, usually lifting the receiver is sufficient).
5.6. Ringer Tone Adjustment
The ringer volume can be adjusted using the switch on the side or bottom of the phone body.
- Slide the RING HIGH/LOW/OFF switch to your desired setting: HIGH for loud, LOW for soft, or OFF to disable the ringer.
5.7. P/T Mode Switch
The P/T switch selects between Pulse (P) and Tone (T) dialing. For most modern telephone systems, the switch should be set to T (Tone). Only switch to P (Pulse) if your telephone service specifically requires it.
6. Maintenance
To ensure the longevity and proper functioning of your ORNIN Y320 phone, follow these simple maintenance guidelines:
- Cleaning: Wipe the phone's surface with a soft, damp cloth. Avoid using harsh chemicals, abrasive cleaners, or excessive moisture, as these can damage the device.
- Environment: Keep the phone in a dry environment, away from direct sunlight, extreme temperatures, and high humidity.
- Cords: Periodically check the telephone cord and handset coiled cord for any signs of wear or damage. Replace if necessary.
- Power Source: This phone operates without batteries, drawing power directly from the telephone line. No battery maintenance is required.
7. Troubleshooting
If you encounter any issues with your ORNIN Y320 phone, please refer to the following troubleshooting tips:
| Problem | Possible Cause | Solution |
|---|---|---|
| No dial tone. | Telephone cord is disconnected or faulty. No telephone service. | Ensure the telephone cord is securely connected to both the phone and the wall jack. Test with another phone or contact your telephone service provider. |
| Cannot hear the other party / Other party cannot hear me. | Handset coiled cord is loose or faulty. Mute function is active. | Check the connection of the handset coiled cord. Press the MUTE button to deactivate it if it's on. |
| Ringer does not sound. | Ringer switch is set to OFF or LOW. | Adjust the RING HIGH/LOW/OFF switch to HIGH or LOW. |
| Static or poor call quality. | Faulty telephone cord or line interference. | Try replacing the telephone cord. If the problem persists, contact your telephone service provider to check your line. |
| Cannot dial out. | Incorrect P/T mode setting. | Ensure the P/T switch is set to T (Tone) for most modern systems. |
8. Specifications
| Feature | Detail |
|---|---|
| Model | Y320 |
| Brand | ORNIN |
| Telephone Type | Corded Landline Phone |
| Material | Acrylonitrile Butadiene Styrene (ABS) |
| Color | Black |
| Power Source | Corded Electric (Line Powered, No Batteries Required) |
| Product Dimensions (L x W x H) | 5.91 x 7.48 x 3.7 inches (15.01 x 18.99 x 9.4 cm) |
| Item Weight | 1.3 pounds (0.59 Kilograms) |
| Functions | Redial, Mute, Hold, Adjustable Ringer Tone |
| Installation Options | Desktop or Wall Mountable |
| Compatible Devices | Standard Landline Networks, Answering Machines, Fax Machines |
9. Warranty and Support
For warranty information or technical support, please refer to the documentation provided with your purchase or contact ORNIN customer service directly. Contact details can typically be found on the product packaging or the official ORNIN website.
Please retain your proof of purchase for any warranty claims.


