1. Introduction
This manual provides detailed instructions for the safe and proper installation, operation, and maintenance of your IWORKBOARD Full Motion TV Wall Mount. Please read all instructions carefully before beginning installation and keep this manual for future reference. This mount is designed to securely hold most 40-90 inch flat and curved TVs with VESA patterns from 200x100mm to 600x400mm, supporting up to 132 lbs (60 kg). It is suitable for installation on 8, 12, or 16-inch wood studs, concrete, and brick walls.
2. Safety Information
- WARNING: Do not attempt installation into drywall alone. If concrete anchors are required, please contact us for assistance.
- Ensure the wall structure can support the combined weight of the mount and your TV.
- Always use a stud finder to locate wood studs accurately.
- Do not exceed the maximum weight capacity of 132 lbs (60 kg).
- Ensure all screws are tightened securely before hanging the TV.
- Keep children and pets away from the installation area.
- If you have any doubts about the installation process, seek professional assistance.
3. Package Contents
Verify that all components are present and undamaged before installation. The package includes:
- Full Motion TV Wall Mount Assembly
- TV Brackets (2 pieces)
- Mounting Hardware Kit (various screws, washers, spacers for TV and wall)
- Installation Template
- Small Level (for ensuring straight installation)
4. Specifications
| Feature | Detail |
|---|---|
| Mounting Type | Wall Mount |
| Movement Type | Articulating (Full Motion) |
| Compatible TV Sizes | 40 - 90 inches |
| Weight Capacity | Up to 132 lbs (60 kg) |
| VESA Compatibility | Min 200x100mm to Max 600x400mm |
| Wall Type Compatibility | 8"/12"/16" Wood Studs, Solid Concrete Wall, Brick Wall |
| Tilt Angle | +5° / -15° |
| Swivel Angle | +/- 45° |
| Level Adjustment | +/- 3° (post-installation) |
| Extension from Wall | 2.56 inches (retracted) to 16.65 inches (extended) |
| Material | Heavy-Gauge Steel |
5. Setup and Installation
5.1 Pre-Installation Checks
- TV Compatibility: Ensure your TV size is between 40-90 inches and its VESA pattern (mounting holes on the back) is within 200x100mm to 600x400mm.
- Wall Type: Identify your wall type (wood stud, concrete, or brick). This mount is not for drywall-only installation.
- Weight Capacity: Confirm your TV's weight does not exceed 132 lbs (60 kg).
- Cable Access: Check the location of your TV's cable outlets to avoid blockage once mounted.
5.2 Tools Required (Not Included)
- Pencil
- Drill
- Stud Finder (for wood stud installation)
- Socket Wrench
- Hammer (for concrete/brick anchors)
- Phillips Head Screwdriver
5.3 Attaching Brackets to TV
Attach the two vertical TV brackets to the back of your television using the appropriate screws, washers, and spacers from the hardware kit. Ensure they are securely fastened. For flat TV backs, spacers may not be needed. For irregular TV backs, use spacers to ensure a flat fit.
5.4 Mounting the Wall Plate
Use the provided installation template to mark drill holes on your wall. Ensure the template is level using the included small level.

Image: Installation steps including marking, attaching brackets, mounting wall plate, and hanging TV.
5.4.1 Wood Stud Installation
- Use a stud finder to locate the center of your wood studs. This mount is compatible with 8, 12, or 16-inch stud spacing.
- Mark the drill points on the studs using the template.
- Drill pilot holes with a 7/32 inch (5.5mm) drill bit to a depth of 2.5 inches (64mm).
- Attach the wall plate to the wall using the lag bolts and washers. Tighten securely with a socket wrench.
5.4.2 Concrete/Brick Wall Installation
- Mark the drill points on the concrete or brick wall using the template.
- Drill pilot holes with a 3/8 inch (10mm) masonry drill bit to a depth of 2.5 inches (64mm).
- Insert the concrete anchors into the drilled holes, tapping gently with a hammer until flush with the wall surface.
- Attach the wall plate to the wall using the lag bolts and washers. Tighten securely with a socket wrench.
5.5 Hanging the TV
- Carefully lift the TV (with brackets attached) and hook the TV brackets onto the wall plate.
- Ensure the TV is centered and level. Use the post-installation leveling adjustment if needed.
- Secure the TV to the wall plate using the safety screws or locking mechanisms on the brackets to prevent accidental dislodgement.
Video: Official IWORKBOARD Full Motion TV Mount Installation Guide. This video demonstrates the step-by-step process for installing the TV wall mount on both wood stud and concrete walls, including attaching brackets and securing the TV.
6. Operating Instructions (Adjustments)
Your full motion TV wall mount offers various adjustments for optimal viewing comfort.
6.1 Tilt Adjustment
- The mount allows for a tilt range of +5° (upward) to -15° (downward).
- Loosen the tilt adjustment knobs on the TV brackets, adjust the TV to your desired angle to reduce glare, and then tighten the knobs securely.

Image: Demonstrates the tilt adjustment feature of the TV mount, allowing for +5° to -15° movement to optimize viewing and reduce glare.
6.2 Swivel Adjustment
- The articulating arms allow the TV to swivel +/- 45° horizontally.
- Gently push or pull the TV to the desired viewing angle. The arms are designed for smooth movement.
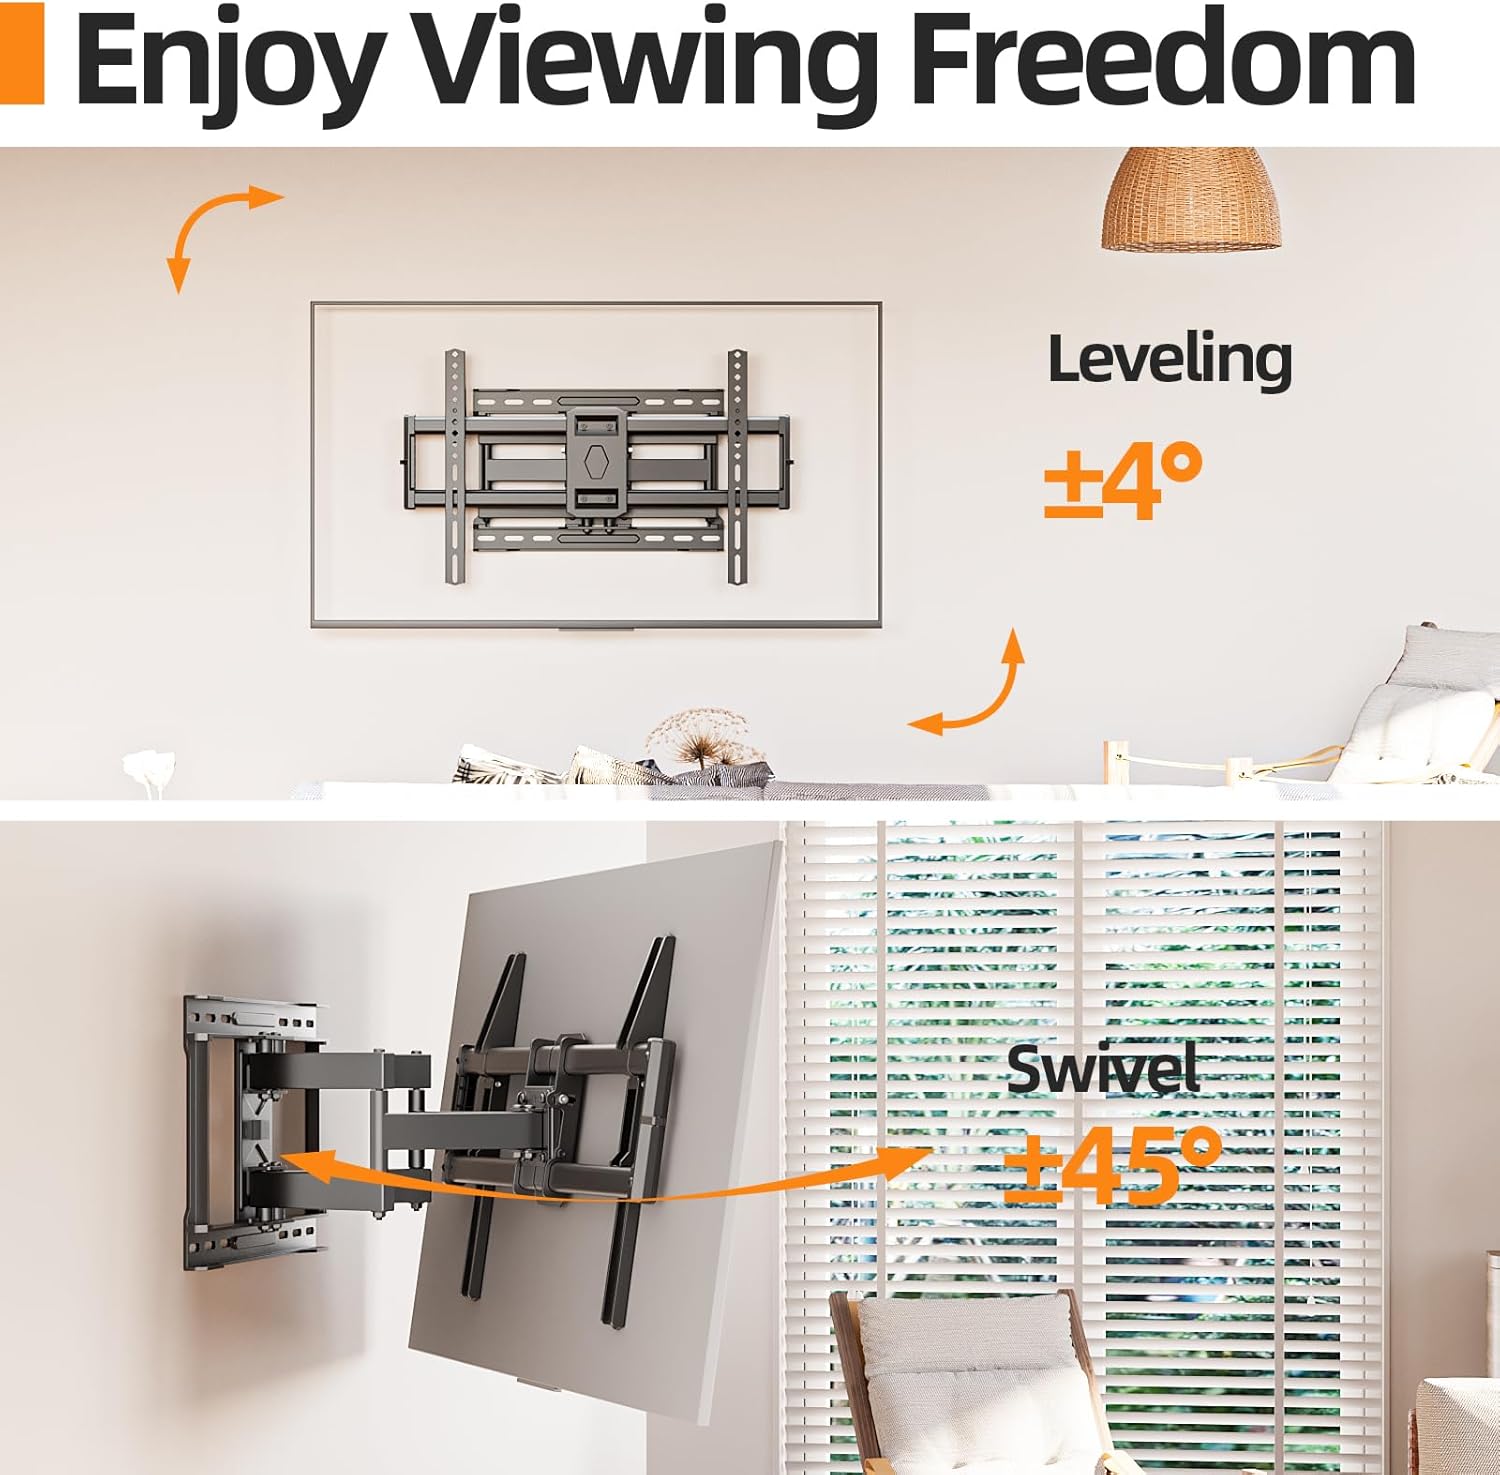
Image: Illustrates the swivel capability of the mount, allowing the TV to be angled up to 45 degrees left or right for flexible viewing.
6.3 Extension and Retraction
- The mount can extend your TV from 2.56 inches (retracted) to 16.65 inches (extended) from the wall.
- Gently pull the TV forward or push it back towards the wall to achieve the desired distance.
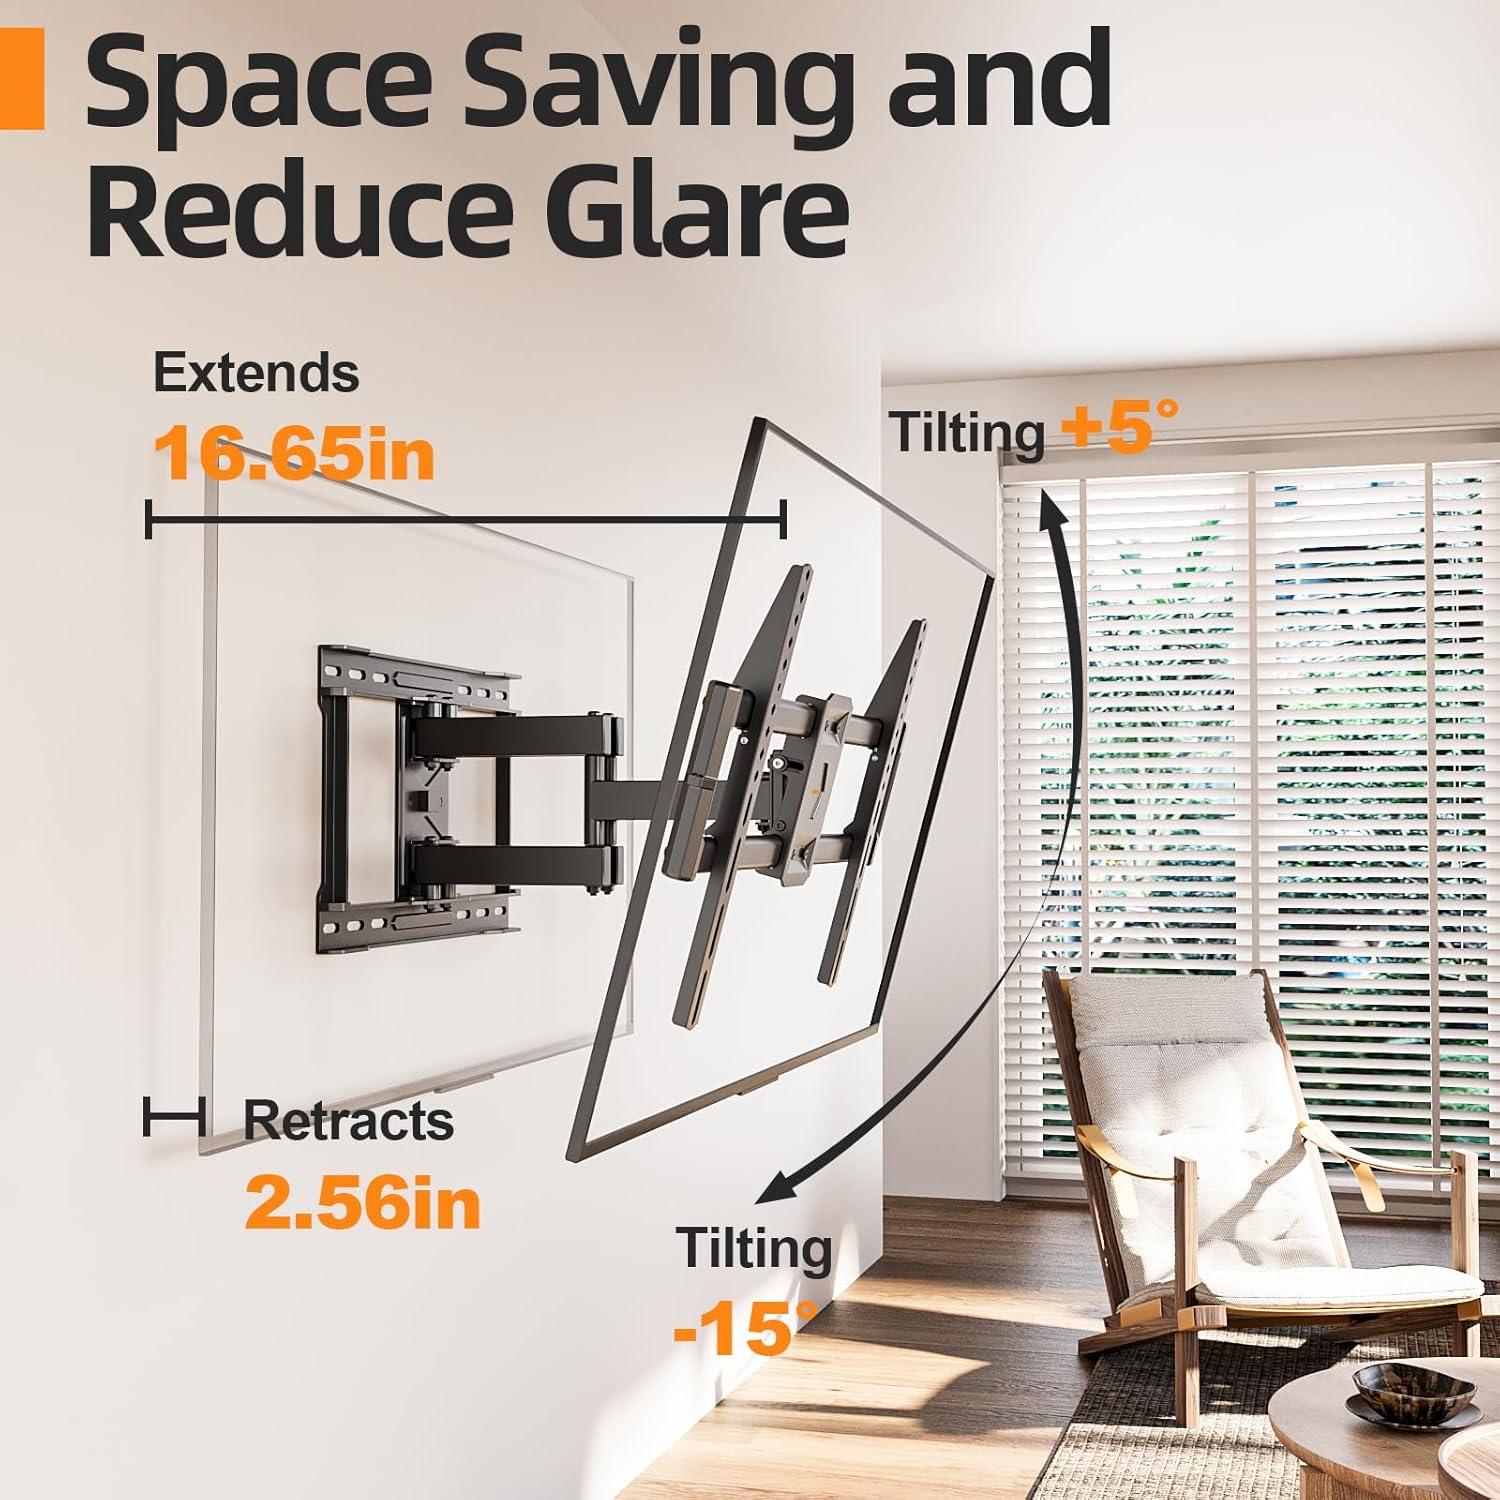
Image: Shows the TV mount's ability to extend and retract, providing a range of 2.56 to 16.65 inches from the wall for space-saving or optimal viewing.
6.4 Level Adjustment
- After installation, you can fine-tune the TV's level by +/- 3°.
- Refer to the specific mechanism on your mount (usually a screw or knob) to adjust the level if the TV appears slightly off-kilter.

Image: Depicts the leveling adjustment feature, allowing for minor rotational corrections of +/- 3° to ensure the TV is perfectly horizontal after mounting.
7. Maintenance
- Periodic Checks: Regularly inspect the mount and all fasteners to ensure they remain tight and secure.
- Cleaning: Wipe the mount with a soft, dry cloth. Avoid abrasive cleaners or solvents.
- Lubrication: The articulating joints are designed for smooth operation and generally do not require lubrication. If movement becomes stiff, consult customer support.
8. Troubleshooting
8.1 TV Not Level After Installation
Use the post-installation level adjustment feature (typically a screw or knob on the TV brackets) to fine-tune the horizontal alignment of your TV. Refer to section 6.4 for details.
8.2 Mount Feels Loose or Unstable
- Recheck all wall mounting bolts and TV bracket screws to ensure they are tightened to the recommended torque.
- Verify that the wall type is appropriate for the installation and that studs/anchors are correctly installed.
- Ensure the TV's weight does not exceed the mount's capacity.
8.3 Difficulty Adjusting Tilt/Swivel/Extension
- Ensure no cables are snagged or obstructing movement.
- Check for any locking mechanisms that might be engaged.
- If tilt is stiff, slightly loosen the tilt adjustment knobs, adjust, then re-tighten.
Video: IWORKBOARD Full Motion TV Mount Overview. This video provides a general overview of the TV mount's features and functionality, including its full motion capabilities.
9. Warranty and Support
This IWORKBOARD TV Wall Mount comes with a 10-Year Manufacturer Warranty. For warranty claims, technical assistance, or any questions regarding your product, please contact IWORKBOARD customer support through the retailer's platform or the official IWORKBOARD website.