Jiayete JM6
Jiayete JM6 6-Channel DJ Mixer Instruction Manual
Model: JM6 | Brand: Jiayete
1. Introduction
Welcome to the Jiayete JM6 6-Channel DJ Mixer. This professional audio mixer is designed to provide high-quality sound control for various applications, including music streaming, PC audio, and podcasting. Featuring advanced DSP effects, Bluetooth connectivity, and phantom power, the JM6 offers versatile input and output options for both beginners and experienced users. This manual will guide you through the setup, operation, and maintenance of your new mixer.
2. Key Features
- High-Quality Digital Effects: Features 99 built-in digital effects, including professional reverb and delay algorithms, enhancing spatial effects with realism and naturalness.
- USB Interface and Playback Options: Includes a USB interface for direct input from USB flash drives and external storage devices. It features a built-in MP3 player and recorder, supporting formats like MP3, WAV, and WMA for convenient mixing and recording.
- Real-Time Monitoring Capability: Users can monitor signal levels of each channel in real-time directly from their mobile devices, offering enhanced control and flexibility during live performances or recording sessions.
- Support for Various Microphones: With XLR inputs supporting phantom power, the mixer accommodates 48V condenser microphones, dynamic microphones, vocals, and instruments, ensuring clear and robust sound quality across different input sources.
- Bluetooth Connectivity and Input Versatility: Supports Bluetooth connectivity, allowing wireless streaming from iOS, Android, tablets, and MP3 players. This enables seamless integration of external devices for audio mixing.
- Advanced Audio Control Features: Equipped with a 7-band equalizer, enabling precise adjustment of high, mid, and low frequencies for each channel. It also includes gain controls for fine-tuning audio inputs.
- Durable Metal Construction: Designed with an all-metal housing for enhanced durability and reliability.
3. Setup Guide
3.1 Unpacking and Inspection
Carefully remove all components from the packaging. Verify that all items listed in the product list are present and undamaged. If any items are missing or damaged, contact customer support immediately.
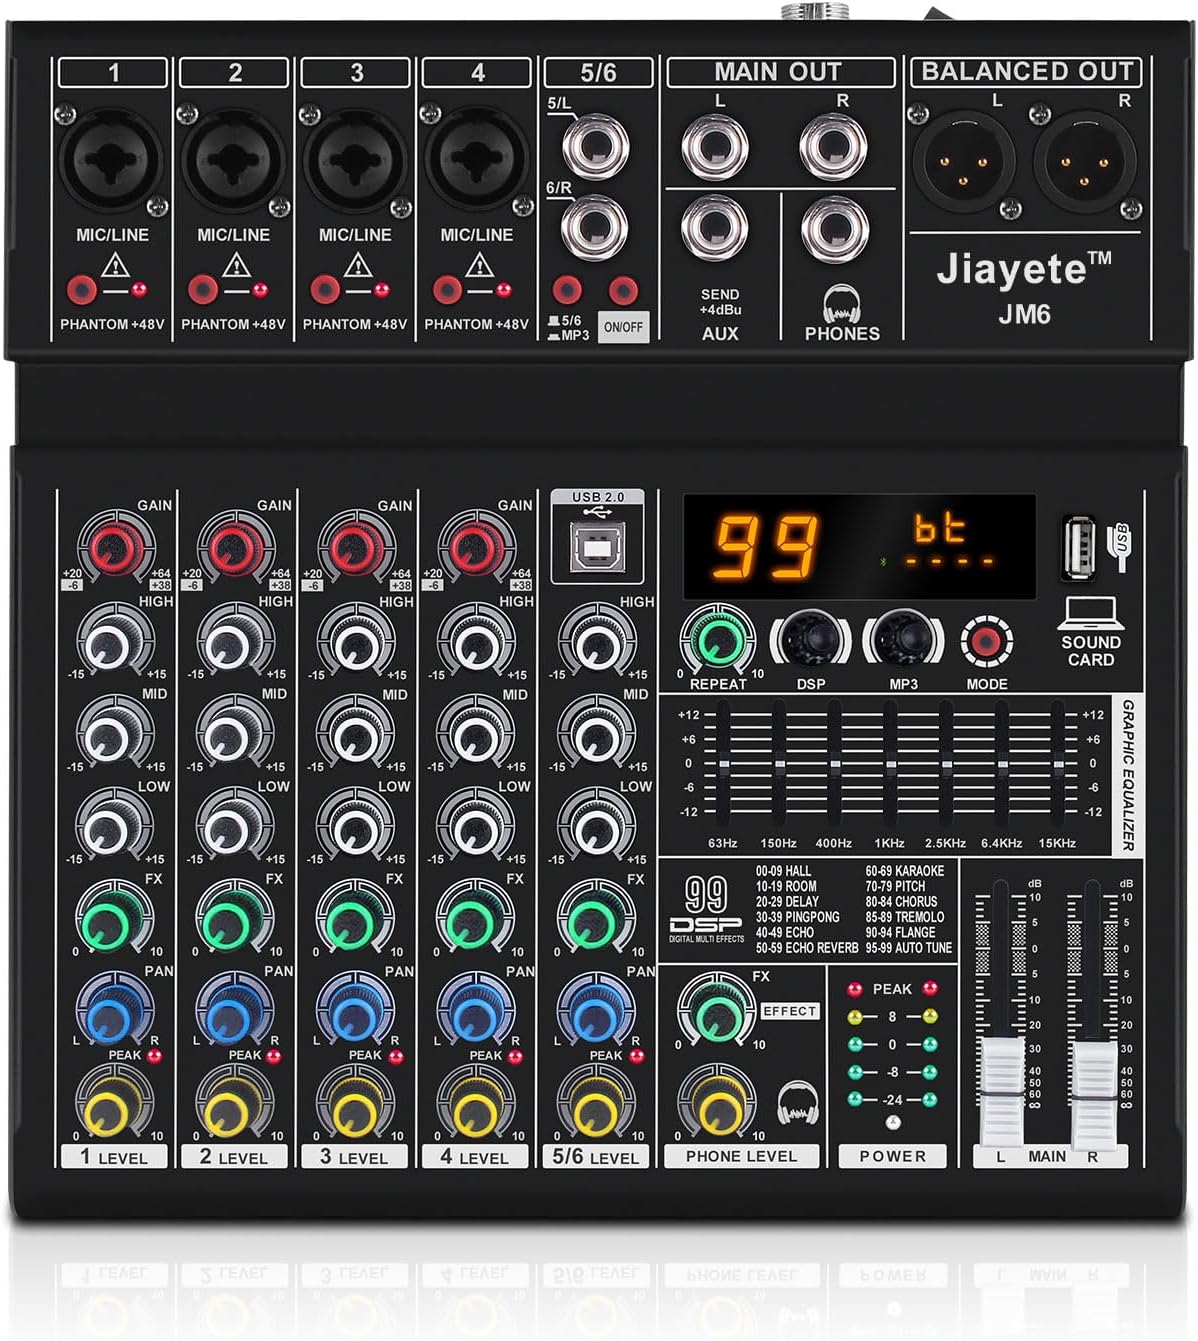
Figure 3.1: Front view of the Jiayete JM6 mixer, showing all knobs, faders, and input/output ports.
3.2 Power Connection
Connect the provided power adapter to the DC IN port on the rear of the mixer. Plug the adapter into a suitable power outlet (110V). Ensure the power switch is in the OFF position before connecting.

Figure 3.2: Rear panel of the mixer, highlighting the power input and switch for safe connection.
3.3 Connecting Audio Devices
The JM6 mixer supports various input and output devices. Refer to the following for common connections:
- Microphones: Use XLR cables for condenser microphones (requiring 48V phantom power) or dynamic microphones. Ensure phantom power is only enabled for condenser microphones.
- Line-Level Devices: Connect instruments, CD players, or other line-level audio sources to the 1/4" TRS/TS inputs.
- USB Devices: Insert USB flash drives into the USB 2.0 port for MP3 playback or recording.
- Output Devices: Connect your main speakers or recording interface to the MAIN OUT (L/R) or BALANCED OUT (L/R) ports. Use the PHONES output for headphone monitoring.

Figure 3.3: Illustration of widely adaptable devices, including microphones, speakers, and computers, connecting to the mixer.
3.4 Phantom Power Activation
For condenser microphones, activate the +48V phantom power by pressing the corresponding button for the desired channel. A red indicator light will illuminate when active. Warning: Do not activate phantom power for dynamic microphones or ribbon microphones as it may cause damage.

Figure 3.4: Detail of the mixer's XLR inputs and the +48V phantom power activation buttons.
4. Operating Instructions
4.1 Basic Audio Mixing
Each channel on the JM6 mixer features individual controls for GAIN, HIGH, MID, LOW, FX, and PAN. Adjust these knobs to shape the sound of each input source.
- GAIN: Adjusts the input sensitivity for each channel. Set it to prevent clipping (PEAK indicator lighting up red).
- HIGH/MID/LOW: 3-band equalizer for adjusting treble, midrange, and bass frequencies.
- FX: Controls the amount of effect applied to the channel.
- PAN: Adjusts the stereo position (left/right) of the channel.
- LEVEL: Controls the overall output volume of the individual channel.

Figure 4.1: Overview of channel controls including gain, 3-band EQ, FX send, pan, and level faders.
4.2 Digital Effects Processor (DSP)
The JM6 features 99 built-in DSP effects. Use the DSP knob to select an effect number (00-99) and the EFFECT knob to adjust the intensity. The graphic equalizer allows for fine-tuning the overall output sound.

Figure 4.2: Digital Signal Processor (DSP) section with 99 effects and the graphic equalizer for master output control.
4.3 USB Playback and Recording
Insert a USB flash drive into the USB 2.0 port. Use the MP3/MODE button to switch to MP3 mode. The mixer supports MP3, WAV, and WMA formats. You can also record your mix directly to the USB drive.

Figure 4.3: USB interface and playback options, including the USB 2.0 port and MP3 player controls.
4.4 Bluetooth Connectivity
To connect via Bluetooth, press the MODE button until "bt" appears on the display. On your mobile device, search for "BT-AUDIO" and pair. You can now stream audio wirelessly to the mixer.

Figure 4.4: Bluetooth connectivity feature, showing the mixer's display in "bt" mode and a smartphone streaming audio.
5. Maintenance
- Cleaning: Use a soft, dry cloth to clean the mixer's surface. Avoid abrasive cleaners or solvents.
- Storage: Store the mixer in a cool, dry place away from direct sunlight and extreme temperatures.
- Ventilation: Ensure proper ventilation around the mixer to prevent overheating. Do not block ventilation openings.
- Cable Management: Keep cables organized and untangled to prevent damage to ports and cables.
6. Troubleshooting
| Problem | Possible Cause | Solution |
|---|---|---|
| No sound output | Incorrect cable connections, low volume levels, power issue. | Check all audio cables and connections. Ensure all volume knobs (channel, main, phone) are turned up. Verify power supply. |
| Distorted sound | Input gain too high, damaged cables, impedance mismatch. | Reduce input GAIN. Check for damaged cables and replace if necessary. Ensure correct impedance matching for connected devices. |
| Bluetooth not connecting | Mixer not in Bluetooth mode, device too far, interference. | Ensure mixer is in "bt" mode. Move device closer to the mixer. Reduce other wireless interference. |
| Phantom power not working | Button not pressed, faulty microphone. | Press the +48V button for the specific channel. Test with another condenser microphone if available. |
7. Specifications
| Feature | Detail |
|---|---|
| Brand | Jiayete |
| Model Number | JM6 |
| Number of Channels | 6 |
| Connectivity Technology | Bluetooth, USB |
| Item Weight | 5.37 pounds |
| Product Dimensions | 10.24 x 10.04 x 1.97 inches |
| Power Source | Corded Electric |
| Voltage | 110 Volts |
| Country of Origin | China |
8. Warranty and Support
For warranty information and technical support, please refer to the contact details provided with your product packaging or visit the official Jiayete website. Keep your purchase receipt for warranty claims.
Ask a question about this manual
Ask about setup, troubleshooting, compatibility, parts, safety, or missing instructions. Manuals+ will review the question and use this page’s manual context to help answer it.