1. Introduction
This manual provides detailed instructions for the installation, operation, and maintenance of your Audiopipe APMQ-1300 Mini Class D Mono MOSFET Power Amplifier. Please read this manual thoroughly before attempting installation or operation to ensure proper use and to prevent damage to the unit or your vehicle's audio system.
The APMQ-1300 is a compact, high-performance Class D mono amplifier designed to deliver efficient power with minimal distortion, making it suitable for driving subwoofers in car audio systems.

Image 1.1: Angled view of the Audiopipe APMQ-1300 amplifier, showcasing its compact design and heat sink fins.
2. Safety Information
Important Safety Precautions:
- Always disconnect the vehicle's battery negative terminal before starting any electrical work.
- Ensure all wiring is properly insulated to prevent short circuits.
- Use appropriate gauge wiring for power and ground connections as specified in this manual.
- Install the amplifier in a dry, well-ventilated location, away from direct sunlight or heat sources.
- Do not mount the amplifier where it may interfere with vehicle operation or safety devices.
- If you are unsure about any installation steps, consult a professional car audio installer.
- This amplifier is designed for 12V DC automotive electrical systems only.
3. Package Contents
Verify that all items are present in the package:
- Audiopipe APMQ-1300 Mini Class D Mono MOSFET Power Amplifier
- Remote Bass Knob with Cable
- Instruction Manual (this document)
- Mounting Hardware (screws, etc.)
- External Fuse Holder
4. Features
The Audiopipe APMQ-1300 amplifier incorporates several features for optimal performance and user convenience:
- Class D Circuitry: Provides high efficiency and power output with reduced heat generation.
- Compact Design: Allows for flexible installation in various vehicle interiors.
- Advanced MOSFET Circuitry: Ensures maximum performance with minimal audio distortion.
- Variable Subsonic Filter: Adjustable from 5Hz to 50Hz to eliminate ultra-low frequencies that are inaudible and can waste subwoofer power.
- Variable Low-Pass Filter (LPF): Adjustable from 40Hz to 180Hz for precise control over the frequency range sent to the subwoofer.
- Bass Boost Control: Adjustable from 0dB to 12dB with a variable frequency from 30Hz to 80Hz to enhance low-frequency output.
- LED Indicators: Power (green) and Protection (red) LEDs for easy status monitoring.
- Reliable Protection Circuitry: Includes overload, overheat, short circuit, and low voltage protection.
- Remote Bass Knob: Allows for convenient adjustment of subwoofer volume from the driver's seat.
5. Installation and Setup
Proper installation is crucial for the performance and longevity of your amplifier. Follow these steps carefully.
5.1 Mounting Location
- Choose a location that is dry, well-ventilated, and protected from direct sunlight or excessive heat.
- Ensure sufficient airflow around the amplifier's heat sink fins for proper cooling.
- Avoid mounting on carpet or other materials that may obstruct airflow.
- Securely mount the amplifier using the provided hardware to prevent movement during vehicle operation.

Image 5.1: Top view of the APMQ-1300 amplifier, showing the heat sink design.
5.2 Wiring Connections
Before making any connections, disconnect the negative terminal of your vehicle's battery.
5.2.1 Power Connections
- +12V (Power): Connect a 4-gauge power cable directly from the positive terminal of the vehicle's battery to the +12V terminal on the amplifier. Install an appropriate fuse holder (e.g., 80A) within 18 inches (45 cm) of the battery.
- GND (Ground): Connect a 4-gauge ground cable from the GND terminal on the amplifier to a clean, unpainted metal surface of the vehicle chassis. Ensure a solid, low-resistance connection.
- REM (Remote Turn-On): Connect a 18-gauge remote turn-on wire from the REM terminal on the amplifier to the remote output of your head unit. This wire turns the amplifier on and off with your head unit.
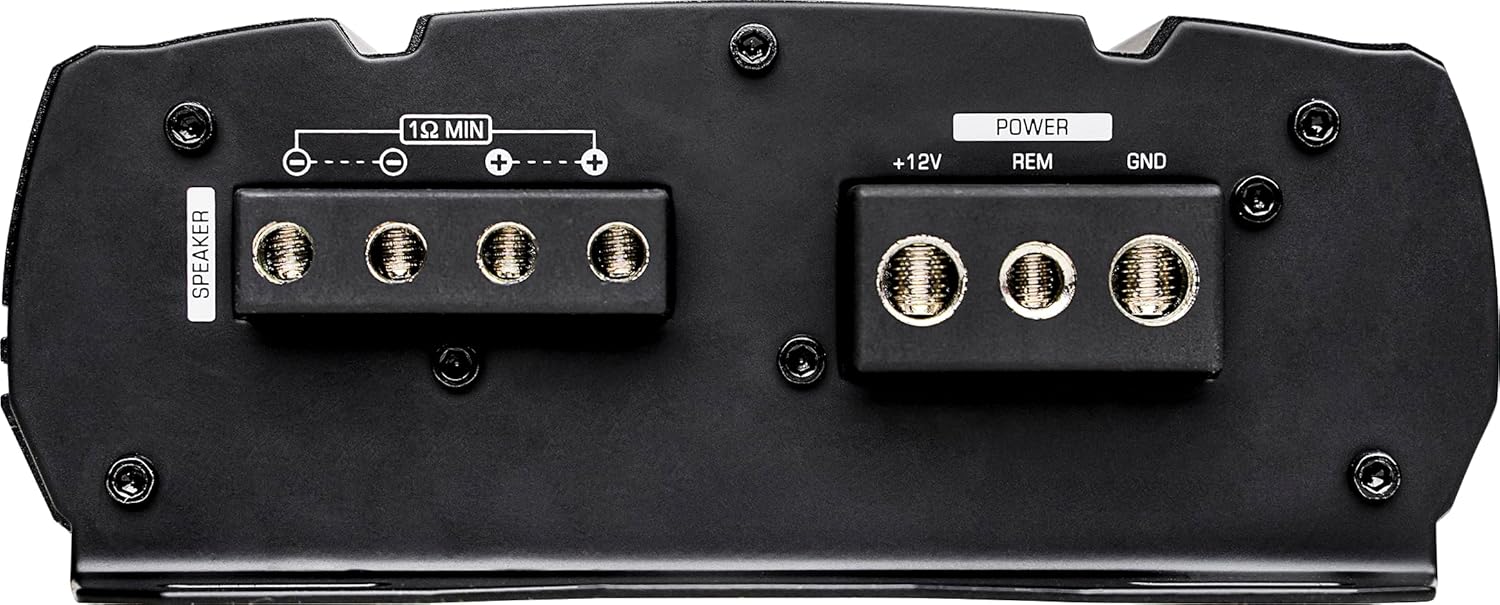
Image 5.2: Rear view of the APMQ-1300 showing the power (+12V, REM, GND) and speaker output terminals.

Image 5.3: Detailed view highlighting the 4-gauge power and ground input terminals.
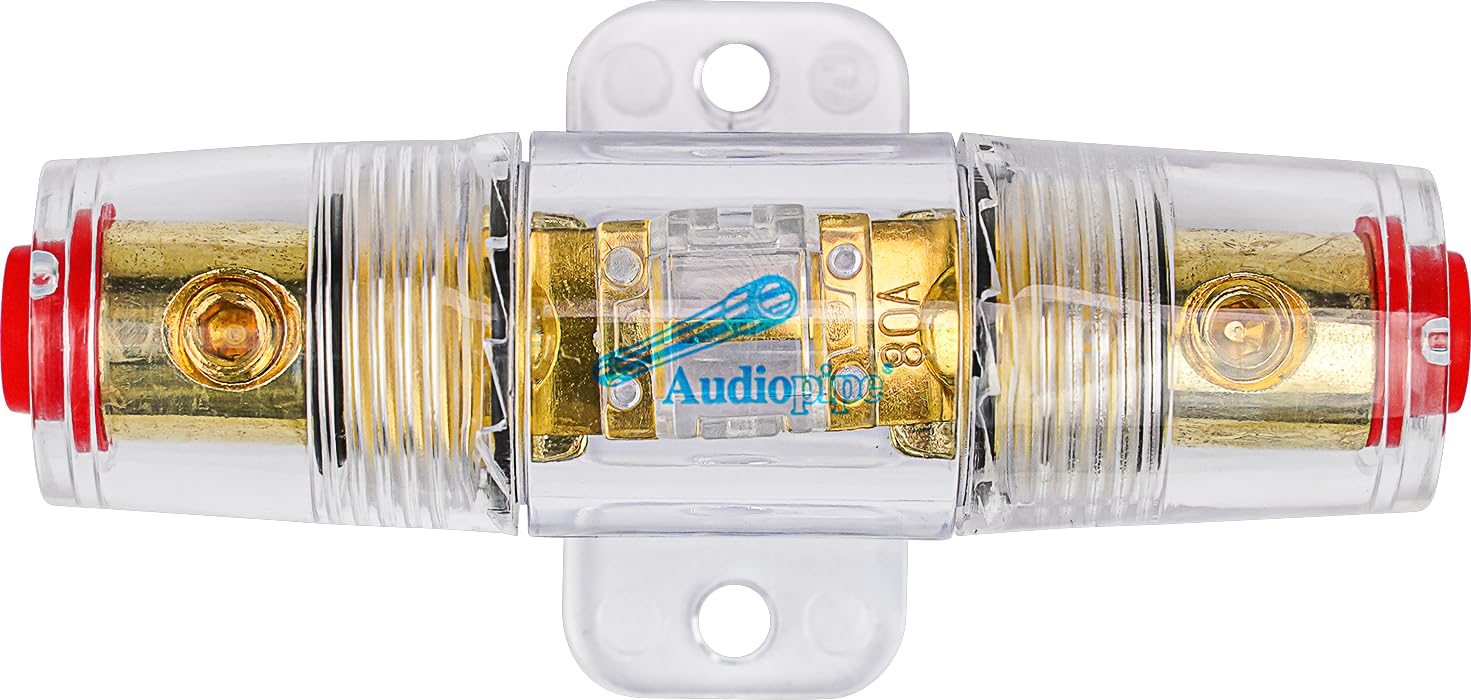
Image 5.4: Example of an external fuse holder, which should be installed near the battery.
5.2.2 Audio Input Connections (RCA)
- Connect RCA cables from the subwoofer output of your head unit to the "INPUT (L)" and "INPUT (R)" RCA jacks on the amplifier.
- If your head unit has only one subwoofer output, use a Y-adapter to split the signal to both RCA inputs on the amplifier.
- The "BRIDGE IN" and "BRIDGE OUT" RCA jacks are for linking multiple amplifiers (master/slave configuration). Refer to advanced wiring diagrams if using this feature.

Image 5.5: Control panel of the APMQ-1300, showing RCA input jacks and audio crossover controls.

Image 5.6: Detailed view highlighting the RCA input jacks and the remote bass knob connector.
5.2.3 Speaker Output Connections
- Connect your subwoofer(s) to the "SPEAKER" terminals on the amplifier. The APMQ-1300 is a mono amplifier, designed for a single subwoofer or multiple subwoofers wired to a minimum impedance of 1 Ohm.
- Ensure correct polarity (+ to + and - to -) for all speaker connections.
- Use appropriate gauge speaker wire (e.g., 12-16 gauge) for your subwoofer(s).
Image 5.7: Detailed view highlighting the multi-connect 12-gauge speaker input terminals.
5.2.4 Remote Bass Knob Connection
- Connect the remote bass knob cable to the "REMOTE" port on the amplifier.
- Mount the remote bass knob in a convenient location within reach of the driver.

Image 5.8: The included remote bass knob with its connection cable.
6. Operating Instructions
Once all connections are made and verified, reconnect the vehicle's battery negative terminal. Turn on your head unit to power on the amplifier.
6.1 Initial Setup and Adjustments
Image 6.1: Control panel of the APMQ-1300, showing all adjustment knobs.
- Gain Control (MIN-MAX): This adjusts the input sensitivity of the amplifier to match the output voltage of your head unit. Start with the gain at minimum. Play a familiar track at about 75% of your head unit's maximum volume. Slowly increase the amplifier's gain until you hear distortion, then back it off slightly.
- Low-Pass Filter (LPF) (40Hz-180Hz): This filter allows only frequencies below the set point to pass through to the subwoofer. Adjust this to blend the subwoofer's output seamlessly with your main speakers. A common starting point is 80Hz-100Hz.
- Subsonic Filter (OFF-50Hz): This filter removes very low, inaudible frequencies that can waste amplifier power and potentially damage your subwoofer. Set this filter to a frequency below your subwoofer's resonant frequency or below the lowest frequency you want reproduced (e.g., 25Hz-30Hz).
- Bass Boost Frequency (30Hz-80Hz): Selects the center frequency for the bass boost.
- Bass Boost (0dB-12dB): Increases the output at the selected bass boost frequency. Use sparingly to avoid distortion and potential speaker damage. Start at 0dB and increase only if needed.
- Remote Bass Knob: Once the gain is set, use this knob to adjust the subwoofer volume level conveniently from your listening position.
6.2 LED Indicators
- POWER LED (Green): Illuminates when the amplifier is powered on and operating normally.
- PROTECT LED (Red): Illuminates when the amplifier enters protection mode due to an issue such as overheating, short circuit, or low voltage. The amplifier will shut down to prevent damage. Refer to the Troubleshooting section.
7. Maintenance
The Audiopipe APMQ-1300 amplifier requires minimal maintenance. Keep the unit clean and free from dust and debris. Periodically check all wiring connections to ensure they are secure and free from corrosion.
- Use a soft, dry cloth to clean the amplifier's exterior.
- Do not use harsh chemicals or abrasive cleaners.
- Ensure the heat sink fins remain clear of obstructions for proper cooling.
8. Troubleshooting
If you experience problems with your amplifier, consult the following troubleshooting guide before contacting support.
| Problem | Possible Cause | Solution |
|---|---|---|
| No Power (Power LED Off) |
|
|
| Protect LED On |
|
|
| No Audio Output |
|
|
| Distorted Sound |
|
|
9. Specifications
Technical specifications for the Audiopipe APMQ-1300 Mini Class D Mono MOSFET Power Amplifier:
| Parameter | Value |
|---|---|
| Model Number | APMQ-1300 |
| Amplifier Class | Class D (Mono) |
| Peak Power | 1000 Watts |
| RMS Power @ 4 Ohm (<1% THD) | 376W |
| RMS Power @ 2 Ohm (<1% THD) | 648W |
| RMS Power @ 1 Ohm (<1% THD) | 1024W |
| Frequency Response | 18Hz ~ 180Hz |
| Signal-to-Noise Ratio (S/N) | >70dB |
| Input Sensitivity | 0.2V - 5V |
| Total Harmonic Distortion (THD) | ≤0.5% |
| Variable Subsonic Filter | 5Hz - 50Hz |
| Variable Low-Pass Filter (LPF) | 40Hz - 180Hz |
| Bass Boost | 0dB - 12dB |
| Bass Boost Frequency | 30Hz - 80Hz |
| Working Voltage | 9V - 16V DC |
| Dimensions (L x W x H) | 10.5” x 2.1” x 6.2” (267 x 54 x 158mm) |
| Weight | 7.32 Pounds (approx. 3.32 kg) |
10. Warranty and Support
For warranty information and technical support, please refer to the official Audiopipe website or contact your authorized Audiopipe dealer. Keep your purchase receipt as proof of purchase for warranty claims.
You can visit the Audiopipe store for more information: Audiopipe Store on Amazon


