1. Introduction
Thank you for choosing the BBRKIN Smart Security Cabinet Safe (Model THJJX01). This manual provides essential information for the safe and efficient use of your new security safe. Please read these instructions carefully before installation and operation, and retain them for future reference.
This safe is designed to provide secure storage for valuables, documents, and firearms, featuring multiple access methods including a 10-digit keypad, biometric fingerprint scanner, and emergency key access.
2. Important Safety Information
- Always keep the emergency keys in a secure location away from the safe. Do not store them inside the safe.
- Ensure the safe is securely mounted to a floor or wall to prevent unauthorized removal.
- Do not store flammable liquids or other hazardous materials inside the safe.
- Keep children and unauthorized individuals away from the safe and its access codes/fingerprints.
- Replace batteries promptly when the low battery indicator appears to avoid being locked out.
- Avoid exposing the safe to extreme temperatures or humidity.
3. Package Contents
Please check the package to ensure all items are present:
- BBRKIN Smart Security Cabinet Safe (Model THJJX01)
- Emergency Keys (2)
- External Battery Pack
- Mounting Hardware (bolts, washers)
- Detachable 5-Position Handgun Rack
- User Manual (this document)
4. Product Overview
The BBRKIN Smart Security Cabinet Safe features a robust steel construction and multiple security measures.

Figure 4.1: Interior view of the BBRKIN Smart Security Cabinet Safe, showing storage capacity for firearms and other valuables. The safe includes a removable handgun rack and internal padding.
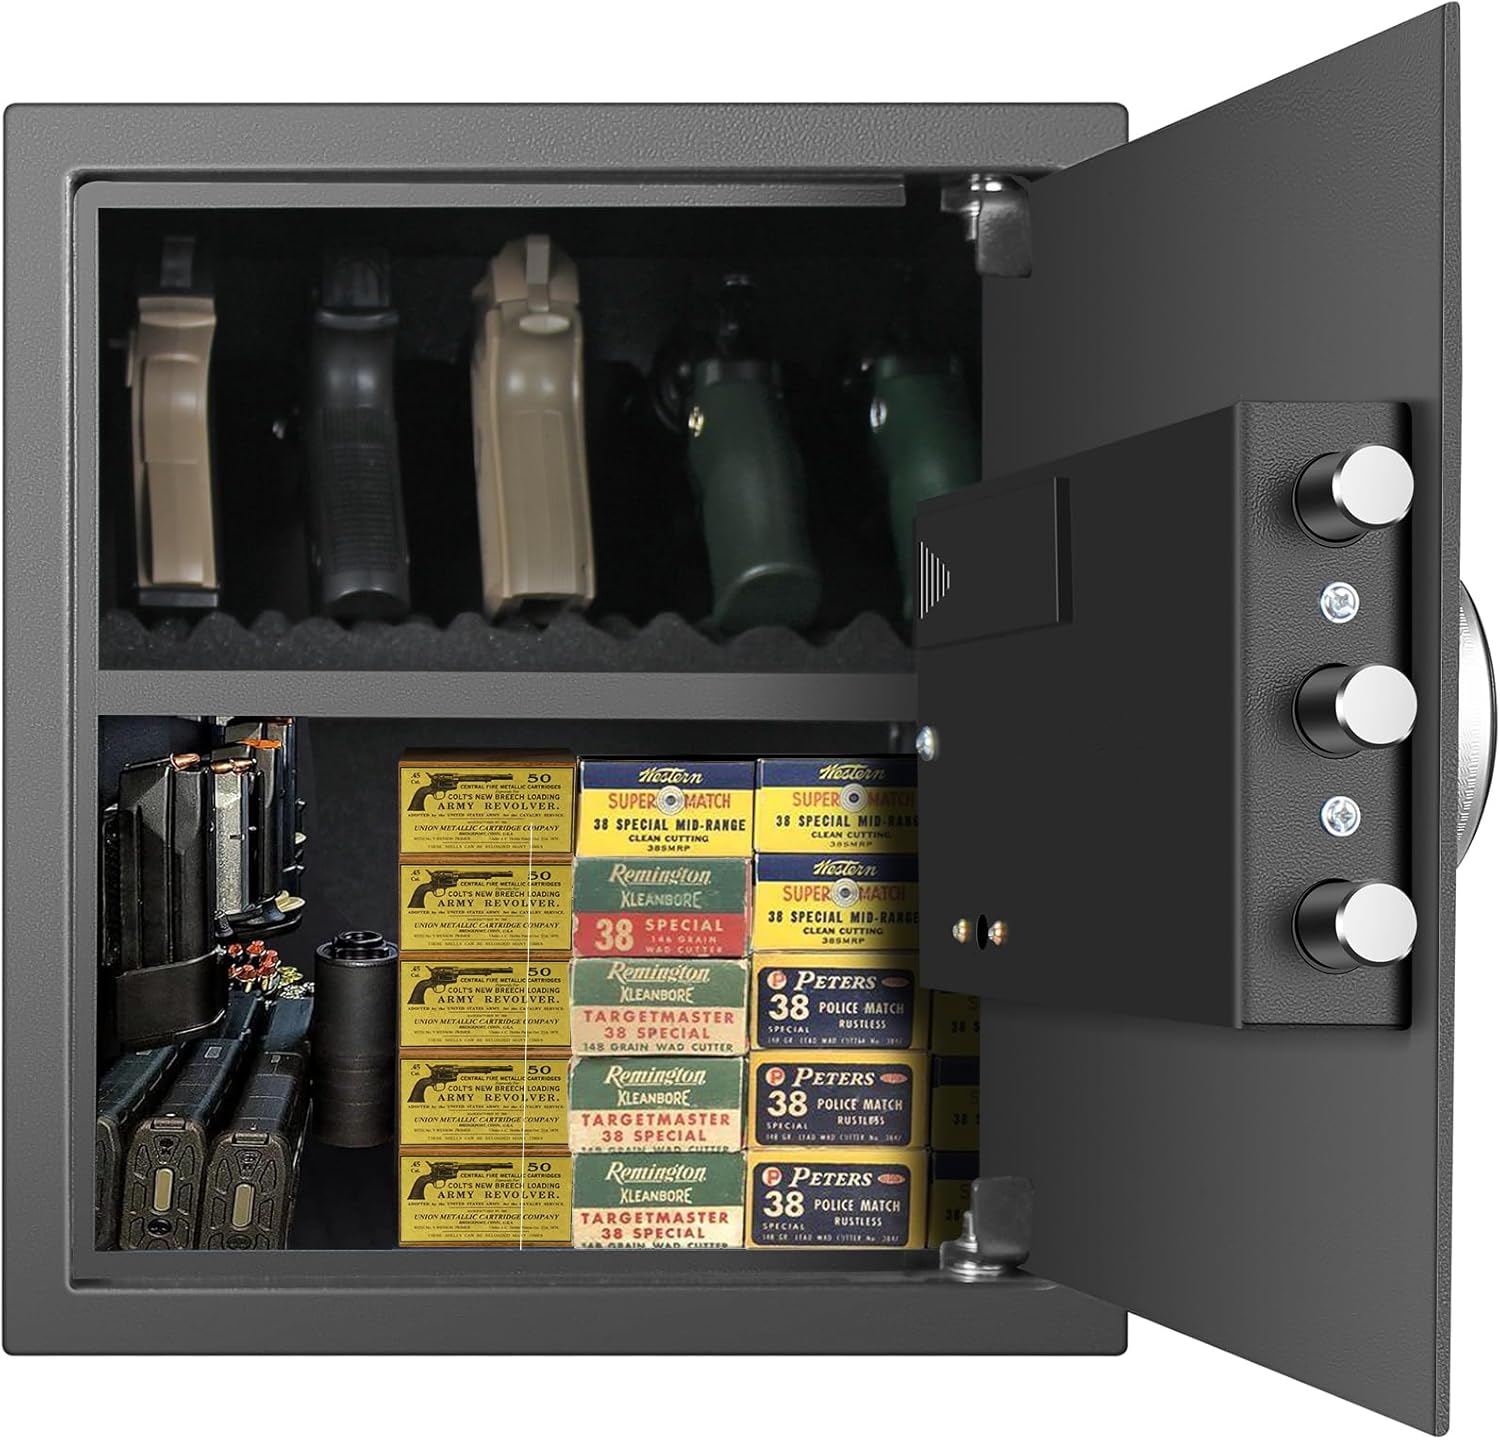
Figure 4.2: Exterior dimensions of the BBRKIN Smart Security Cabinet Safe: 13.75 inches (W) x 13 inches (D) x 15 inches (H).
4.1 Control Panel Features

Figure 4.3: Detailed view of the control panel, featuring a 10-digit keypad, fingerprint scanner, digital display for time, temperature, humidity, and battery status, and a port for the external battery pack.
- Digital Display: Shows time, temperature, humidity, and battery level.
- 10-Digit Keypad: For entering PIN codes.
- Fingerprint Scanner: For biometric access.
- External Power Port: For connecting the external battery pack if internal batteries are depleted.
4.2 Locking Mechanism

Figure 4.4: View of the three 22mm live-door bolts and the internal safety bracket, providing enhanced security against forced entry. A temperature and humidity sensor is also visible.
- 3 Live-Door Bolts: Robust 22mm steel bolts secure the door.
- Internal Safety Bracket: Adds an extra layer of protection.
- Temperature and Humidity Sensor: Located inside the door frame (do not touch).
4.3 Interior Features

Figure 4.5: The detachable 5-position handgun rack, designed to securely hold up to five full-size pistols. This rack can be removed or modified to suit various storage needs.
- Detachable Handgun Rack: Holds up to 5 pistols; can be removed or cut.
- Built-in LED Light: Illuminates the interior when the safe is opened via code.
- Padded Interior: Protects contents from scratches.
5. Setup
5.1 Initial Opening and Battery Installation
- Locate the emergency keys. The keyhole is typically hidden behind a removable cover on the front panel.
- Insert an emergency key and turn it to unlock the safe. Turn the handle to open the door.
- Inside the safe, locate the battery compartment on the back of the door. Install 4 AA batteries (not included), ensuring correct polarity.
- Close the battery compartment. The digital display should now activate.
5.2 Setting Your PIN Code
- With the safe door open, press the RESET button located on the inside of the door (usually a small red button).
- The display will show "SET" or similar. Enter your desired 6-8 digit PIN code on the keypad.
- Press the # button to confirm. The display will show "GOOD" or similar, indicating successful programming.
- Test the new PIN code with the door open before closing it.
5.3 Registering Fingerprints
- With the safe door open, press the RESET button.
- When the display shows "SET", place your finger on the fingerprint scanner. The scanner will light up.
- Lift and place your finger on the scanner multiple times (typically 5-8 times) from different angles until the display confirms successful registration (e.g., "GOOD").
- Repeat for additional fingerprints if desired. The safe can store multiple fingerprints.
- Test registered fingerprints with the door open before closing it.
5.4 Mounting the Safe
The safe has pre-drilled holes for secure mounting.

Figure 5.1: The safe can be discreetly installed in various locations such as a closet, cabinet, or desk, providing flexible placement options.
- Choose a suitable location (e.g., closet, shelf, wall) that provides a stable surface for mounting.
- Mark the drilling points through the pre-drilled holes at the bottom or back of the safe.
- Drill pilot holes into the mounting surface.
- Align the safe with the drilled holes and secure it using the provided mounting hardware. Ensure all bolts are tightened firmly.
6. Operation
6.1 Opening the Safe
- Using PIN Code: Enter your 6-8 digit PIN code followed by the # button. The display will show "OPEN" and the handle can be turned to open the door.
- Using Fingerprint: Place a registered finger on the fingerprint scanner. The scanner will light up, and upon successful recognition, the display will show "OPEN". Turn the handle to open the door.
- Using Emergency Key: If batteries are dead or you forget your code/fingerprint, use an emergency key. Insert the key into the hidden keyhole, turn it, and then turn the handle to open the door.
- Using External Battery Pack: If internal batteries are dead and you don't have the emergency key, connect the external battery pack to the external power port on the control panel. This will power the system, allowing you to use your PIN or fingerprint.
6.2 Closing and Locking the Safe
Close the safe door and turn the handle to the locked position. The safe will automatically lock.
6.3 Silent Mode
To activate silent mode (mute keypad sounds):
- With the safe open, press the * button.
- The display will indicate silent mode is active. Repeat the process to deactivate silent mode.
6.4 Alarm System
The safe features a smart alarm system:
- If an incorrect PIN code or unregistered fingerprint is entered 3 consecutive times, the safe will emit an alarm and the keypad will temporarily lock.
- The alarm will cease after a set period or upon successful entry of a valid code/fingerprint.
7. Maintenance
7.1 Battery Replacement
When the low battery indicator appears on the display, replace the batteries promptly:
- Open the safe door.
- Locate the battery compartment on the inside of the door.
- Remove the old batteries and insert new 4 AA batteries, ensuring correct polarity.
- Close the battery compartment.
7.2 Cleaning
- Wipe the exterior of the safe with a soft, damp cloth. Avoid abrasive cleaners or solvents.
- Keep the fingerprint scanner clean and free of dirt or moisture for optimal performance.
8. Troubleshooting
| Problem | Possible Cause | Solution |
|---|---|---|
| Safe does not open with PIN/fingerprint. | Dead batteries, incorrect code, unregistered fingerprint, keypad locked due to multiple incorrect attempts. | Replace batteries, use external battery pack, use emergency key, re-enter correct code, re-register fingerprint, wait for keypad to unlock. |
| Keypad is unresponsive. | Dead batteries, temporary malfunction. | Replace batteries, use external battery pack, use emergency key. If issue persists, contact support. |
| Fingerprint scanner not recognizing finger. | Finger not placed correctly, scanner dirty, fingerprint not registered properly. | Ensure finger covers the entire scanner, clean scanner, re-register fingerprint, try different finger. |
| Alarm sounds unexpectedly. | Multiple incorrect entries, tampering attempt. | Enter correct code/fingerprint to disarm. Ensure safe is securely mounted. |
9. Specifications
| Feature | Detail |
|---|---|
| Brand | BBRKIN |
| Model Number | THJJX01 |
| Product Dimensions (W x D x H) | 13.75" x 13" x 15" |
| Capacity | 1.3 Cubic Feet |
| Lock Type | Biometric, Electronic Combination Lock, Key |
| Material | Alloy Steel (Door: 14 gauge; Wall: 16 gauge) |
| Special Features | Alarm System, Anti-Theft, Biometric Fingerprint, Built-in LED light, Silent Mode, Time/Temperature/Humidity Display |
| Mounting Type | Floor Mount (pre-drilled holes) |
| Weight | 28 lbs |
| UPC | 723496644847 |
10. Warranty and Support
BBRKIN provides a standard warranty for this product. Please refer to the warranty card included in your package for specific terms and conditions. For technical support, troubleshooting assistance, or warranty claims, please contact BBRKIN customer service.
Contact information for customer service is typically available on the manufacturer's website or through your retailer.