OJNNAVD fuhog68bnhuj
Smart Digital Fingerprint Lock SHP-P72 User Manual
Model: fuhog68bnhuj | Brand: OJNNAVD
1. Introduction
This manual provides comprehensive instructions for the installation, operation, and maintenance of your OJNNAVD Smart Digital Fingerprint Lock SHP-P72. This advanced door lock offers multiple unlocking methods including fingerprint, password, mechanical keys, and card access, designed for enhanced security and convenience in your home.
Please read this manual thoroughly before installation and use to ensure proper functionality and to prevent damage.
2. Product Features
- Multiple Access Methods: Unlock using fingerprint, numeric password, RFID card, or mechanical key.
- Push-Pull Handle Design: Ergonomic design for quick and easy door operation.
- Automatic Locking: Ensures the door is securely locked after closing.
- Built-in Doorbell: Integrated doorbell function for convenience.
- Low Battery Indicator: Visual and audible alerts for low battery status.
- Silent Mode: Option to disable sound for quiet operation.
- Anti-Theft Features: Includes random security code, anti-pry alarm, and anti-theft setup.
- Double Authentication: Enhanced security requiring two methods for access.
- Wi-Fi Connectivity: View access logs and manage temporary passwords via a connected app.
- Wide Door Thickness Compatibility: Suitable for doors 40-100mm thick.
- Durable Construction: Made from zinc alloy for long-lasting performance.

Figure 2.1: Overview of Smart Lock Features. This image illustrates the key functionalities of the OJNNAVD Smart Digital Fingerprint Lock, such as fingerprint recognition, random security code input, NFC unlocking, volume adjustment, battery status alerts, anti-theft settings, automatic locking, dual authentication, and fire alarm integration.
3. Package Contents
Please verify that all components are present and in good condition before beginning installation. If any parts are missing or damaged, contact customer support.
- Front Body Assembly (with keypad and fingerprint sensor)
- Rear Body Assembly (with battery compartment and thumb-turn)
- Mortise Lock Body
- Strike Plate and Strike Box
- Mounting Screws and Hardware
- Mechanical Keys (2-3 pcs)
- RFID Cards (2 pcs)
- User Manual

Figure 3.1: Front and Rear Assemblies of the Smart Lock. This image displays both the exterior (front) and interior (rear) components of the OJNNAVD Smart Digital Fingerprint Lock, highlighting its sleek design and the integrated keypad on the front unit.
4. Installation Guide
Important: This lock is designed for doors with a thickness between 40mm and 100mm. Please confirm your door's thickness before proceeding. Note that the lock has a distinction between left-opening and right-opening doors. Ensure you have the correct variant or adjust the handle direction as per instructions if reversible.
4.1 Preparation
- Ensure the door frame is clean and free of obstructions.
- Verify door handing (left or right) and adjust the handle direction if necessary.
- Gather necessary tools: screwdriver, drill (if new holes are required), measuring tape.
4.2 Mortise Lock Installation
- Insert the mortise lock body into the door edge.
- Secure it with the provided screws.
4.3 Front and Rear Body Installation
- Connect the cable from the front body to the rear body.
- Align the spindle with the mortise lock.
- Mount the front and rear assemblies onto the door, securing them with through-bolts.
- Ensure the lock operates smoothly before tightening all screws.
4.4 Strike Plate and Box Installation
- Install the strike box and strike plate on the door frame, aligning them with the mortise latch and deadbolt.
- Test the door closure and locking mechanism.
4.5 Battery Installation
- Open the battery cover on the rear body.
- Insert the required number of dry batteries (e.g., AA batteries) according to polarity markings.
- Close the battery cover.
5. Operating Instructions
5.1 Unlocking the Door
- Fingerprint: Place your registered finger on the fingerprint sensor. The lock will unlock upon successful recognition.

Figure 5.1: Fingerprint Unlocking. This image demonstrates the process of unlocking the smart lock by placing a registered finger on the integrated fingerprint sensor.
- Password: Touch the keypad to activate. Enter your registered password followed by the '#' key.
- RFID Card: Place your registered RFID card against the card reader area on the lock.
- Mechanical Key: Insert the mechanical key into the emergency keyhole and turn to unlock.
5.2 Locking the Door
- Automatic Locking: The lock will automatically engage the deadbolt after the door closes.
- Manual Locking: From the inside, use the thumb-turn or press the lock button (if available).
5.3 Special Features Operation
- Push-Pull Handle: Simply push or pull the handle to open the door once unlocked.

Figure 5.2: Push-Pull Design. This image highlights the intuitive push-pull handle mechanism of the smart lock, allowing for easy and fast door operation with a single action.
- Auto Wake Up & Silent Mode: The keypad automatically illuminates upon approach. Silent mode can be activated/deactivated via settings to reduce operational sounds.
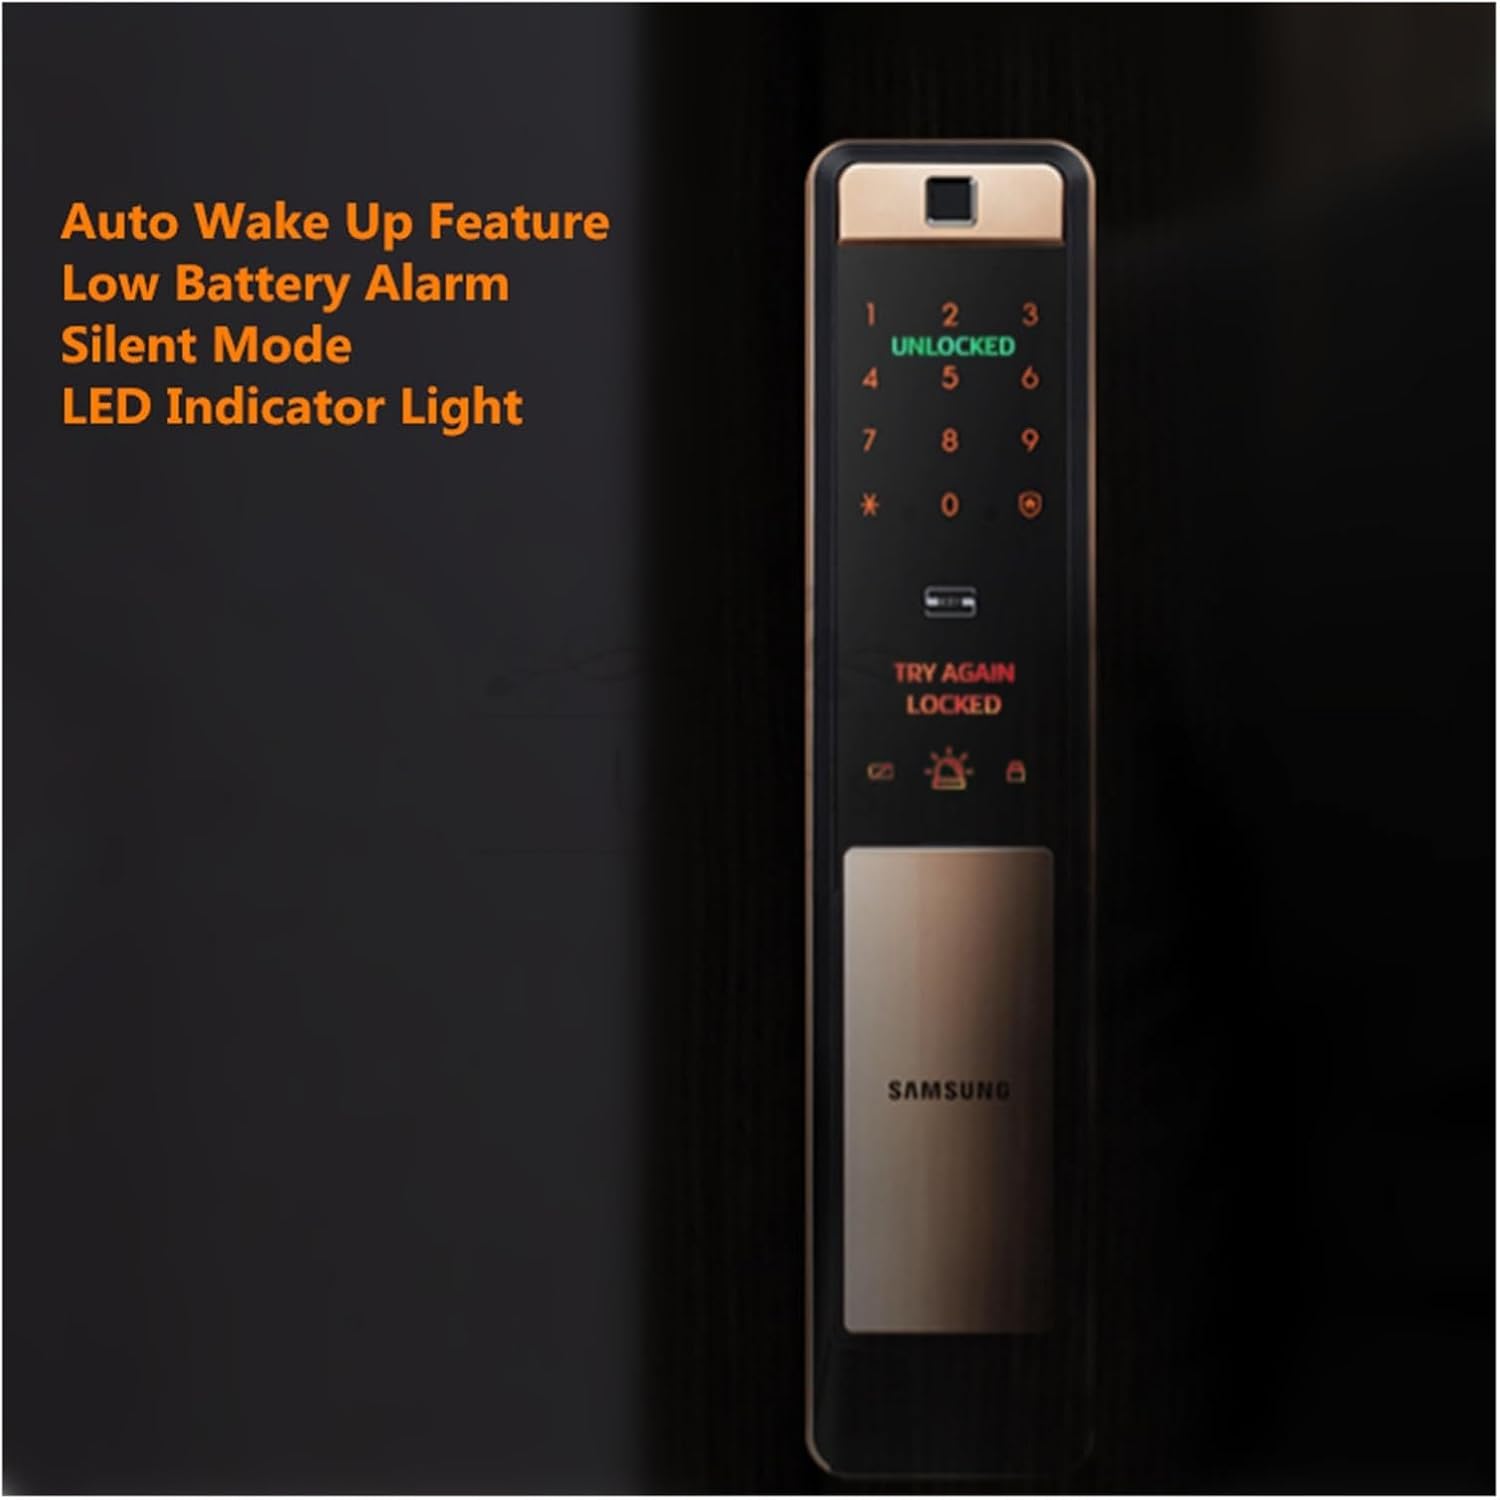
Figure 5.3: Auto Wake Up and Silent Mode. This image shows the smart lock's keypad with indicators for 'UNLOCKED' and 'LOCKED', illustrating features like auto wake-up, low battery alarm, silent mode, and LED indicator lights for user convenience.
- Wi-Fi Connectivity: Connect the lock to your home Wi-Fi network to manage access logs, generate one-time passwords, and set duration-based access via a compatible smartphone application.

Figure 5.4: Wi-Fi Connectivity and App Management. This image depicts a smartphone running a lock management application alongside the smart lock, illustrating its Wi-Fi connectivity for viewing access logs, generating duration passwords, and creating random security codes.
6. User Management
The lock supports up to 100 fingerprints and 100 passwords. Refer to the specific programming instructions provided in the quick start guide for detailed steps on adding and deleting users.
6.1 Adding a Master User
The first registered fingerprint or password will typically be designated as the master user, required for adding or deleting other users.
6.2 Adding Fingerprints
- Enter programming mode (usually by pressing a button on the rear unit or entering a master code).
- Follow voice prompts to register a new fingerprint, scanning the finger multiple times.
6.3 Adding Passwords
- Enter programming mode.
- Follow voice prompts to enter a new 6-12 digit password, then re-enter to confirm.
6.4 Adding RFID Cards
- Enter programming mode.
- Follow voice prompts to present the RFID card to the reader.
6.5 Deleting Users
Users can be deleted individually or all at once. Consult the quick start guide for specific deletion procedures.
7. Maintenance
7.1 Battery Replacement
When the low battery indicator activates, replace all batteries promptly with new, high-quality dry batteries. Do not mix old and new batteries or different battery types.
7.2 Cleaning
Clean the lock's surface with a soft, dry cloth. Avoid using abrasive cleaners, solvents, or harsh chemicals, as these can damage the finish and electronic components.
7.3 Fingerprint Sensor Care
Keep the fingerprint sensor clean and free of dirt or moisture to ensure optimal performance. Use a soft, lint-free cloth to gently wipe the sensor if needed.
8. Troubleshooting
| Problem | Possible Cause | Solution |
|---|---|---|
| Lock does not respond. | Batteries are dead or incorrectly installed. | Replace batteries with new ones, ensuring correct polarity. |
| Fingerprint not recognized. | Finger is dirty/wet, sensor is dirty, or fingerprint not properly registered. | Clean finger and sensor. Re-register fingerprint if issue persists. |
| Password not accepted. | Incorrect password entered, or random security code feature active. | Ensure correct password. If random security code is active, enter random numbers before your password. |
| Door does not lock automatically. | Misalignment of lock body/strike plate, or automatic locking feature disabled. | Check alignment. Verify automatic locking is enabled in settings. |
| Alarm sounds unexpectedly. | Anti-theft alarm triggered, or low battery warning. | Check for tampering. Replace batteries if low battery warning. |

Figure 8.1: Security Features Overview. This image illustrates various security features of the smart lock, including double authentication, C-Class lock, random security code, anti-small black box, anti-cat eye, anti-pry alarm, and anti-theft setup, which are crucial for troubleshooting security-related issues.
9. Specifications
| Feature | Detail |
|---|---|
| Model Name | fuhog68bnhuj (SHP-P72) |
| Brand | OJNNAVD |
| Power Supply | Dry Battery |
| Fit Door Thickness | 40-100mm |
| Suitable Door Types | Steel Door, Wooden Door, Brass Door, Stainless Steel Door |
| Unlocking Methods | Card, Fingerprint, Password, Mechanical Keys |
| Fingerprint Capacity | 100 |
| Password Capacity | 100 |
| Lock Body Type | Automatic |
| Material | Zinc alloy |
| Connectivity Protocol | Wi-Fi |
| Item Dimensions (L x W x H) | 1.18 x 0.79 x 0.39 inches |
| Item Weight | 1.76 ounces (approx. 50 Grams) |
10. Warranty and Support
For warranty information and technical support, please refer to the product packaging or contact the manufacturer directly. Keep your purchase receipt as proof of purchase.
Manufacturer: fuhog68bnhuj
For further assistance, please visit the official OJNNAVD website or contact their customer service department.
11. Product Videos
No official product videos from the seller are available for embedding at this time.
Ask a question about this manual
Ask about setup, troubleshooting, compatibility, parts, safety, or missing instructions. Manuals+ will review the question and use this page’s manual context to help answer it.