Introduction
This manual provides detailed instructions for the safe and effective use of your YIYEIE 3/8-Inch Drive Torque Wrench Set. This 6-piece kit is designed for automotive repair tasks, particularly spark plug installation and removal, ensuring precise torque application. Please read this manual thoroughly before operation and retain it for future reference.

Image: The complete YIYEIE 3/8-Inch Drive Torque Wrench Set, including the torque wrench, spark plug sockets, extension bar, universal joint, and spark plug gapper, all neatly arranged with their protective case.
Package Contents
Your YIYEIE 3/8-Inch Drive Torque Wrench Set includes the following components:
- 1 x 3/8-Inch Drive Click Torque Wrench (10-45 ft-lbs / 13.6-61 Nm)
- 1 x 14mm Magnetic 12-Point Spark Plug Socket
- 1 x 16mm Magnetic 12-Point Spark Plug Socket
- 1 x Spark Plug Gapper (Coin-style)
- 1 x 10-Inch Extension Bar (3/8-Inch drive)
- 1 x 3/8-Inch Universal Joint
- 1 x Protective Storage Case
- 1 x Calibration Certificate
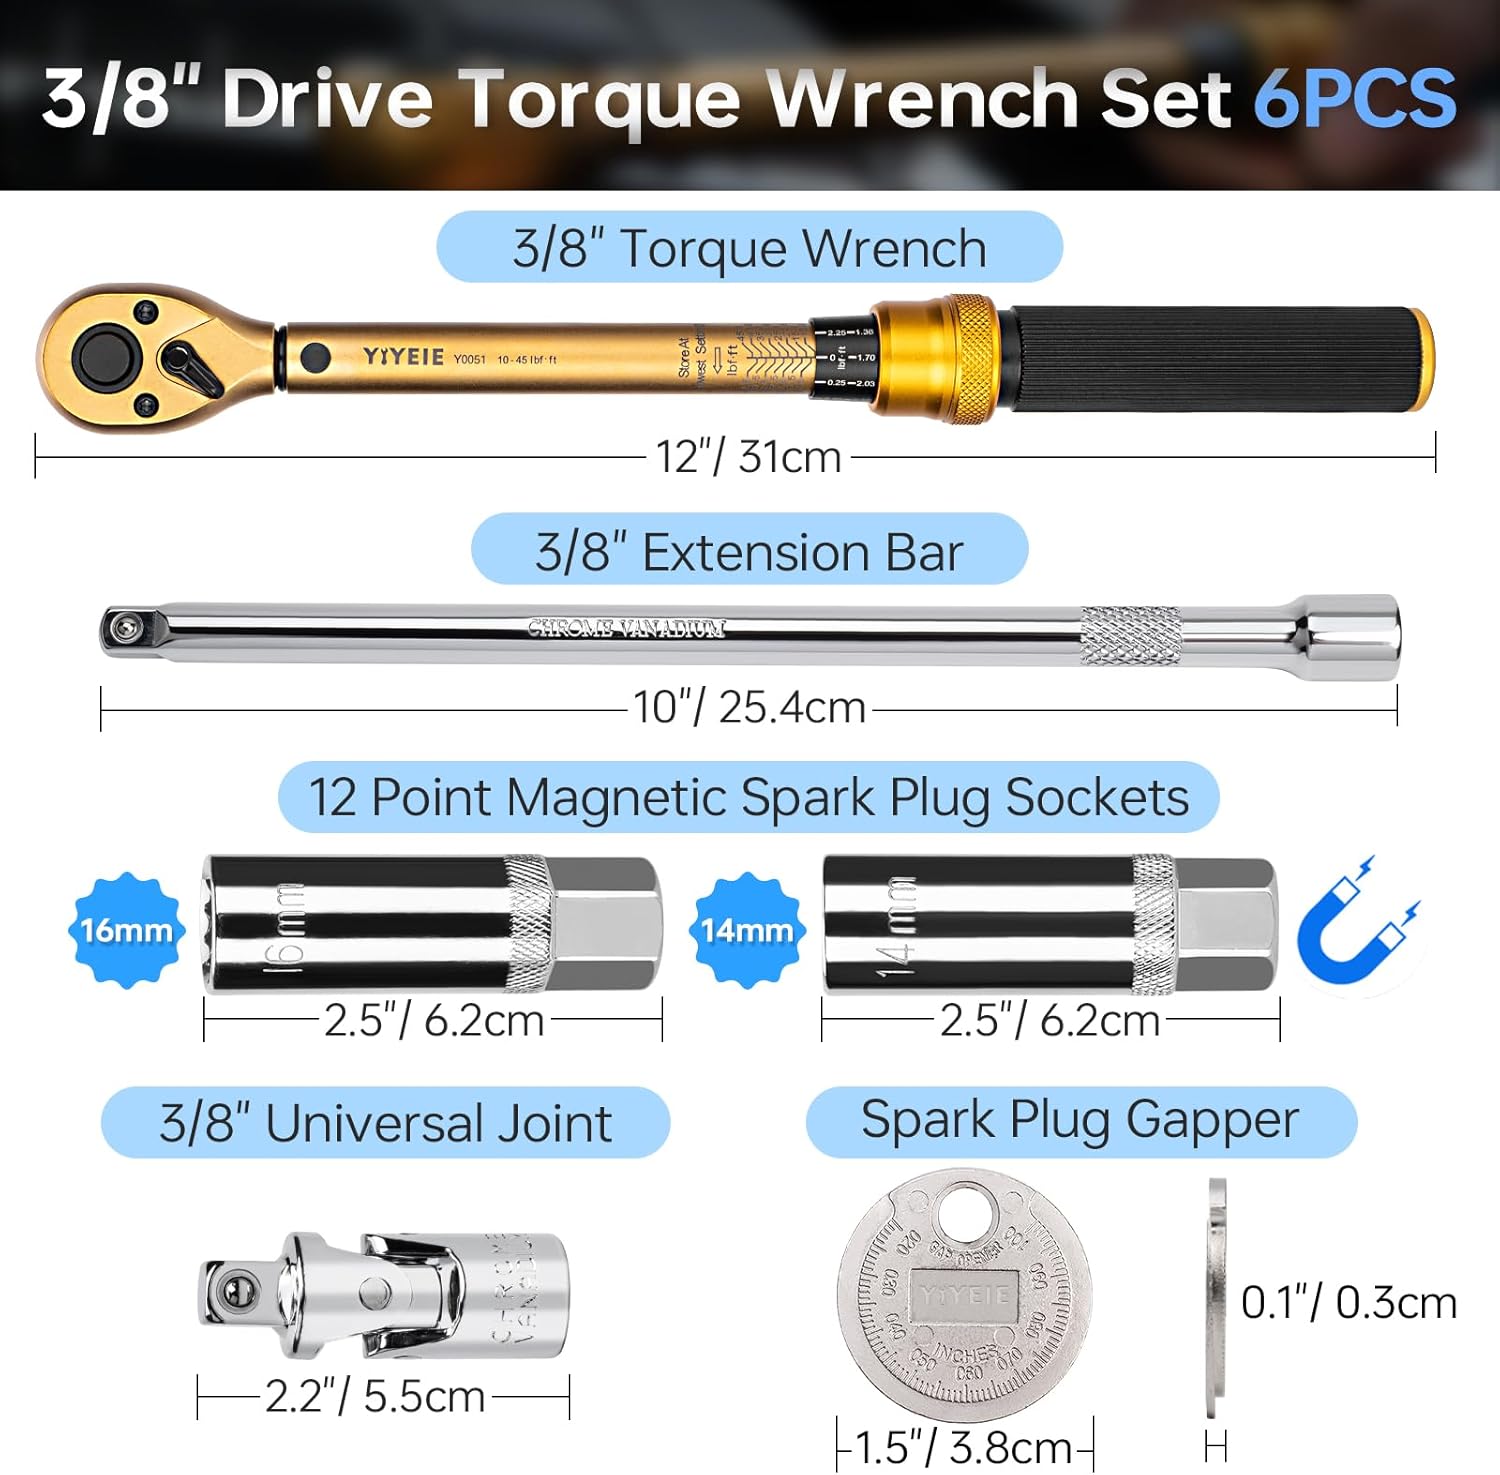
Image: A detailed diagram illustrating each component of the 6-piece torque wrench set, including the torque wrench, extension bar, magnetic spark plug sockets (14mm and 16mm), universal joint, and spark plug gapper, with their respective dimensions.
Safety Information
Always observe the following safety precautions when using this tool set:
- Wear appropriate personal protective equipment, such as safety glasses, to prevent eye injury.
- Ensure the workpiece is securely fastened before applying torque.
- Do not use the torque wrench as a standard ratchet or for breaking loose fasteners. It is a precision measuring tool.
- Avoid dropping the torque wrench, as this can affect its calibration.
- Do not exceed the maximum torque capacity of the wrench (45 ft-lbs / 61 Nm).
- Keep hands and clothing clear of moving parts.
- Store tools in a clean, dry place, away from children.
Setup
Setting the Torque Value
- Unlock the Handle: Rotate the knurled lock knob at the base of the handle counter-clockwise to unlock it.
- Adjust the Main Scale: Rotate the handle to align the desired major torque value (e.g., 10, 20, 30 ft-lbs) with the center line on the main scale.
- Adjust the Micro Scale: Continue rotating the handle until the desired micro-adjustment value (e.g., 0.25, 0.50 ft-lbs) on the knurled handle scale aligns with the center line of the main scale. For example, to set 25.50 ft-lbs, align 25 on the main scale, then rotate the handle until 0.50 on the micro scale aligns with the center line.
- Lock the Handle: Rotate the knurled lock knob clockwise to secure the set torque value.

Image: A close-up view of the torque wrench's dual-range scale, showing both FT.LB and N.m markings, along with the micro-adjustment markings on the handle for precise torque setting.
Attaching Sockets and Accessories
Press the quick-release button on the ratchet head to attach or detach sockets and accessories. Ensure the socket is fully seated and locked onto the drive square before use.

Image: A pair of gloved hands demonstrating the quick installation of a socket onto the 3/8-inch drive torque wrench, highlighting the quick-release mechanism.
Operating Instructions
Using the Torque Wrench
- Set the desired torque value as described in the 'Setup' section.
- Attach the appropriate socket or accessory to the drive square.
- Place the socket onto the fastener.
- Hold the torque wrench by the handle and apply steady, increasing force in the tightening direction.
- Continue applying force until you hear and feel a distinct "Click" sound and sensation. This indicates that the pre-set torque value has been reached.
- Immediately stop applying force once the click is detected to prevent over-torquing.
- The 72-tooth reversible ratchet head allows for tightening and loosening. Use the lever on the ratchet head to change direction.

Image: A close-up shot of a torque wrench in action, illustrating the 'Click-Stop' mechanism that signals when the desired torque has been achieved.

Image: A detailed view of the torque wrench's 72-tooth reversible ratchet head, showing the mechanism for changing the direction of rotation without removing the wrench from the fastener.
Using Magnetic Spark Plug Sockets
The 14mm and 16mm spark plug sockets feature an internal magnetic ring to securely hold spark plugs during installation and removal. The 12-point design provides a strong grip and helps prevent rounding of the spark plug hex.
- Select the correct size magnetic spark plug socket (14mm or 16mm) for your spark plugs.
- Attach the socket to the torque wrench or extension bar.
- Gently insert the spark plug into the socket; the magnet will hold it in place.
- For deep-seated spark plugs, use the 10-inch extension bar to reach them.
- Carefully guide the spark plug into its port and begin threading it by hand to avoid cross-threading.
- Once hand-tight, use the torque wrench to apply the manufacturer-specified torque.

Image: A magnetic spark plug socket securely holding a spark plug, demonstrating the strong magnetic feature that keeps the plug in place during installation or removal.

Image: A torque wrench fitted with a spark plug socket, shown in the process of installing a spark plug into an engine, illustrating proper usage for spark plug maintenance.
Using the Spark Plug Gapper
The coin-style spark plug gapper is used to measure and adjust the gap between the spark plug electrodes.
- Measure the Gap: Insert the edge of the gapper into the spark plug gap. Slide it until it snugly fits between the electrodes. Read the measurement indicated on the gapper.
- Increase the Gap: If the gap is too small, use the small hole at the top of the gapper to gently pry the ground electrode away from the center electrode.
- Decrease the Gap: If the gap is too large, gently press the ground electrode against a hard, flat surface (or the gapper itself) to close the gap. Be careful not to damage the center electrode.
- Re-measure the gap to ensure it matches the manufacturer's specifications for your vehicle.

Image: A pair of hands demonstrating the use of the coin-style spark plug gapper to accurately measure the gap between the electrodes of a spark plug.

Image: A close-up view of a spark plug gapper being used to precisely adjust the gap of a spark plug, ensuring optimal engine performance.
Maintenance
Cleaning
Wipe down all tools with a clean, dry cloth after each use. For stubborn grime, a mild degreaser can be used, followed by thorough drying. Do not immerse the torque wrench in liquids.
Storage
Always return the torque wrench to its lowest torque setting (10 ft-lbs / 13.6 Nm) before storing. This relieves tension on the internal spring mechanism, preserving its accuracy. Store all components in the provided protective case in a clean, dry, and temperature-controlled environment.

Image: The YIYEIE torque wrench set components, including the torque wrench, sockets, and accessories, neatly organized within their custom-fit protective storage case.
Calibration
Your torque wrench is pre-calibrated to ±3% accuracy and comes with a traceable calibration certificate. It is recommended that the wrench be recalibrated no later than 12 months after the date of first use or after 5000 cycles, whichever comes first, to maintain optimal accuracy.
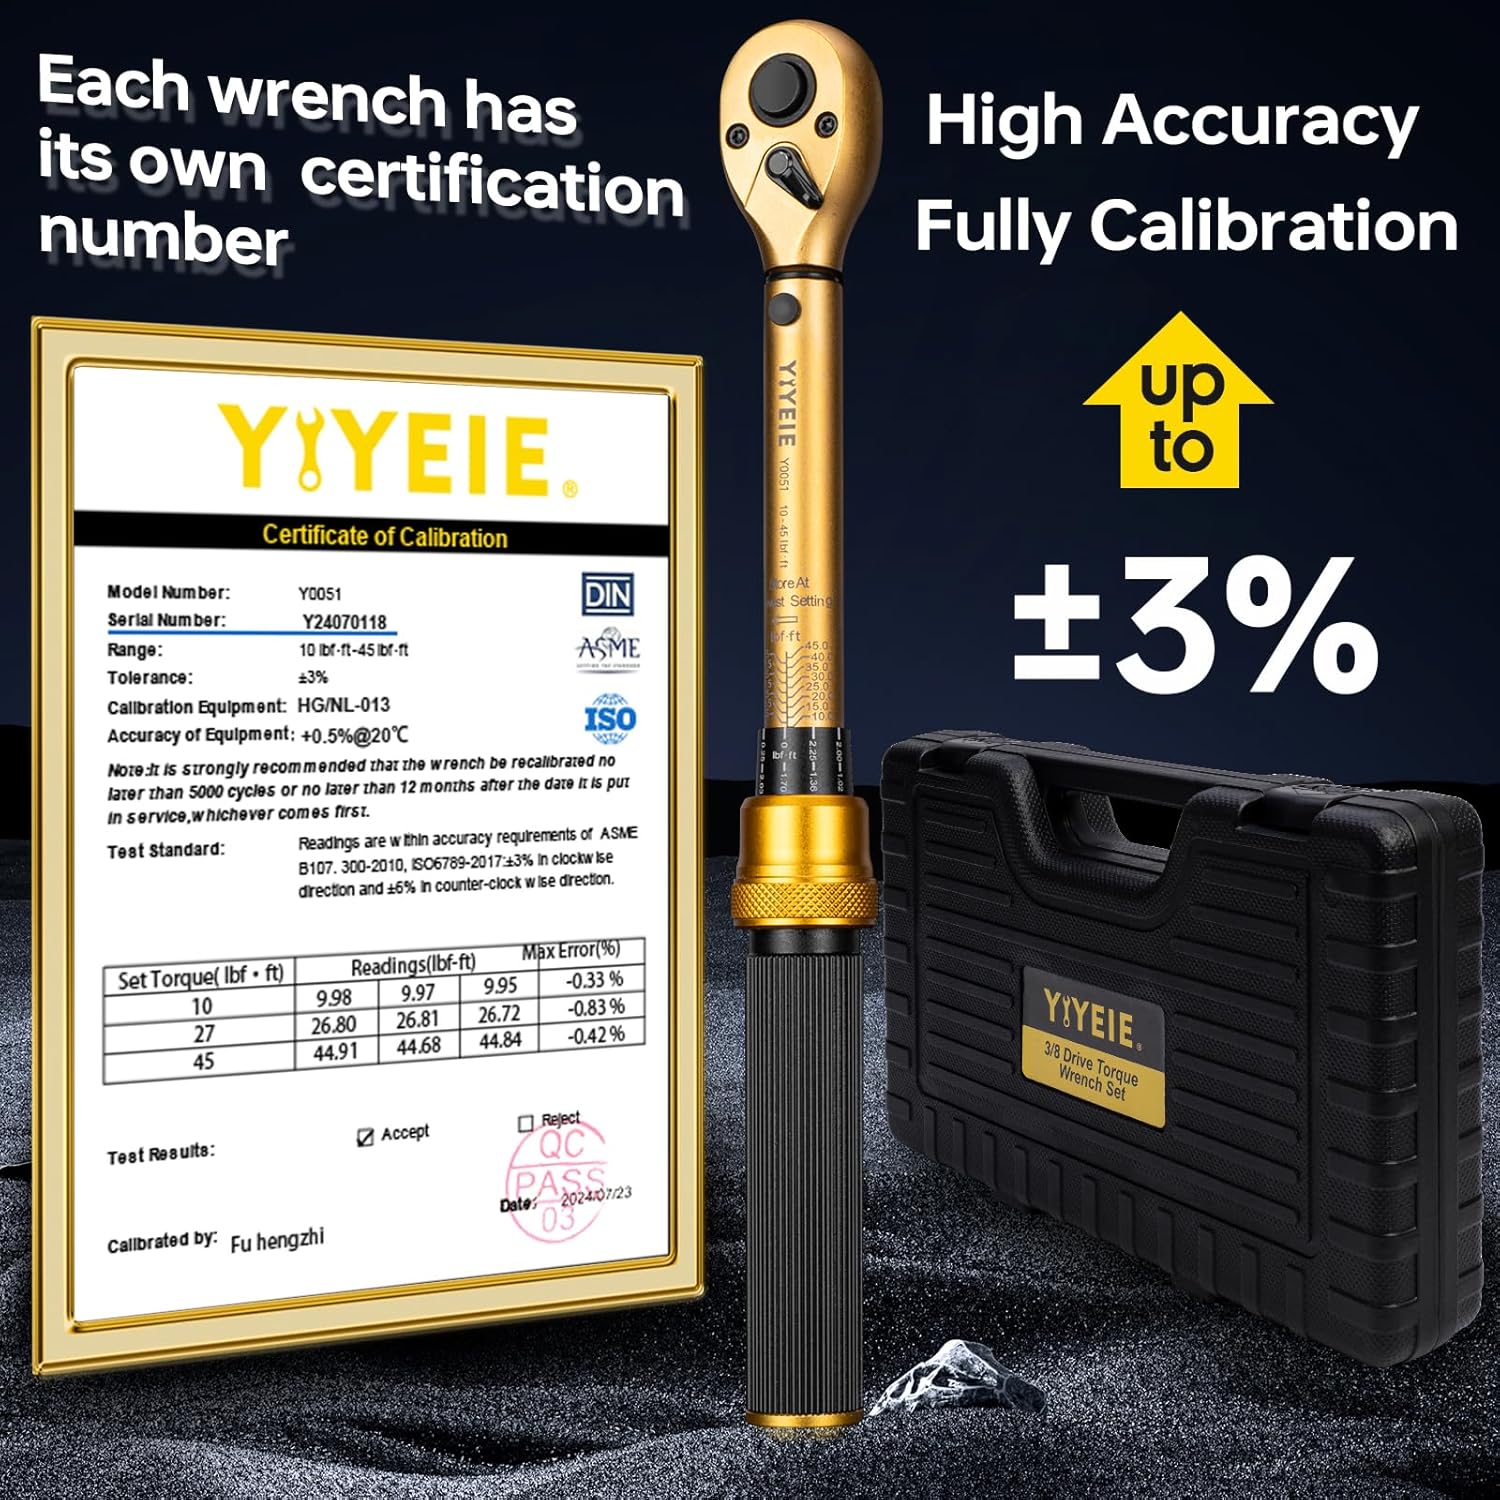
Image: The YIYEIE torque wrench displayed alongside its individual calibration certificate, which details its model number, serial number, range, tolerance, and test results, confirming its ±3% accuracy.
Troubleshooting
- Wrench does not click: Ensure the torque setting is within the wrench's operational range (10-45 ft-lbs). Confirm the handle is unlocked before adjusting and locked after setting. Apply steady, increasing force; a quick jerk may prevent the click from being felt. If the issue persists, the wrench may require recalibration or service.
- Inaccurate readings: Verify the torque setting is correctly aligned. Ensure the wrench is clean and free of debris. Avoid using extensions between the wrench and the socket, as this can affect accuracy. If accuracy is still a concern, recalibration is recommended.
- Socket not holding spark plug: Check for debris or damage to the magnetic ring inside the socket. Ensure the spark plug is fully inserted.
Specifications
| Feature | Specification |
|---|---|
| Model Number | Y0051 |
| Drive Size | 3/8 Inch |
| Torque Range | 10-45 ft-lbs (13.6-61 Nm) |
| Micro-Adjustment | 0.25 ft-lb |
| Accuracy | ±3% (Pre-calibrated) |
| Ratchet Teeth | 72-Tooth, Reversible |
| Material | Alloy Aluminum, Chromium Molybdenum Steel (Cr-V Steel) |
| Included Sockets | 14mm & 16mm Magnetic 12-Point Spark Plug Sockets |
| Included Accessories | 10-inch Extension Bar, 3/8-inch Universal Joint, Spark Plug Gapper |
| Item Length (Wrench) | 12 Inches |
| Item Weight | 3.32 pounds (total package) |

Image: A close-up view of the torque wrench components, highlighting the Cr-V Steel construction, 12-point socket design, zinc alloy spark plug gapper, and interior magnets in the sockets, emphasizing durability and corrosion resistance.
Warranty and Support
For warranty information, technical support, or service inquiries regarding your YIYEIE Torque Wrench Set, please contact the manufacturer directly through their official channels or the retailer from whom the product was purchased. Keep your purchase receipt and calibration certificate as proof of ownership and for warranty claims.


