1. Product Overview
This Loddery Android 13 Car Stereo is designed specifically for Hyundai Tucson models from 2015 to 2019. It features a 9-inch HD touch screen, 4GB RAM, 64GB ROM, and supports a variety of connectivity options and smart features to enhance your driving experience.
Key Features:
- Android 13 Operating System
- 9-inch HD 2.5D Tempered Glass Touch Screen (1280x720 resolution)
- Wireless Apple CarPlay & Android Auto
- Mirror Link Functionality (Phonelink App)
- Bluetooth Hands-free Calling & Music Streaming
- FM/RDS Radio with 18 preset stations
- Built-in GPS Navigation (online & offline maps)
- Steering Wheel Control Support
- AHD Backup Camera Input
- Wi-Fi Connectivity for app downloads (YouTube, TikTok)
- Split Screen Function
2. What's in the Box
Carefully unpack the box and ensure all items are present:
- 1 x Car MP5 Player (Main Unit)
- 1 x Power Cable
- 1 x GPS Antenna
- 1 x Rear Camera Input Cable
- 1 x RCA Cable
- 2 x USB Cable
- 2 x Mounting Bracket
- 4 x Screws
- 1 x Instruction Manual

Image: All components included in the product packaging.
3. Specifications
| System | Android 13 |
| Chipset | 8227L-DEMO |
| Screen Size | 9 inches |
| Memory | 4GB (RAM) + 64GB (ROM) |
| Screen Resolution | 1024x600 |
| Radio Chip | MT6625 |
| Power Output | 4x45W |
| Work Temperature | -20℃ to 75℃ |
| Power Amplifier Chip | TDA7388 |
| Radio Band | FM/RDS |
| Video Output | Support |
| Reversing Input | AHD or CVBS |
| External Microphone | Support |
| Split Screen | Support |
| Maps | Built-in offline maps (requires internet to download data) |
| WIFI | Support |
| USB | Double USB interface |
| Factory Setting Keyword | 8888 or 3368 |
| Item Weight | 4.41 pounds |
| Package Dimensions | 16.93 x 13.39 x 6.3 inches |
4. Installation Guide
This section provides general guidance for installing the Loddery Android 13 Car Stereo. Professional installation is recommended. Always ensure the vehicle's power is disconnected before beginning installation.
4.1 Pre-Installation Check
- Verify compatibility with your Hyundai Tucson (2015-2019).
- Ensure all components listed in 'What's in the Box' are present.
- Gather necessary tools (screwdrivers, wire strippers, electrical tape, etc.).
4.2 Removing the Old Head Unit
- Disconnect the negative terminal of the car battery.
- Carefully remove the trim panels surrounding the factory radio.
- Unscrew and remove the factory head unit.
- Disconnect all wiring harnesses and antenna cables from the old unit.
4.3 Connecting the New Head Unit
- Connect the new wiring harness to the vehicle's factory harness.
- Connect the GPS antenna, USB cables, RCA cables, and rear camera input cable to the corresponding ports on the new stereo.
- If applicable, connect the external microphone.
- Mount the new stereo using the provided brackets and screws.
4.4 Post-Installation Check
- Reconnect the car battery.
- Turn on the vehicle and the car stereo.
- Test all functions: radio, Bluetooth, GPS, touch screen, steering wheel controls, and backup camera.
- Adjust settings as needed (refer to Operating Instructions).

Image: Comparison of the car dashboard before and after installing the Loddery Android 13 Car Stereo.
5. Operating Instructions
This section details the various functions and settings of your Loddery Android 13 Car Stereo. For a visual guide, please refer to the 'Multifunctional Operation Guide' video below.
Video: Multifunctional Operation Guide for the car stereo, demonstrating various settings and features.
5.1 Basic Operations
- Power On/Off: Press and hold the power button on the unit.
- Volume Control: Use the volume buttons on the unit or steering wheel controls.
5.2 Connectivity
5.2.1 Wi-Fi Connection (Video: 05s - 34s)
To connect to Wi-Fi: Go to Settings > Network & Internet > Wi-Fi. Select your desired network and enter the password. After a successful connection, you can use online apps like YouTube or Google.
5.2.2 Bluetooth Connection (Video: 4m15s - 4m37s)
To connect your phone via Bluetooth: Go to Settings > Bluetooth. Ensure Bluetooth is enabled on both the stereo and your phone. Select the car stereo's Bluetooth name from your phone's available devices and pair. After connecting, you can make hands-free calls and stream music.
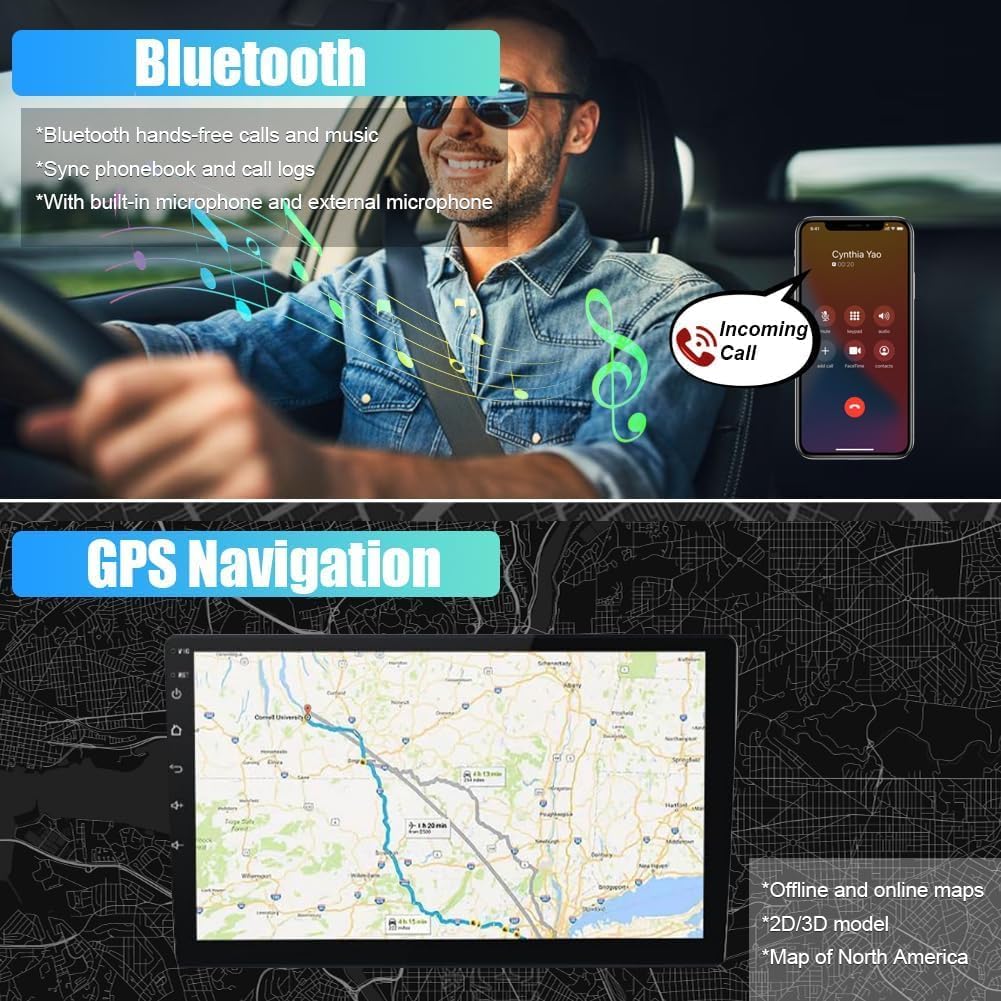
Image: The car stereo screen showing Bluetooth and GPS navigation interfaces.
5.2.3 Wireless CarPlay (Video: 4m37s - 5m02s)
Connect your iPhone to the car stereo via Bluetooth. Once paired, the CarPlay icon will appear. Tap it to launch Wireless CarPlay, allowing access to phone, music, maps, and messages directly on the stereo screen.

Image: The car stereo screen showing the Wireless CarPlay interface with common applications.
5.2.4 Android Auto (Video: 5m02s - 5m26s)
Connect your Android phone to the car stereo via Bluetooth. Once paired, the Android Auto icon will appear. Tap it to launch Wireless Android Auto, providing access to navigation, communication, and music apps.

Image: The car stereo screen illustrating voice control commands for CarPlay and Android Auto.
5.2.5 Mirror Link
The Mirror Link function (via Phonelink app) allows you to mirror your smartphone screen onto the car stereo. For Android phones, it supports two-way control; for iOS, it supports one-way control. This feature is useful for displaying apps or content not natively supported by CarPlay/Android Auto.
Video: Demonstration of RK3326 CarPlay, Android Auto, and Mirror Link connection. (Note: Video creator 'Realdio' is a seller of similar products.)
5.3 Display Settings
5.3.1 Screen Brightness Adjustment (Video: 34s - 52s)
Adjust screen brightness by navigating to Settings > Car Settings > Display > Brightness. Use the slider to set the desired brightness level for day and night modes. You can also swipe down the status bar for quick adjustments.
5.3.2 UI Theme (Video: 3m10s - 3m27s)
The stereo offers multiple UI themes for customization. Access themes through the main interface or settings to change the visual appearance. Some themes allow wallpaper customization.
5.4 Audio Settings
5.4.1 Radio Settings (Video: 3m27s - 3m39s)
Access the Radio app to adjust radio bands, frequencies, and search for stations. You can save your favorite stations as presets.
5.4.2 EQ Settings (Video: 3m39s - 4m15s)
Customize the sound output using the Equalizer settings. You can select from preset modes (e.g., Pop, Rock, Jazz) or manually adjust individual frequency bands to achieve your preferred audio profile.
5.5 System Settings
5.5.1 Language Settings (Video: 52s - 1m07s)
To change the system language: Go to Settings > System > Languages & input > Languages > Add a language. Select your desired language from the list.
5.5.2 Time Settings (Video: 1m07s - 1m16s)
Set the date and time by going to Settings > System > Date & time. You can choose to use GPS-provided time for automatic synchronization.
5.5.3 Touch Calibration (Video: 1m16s - 1m39s)
If the touch screen responsiveness is off, perform a five-point calibration. Go to Factory Setup (password: 8888 or 3368) > Touch Calibration. Follow the on-screen instructions to touch the indicated points.
5.5.4 Steering Wheel Control Learning (Video: 2m19s - 2m41s)
To configure steering wheel controls: Go to Factory Setup (password: 8888 or 3368) > Party Control Learning. Follow the instructions to assign functions to your steering wheel buttons.
5.5.5 Reverse Camera Format Selection (Video: 2m41s - 2m51s)
Adjust the reverse camera format if needed. Go to Factory Setup (password: 8888 or 3368) > Backcar Source Settings and select the appropriate format (e.g., AHD 720P 25fps, CVBS).
5.5.6 Car System Protocol Settings (Video: 2m51s - 3m05s)
Configure car system protocols for specific vehicle models. Go to Factory Setup (password: 8888 or 3368) > Can Settings. Select the correct Brand, Model, Year, Cfg, and Protocol for your vehicle.
5.5.7 Clear Memory (Video: 3m05s - 3m10s)
To optimize performance, you can clear memory by swiping down from the top of the screen and tapping the 'System Optimize' or 'Clear Memory' option.
6. Maintenance
Regular maintenance helps ensure the longevity and optimal performance of your car stereo.
- Cleaning: Use a soft, dry cloth to clean the screen and unit. Avoid abrasive cleaners or solvents.
- Software Updates: Periodically check for software updates to ensure you have the latest features and bug fixes.
- Temperature: Avoid exposing the unit to extreme temperatures.
7. Troubleshooting
If you encounter issues with your car stereo, refer to the following common problems and solutions:
- No Power: Check all power connections and the vehicle's fuse box. Ensure the unit is properly installed.
- No Sound: Verify speaker connections, volume levels, and EQ settings. Check if the mute function is active.
- Touch Screen Unresponsive: Perform a touch calibration (refer to section 5.5.3). If the issue persists, try restarting the unit.
- Bluetooth Connection Issues: Ensure Bluetooth is enabled on both devices and that the stereo is discoverable. Try unpairing and re-pairing the devices.
- GPS Not Working: Ensure the GPS antenna is properly connected and has a clear view of the sky. Check GPS settings in the system menu.
- Backup Camera Not Displaying: Verify the camera connection and ensure the correct reverse camera format is selected in settings (refer to section 5.5.5).
For more complex issues, please contact customer support.
8. Warranty and Support
For any questions or support needs regarding your Loddery Android 13 Car Stereo, please contact the seller or manufacturer directly. Warranty information may be provided with your purchase documentation.