1. Introduction
This manual provides comprehensive instructions for the safe and effective use of your AKKTOL Hollow Wall Anchor Kit BT910 and Rivet Nut Tool Kit BT607. This combined kit offers versatile fastening solutions for various applications, including automotive work, metal fabrication, and general household repairs. Please read this manual thoroughly before operating the tools to ensure proper usage and to prevent injury or damage.

Image 1.1: Overview of the AKKTOL Hollow Wall Anchor Kit BT910 and Rivet Nut Tool Kit BT607, showing both tools, their respective cases, and an assortment of fasteners.
2. Safety Information
Always observe the following safety precautions when using these tools:
- Wear appropriate personal protective equipment, including safety glasses, to protect against flying debris.
- Ensure your work area is clean, well-lit, and free from obstructions.
- Keep children and bystanders away from the work area.
- Do not operate tools while under the influence of drugs, alcohol, or medication.
- Inspect tools and fasteners for damage before each use. Do not use damaged equipment.
- Use the correct tool for the application. Do not force a tool or attachment.
- Store tools in a dry, secure place out of reach of children.
3. Product Overview and Contents
The AKKTOL kit includes two primary tools and a comprehensive assortment of fasteners:
3.1. AKKTOL Rivet Nut Tool Kit BT607
- 1 x AKKTOL Rivet Nut Tool (BT607) with 16-inch handles
- Multiple mandrels/nosepieces for various rivet nut sizes
- 240 pcs Rivet Nuts Assortment Kit (SAE: 6#-32, 8#-32, 10#-32, 10#-24, 1/4"-20, 5/16"-18, 3/8"-16, 1/2"-13; Metric: M3, M4, M5, M6, M8, M10, M12)
- Storage case for the tool and accessories

Image 3.1: Contents of the AKKTOL Rivet Nut Tool Kit BT607, including the tool, various mandrels, and a box of assorted rivet nuts.
3.2. AKKTOL Hollow Wall Anchor Kit BT910
- 1 x AKKTOL Hollow Wall Anchor Setting Tool (BT910)
- 35 pcs Molly Bolts in 7 sizes (M4x32mm, M4x46mm, M4x60mm, M5x37mm, M5x52mm, M5x65mm, M6x52mm)
- Storage case for the tool and molly bolts

Image 3.2: Contents of the AKKTOL Hollow Wall Anchor Kit BT910, showing the setting tool, a selection of molly bolts, and its storage case.
4. Setup
4.1. Rivet Nut Tool BT607 Setup
- Identify the correct mandrel and nosepiece size that matches the rivet nut you intend to use.
- Unscrew the existing nosepiece and mandrel from the tool if different.
- Thread the appropriate mandrel into the tool.
- Screw on the matching nosepiece until it is secure.
4.2. Hollow Wall Anchor Tool BT910 Setup
The Hollow Wall Anchor Tool BT910 requires no specific setup beyond selecting the correct molly bolt size for your application. Ensure the molly bolt's screw is backed out approximately 1/4 inch before insertion into the wall.
5. Operating Instructions
5.1. Operating the Hollow Wall Anchor Tool BT910
The AKKTOL Hollow Wall Anchor Tool BT910 is designed for installing molly bolts in thin or hollow walls such as drywall and plasterboard (0.12"-1.52" thickness). Molly bolts provide strong holding power, up to 65 lbs, for hanging various objects.
- Drill a Hole: Using an appropriate drill bit, drill a hole through the wall at the desired location. The hole size should match the diameter of the molly bolt body.
- Insert Molly Bolt: Insert the molly bolt into the drilled hole until its flange is flush with the wall surface. Ensure the screw is backed out about 1/4 inch.
- Position Setting Tool: Place the setting tool over the head of the molly bolt's screw.
- Expand Anchor: Squeeze the handles of the setting tool firmly. This action will expand the wings of the molly bolt behind the wall, creating a secure anchor. Continue squeezing until the tool feels firm and the anchor is fully expanded.
- Remove Tool: Release the tool from the molly bolt.
- Secure Object: Attach your desired object using the molly bolt's screw.

Image 5.1: Step-by-step guide for installing a hollow wall anchor using the AKKTOL BT910 tool, from drilling to securing the object.

Image 5.2: Illustration of the holding capacity of AKKTOL molly bolts, demonstrating their suitability for hanging items up to 65 lbs.
5.2. Operating the Rivet Nut Tool BT607
The AKKTOL Rivet Nut Tool BT607 is designed for installing threaded rivet nuts (nutserts) in various materials, including aluminum, steel, and stainless steel. Its 16-inch handles provide increased leverage for easier installation, especially for larger sizes.
- Attach Rivet Nut: Fully open the handles of the rivet nut tool. Thread the selected rivet nut onto the mandrel until it is snug against the nosepiece.
- Insert into Hole: Insert the rivet nut into the pre-drilled hole in your workpiece.
- Deform Rivet Nut: Squeeze the handles of the tool together firmly and steadily. This action will pull the mandrel, deforming the rivet nut and creating a bulge on the blind side of the workpiece, securing it in place.
- Release Tool: Once the rivet nut is set, loosen the knob on the tool to release the mandrel from the now-threaded rivet nut.
- Secure Attachment: You can now use a bolt to secure an attachment to the newly installed threaded rivet nut.

Image 5.3: Step-by-step guide for installing a rivet nut using the AKKTOL BT607 tool, from attaching the nut to securing an object.
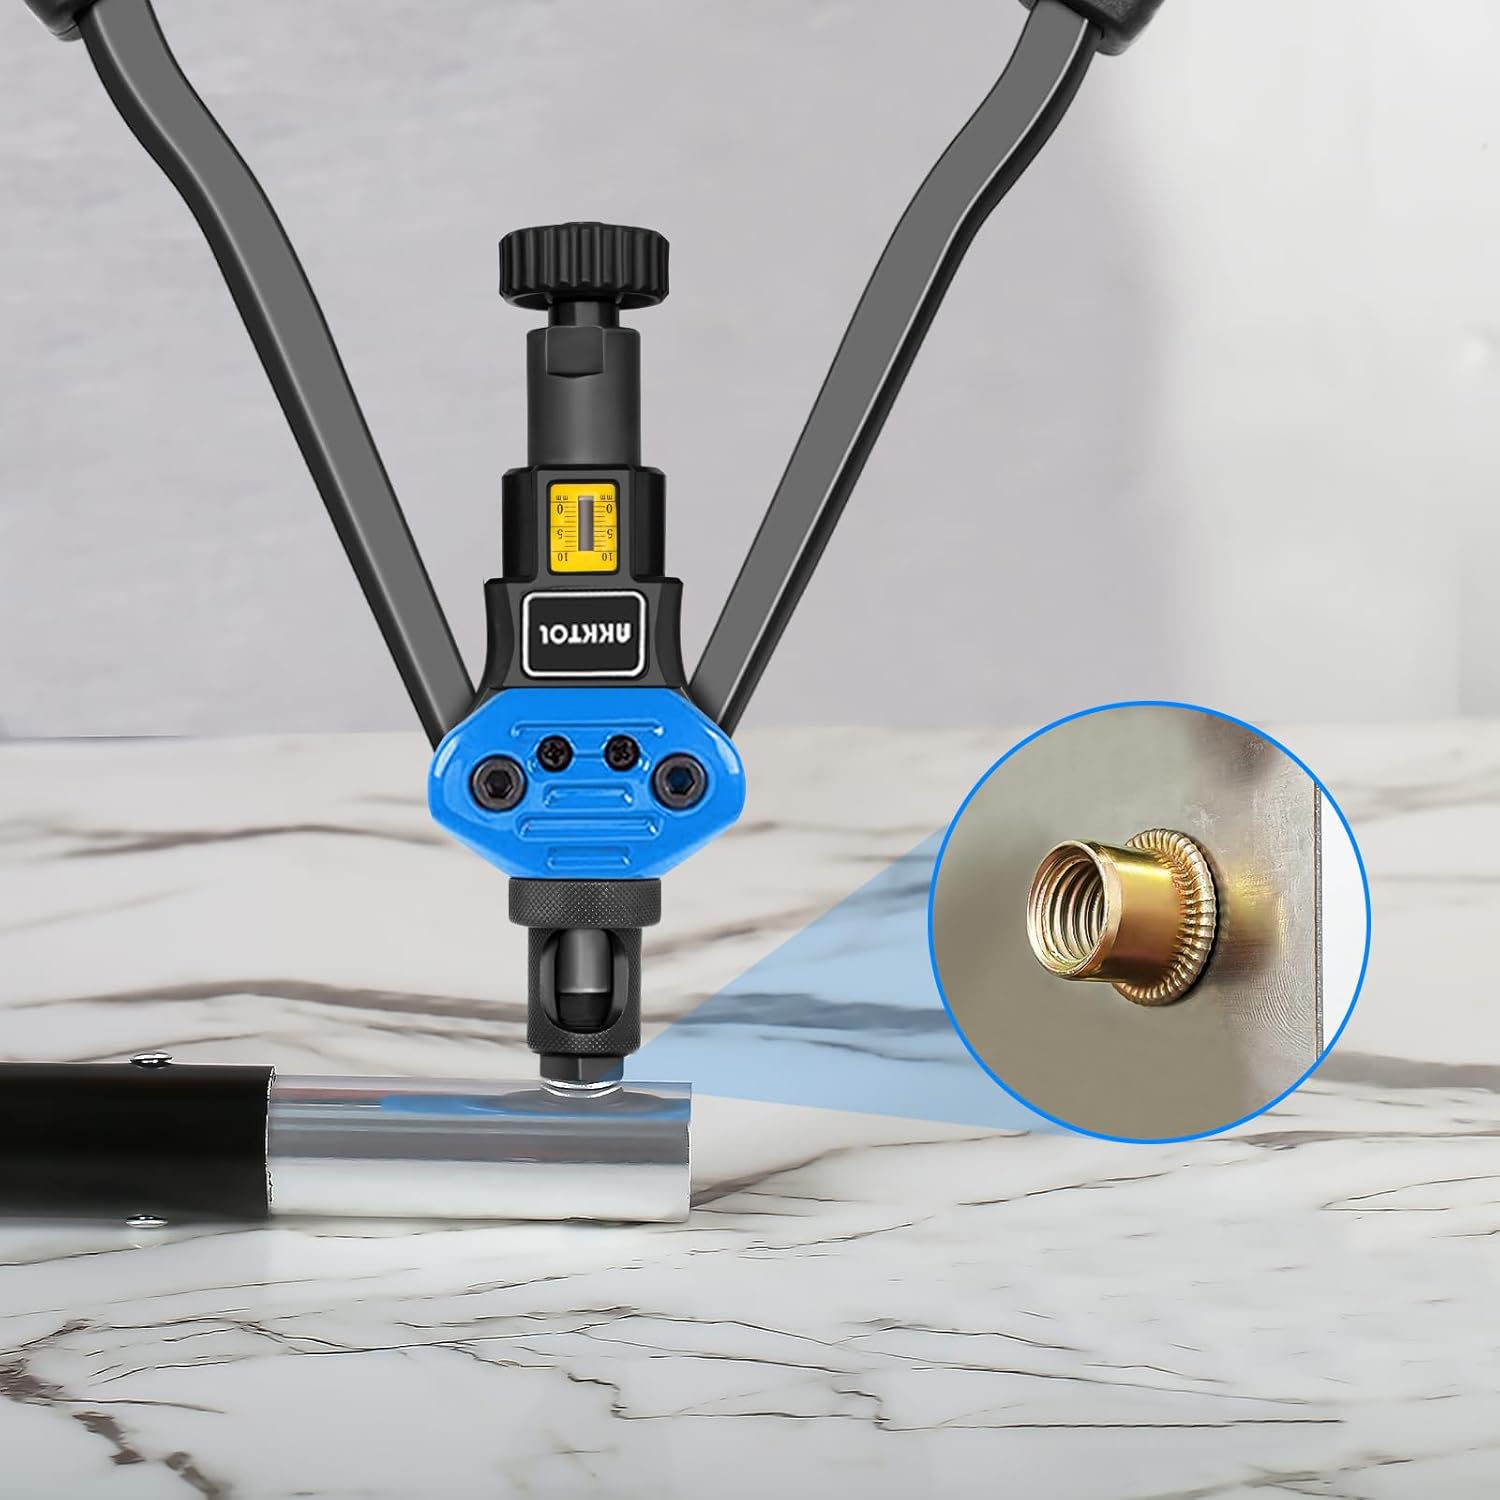
Image 5.4: Examples of wide applications for rivet nuts, demonstrating their versatility in different industries and projects.
6. Maintenance
Proper maintenance ensures the longevity and reliable performance of your AKKTOL tools:
- Cleaning: After each use, wipe down the tools with a clean, dry cloth to remove any dust, debris, or residue.
- Lubrication: Periodically apply a light machine oil to the moving parts and pivot points of both tools to ensure smooth operation.
- Inspection: Regularly inspect mandrels, nosepieces, and molly bolts for wear or damage. Replace worn components as necessary.
- Storage: Store both tools and their respective fasteners in their original cases in a dry, cool place to prevent rust and damage. Keep fasteners organized to easily identify sizes.

Image 6.1: Example of organized storage for the AKKTOL Rivet Nut Tool Kit, highlighting the importance of keeping components tidy.
7. Troubleshooting
If you encounter issues during operation, refer to the following common troubleshooting tips:
7.1. Rivet Nut Tool BT607
- Rivet nut not setting properly:
- Ensure the correct mandrel and nosepiece size are used for the rivet nut.
- Verify the rivet nut is fully threaded onto the mandrel before insertion.
- Apply sufficient and steady pressure to the handles.
- Check if the material thickness is within the rivet nut's grip range.
- Mandrel stuck in rivet nut:
- Ensure the knob is fully loosened to release the mandrel after setting.
- Lubricate the mandrel threads if they appear dry or sticky.
7.2. Hollow Wall Anchor Tool BT910
- Molly bolt not expanding:
- Ensure the molly bolt is fully inserted into the wall and flush with the surface.
- Verify the screw is backed out approximately 1/4 inch before using the setting tool.
- Apply firm and consistent pressure to the tool handles.
- Check if the wall thickness is within the molly bolt's specified range (0.12"-1.52").
- Molly bolt spins in hole:
- The drilled hole may be too large. Use the correct drill bit size for the molly bolt.
- Ensure the molly bolt's anti-rotation fins are engaged with the wall material.
8. Specifications
| Feature | Specification |
|---|---|
| Brand | AKKTOL |
| Material | Stainless Steel, Steel |
| Rivet Nut Tool Model | BT607 |
| Rivet Nut Tool Handle Length | 16 inches |
| Rivet Nut Compatibility | SAE: 6#-32, 8#-32, 10#-32, 10#-24, 1/4"-20, 5/16"-18, 3/8"-16, 1/2"-13 Metric: M3, M4, M5, M6, M8, M10, M12 |
| Rivet Nut Material Compatibility | Aluminum, Steel, Stainless Steel |
| Hollow Wall Anchor Tool Model | BT910 |
| Molly Bolt Compatibility | M3, M4, M5, M6, M8 (specific sizes: M4x32mm, M4x46mm, M4x60mm, M5x37mm, M5x52mm, M5x65mm, M6x52mm) |
| Molly Bolt Wall Thickness Range | 0.12" - 1.52" |
| Molly Bolt Holding Power | Up to 65 lbs (depending on wall material and anchor size) |
9. Warranty and Support
AKKTOL products are manufactured to high-quality standards. For warranty information, technical support, or assistance with your product, please refer to the contact information provided with your purchase or visit the official AKKTOL website. Please retain your proof of purchase for any warranty claims.