1. Introduction
This manual provides essential instructions for the safe and efficient use of your Tyocle Portable Level 2 EV Charger, Model CDZ-40A. Please read this manual thoroughly before operating the device and retain it for future reference.
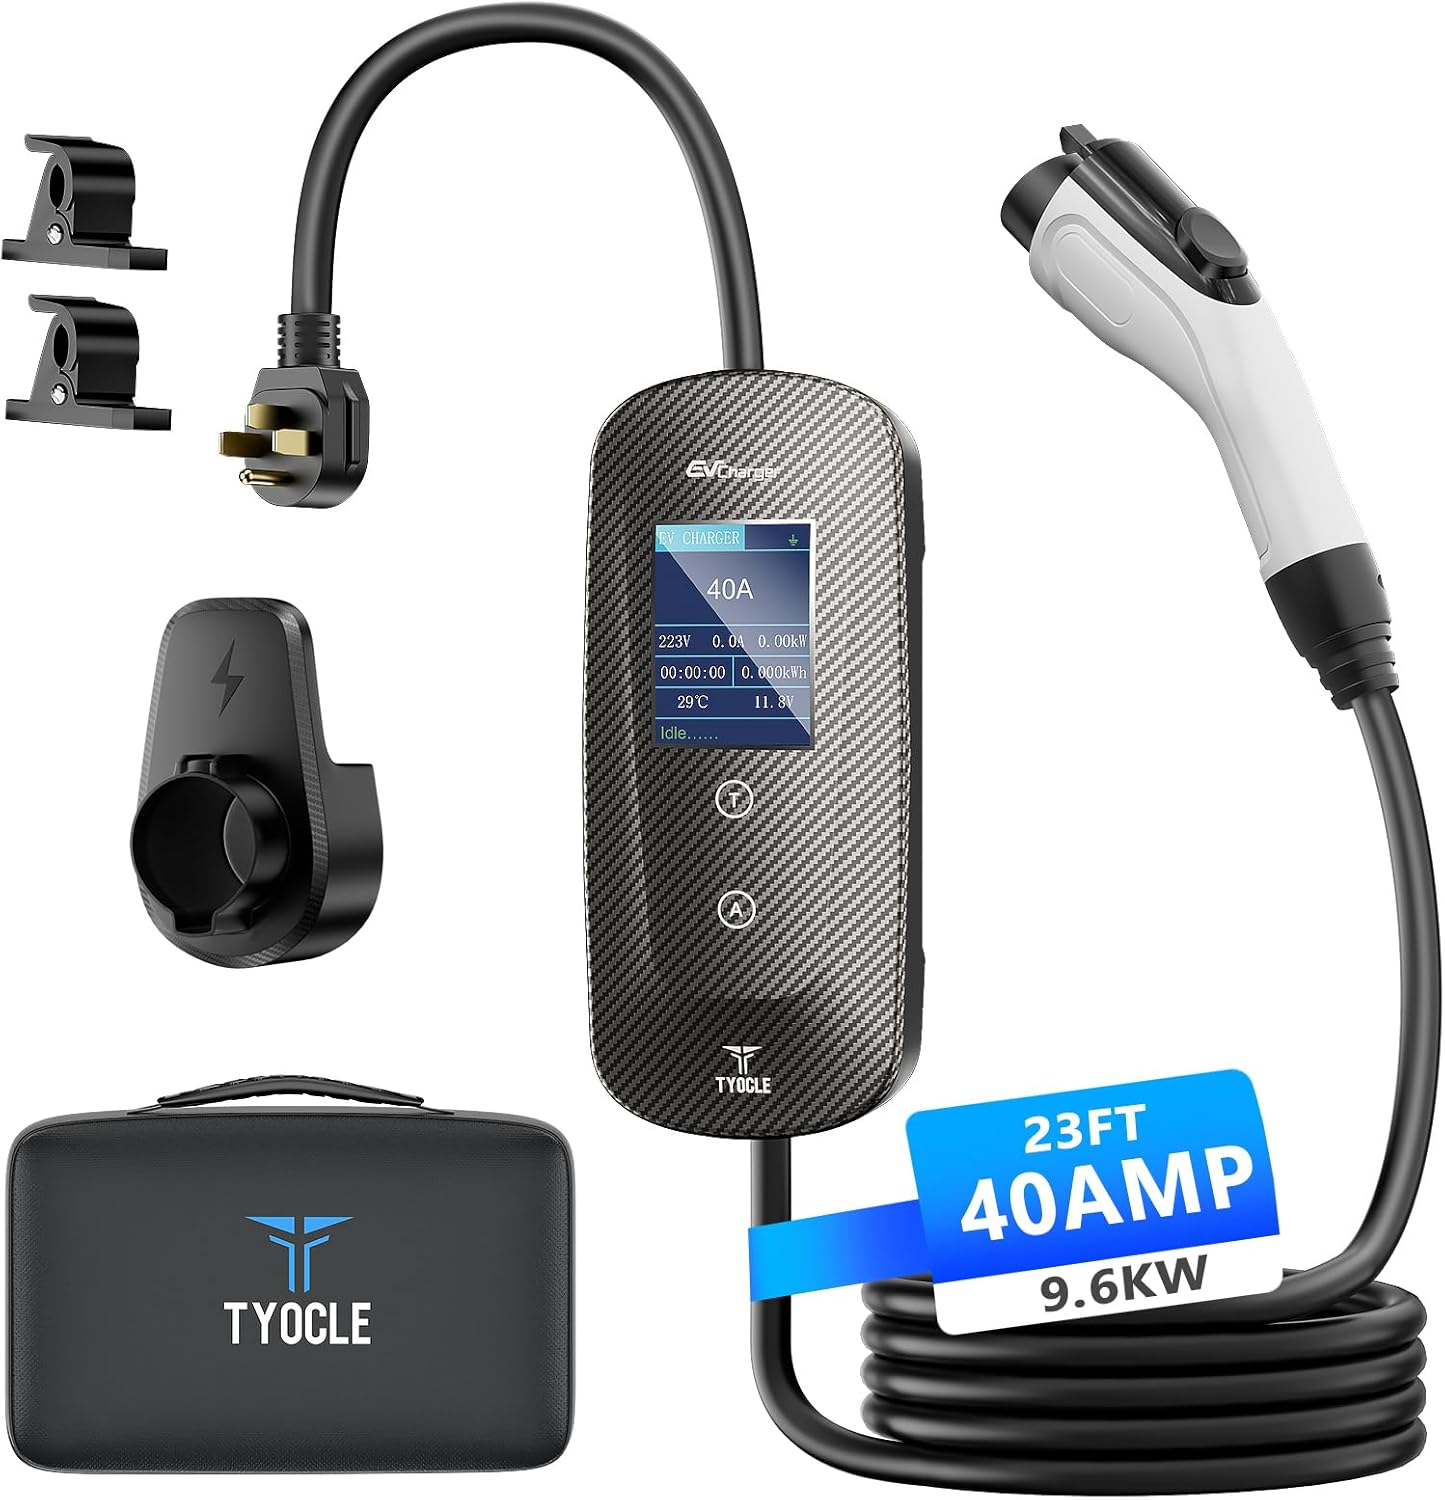
Image 1.1: Tyocle Portable Level 2 EV Charger and included accessories.
2. Safety Information
Always adhere to the following safety guidelines to prevent injury or damage to the charger or your vehicle.
- Ensure the charging cable and connector are free from damage before each use. Do not use if damaged.
- Connect the charger only to a properly grounded NEMA 14-50P outlet.
- Do not attempt to open, disassemble, or modify the charger.
- Keep children and pets away from the charging area during operation.
- Avoid submerging the charger or its components in water. The unit is IP65 rated for water resistance, but not submersion.
- In case of smoke, unusual odors, or abnormal operation, immediately disconnect the charger from the power source and your vehicle.
2.1 Integrated Safety Protections
The Tyocle CDZ-40A charger incorporates 10 intelligent safety protections:
- Overvoltage Protection
- Undervoltage Protection
- Overheating Protection
- Overcurrent Protection
- Undercurrent Protection
- Leakage Protection
- Short Circuit Protection
- Surge Protection
- Lightning Protection
- Ground Fault Protection

Image 2.1: Overview of the charger's safety features.
3. Product Overview
3.1 Package Contents
Verify that all items are present in the package:
- 1 x Tyocle Portable Level 2 EV Charger (CDZ-40A)
- 1 x Cable Holder
- 1 x Zipper Bag
- 1 x Gun Mount
- 7 x Expansion Tubes
- 7 x Screws
- 1 x User Manual (this document)
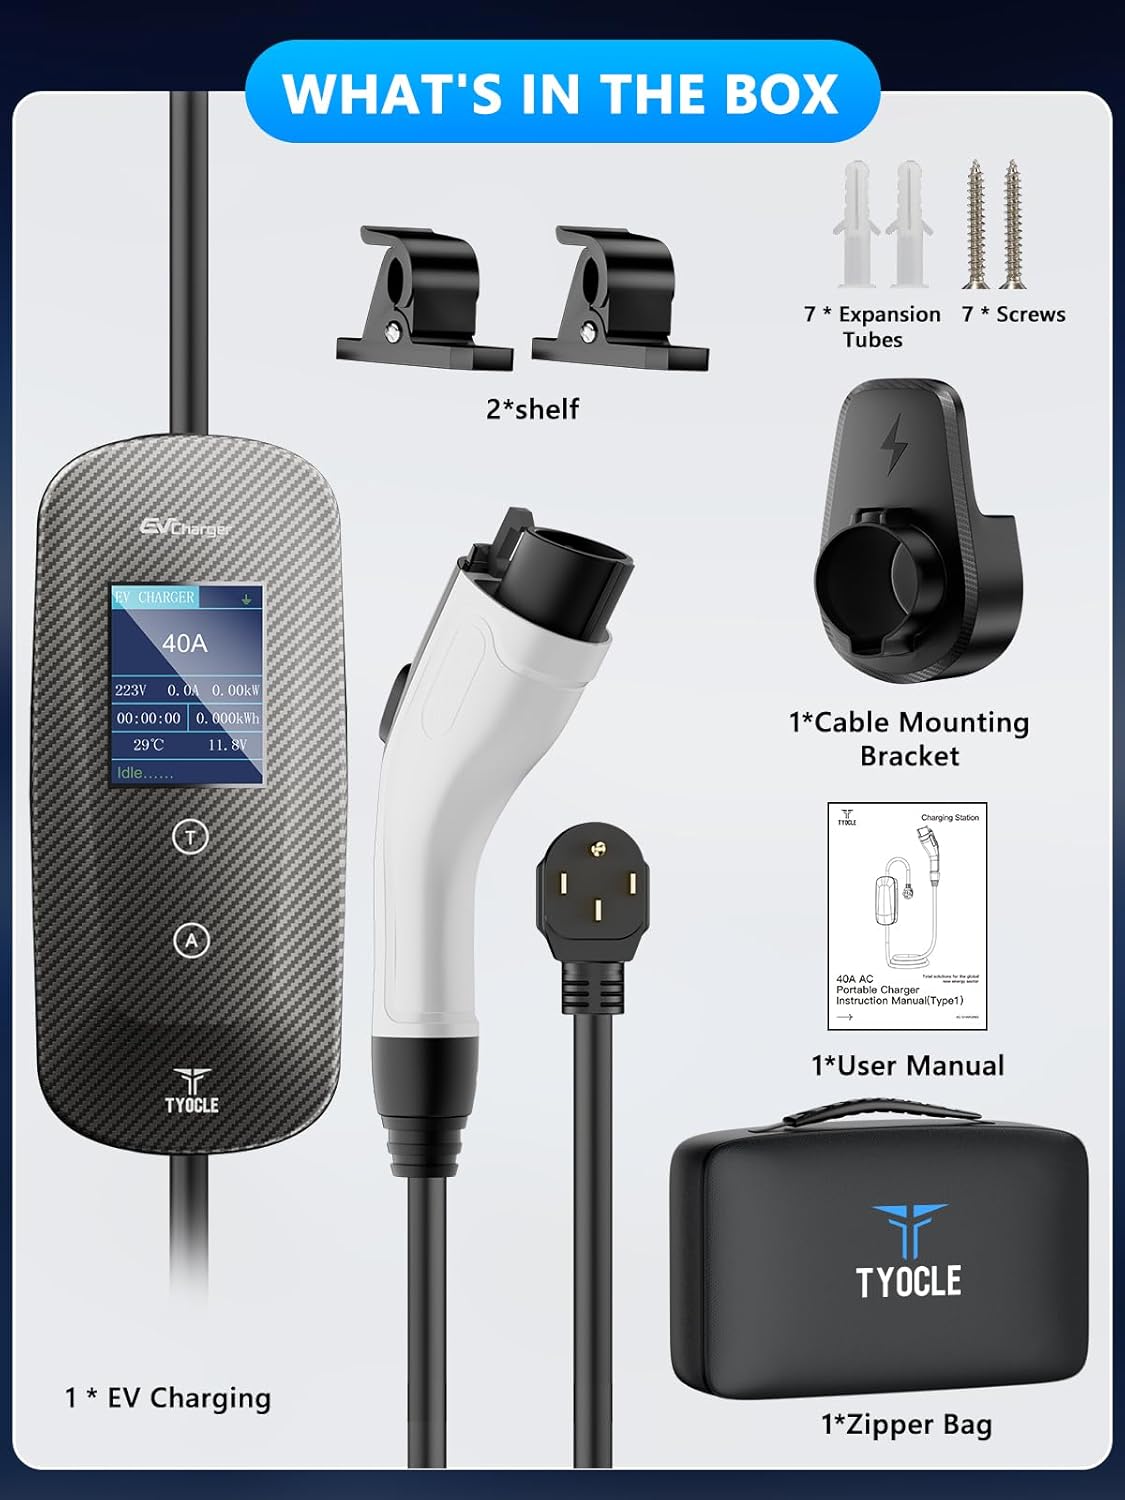
Image 3.1: All components included in the product package.
3.2 Key Features
- Level 2 Charging: Delivers 40Amp/240V, 9.6KW power for faster charging.
- Adjustable Current: 8-stage smart current control (8A/10A/12A/16A/20A/24A/32A/40A).
- Delay Charging: Function to schedule charging during off-peak hours.
- Durable Construction: High-strength PC J1772 adapter, carbon fiber control box, robust TPU cable.
- Extended Cable: 23-foot cable for flexible parking and charging.
- Weather Resistant: IP65 rating for indoor and outdoor use.

Image 3.2: The charger's intelligent current control and timed charging features.
3.3 Compatibility
The Tyocle CDZ-40A charger is compatible with all Electric Vehicles (EVs) that utilize the J1772 charging standard. Note: A J1772 to Tesla adapter is required to charge Tesla vehicles with this EV charger (adapter sold separately).
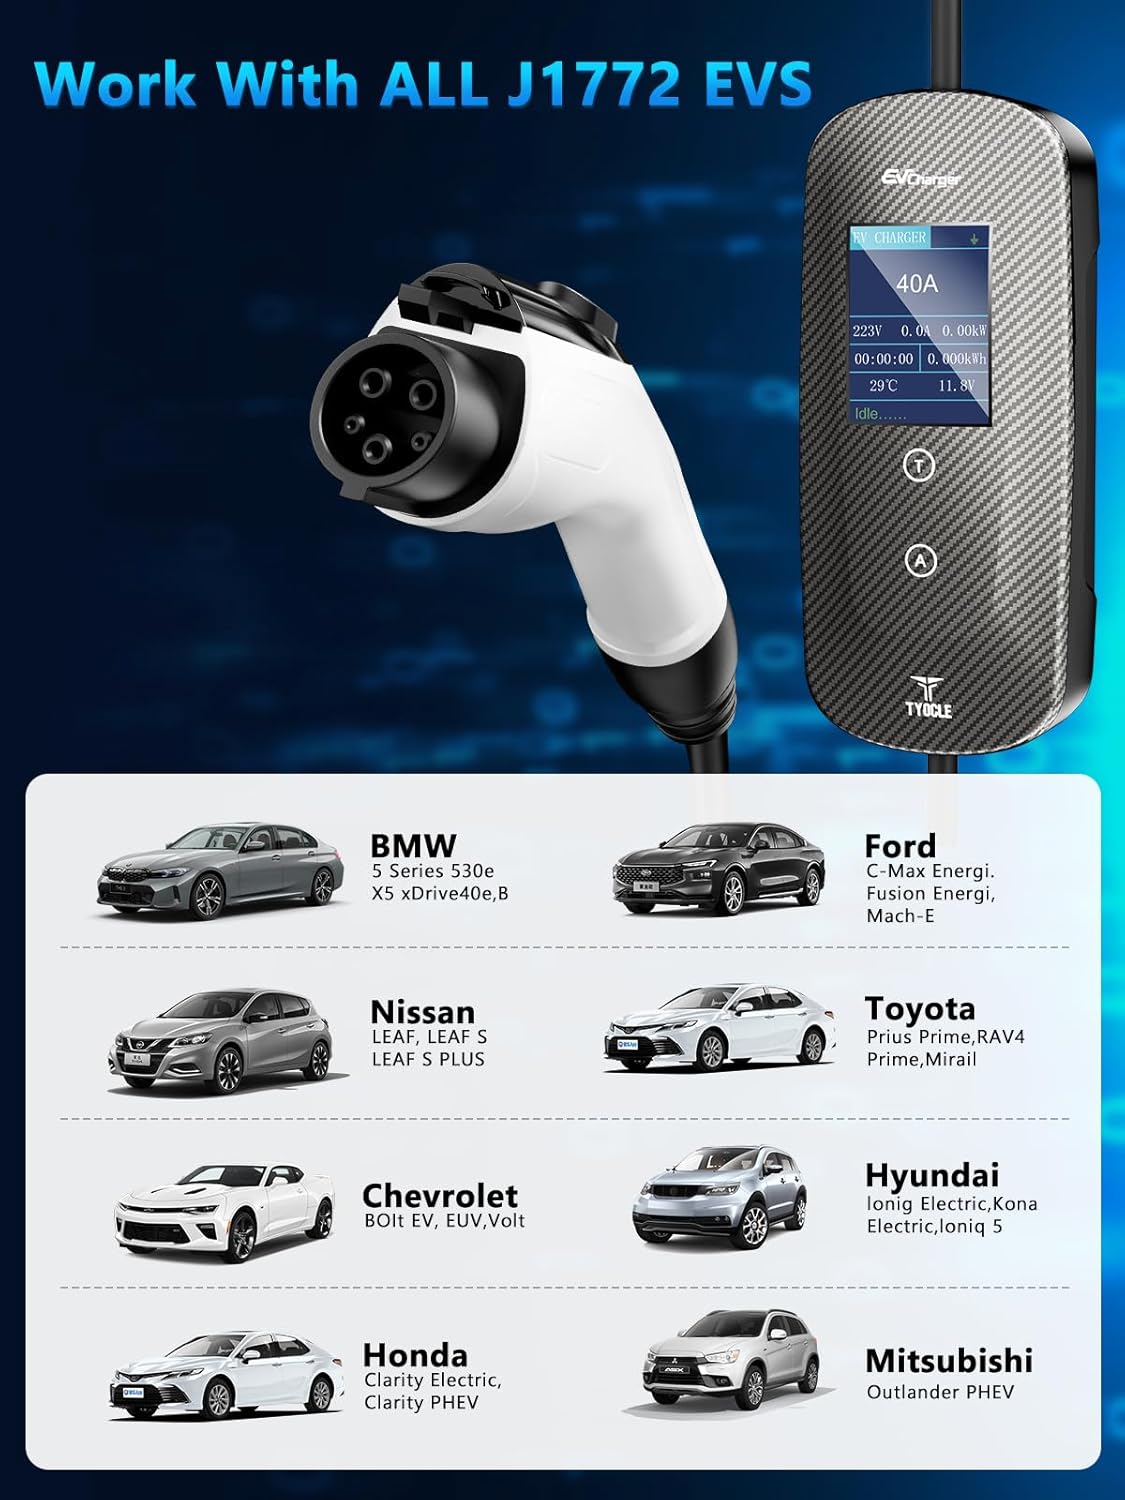
Image 3.3: Examples of J1772 compatible electric vehicles.
4. Setup and Installation
Follow these steps to set up your Tyocle EV charger.
- Mounting the Cable Holder and Gun Mount: Use the provided screws and expansion tubes to securely mount the cable holder and gun mount on a wall near your NEMA 14-50P outlet. Ensure the mounting location is sturdy and can support the weight of the cable and connector.
- Connecting to Power: Insert the NEMA 14-50P plug of the EV charger into a dedicated 240V NEMA 14-50R wall outlet. Ensure the connection is firm.
- Initial Check: Once plugged in, the charger's display will illuminate, indicating it is powered on and ready for use.

Image 4.1: Basic steps for connecting the charger.
5. Operating Instructions
5.1 Charging Your EV
- Connect to Vehicle: Open your EV's charging port and firmly insert the J1772 connector from the Tyocle charger. Ensure it clicks into place.
- Select Charging Current: The charger's display will show the current settings. Use the 'A' button on the control box to cycle through the available amperage options (8A, 10A, 12A, 16A, 20A, 24A, 32A, 40A). Select the desired current based on your vehicle's requirements and your electrical system's capacity.
- Initiate Charging: Once the current is selected, charging will typically begin automatically. The display will show charging status, including voltage, current, power, and charging time.
- Disconnect: To stop charging, first disconnect the J1772 connector from your vehicle. The charger will then enter an idle state.
5.2 Delay Charging Function
The charger features a delay start function to optimize charging during off-peak electricity hours:
- After connecting the charger to your vehicle and selecting the current, press the 'T' button on the control box.
- Each press of the 'T' button will increase the delay time (e.g., 1H, 2H, 3H, 4H, 5H).
- The charger will begin charging automatically after the set delay period has elapsed.
5.3 LED Indicator Status
The charger's display and LED lights provide visual feedback on its status:

Image 5.1: LED indicator status guide.
| Color | Description |
|---|---|
| Green | EV Connected / Solidifying by (Ready to charge or waiting for delay) |
| Blue | Charging / Fully Charged |
| Red | General Fault / Error |
6. Maintenance
Proper maintenance ensures the longevity and optimal performance of your EV charger.
- Cleaning: Regularly wipe the charger's control box and cable with a soft, dry cloth. For stubborn dirt, use a slightly damp cloth and mild detergent, then dry thoroughly. Do not use abrasive cleaners or solvents.
- Cable Inspection: Periodically inspect the charging cable for any signs of wear, cuts, or damage. Ensure the J1772 connector is clean and free of debris.
- Storage: When not in use, store the charging cable neatly on the provided cable holder and the J1772 connector in the gun mount to protect it from dust and damage. Store the charger in a cool, dry place.

Image 6.1: Features highlighting the durability and resilience of the charging cable.
7. Troubleshooting
If you encounter issues with your Tyocle EV charger, refer to the following table for common problems and solutions.
| Problem | Possible Cause | Solution |
|---|---|---|
| Charger not powering on | No power from outlet; loose connection | Ensure the NEMA 14-50P plug is fully inserted. Check the circuit breaker for the outlet. |
| Charging not starting | J1772 connector not fully inserted; delay timer active; vehicle fault | Ensure the J1772 connector is securely latched. Check if a delay time is set. Consult your vehicle's manual for charging issues. |
| Red LED indicator / Error message | Safety protection triggered (e.g., overcurrent, ground fault) | Disconnect the charger from both the vehicle and the power outlet. Wait 5 minutes, then reconnect. If the error persists, contact customer support. |
| Slow charging speed | Lower amperage selected; vehicle limitation | Adjust the charging current to a higher setting using the 'A' button. Verify your vehicle's maximum charging rate. |
If the problem persists after attempting these solutions, please contact Tyocle customer support.
8. Specifications
| Feature | Specification |
|---|---|
| Model Number | CDZ-40A |
| Input Voltage | 240 Volts (AC) |
| Amperage | 40 Amps (Adjustable: 8A/10A/12A/16A/20A/24A/32A/40A) |
| Wattage | 9600 watts (9.6 KW) |
| Connector Type | J1772 |
| Cable Length | 23 feet |
| Product Dimensions | 2.05 x 3.9 x 8.78 inches (Control Box) |
| Item Weight | 7.72 pounds |
| IP Rating | IP65 (Water Resistance) |
9. Warranty and Support
Tyocle is committed to providing reliable and eco-friendly charging solutions. Your Tyocle Portable Level 2 EV Charger comes with comprehensive support.
- Warranty: 2-Year Product Support.
- After-sales Service: 7x24 Hour After-sales Service.
- Exchange Policy: 30-Day Exchange Service.
- Care Plan: 24-Months Care Plan.
For technical assistance, warranty claims, or any inquiries, please contact Tyocle customer support through the retailer's platform or the official Tyocle website.

Image 9.1: Tyocle customer support information.


