1. Safety Information
Please read and understand all instructions before assembly and use of this product. Failure to follow these instructions may result in injury or damage to the product.
- Keep all small parts and packaging materials away from children and pets.
- Ensure all connections are secure before use. Periodically check and re-tighten fasteners as needed.
- Do not exceed the maximum weight recommendation of 50 pounds (22.68 kg).
- Place the table on a flat, stable surface. Use the adjustable feet to ensure stability on uneven floors.
- Avoid placing hot items directly on the surface without protective coasters.
- This product is designed for indoor residential use only.
2. Parts List
Before beginning assembly, verify that all components are present and undamaged. If any parts are missing or damaged, please contact customer support.

Image 2.1: Exploded view of table components. This image shows the four main wooden panels that make up the C-shaped end table, labeled 1 through 4, indicating how they fit together during assembly.
The package includes:
- Top Panel (1)
- Curved Side Panel (2)
- Straight Side Panel (3)
- Base Panel (4)
- Assembly Hardware (screws, dowels, adjustable feet)
- Hex Key / Screwdriver (if applicable)
3. Assembly Instructions
Assembly typically requires one person and a screwdriver (included). Follow these steps carefully:
- Step 1: Attach the Curved Side Panel to the Base Panel.
Align the Curved Side Panel (2) with the pre-drilled holes on the Base Panel (4). Secure using the provided screws. Ensure the curved edge faces inward as shown in the diagram.
- Step 2: Attach the Straight Side Panel.
Connect the Straight Side Panel (3) to the other end of the Base Panel (4), aligning the holes and securing with screws. This forms the lower 'C' shape.
- Step 3: Attach the Top Panel.
Place the Top Panel (1) onto the assembled side panels. Align the pre-drilled holes on the Top Panel with the top edges of the Curved Side Panel (2) and Straight Side Panel (3). Secure all connections with screws.
- Step 4: Install Adjustable Feet.
Screw the adjustable feet into the designated holes on the underside of the Base Panel (4). Adjust them as needed to level the table on your floor.

Image 3.1: Adjustable feet installation. This image illustrates how the adjustable feet are screwed into the base of the table, allowing for leveling on uneven surfaces.
For visual guidance, refer to the included assembly guide.
4. Usage Guidelines
The Tribesigns C-Shaped End Table is designed for versatile use in various settings.
- Couch Side Table: Slide the base under your sofa or armchair to bring the tabletop closer for easy access to drinks, snacks, or remote controls.
- Laptop Workstation: Position the table over your lap while seated on a sofa for a comfortable work-from-home setup.
- Bedside Table: Use it next to your bed for books, a lamp, or personal items.
- Small Space Solution: Its compact design is ideal for maximizing functionality in limited living areas.

Image 4.1: C-shaped end tables in a living room setting. This image shows two rustic brown C-shaped end tables, one on each side of a light-colored sofa, demonstrating their use as convenient surfaces for drinks and electronics.

Image 4.2: Table used as a laptop workstation. A rustic brown C-shaped end table is shown with a laptop and a coffee cup on its surface, positioned over a sofa, highlighting its functionality for work or leisure.
5. Care and Maintenance
Proper care will ensure the longevity and appearance of your Tribesigns C-Shaped End Table.
- Cleaning: Wipe the surface with a damp cloth. Avoid harsh chemicals or abrasive cleaners, which can damage the finish.
- Spills: Clean spills immediately to prevent staining.
- Heat Protection: Use coasters or placemats under hot dishes or beverages to protect the tabletop from heat damage.
- Sunlight Exposure: Avoid prolonged direct sunlight exposure to prevent fading or discoloration of the wood finish.
- Stability Check: Periodically check all screws and connections to ensure they remain tight. Re-tighten if necessary.
6. Troubleshooting
| Problem | Possible Cause | Solution |
|---|---|---|
| Table wobbles or is unstable. | Uneven floor surface; loose connections. | Adjust the leveling feet on the base of the table. Ensure all assembly screws are tightened securely. |
| Parts do not fit together during assembly. | Incorrect orientation of parts; manufacturing defect. | Review the assembly instructions and diagrams carefully to ensure correct part orientation. If parts still do not fit, contact customer support. |
| Surface appears dull or stained. | Accumulated dust/grime; liquid stains. | Clean with a damp cloth. For stubborn stains, use a mild wood cleaner designed for engineered wood. Always wipe dry immediately. |
7. Product Specifications
- Brand: Tribesigns
- Model Name: C-Shaped End Table
- Model Number: RY0138
- Product Dimensions (D x W x H): 11.81" x 23.62" x 25.59" (30 cm x 60 cm x 65 cm)
- Item Weight: 14 Pounds (6.35 kg)
- Maximum Weight Recommendation: 50 Pounds (22.68 kg)
- Color: Rustic Brown
- Material Type: Engineered Wood (Medium-Density Fiberboard)
- Frame Joint Type: Dowel Joint
- Included Components: Assembly Guide, Hardware, Tools
- Indoor/Outdoor Usage: Indoor Only
- Product Care Instructions: Wipe with Damp Cloth
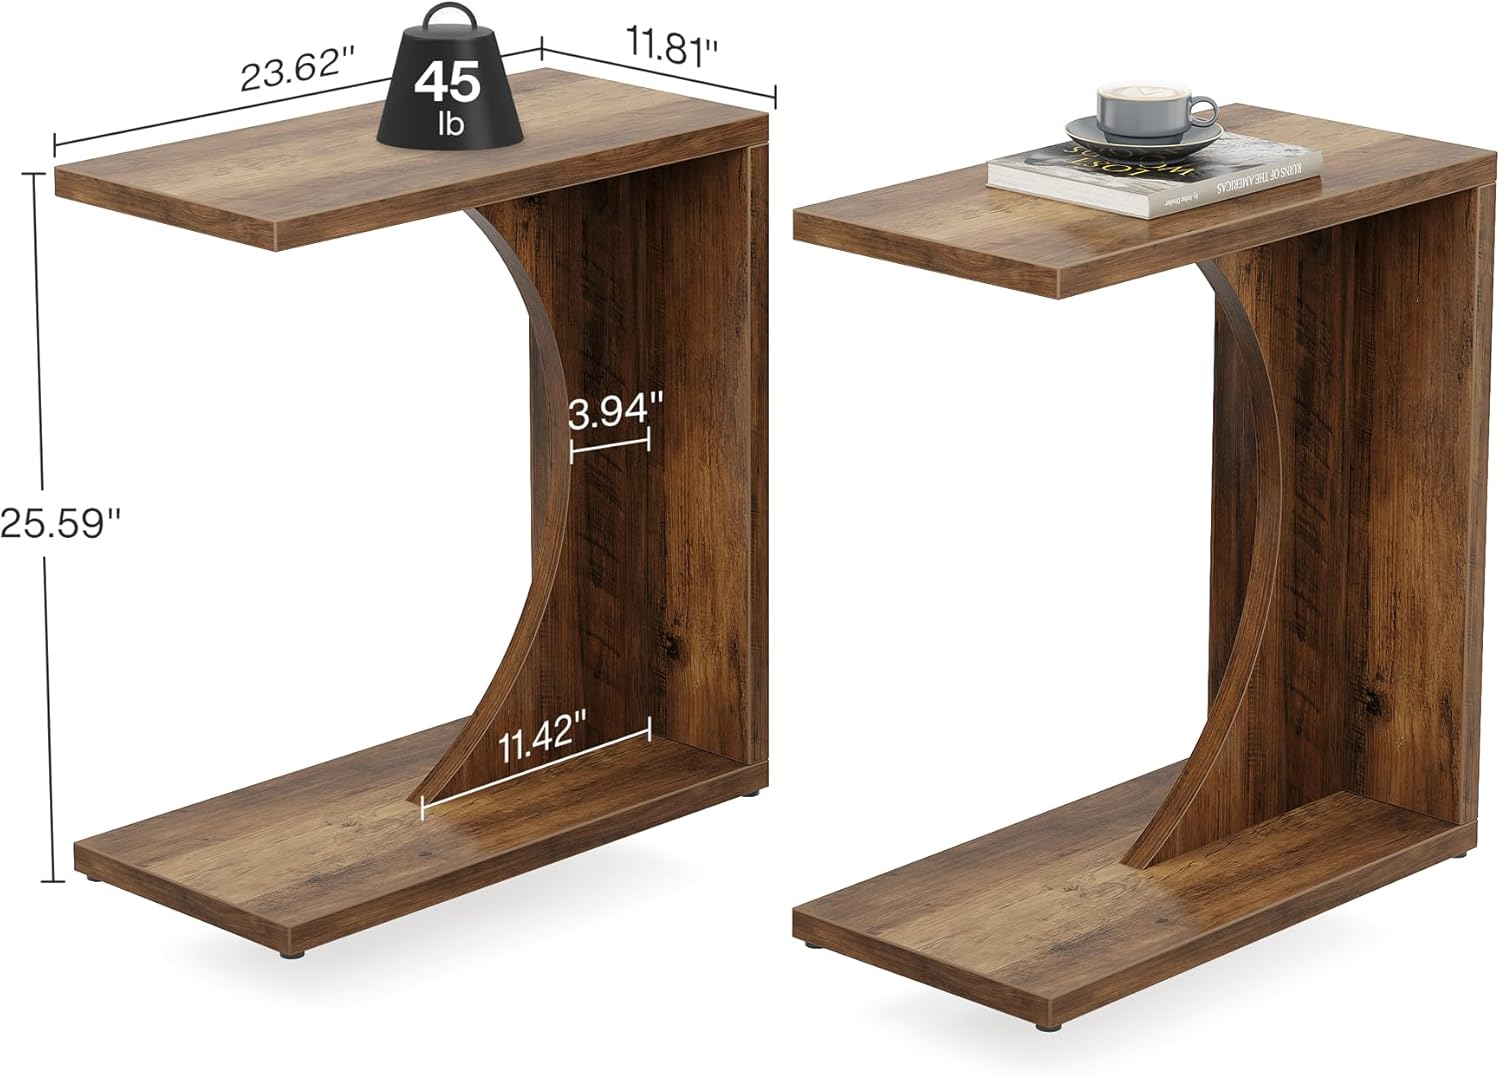
Image 7.1: Product dimensions. This diagram illustrates the width (23.62 inches), depth (11.81 inches), and height (25.59 inches) of the C-shaped end table, along with its weight capacity.
8. Warranty and Customer Support
Tribesigns products come with a limited warranty. For specific details regarding your product's warranty coverage, please refer to the documentation included with your purchase or visit the official Tribesigns website.
If you encounter any issues during assembly or use, or if you have questions about your product, please contact Tribesigns customer service:
- Online Support: Visit the Tribesigns Store on Amazon for FAQs and contact options.
- Email: Refer to your purchase invoice for direct email support.
- Phone: Refer to your purchase invoice for direct phone support.
Please have your model number (RY0138) and proof of purchase ready when contacting support.


