Introduction
This manual provides detailed instructions for the installation, operation, and maintenance of your Bathlink 60x36 inch shower base with a right drain. Please read all instructions carefully before beginning installation to ensure proper function and longevity of your product. Retain this manual for future reference.
Safety Information
- Always wear appropriate personal protective equipment (PPE) during installation, including safety glasses and gloves.
- Ensure the installation area is clean, dry, and well-lit.
- Verify all local plumbing and building codes are met during installation.
- Do not use harsh chemicals or abrasive cleaners on the shower base, as this may damage the surface.
- Seek professional assistance if you are unsure about any step of the installation process.
Package Contents
Please verify that all components are present and undamaged before proceeding with installation.
- Bathlink 60x36 Inch Shower Base (with Right Drain)
- Stainless Steel Chrome Trench Cover
- Standard ABS Shower Drain (included)
Setup and Installation
The Bathlink shower base is engineered for surface wall mounting and features a monolithic solid surface body for leak prevention.
1. Site Preparation
- Ensure the subfloor is level, clean, and structurally sound to support the shower base and user weight.
- Confirm the plumbing for the right drain is correctly positioned according to the shower base dimensions. The drain zone is optimized for a 4-inch diameter connection.
- Review the product dimensions to ensure proper fit within your shower enclosure.
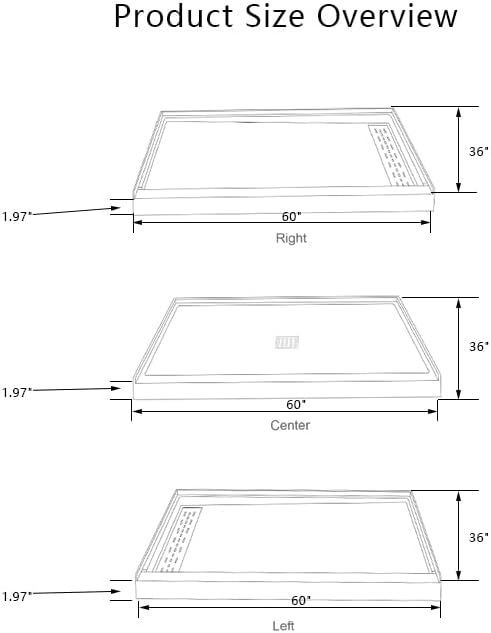
Figure 1: Product Size Overview. This diagram illustrates the dimensions of the 60x36 inch shower base, including the 1.97-inch threshold height and drain placement for right, center, and left drain configurations. Ensure your chosen model matches your plumbing setup.
2. Base Placement
- Carefully position the shower base onto the prepared subfloor, aligning the drain opening with your plumbing.
- The base features a pre-sloped design (1/4" per foot) towards the drain for optimal water flow.
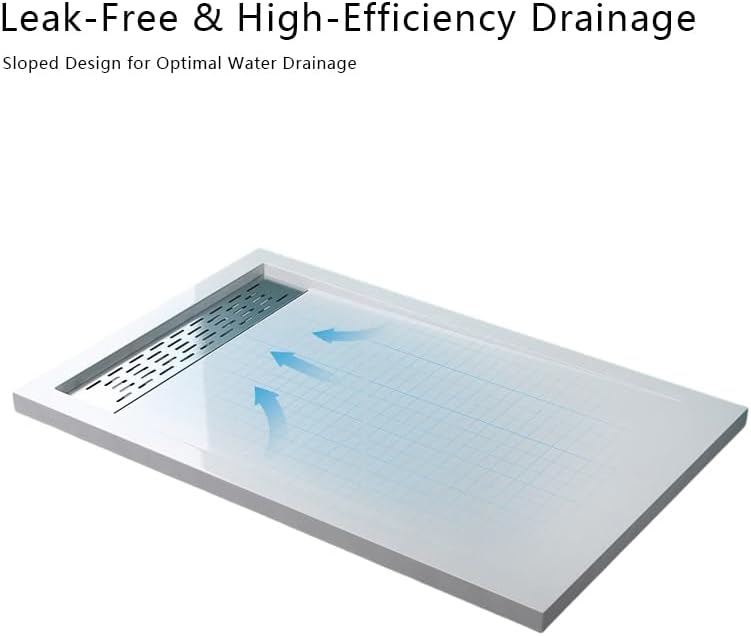
Figure 2: Leak-Free and High-Efficiency Drainage. This image highlights the sloped design of the shower base, ensuring efficient water drainage towards the right-side drain opening.
3. Drain Connection
- Connect the included standard ABS shower drain to your plumbing system according to manufacturer instructions and local codes.
- Ensure all connections are watertight to prevent leaks.
- Install the stainless steel chrome trench cover over the drain opening.
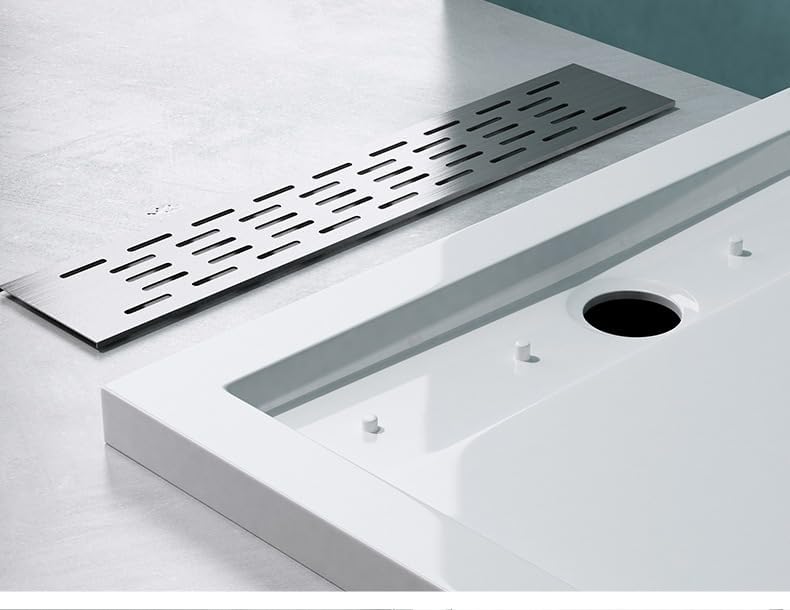
Figure 3: Shower Base Drain Detail. This close-up shows the removable stainless steel trench cover and the drain opening, facilitating easy access for cleaning and maintenance.
4. Sealing and Finishing
- Apply a waterproof sealant around the perimeter of the shower base where it meets the walls and floor, as required by local building codes.
- The low-profile 3-inch curb allows for integration with walk-in shower designs while effectively containing water.
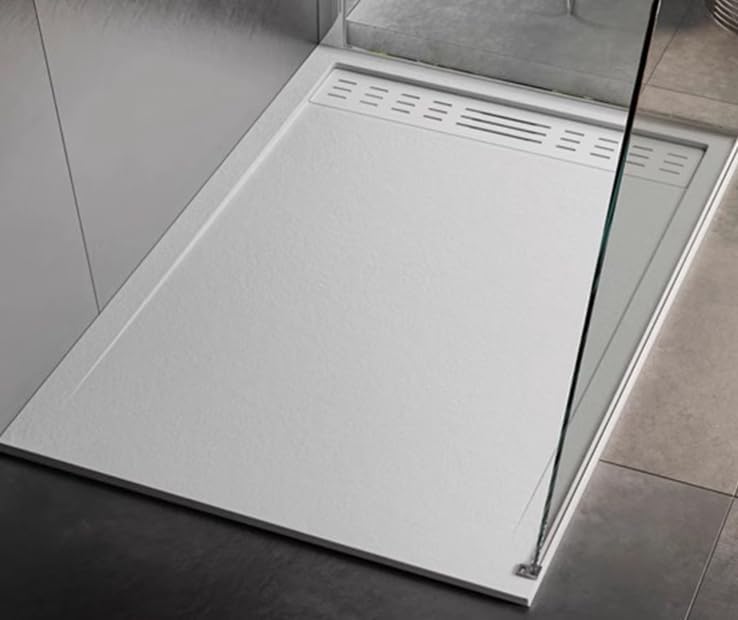
Figure 4: Installed Shower Base. This image demonstrates the appearance of the shower base once installed, showcasing its seamless integration into a modern bathroom setting.
Operation
The Bathlink shower base is designed for daily use in residential and commercial settings. Its slip-resistant textured surface provides enhanced safety during showering.

Figure 5: Key Features. This diagram highlights features such as the slip-resistant textured surface, smooth threshold design, and premium stainless steel drain assembly.
Maintenance
Proper maintenance will ensure the longevity and appearance of your Bathlink shower base.
- Regular Cleaning: The non-porous surface resists soap scum and hard water stains. Clean regularly with mild household disinfectants and a soft cloth or sponge.
- Avoid Abrasives: Do not use abrasive cleaners, scouring pads, or harsh chemicals (e.g., acetone, paint thinner) as these can damage the slip-resistant textured finish.
- Drain Maintenance: Periodically remove the stainless steel trench cover and clean any debris from the drain to ensure optimal water flow and prevent clogs.
- Material Benefits: The SMC (Sheet Molding Compound) material offers durability and low maintenance compared to other materials.

Figure 6: Material Comparison. This image illustrates the benefits of SMC material used in the Bathlink shower base, highlighting its durability and low maintenance properties.
Troubleshooting
| Problem | Possible Cause | Solution |
|---|---|---|
| Slow Drainage | Clogged drain or P-trap. | Remove drain cover and clear any hair or debris. Use a drain snake if necessary. |
| Water Pooling | Drain obstruction or improper installation (unlikely due to pre-slope). | Check for drain obstruction. If problem persists, consult a professional plumber. |
| Surface Stains | Hard water deposits or soap scum buildup. | Clean with a mild household disinfectant and a soft cloth. Avoid abrasive cleaners. |
Specifications
| Feature | Detail |
|---|---|
| Brand | Bathlink |
| Model Number | SBB-C- 6032 6036L |
| Dimensions | 60" x 36" x 4" (Product: 32 x 60 x 4 inches) |
| Drain Location | Right Drain |
| Material | SMC (Sheet Molding Compound) |
| Color | White |
| Finish Type | Slip-Resistant Textured Surface |
| Threshold Height | 3 inches (low-profile) |
| Drain Cover | Stainless Steel Chrome Trench Cover |
| Item Weight | 39.9 pounds |
| UPC | 763055305703 |
Warranty Information
Bathlink products are manufactured to high-quality standards. For specific warranty details, please refer to the warranty card included with your purchase or visit the official Bathlink website. Keep your proof of purchase for any warranty claims.
Customer Support
If you have any questions regarding the installation, operation, or maintenance of your Bathlink shower base, please contact our customer support team. Refer to the contact information provided with your product or on the Bathlink official website for assistance.