x2+
X2+ Game Stick User Manual
Model: x2+ | Brand: Generic
Introduction
Welcome to the user manual for your X2+ Game Stick. This compact and powerful device is designed to bring you back to the classic era of gaming, offering an extensive library of over 30,000 games from your favorite retro consoles. It features a sleek, portable design, 2.4G wireless controllers, 64GB storage, and HD output for an immersive gaming experience. This manual provides essential information for setting up, operating, maintaining, and troubleshooting your game stick.

Image: The X2+ Game Stick, showing the HDMI stick, two wireless gamepads, and the product packaging.
What's in the Box
Please ensure all the following items are present in your package:
- 8k Game Stick (Main Console)
- 64GB Memory Card (Pre-installed or separate)
- Two Wireless Controllers
- HDMI Extension Cable
- USB Power Cable
- User Manual (This document)
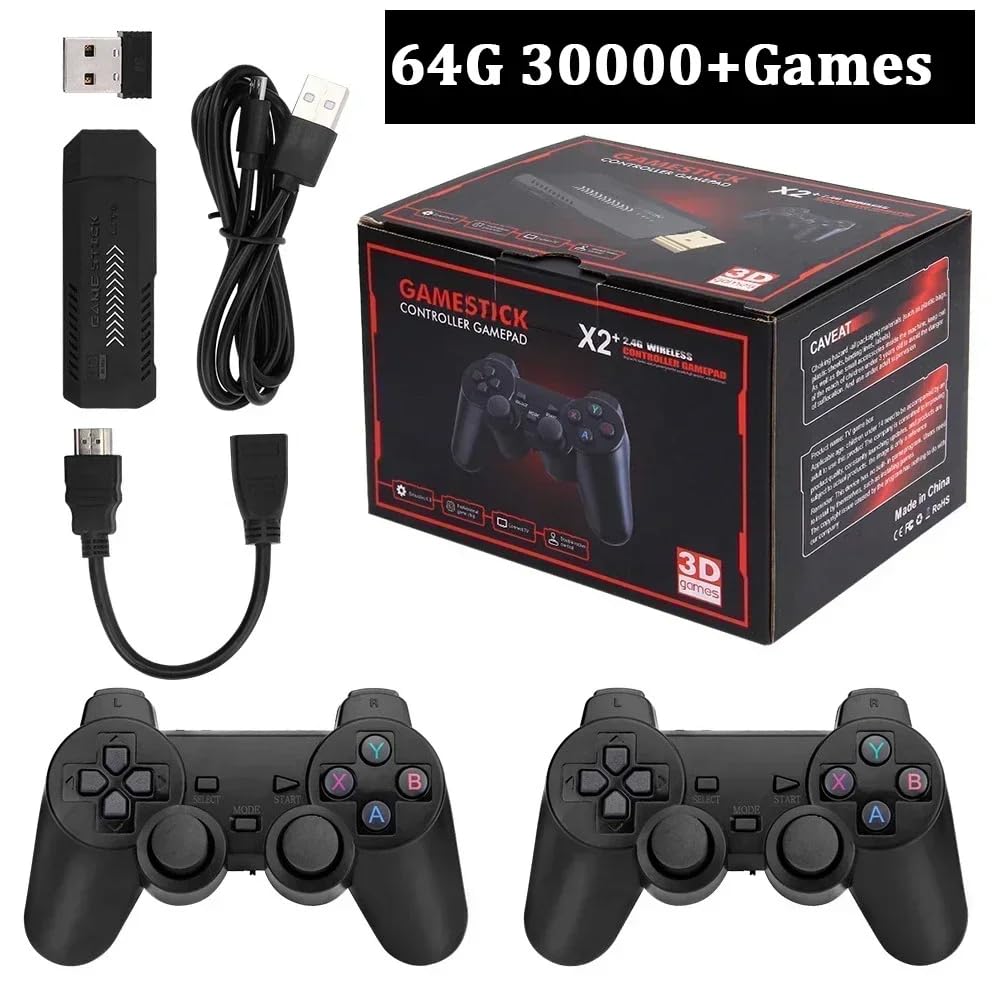
Image: A visual representation of all components included in the X2+ Game Stick package.
Setup Guide
- Connect the Game Stick to TV:
Locate an available HDMI port on your television or monitor. Insert the X2+ Game Stick directly into the HDMI port. If space is limited, use the provided HDMI Extension Cable.

Image: Illustration of the game stick plugged into a TV's HDMI port, demonstrating HD output.
- Connect Power:
Connect the USB Power Cable to the micro-USB port on the Game Stick. Plug the other end of the USB cable into a USB power adapter (not included) or a USB port on your TV that provides sufficient power (5V/1A recommended).
- Insert Memory Card:
Ensure the 64GB memory card is properly inserted into the designated slot on the Game Stick. This card contains all the pre-loaded games.
- Power On TV and Select Input:
Turn on your television and select the correct HDMI input source to which the Game Stick is connected.
- Connect Wireless Controllers:
Insert 2 AAA batteries (not included) into each wireless controller. The controllers should automatically pair with the Game Stick upon power-up. If they do not connect, press the 'MODE' button on the controller to initiate pairing.
Operating Instructions
Navigating the Interface
Once powered on, the Game Stick will display its main menu. Use the directional pad (D-pad) on your wireless controller to navigate through options and game categories. The 'A' button typically confirms selections, and the 'B' button acts as a back or cancel function.
Playing Games
- Browse through the extensive game library using the categories or search function.
- Select a game by pressing the 'A' button. The game will load automatically.
- The X2+ Game Stick supports over 40 emulators, including PSP, PS1, N64, NES, SNES, and more, allowing you to play a wide variety of classic titles.

Image: The X2+ Game Stick highlighting its compatibility with over 40 emulators.
Saving and Exiting Games
Most emulators support in-game saving. Additionally, the Game Stick may offer a quick save/load feature accessible via a combination of controller buttons (refer to on-screen prompts or specific emulator instructions). To exit a game and return to the main menu, typically press the 'SELECT' and 'START' buttons simultaneously for a few seconds.
Maintenance
- Cleaning: Use a soft, dry cloth to clean the Game Stick and controllers. Do not use liquid cleaners or abrasive materials.
- Storage: When not in use, store the Game Stick and controllers in a cool, dry place away from direct sunlight and extreme temperatures.
- Battery Replacement: Replace controller batteries (AAA) when performance degrades. Ensure correct polarity when inserting new batteries. Remove batteries if storing the controllers for extended periods to prevent leakage.
- Software Updates: Periodically check the manufacturer's website or product support page for any available firmware updates to ensure optimal performance and compatibility.
Troubleshooting
| Problem | Possible Cause | Solution |
|---|---|---|
| No display on TV / "No Signal" |
|
|
| Controllers not responding |
|
|
| Games not loading or freezing |
|
|
Specifications

Image: Close-up view of the X2+ Game Stick, highlighting its compact design and ports.
| Feature | Detail |
|---|---|
| Model Number | x2+ |
| Dimensions | 3.94 x 6.14 x 3.94 inches |
| Weight | 1 pound |
| Storage Capacity | 64GB (Memory Card) |
| Connectivity | HDMI Output, 2.4G Wireless (for controllers) |
| Power Input | USB (5V/1A recommended) |
| Pre-loaded Games | Over 30,000 |
| Supported Emulators | 40+ (e.g., PSP, PS1, N64, NES, SNES) |
Warranty and Support
For information regarding the product warranty, please refer to the terms and conditions provided by your retailer or the original seller at the time of purchase.
For technical support, troubleshooting assistance beyond this manual, or inquiries about replacement parts, please contact the seller directly through the platform where you purchased the X2+ Game Stick.