1. Important Safety Information
Please read all instructions carefully before installing or operating this appliance. Retain this manual for future reference.
- Always disconnect power before servicing or cleaning the unit.
- Installation must be performed by a qualified technician in accordance with all local codes and standards.
- Ensure proper ventilation for combustion gases from fuel-burning equipment to prevent back-drafting.
- Do not operate any fan with a damaged cord or plug. Discard fan or return to an authorized service facility for examination and/or repair.
- Never leave surface units unattended at high settings. Boil-overs cause smoking and greasy spill-overs that may ignite.
- Clean ventilating fans frequently. Grease should not be allowed to accumulate on fan or filter.
- Use only metal ductwork for installation.
2. Package Contents
Verify that all items are present and undamaged upon unpacking.
- Range Hood Insert (x1)
- Baffle Filters (x2 for 30-inch model)
- Blower Motor System (x1)
- Remote Control (x1)
- 6-inch Elbow Duct (x1)
- Charcoal Filter (x2, for ductless conversion)
- Woodscrews (x8)
- Anchor Screws (x8)
- Self-drilling Plastic Drywall Anchors (x8)
- Apron (x1)
- Gloves (x1 pair)

Video: Unboxing and Package Contents Overview
3. Required Tools
The following tools are recommended for installation:
- Cutter
- Pencil
- Level
- Aluminum Foil Tape
- Tape Measure
- Small Electric Saw (for cabinet modification)
- Electric Drill
4. Specifications
| Feature | Specification |
|---|---|
| Model Info | IA08S-E30 |
| Airflow Displacement | 900 Cubic Feet Per Minute (CFM) |
| Noise Level | 65 Decibels (Max) |
| Mounting Type | Built-in or Insert |
| Material | Stainless Steel |
| Controls Type | Touch, Gesture, Remote |
| Number of Speeds | 4 |
| Voltage | 120 Volts |
| Wattage | 120 watts |
| Light Source Type | LED (Adjustable Brightness) |
| Filter Type | Baffle |
| Ventilation Type | Convertible (Ducted/Ductless) |
| Product Dimensions | 11.8"D x 27.8"W x 11"H |
| Item Weight | 23.5 pounds |
| Special Features | Delay Shutdown, Gesture Sensing, Remote Control, Timer |
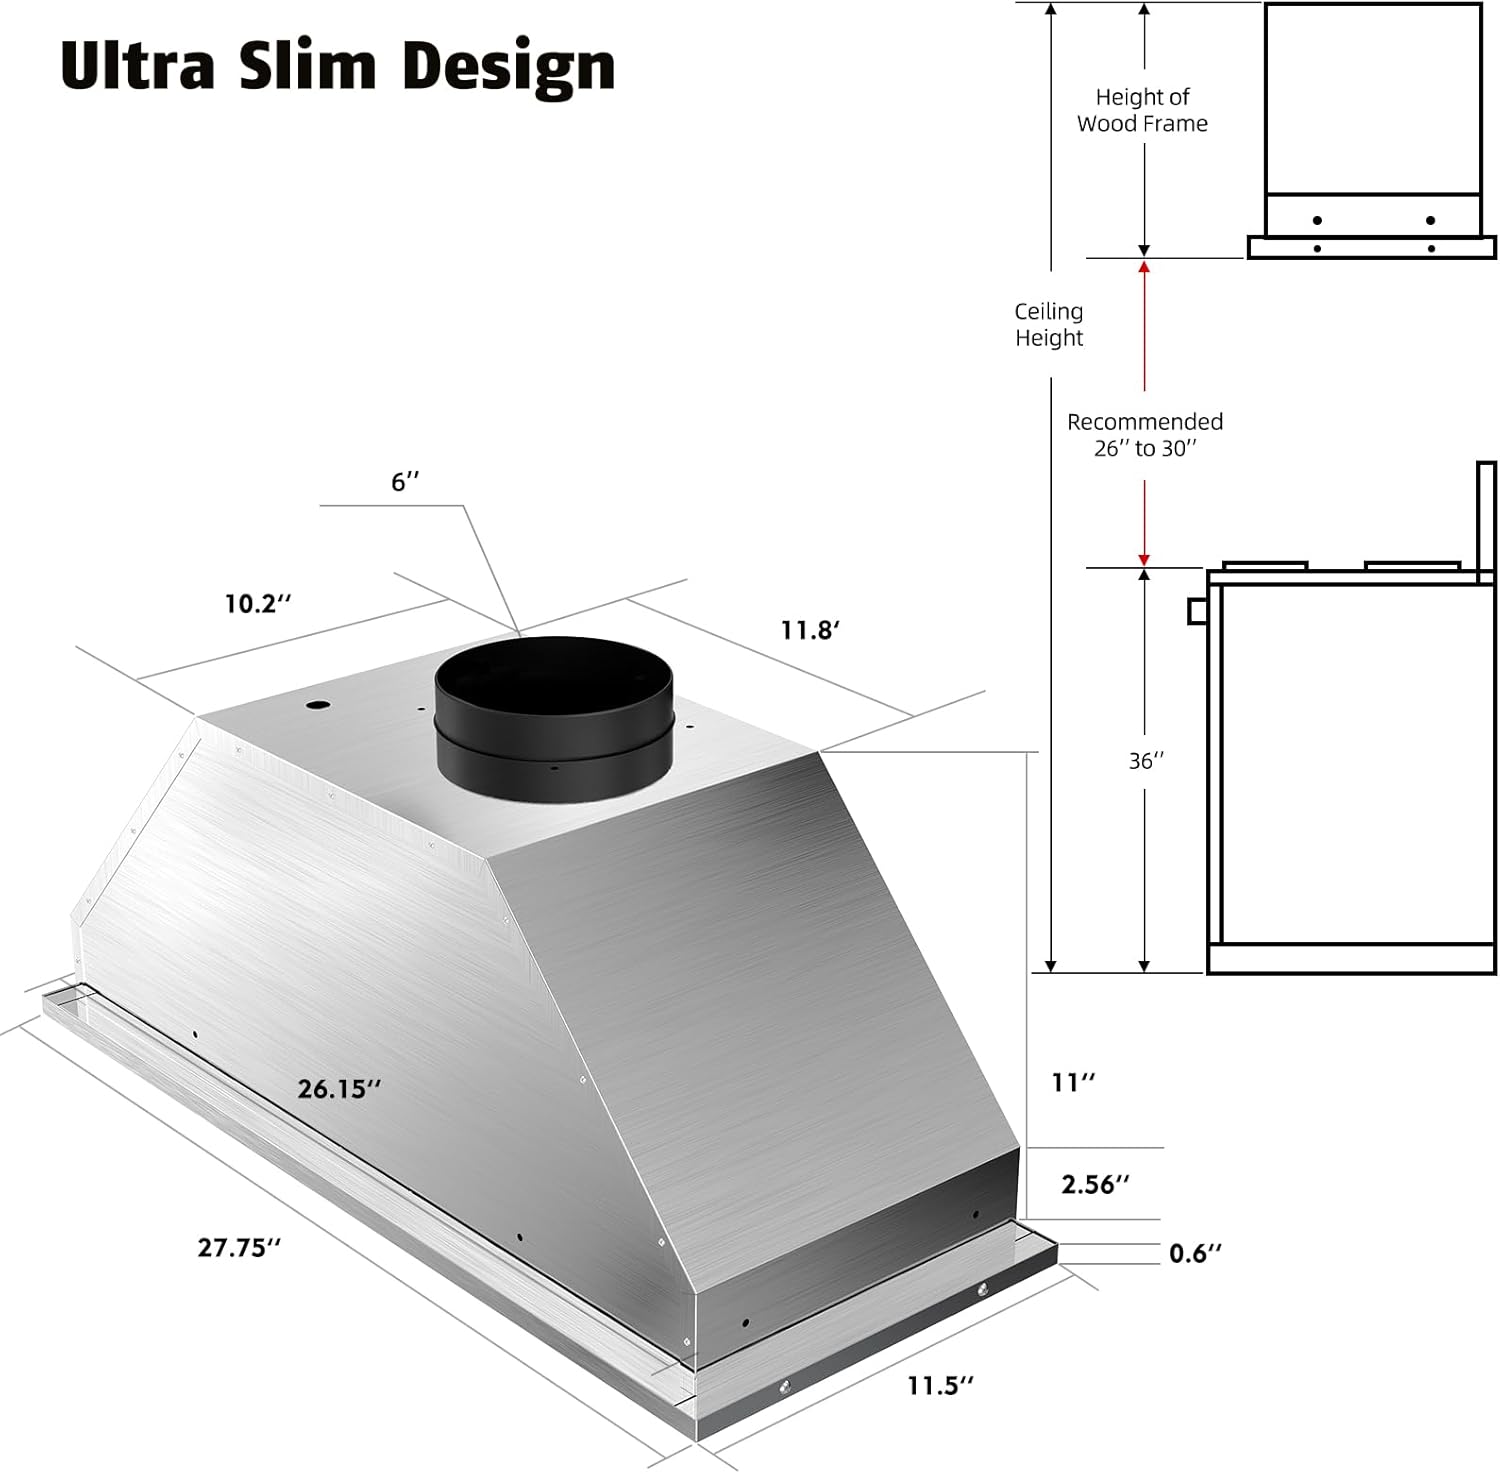
Image: Product Dimensions
5. Installation
This range hood can be installed in either ducted or ductless configurations. Follow the steps below for proper installation.
5.1 Pre-installation
- Cabinet Modification: Cut an opening at the bottom of your cabinet according to the dimensions specified in the product specifications table.
- Wood Blocking: Prepare and anchor wood blocking inside the cupboard bottom panel around the opening. This provides a secure mounting surface for the range hood.
5.2 Mounting the Range Hood
- Carefully insert and slide the range hood into the overhead cabinet opening. Ensure the side installation holes align with the prepared wood blocking.
- Fasten the range hood using the provided woodscrews through the installation holes onto the wood blocking. Tighten all screws to secure the unit.
5.3 Ventilation Options (Ducted / Ductless)
This range hood is convertible for both ducted and ductless operation.

Image: Ducted and Ductless Ventilation Options
Ducted Installation:
- Connect the provided 6-inch elbow duct to the top vent of the range hood.
- Secure the vent and vent pipe together using aluminum foil tape to ensure an airtight seal.
- Extend the ductwork to the outside of your home, ensuring it is properly sealed and routed according to local building codes.
Ductless Installation:
- Install the provided charcoal filters onto the blower motor system. These filters are essential for removing odors in a ductless setup.
- No external ductwork is required for this configuration, as the air is filtered and recirculated back into the kitchen.
5.4 Power Connection
- Once the range hood is securely mounted and ventilation is configured, plug the power cord into a standard 120V electrical outlet.
Video: Iamsii Range Hood Insert Installation Guide
6. Operating Instructions
The Iamsii Range Hood Insert offers multiple convenient control methods.
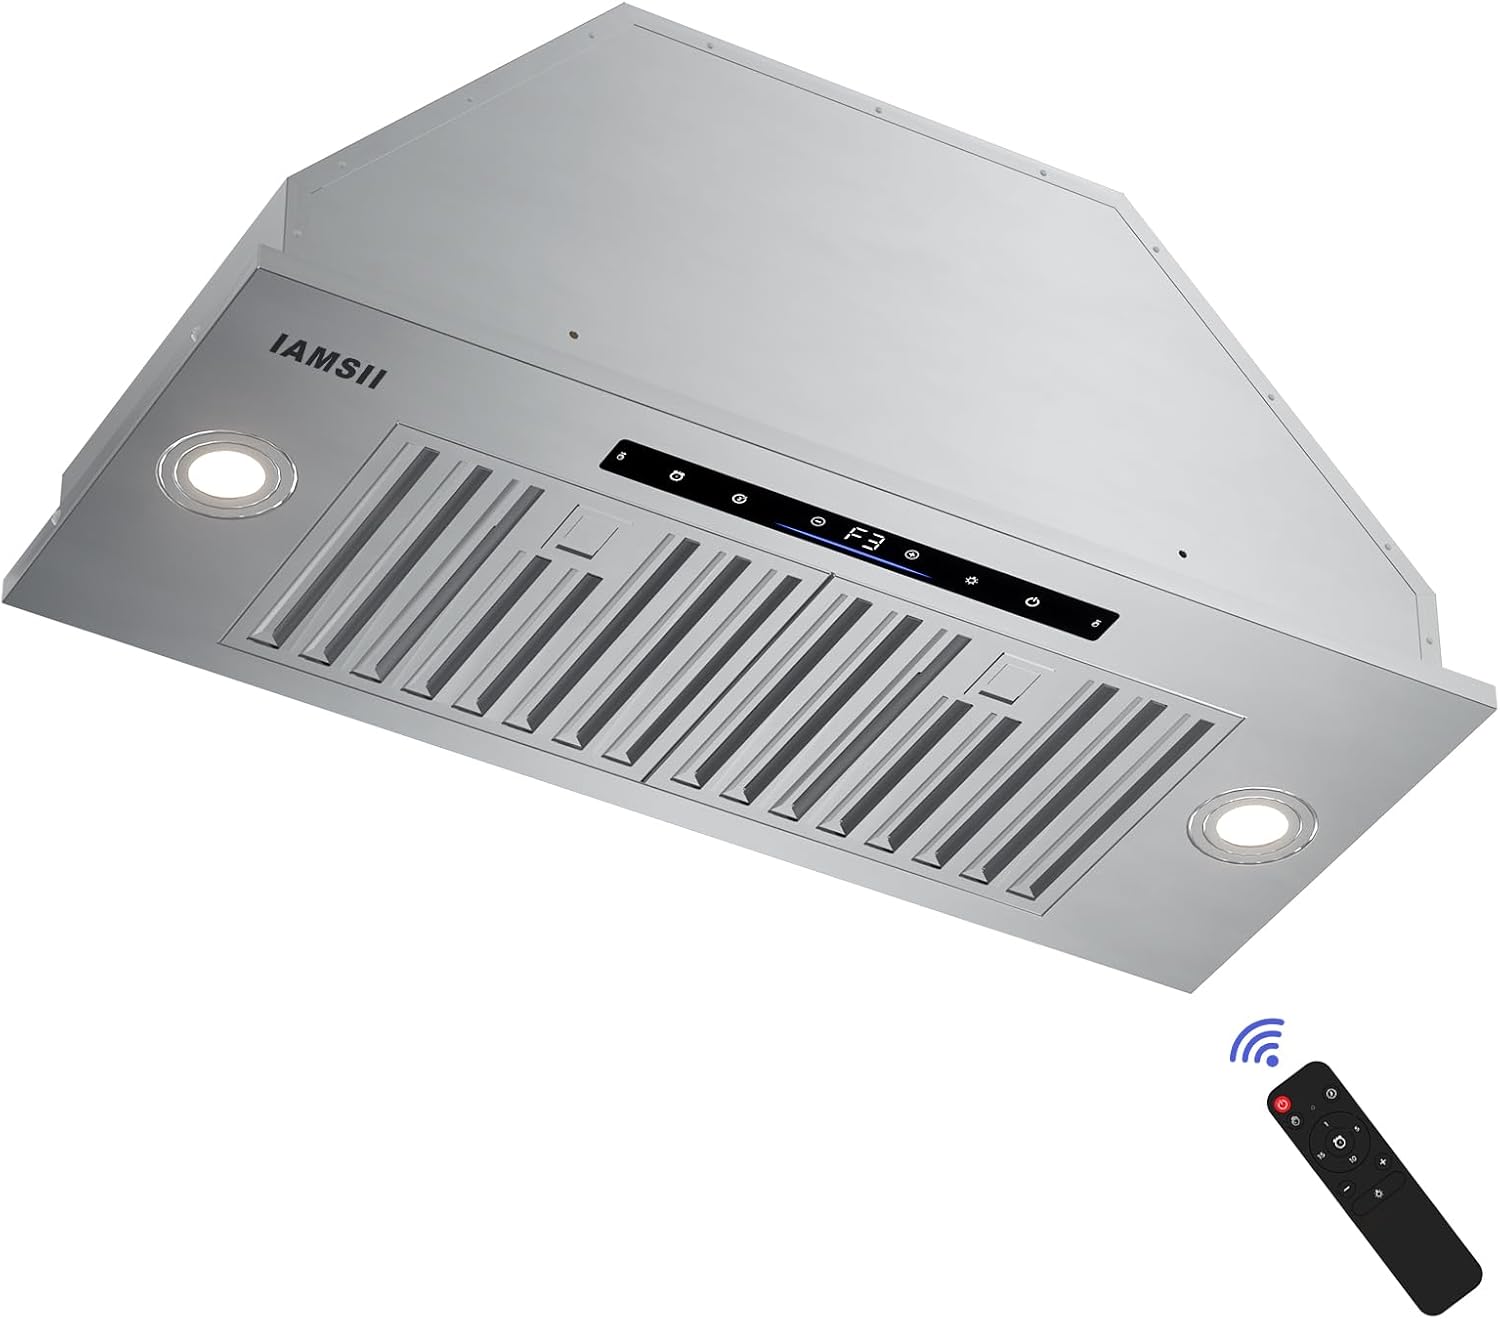
Image: Range Hood with Remote Control
6.1 Control Panel Overview
The control panel features touch-sensitive buttons for power, fan speed, lighting, and timer functions.
6.2 Gesture Sensing Control
Wave your hand across the two sensing points on the control panel to adjust the fan speed without touching the unit.
- Wave right: Increase fan speed.
- Wave left: Decrease fan speed.

Image: Gesture Sensing Control
6.3 Remote Control
Use the included remote control for convenient operation from a distance. The remote allows you to power on/off, adjust fan speed, control lighting, and set the timer.
6.4 Fan Speed Adjustment
The range hood features 4 fan speeds to suit various cooking needs. Adjust the speed using the touch controls, gesture sensing, or remote control.

Image: 900 CFM Powerful Suction
6.5 Lighting Control
Press the light button on the control panel or remote to turn the LED lights on/off. Press and hold the light button for three seconds to adjust the brightness of the lighting.
6.6 Delay Shutdown Function
Activate the 3-minute delay shutdown function to allow the hood to continue clearing residual grease and fumes after cooking, ensuring a fresh kitchen environment.
Video: Features Overview (Remote, Gesture, Delay Shutdown, Suction, Low Noise, Dimmable Lights)
7. Maintenance
Regular maintenance ensures optimal performance and longevity of your range hood.
7.1 Baffle Filter Cleaning
The stainless steel baffle filters are removable and dishwasher-safe. Clean them regularly to prevent grease buildup and maintain efficient air filtration.
- Remove the baffle filters by sliding them out.
- Place them in a dishwasher for cleaning or wash by hand with warm, soapy water.
- Ensure filters are completely dry before reinstalling.

Image: Dishwasher-Safe Baffle Filters
7.2 Charcoal Filter Replacement (Ductless Mode)
If using the range hood in ductless mode, the charcoal filters need to be replaced periodically (typically every 3-6 months, depending on usage) to maintain odor absorption effectiveness.
- Refer to the charcoal filter packaging for specific replacement instructions.
- Ensure the replacement filters are compatible with your Iamsii range hood model.
7.3 Exterior Cleaning
Clean the exterior of the range hood with a soft cloth and a non-abrasive stainless steel cleaner. Avoid using harsh chemicals or abrasive pads that could scratch the surface.
8. Troubleshooting
If you encounter issues with your range hood, refer to the following common problems and solutions:
| Problem | Possible Cause | Solution |
|---|---|---|
| Range hood does not turn on | No power supply | Check if the power cord is securely plugged in and the circuit breaker is not tripped. |
| Low suction power | Clogged filters or improper ductwork | Clean or replace baffle/charcoal filters. Inspect ductwork for obstructions or leaks. |
| Excessive noise | Loose parts or motor issue | Ensure all mounting screws are tight. Check for any loose components. If noise persists, contact customer support. |
| Lights not working | Faulty LED or wiring issue | Check light connections. If LEDs are replaceable, consider replacement. Otherwise, contact customer support. |
| Gesture control unresponsive | Obstruction or sensor issue | Ensure nothing is blocking the gesture sensors. Clean the sensor area. If the issue continues, use touch or remote control. |
For issues not listed here, please contact Iamsii customer support.
9. Warranty and Support
Iamsii is committed to providing quality products and excellent customer service.
9.1 Product Warranty
This Iamsii Range Hood Insert comes with a 5-Year Warranty, covering defects in materials and workmanship under normal use.
9.2 Customer Support
If you have any questions, require assistance, or need to claim warranty service, please contact Iamsii customer support. We aim to provide a quick response within 24 hours.
- Contact Information: Refer to the product packaging or the official Iamsii website for the most current contact details.
- Please have your model number (IA08S-E30) and purchase date ready when contacting support.