1. Introduction
This manual provides comprehensive instructions for the assembly, operation, and maintenance of your GarveeLife 6.25 x 6 Ft Greenhouse. This product is engineered to create an optimal environment for plant growth by maintaining stable temperature and humidity levels, extending your gardening season and protecting plants from adverse weather conditions.

A full view of the GarveeLife 6.25 x 6 Ft Greenhouse, featuring its silver aluminum alloy frame and translucent polycarbonate panels, with a roof vent slightly open.
2. Important Safety Information
Please read and understand all safety instructions thoroughly before beginning assembly or operation of the greenhouse. Failure to follow these instructions may result in injury or damage to the product.
- Always follow the assembly instructions carefully, step-by-step.
- Use appropriate tools and safety precautions, such as gloves and eye protection, when handling components, especially during assembly.
- Keep children and pets away from the assembly area to prevent accidents.
- Do not exceed the structural weight limit of the greenhouse. Avoid hanging heavy objects from the frame.
- Ensure the greenhouse is anchored securely to the ground to prevent wind damage.
3. Package Contents
Before starting assembly, unpack all components and verify that all parts are present and undamaged against the following list. If any parts are missing or damaged, contact customer support immediately.
- Aluminum Alloy Frame Components (various profiles and connectors)
- Polycarbonate Panels (for walls and roof)
- Roof Vent Assembly
- Sliding Door Assembly (frame, panel, and hardware)
- Integrated Gutter System Components
- Fasteners and Hardware Kit (bolts, nuts, washers, clips, seals)
- Instruction Manual
4. Setup and Assembly
The GarveeLife greenhouse is designed for quick assembly using a rivet and sliding panel system. Two people are recommended for assembly.
4.1 Site Preparation
- Choose a level, well-drained site that receives adequate sunlight throughout the day.
- Ensure the ground is firm and stable to provide a secure foundation for the greenhouse structure.
- Clear the area of any debris, rocks, or vegetation that could interfere with assembly or stability.
4.2 Assembly Steps
- Unpack and Organize: Carefully unpack all components and organize them according to the parts list in your separate assembly guide.
- Assemble the Base Frame: Connect the aluminum alloy base frame components using the provided fasteners. Ensure the frame is square and level.
- Erect Vertical Supports: Attach the vertical frame supports to the base frame, securing them firmly.
- Install Wall Panels: Slide the polycarbonate wall panels into the designated channels of the vertical frame. Ensure panels are oriented correctly.
- Assemble and Attach Roof Structure: Construct the roof frame and then install the polycarbonate roof panels.
- Install Roof Vent: Integrate the roof vent assembly into the roof structure as per the detailed instructions.
- Install Sliding Door: Assemble the sliding door and mount it onto the door tracks. Test for smooth operation and ensure the security lock functions.
- Attach Integrated Gutters: Secure the integrated gutters to the roof edges. These are designed to effectively drain and collect water.

A detailed image highlighting the robust aluminum alloy frame and the translucent polycarbonate panels, emphasizing the sturdy construction of the greenhouse.
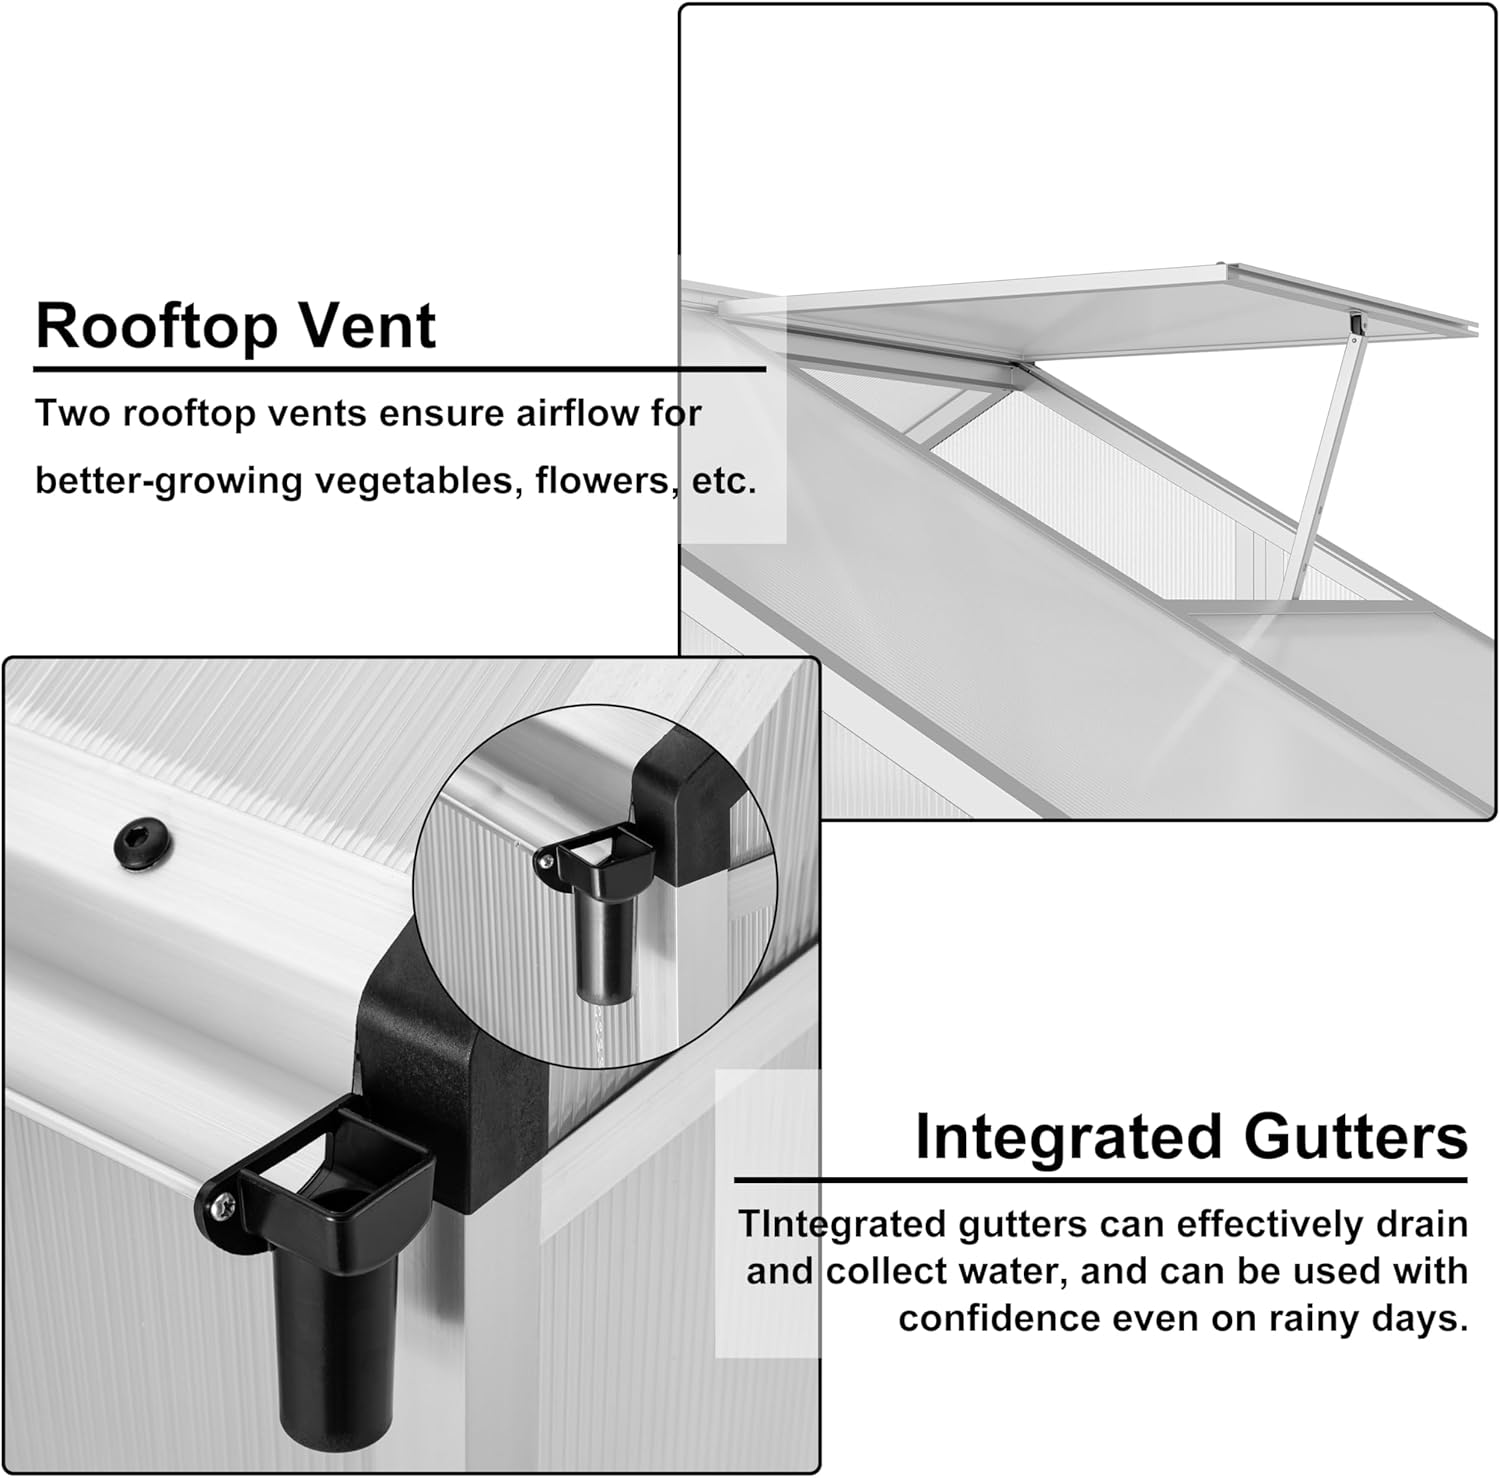
A close-up view illustrating the rooftop vent mechanism for airflow and the integrated gutters designed for water drainage and collection.
5. Operating Instructions
Understanding how to properly operate your greenhouse's features will help you maintain an optimal growing environment for your plants.
5.1 Ventilation (Roof Vent)
The greenhouse is equipped with a large roof vent (24" x 23") to facilitate air circulation and temperature regulation.
- Opening: Manually open the roof vent to allow warm, stale air to escape and fresh air to enter. This is crucial for preventing overheating and reducing humidity.
- Adjustment: Adjust the degree of the vent opening based on external temperature, internal humidity, and the specific needs of your plants.
- Closing: Close the vent during cold weather, strong winds, or heavy rain to retain heat and protect plants from harsh elements.
5.2 Door Operation
The greenhouse features a sliding door for convenient access.
- Sliding: Gently slide the door along its tracks to open or close. Avoid forcing the door if it encounters resistance.
- Security Lock: Utilize the integrated security lock to secure the greenhouse when not in use, protecting your plants and equipment.

An image showing the sliding door of the greenhouse, with an inset close-up of the security lock mechanism, indicating secure closure.
6. Maintenance
Regular maintenance will prolong the life of your greenhouse and ensure optimal performance.
6.1 Cleaning
- Panels: Regularly clean the polycarbonate panels with a soft cloth, mild soap, and water. Avoid using abrasive cleaners or harsh chemicals, which can damage the panels. Rinse thoroughly.
- Gutters: Periodically clear any leaves, dirt, or debris from the integrated gutters to ensure proper water drainage and prevent blockages.
6.2 Structural Inspection
- Fasteners: Periodically check all bolts, nuts, and other fasteners to ensure they remain tight and secure. Tighten any loose connections.
- Frame: Inspect the aluminum alloy frame for any signs of corrosion, bending, or damage, especially after severe weather events. Address any issues promptly.
- Seals: Check the seals around panels and the door for integrity to prevent drafts and water leaks.
6.3 Winter Preparation
- In areas prone to heavy snowfall, gently remove snow from the roof to prevent excessive weight and potential structural damage.
- Ensure all vents and doors are securely closed to retain heat and protect plants from freezing temperatures.
7. Troubleshooting
This section addresses common issues you might encounter with your greenhouse.
7.1 Issue: Excessive Heat Inside Greenhouse
Solution: Ensure the roof vent is fully open to allow hot air to escape. If temperatures remain high, consider partially opening the door or adding a shade cloth over the roof during peak sunlight hours.
7.2 Issue: Poor Air Circulation / High Humidity
Solution: Verify that the roof vent is unobstructed and functioning correctly. Ensure the integrated gutters are clear. If necessary, open the door partially for cross-ventilation, especially on humid days.
7.3 Issue: Water Leakage
Solution: Inspect all panel seals and frame connections for proper installation and tightness. Ensure the integrated gutters are clear of debris and correctly positioned to channel water away.
7.4 Issue: Door Sticking or Not Sliding Smoothly
Solution: Clean the door tracks thoroughly to remove any accumulated dirt, dust, or debris. If needed, apply a silicone-based lubricant to the tracks to improve sliding action.
8. Product Specifications
Detailed specifications for the GarveeLife 6.25 x 6 Ft Greenhouse.
| Feature | Detail |
|---|---|
| Brand | GarveeLife |
| Model | Greenhouse |
| ASIN | B0DBVDH17H |
| Product Dimensions (L x W x H) | 74.8 x 71.7 x 76.8 inches |
| Item Weight | 45.6 pounds |
| Color | Silver |
| Frame Material | Aluminum Alloy |
| Panel Material | Polycarbonate |
| Roof Vent Size | 24" x 23" |
| Water Resistance Level | Waterproof |
| Assembly Required | Yes |
| UPC | 198723242125 |

A diagram illustrating the key dimensions of the greenhouse, including length (74.8 inches), width (71.6 inches), height (76.7 inches), door height (62.9 inches), and roof vent dimensions (24 inches by 23 inches).
9. Warranty and Customer Support
This GarveeLife greenhouse is covered by a 30-day free returns, refund/replacement policy, as per Amazon's terms.
For any questions, concerns, or assistance with your product, please contact GarveeLife customer support. You can typically find contact information on the GarveeLife Store on Amazon or refer to your purchase documentation.