BONTEC CT129, CT139M
BONTEC Full Motion TV Monitor Wall Mounts User Manual
Models: CT129 (for 13-42 inch TVs) & CT139M (for 32-75 inch TVs)
Introduction
Thank you for choosing BONTEC Full Motion TV Monitor Wall Mounts. This manual provides detailed instructions for the safe and proper installation, operation, and maintenance of your new wall mounts. Please read this manual thoroughly before installation and keep it for future reference. This product bundle includes two distinct models: the CT129 mount for smaller TVs (13-42 inches) and the CT139M mount for larger TVs (32-75 inches).
Safety Information
WARNING: Failure to read and follow all instructions may result in personal injury or property damage.
- Ensure the mounting surface can safely support the combined weight of the mount and the display.
- DO NOT MOUNT ON DRYWALL ALONE. This mount is designed for installation on solid concrete walls, brick walls, or wood studs.
- Always use a stud finder to locate wood studs accurately.
- Do not exceed the maximum weight capacity specified for each mount: 55 lbs (25 kg) for CT129 and 132 lbs (60 kg) for CT139M.
- Ensure all screws are securely tightened before use. Do not overtighten.
- Keep children and pets away during installation.
- If you have any doubts about the installation, consult a qualified professional.
Package Contents
Please verify that all components are present and undamaged before beginning installation. Refer to the parts list provided in your product packaging for specific quantities of each item.

Image: Overview of the BONTEC CT129 and CT139M wall mounts, along with two HDMI cables typically included in the package.
Setup and Installation
Pre-Installation Checks
- Check TV VESA Pattern: Measure the horizontal and vertical distance between the mounting holes on the back of your TV. This is your VESA pattern.
- Check TV Weight: Ensure your TV's weight does not exceed the maximum capacity of the chosen mount.
- Identify Wall Type: Determine if your wall is concrete, brick, or wood stud. This will dictate the appropriate hardware and drilling method.

Image: Illustration of compatible wall types for secure installation: concrete, wood stud, and brick. A critical warning indicates that the mount should not be installed on drywall alone.
Step-by-Step Installation (General Guide)
- Attach TV Brackets to TV: Secure the vertical mounting brackets to the back of your TV using the appropriate screws and spacers from the hardware kit. Ensure the brackets are centered and level.
- Mark Drilling Holes: Hold the wall plate against the wall at your desired mounting height. Use a pencil to mark the drilling locations. For wood studs, ensure marks are centered on the stud. For concrete/brick, use a level to ensure accuracy.
- Drill Pilot Holes: Drill pilot holes at the marked locations using the recommended drill bit size for your wall type.
- Mount Wall Plate: Attach the wall plate to the wall using the provided lag bolts and washers. Tighten securely, but do not overtighten.
- Hang TV on Wall Plate: Carefully lift the TV with the attached brackets and hook them onto the wall plate. Ensure the TV is securely seated.
- Secure TV to Mount: Use the safety screws or locking mechanisms on the brackets to secure the TV to the wall plate, preventing accidental dislodgement.
VESA Compatibility
The CT129 mount supports VESA patterns including 75x75mm, 100x100mm, 100x200mm, and 200x200mm.

Image: Visual representation of the different VESA mounting patterns compatible with the CT129 mount, including dimensions for each configuration.
The CT139M mount supports a wider range of VESA patterns, including 200x100mm, 200x200mm, 300x200mm, 300x300mm, 400x200mm, 400x300mm, 400x400mm, and 600x400mm.
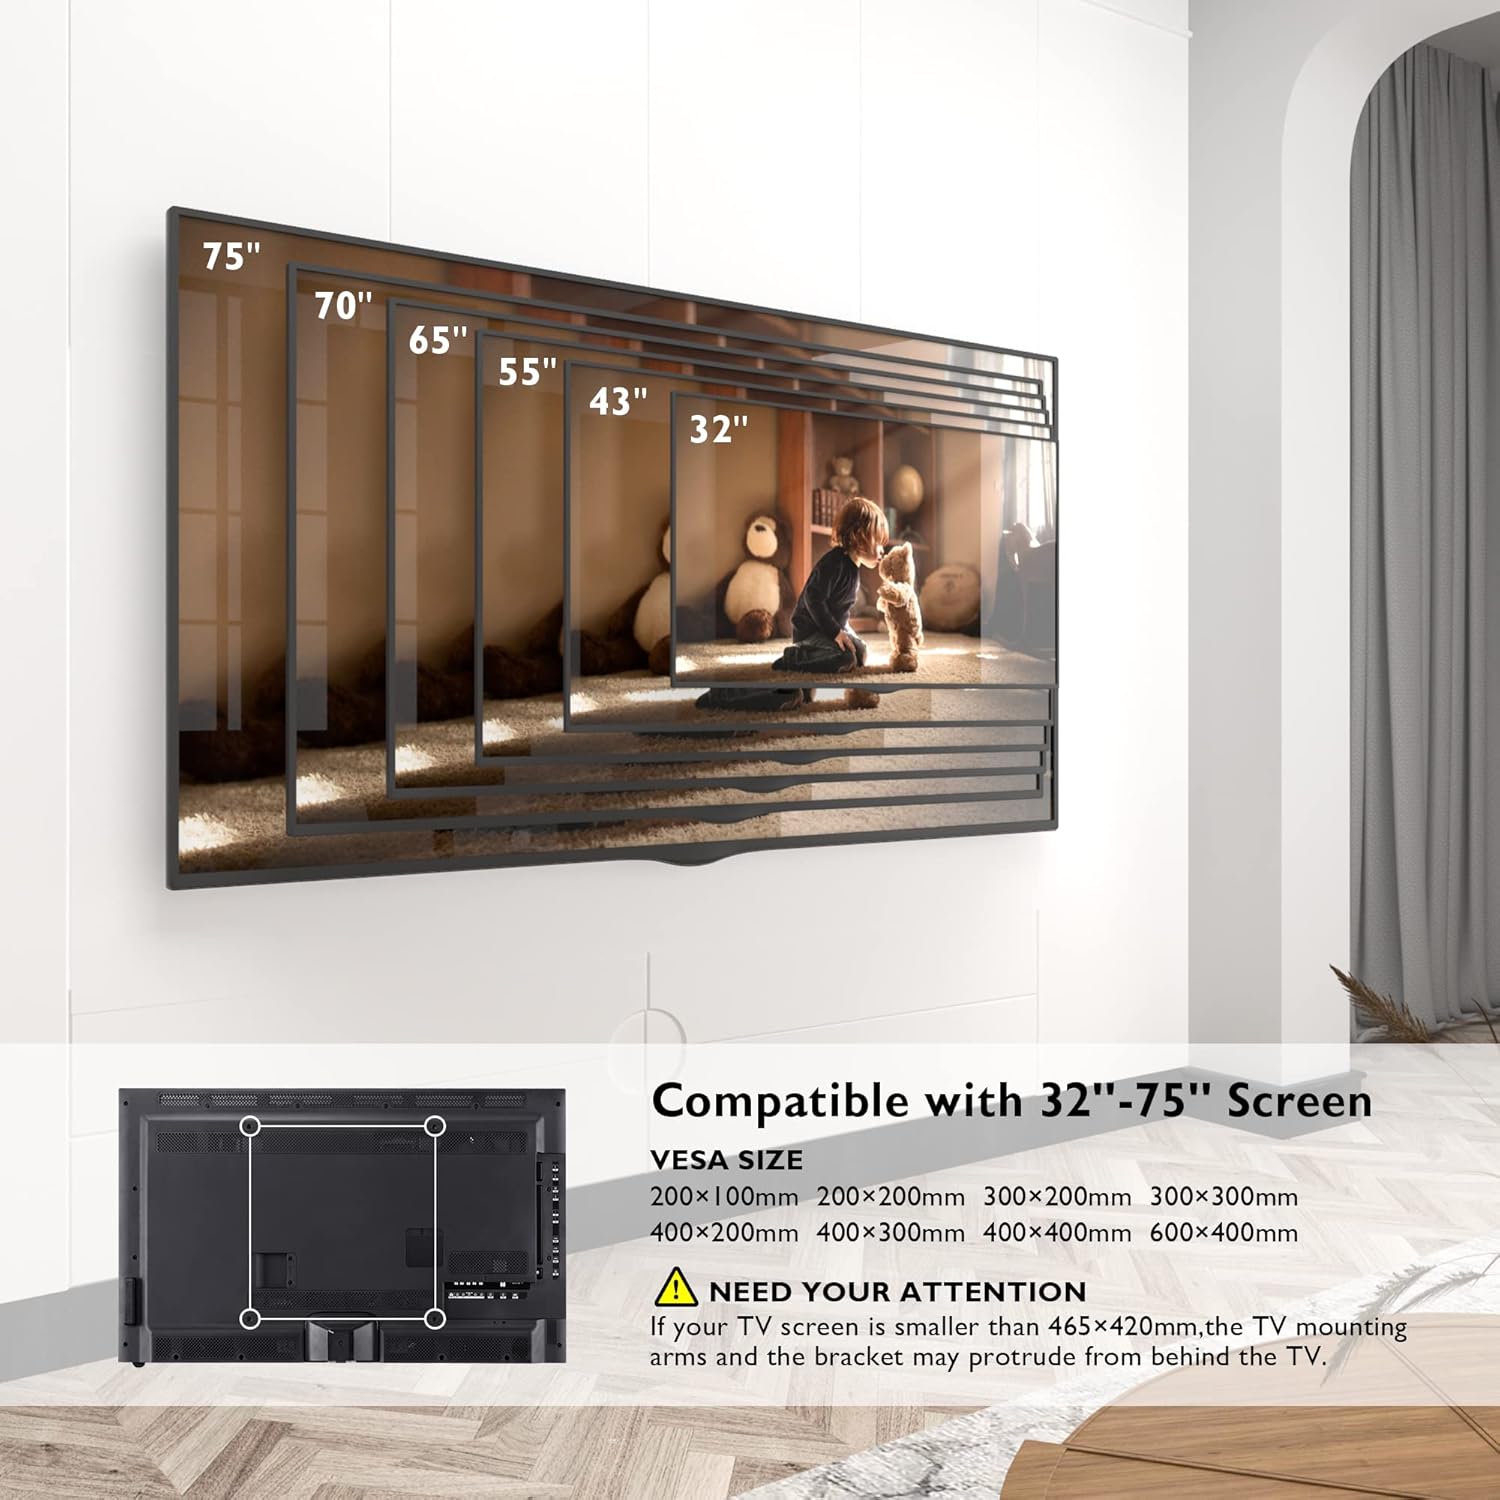
Image: This diagram illustrates the range of compatible TV screen sizes (32" to 75") and the corresponding VESA mounting patterns supported by the CT139M mount, including a note about potential protrusion for smaller TVs.
Operation and Adjustments
CT129 Mount Adjustments (13-42 inch)
- Tilt: Adjust the screen tilt by +/- 10° to reduce glare and optimize viewing.
- Swivel: Swivel the TV +/- 90° left or right for flexible viewing angles.
- Rotation: Rotate the screen 360° for portrait or landscape orientation.
- Extension/Retraction: The mount extends up to 15.7 inches (40 cm) from the wall and retracts to a slim 2.7 inches (6.8 cm) to save space.

Image: This illustration demonstrates the extension and retraction range of the CT129 mount, showing it can extend up to 15.7 inches and retract to 2.7 inches from the wall.
CT139M Mount Adjustments (32-75 inch)
- Tilt: Adjust the screen tilt by +/- 8° for optimal viewing.
- Swivel: Swivel the TV up to 180° left or right, providing a wide range of viewing positions.
- Level Adjustment: Fine-tune the TV level by +/- 3° after installation.
- Long Reach Extension: The articulated arm extends from 2.6 inches (6.6 cm) to an impressive 40.9 inches (104 cm) from the wall, offering maximum flexibility and space-saving when retracted.

Image: This diagram highlights the extensive extension range of the CT139M mount, showing it can extend from 2.6 inches to 40.9 inches, and indicates its robust 132 lbs (60 kg) weight capacity.

Image: This illustration demonstrates the 180-degree swivel range of the CT139M mount, enabling users to adjust the TV for optimal viewing from various positions in a room.
Maintenance
- Cleaning: Use a soft, dry cloth to clean the mount. Avoid abrasive cleaners or solvents that could damage the finish.
- Periodic Checks: Periodically check all screws and connections to ensure they remain tight and secure. If any looseness is detected, re-tighten them immediately.
- Lubrication: The articulating joints are designed for smooth movement. If any stiffness occurs over time, a small amount of silicone-based lubricant can be applied to the moving parts.
Troubleshooting
- TV Not Level: If the TV appears unlevel after installation, check the level adjustment feature on your mount (CT139M has +/- 3° level adjustment). For CT129, ensure the wall plate and TV brackets were installed perfectly level.
- Difficulty Adjusting Movement: Ensure no cables are snagged or obstructing movement. Check that all pivot points are free from debris. If the mount feels too stiff or too loose, check the tension screws on the articulating arms and adjust as needed.
- Mount Feels Unstable: Immediately remove the TV from the mount. Re-check all wall plate and TV bracket connections. Ensure the wall anchors are properly installed and the wall type is suitable for the mount. Do not re-mount the TV until stability is confirmed.
Product Specifications
| Feature | CT129 Mount (13-42 inch) | CT139M Mount (32-75 inch) |
|---|---|---|
| Compatible TV Size | 13 - 42 inches | 32 - 75 inches |
| Weight Capacity | Up to 55 lbs (25 kg) | Up to 132 lbs (60 kg) |
| VESA Compatibility | 75x75mm, 100x100mm, 100x200mm, 200x200mm | 200x100mm, 200x200mm, 300x200mm, 300x300mm, 400x200mm, 400x300mm, 400x400mm, 600x400mm |
| Tilt Angle | +/- 10° | +/- 8° |
| Swivel Angle | +/- 90° | 180° |
| Rotation | 360° | N/A (Level Adjustment +/- 3°) |
| Extension from Wall | 2.7 inches (retracted) to 15.7 inches (extended) | 2.6 inches (retracted) to 40.9 inches (extended) |
| Material | Metal | |
| Mounting Type | Wall Mount | |
| Movement Type | Rotate, Swivel, Tilt, Articulating | |
Warranty and Support
BONTEC products are manufactured with quality and durability in mind. For any questions, technical assistance, or to report missing/damaged parts, please contact BONTEC customer support. Please have your product model number (CT129 or CT139M) and purchase information ready when contacting support.
For the most up-to-date warranty information and support contact details, please refer to the official BONTEC website or the contact information provided with your product packaging.
Ask a question about this manual
Ask about setup, troubleshooting, compatibility, parts, safety, or missing instructions. Manuals+ will review the question and use this page’s manual context to help answer it.